You can create stock refresh schedules that automatically refresh a menu item or modifier's stock status and count on a defined schedule.
You can set the menu item or modifier so that its stock status refreshes to In stock or to a specific stock quantity. For multi-location restaurants, all stock refresh updates are made in each location's local time.
You can have multiple stock schedules for the same menu item or modifier. For example, you could set the item's quantity to refresh to 20 on Monday to Friday and to 30 on Saturday and Sunday.
The Toast platform does not prevent you from defining multiple conflicting stock refresh schedules and it does not guarantee which stock refresh schedule will win out in the case of conflicts. Stock refresh schedules conflict when:
-
They are set to trigger on the same day at the same time.
-
For multi-location restaurants, they apply to the same location and are set to trigger on the same day at the same time. For example, you define a schedule that applies to the Corporate location group and triggers at 6 AM on Mondays at all locations contained within the group. Then, you define another schedule that applies to a single location within the Corporate location group and also triggers at 6 AM on Mondays. These two schedules would conflict.
For single-location restaurants, you must have the following permissions at the restaurant you are logged into:
-
To create and edit stock refresh schedules, you need the 4. Restaurant Admin > 4.5 Edit Full Menu or the 4. Restaurant Admin > 4.14 Local Menu Edit permission.
-
To publish stock refresh schedules, you need the 6. Web Setup > 6.4 Publishing permission. If you do not have the Publishing permission, you can still create and edit stock refresh schedules but an employee with the Publishing permission has to publish the schedules for you.
For multi-location restaurants:
-
You must have the 4. Restaurant Admin > 4.5 Edit Full Menu or the 4. Restaurant Admin > 4.14 Local Menu Edit permission to the owner of a menu item or modifier to add a stock refresh schedule to it.
-
If you have the Edit Full Menu or Local Menu Edit permission to the location group or location defined in the stock refresh schedule's Applies to (target) setting, or an ancestor of that location group/location, you can view, edit, or delete that schedule.
-
If you have the Edit Full Menu or Local Menu Edit permission to a descendant of the location group or location defined in the stock refresh schedule's Applies to (target) setting, you can view the schedule because it applies to your location, but you cannot edit it.
-
If a stock refresh schedule's Applies to (target) setting is set to a location group or location that belongs to a branch of the location group hierarchy where you have neither Edit Full Menu nor Local Menu Edit permission, then you cannot see or edit that schedule. For example, consider the following location group hierarchy:
-
Corporate
-
Northeast Franchises
-
Boston
-
NYC
-
-
Southeast Franchises
-
Atlanta
-
Charlotte
-
-
If you have the Edit Full Menu or Local Menu Edit permission to the Northeast Franchises location group and a stock refresh schedule's Applies to (target) is set to Atlanta, you will not see that schedule in the Stock settings section.
-
-
You must have the 6. Web Setup > 6.4 Publishing permission to the location group or location defined in the stock refresh schedule's Applies to (target) setting, or an ancestor of that location group/location, to publish that schedule. If you do not have the Publishing permission, you can still create and edit stock refresh schedules but an employee with the Publishing permission has to publish the schedules for you.
The stock refresh schedule settings are are only available in the menu manager. Users with Local Menu Edit permission do not currently have full access to the menu manager. Also, modifiers are not fully supported in the menu manager. For these two reasons, the way you access the stock refresh schedule settings varies slightly, depending on whether you have the Edit Full Menu permission or the Local Menu Edit permission and whether you are creating a refresh schedule for a menu item or a modifier. Use the procedure below to access the stock refresh schedule settings, then use the To create a stock refresh schedule procedure to create the stock refresh schedule.
To access the stock refresh schedule settings
-
Do one of the following:
(Edit Full Menu users) To access the stock refresh schedule settings for a menu item:
-
Choose Menus > Menu management > Menu manager to open the Menu manager page.
-
From the Show section, choose Full menu.
-
(Multi-location only) Select the locations whose menu data you want to edit from the locations control.
-
Use the expand icons to locate the item you want to edit.
-
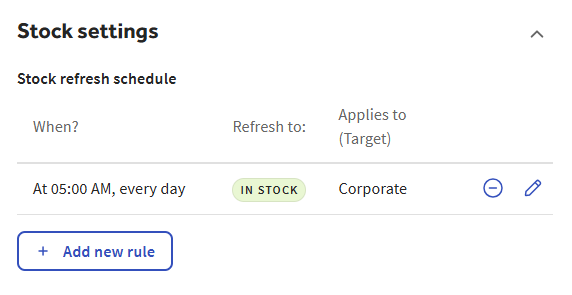
Select the item to see its details in the side panel, then scroll to the Stock settings section.
(Edit Full Menu users) To access the stock refresh schedule settings for a modifier:
-
Choose Menus > Bulk management > Advanced properties to open the Advanced properties page.
-
(Multi-location only) From the Show/Hide menu, choose the locations whose menu data you want to edit.
-
Use the expand icons to locate the modifier you want to edit.
-
Select the modifier to see its classic details page.
-
Select Edit item to see the modifier's item reference page.
-
In the blue banner at the top of the page, select the item page link to open the menu manager page for the item reference.
-
Scroll to the Stock settings section.
(Local Menu Edit users) To access the stock refresh schedule settings for a menu item:
-
Choose Menus > Bulk management > Advanced properties to open the Advanced properties page.
-
Use the expand icons to locate the menu item you want to edit.
-
Select the menu item to see its classic details page.
-
In the blue banner at the top of the page, select the item page link to open the menu manager details page for the menu item.
-
Scroll to the Stock settings section.
(Local Menu Edit users) To access the stock refresh schedule settings for a modifier:
-
Choose Menus > Bulk management > Advanced properties to open the Advanced properties page.
-
Use the expand icons to locate the modifier you want to edit.
-
Select the modifier to see its classic details page.
-
Select Edit item to see the modifier's item reference page.
-
In the blue banner at the top of the page, select the item page link to open the menu manager page for the item reference.
-
Scroll to the Stock settings section.
-
-
Continue with the To create a stock refresh schedule procedure to create the stock refresh schedule.
To create a stock refresh schedule
-
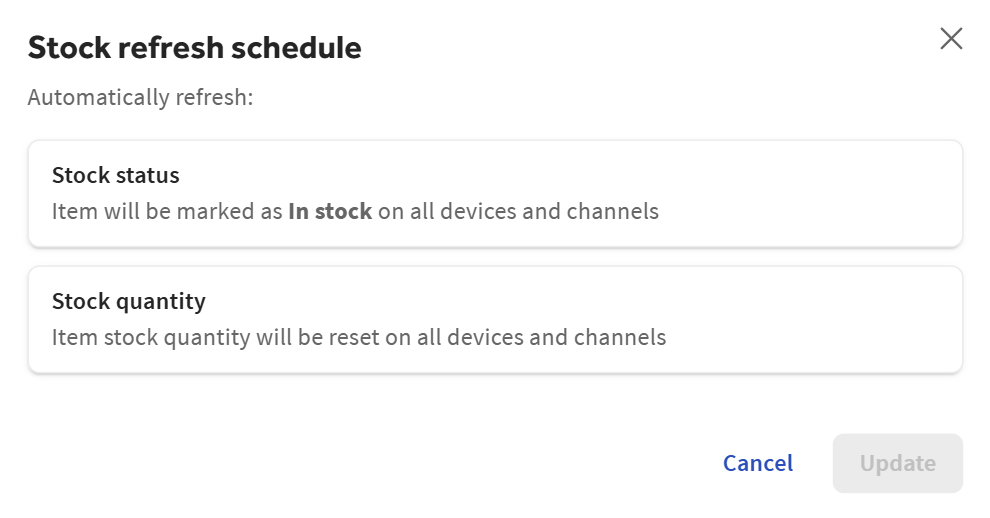
In the Stock settings section, select Add new rule to open the Stock refresh schedule dialog.
-
Do one of the following:
-
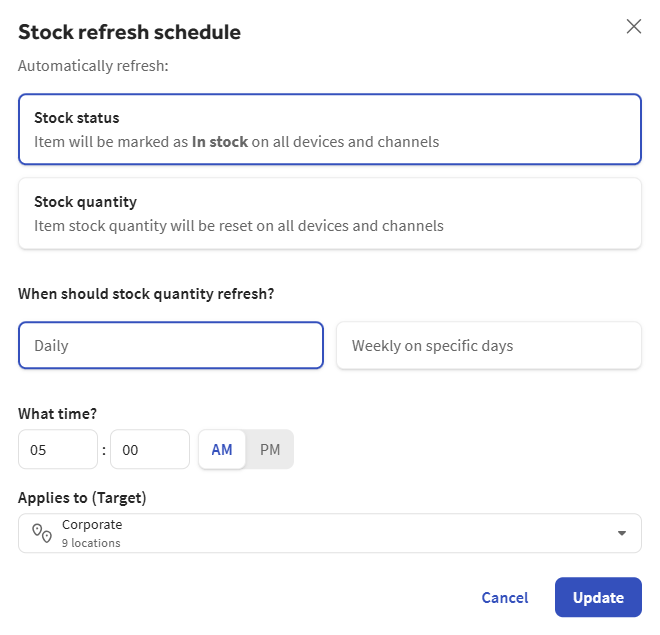
Select Stock status if you want the item to be marked as In stock on all devices and channels.
-
Select Stock quantity if you want to specify the quantity of the item to refresh.
Additional settings appear that let you specify the days and times the refresh schedule takes effect.
-
-
For the When should stock quantity refresh? setting, choose one of the following:
-
Daily: The stock quantity refreshes every day.
-
Weekly on specific days: The stock quantity refreshes on the days you select. If you use this option, select the days from the Select day(s) list that appears.
-
-
For the What time? setting, select the time of day and AM or PM.
-
If you selected Stock quantity in step 2, enter a number in the What quantity? field.
-
(Multi-location only) Select the Applies to (Target) control to open the Select locations dialog where you can set the location groups or locations you want this stock refresh schedule to apply to. All stock refresh updates are completed in each location's local time.
The Applies to (Target) setting defaults to the parent menu item or modifier's target and must be either the same as the parent's target or a descendant of the parent's target.
-
Select Update to close the Stock refresh schedule dialog and add the new rule to the Stock settings.
-
Select Save.
-
When you are ready for guests and employees to see your changes, you must publish them.
Single-location restaurants: Select Publish all changes.
Multi-location restaurants should use the Toast account > Publishing > Publish Config page to publish changes to one or more affected locations:
-
If the page you are currently on does not have the Open publishing page icon at the top, select X in the upper-left corner to return to a page that does.

-
Select the Open publishing page icon at the top of the page to go to the Toast account > Publishing > Publish Config page and follow the instructions in Publishing changes for multiple locations to publish changes to all or some of your locations.
-
To delete a stock refresh schedule
-
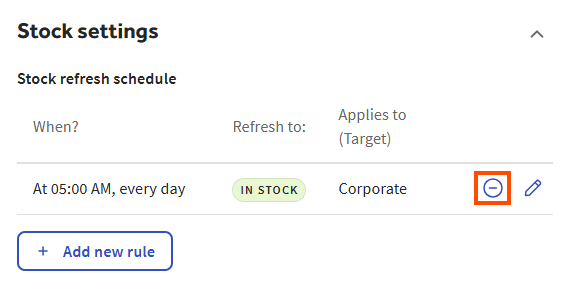
In the Stock settings section, select the delete icon for the stock refresh schedule you want to delete.
-
Select Yes, delete to confirm.
-
Select Save.
-
When you are ready for guests and employees to see your changes, you must publish them.
Single-location restaurants: Select Publish all changes.
Multi-location restaurants should use the Toast account > Publishing > Publish Config page to publish changes to one or more affected locations:
-
If the page you are currently on does not have the Open publishing page icon at the top, select X in the upper-left corner to return to a page that does.
-
Select the Open publishing page icon at the top of the page to go to the Toast account > Publishing > Publish Config page and follow the instructions in Publishing changes for multiple locations to publish changes to all or some of your locations.
-
To edit a stock refresh schedule
-
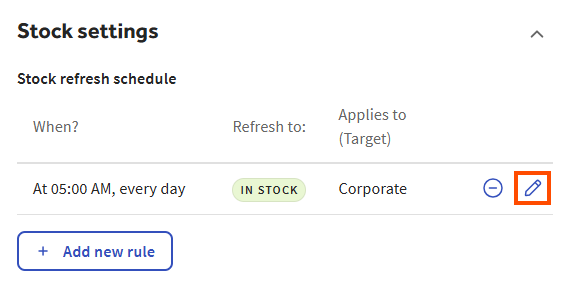
In the Stock settings section, select the edit (pencil) icon for the stock refresh rule you want to edit.
-
Make your changes to the stock refresh schedule and select Update.
-
Select Save.
-
When you are ready for guests and employees to see your changes, you must publish them.
Single-location restaurants: Select Publish all changes.
Multi-location restaurants should use the Toast account > Publishing > Publish Config page to publish changes to one or more affected locations:
-
If the page you are currently on does not have the Open publishing page icon at the top, select X in the upper-left corner to return to a page that does.
-
Select the Open publishing page icon at the top of the page to go to the Toast account > Publishing > Publish Config page and follow the instructions in Publishing changes for multiple locations to publish changes to all or some of your locations.
-