|
Note |
|
You can find this content in the Toast platform guide. This page will be removed August 1, 2025. |
Assembly lines use a sequence of prep stations to guide menu items through the kitchen. Items appear at the first prep station in a sequence, and, once fulfilled, appear at the next prep station in the sequence where it is not yet fulfilled. The assembly line sequence is complete when the item is fulfilled at all prep stations in the sequence that are assigned to the item.
This means that:
-
If an item is not assigned a prep station that is in an assembly line, it skips that prep station.
-
If an item is assigned to a prep station outside of that assembly line, it appears on that prep station's KDS device immediately and is not reliant on the assembly line sequence.
-
If a prep station KDS device is assigned multiple prep stations, once an item is fulfilled at that prep station, it is fulfilled at all prep stations assigned to that device. The item does not need to be fulfilled at the prep station again, even if it is used later in the sequence.
An item only appears on a prep station assigned to it and only uses the assembly line assigned to it. For more information about how an item is assigned an assembly line, see Assigning assembly lines to menu entities.
For example, you have a Pizza assembly line applied to all items in the Pizza menu, using the following sequence of prep stations:
-
Dough
-
Sauce
-
Cheese
-
Toppings
-
Bake
Your restaurant uses a prep station KDS device for each of these prep stations, and an expediter KDS device.
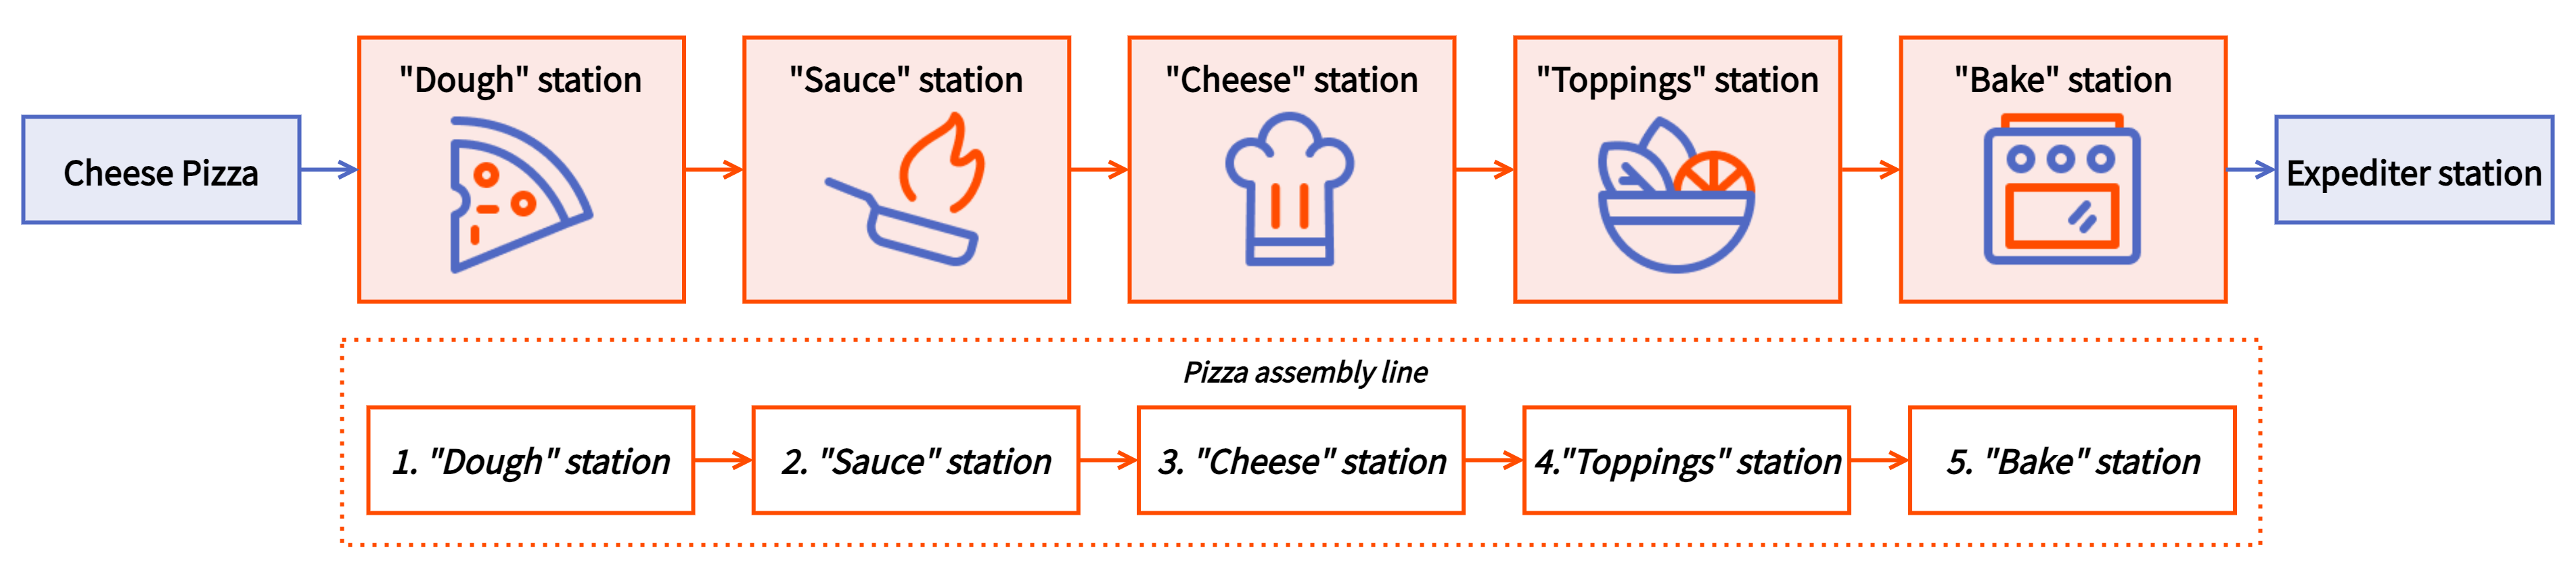
A Veggie Pizza item is assigned to all of these prep stations. When the item is sent to the kitchen, it first appears at the Dough prep station KDS device and the expediter KDS device. Once fulfilled at the Dough prep station KDS device, the item appears at the Sauce prep station KDS device. Once the item is fulfilled at the first prep station in the sequence, a yellow dot appears next to the item on the expediter ticket. This indicates that work on the item started and is not yet complete for fulfillment at the expediter. For more information, see Partial fulfillment indicator.
This process continues from the Sauce prep station, to the Cheese prep station, to the Toppings prep station, and then to the Bake prep station. Once the item is completed at the Bake prep station, the item has completed the assembly line and is marked as completed at all prep stations on the expediter KDS device with a green check mark icon.
Here is a diagram illustrating the path of the item through the kitchen.
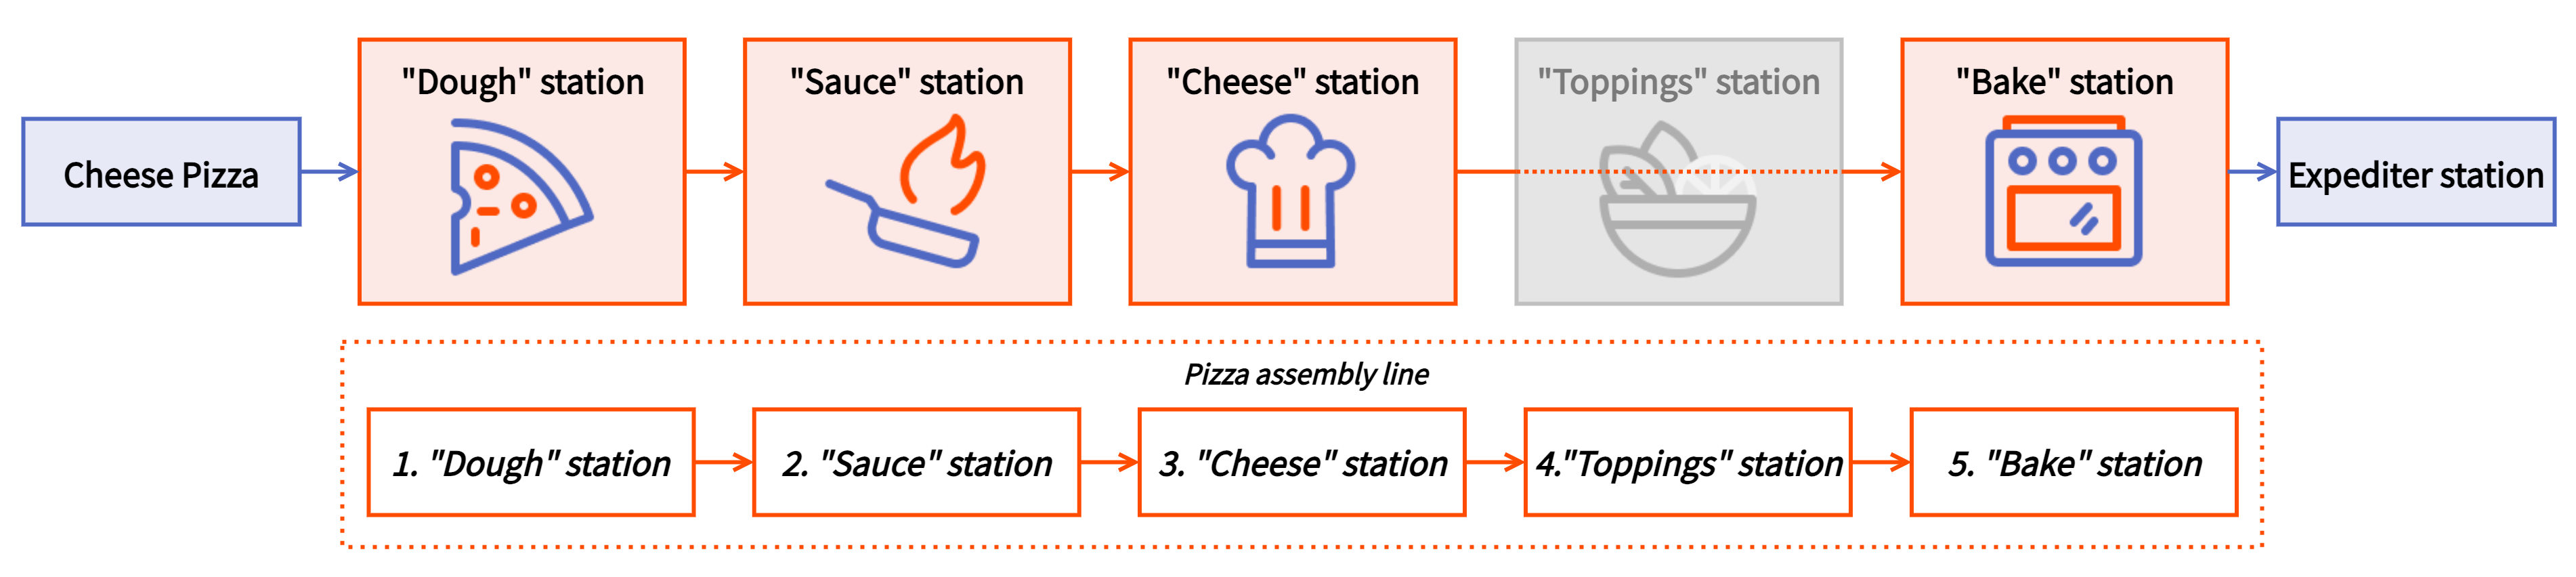
A Cheese Pizza item is assigned to most of the prep stations in the assembly line, except for the Toppings prep station. When moving through the assembly line, the item moves from the Dough prep station, to the Sauce prep station, to the Cheese prep station, and then to the Bake prep station. The item does not need to be fulfilled at the Toppings prep station and does not appear on the device.
Here is a diagram illustrating the path of the item through the kitchen.
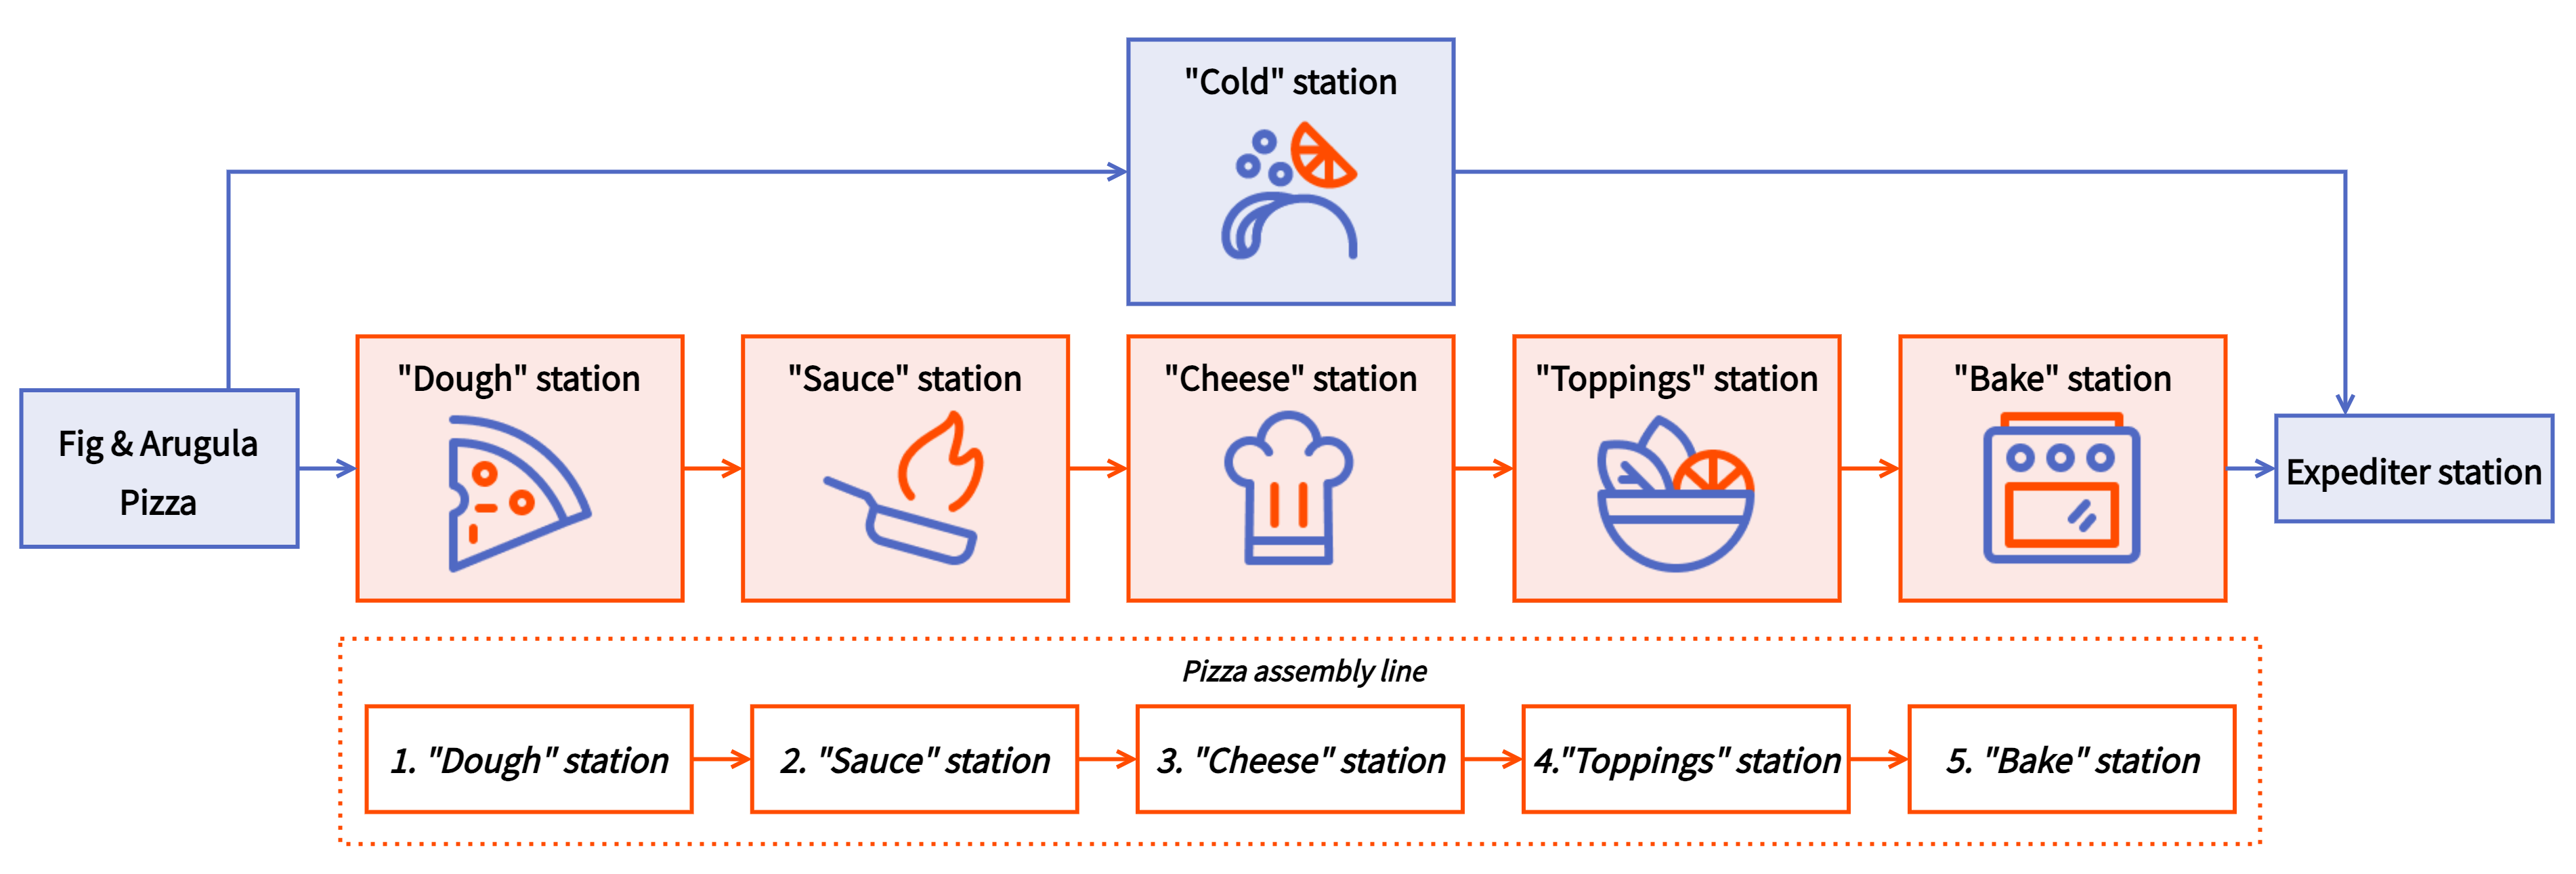
A Fig & Arugula Pizza item is assigned the same prep stations used in the assembly line and also to the Salad prep station where the arugula ingredient is stored. When the item is sent to the kitchen, it appears at the first prep station in the sequence, Dough, and also at the Salad prep station because it is outside of the assembly line. The item is not marked as fulfilled at prep stations on the expediter KDS device until it is fulfilled at the Salad prep station and all prep stations in the assembly line. Items appear on prep stations within the assembly line sequence in order, while appearing on prep stations outside the assembly line immediately, all requiring fulfillment at that prep station in order to be marked as fulfilled at prep stations.
Here is a diagram illustrating the path of the item through the kitchen.
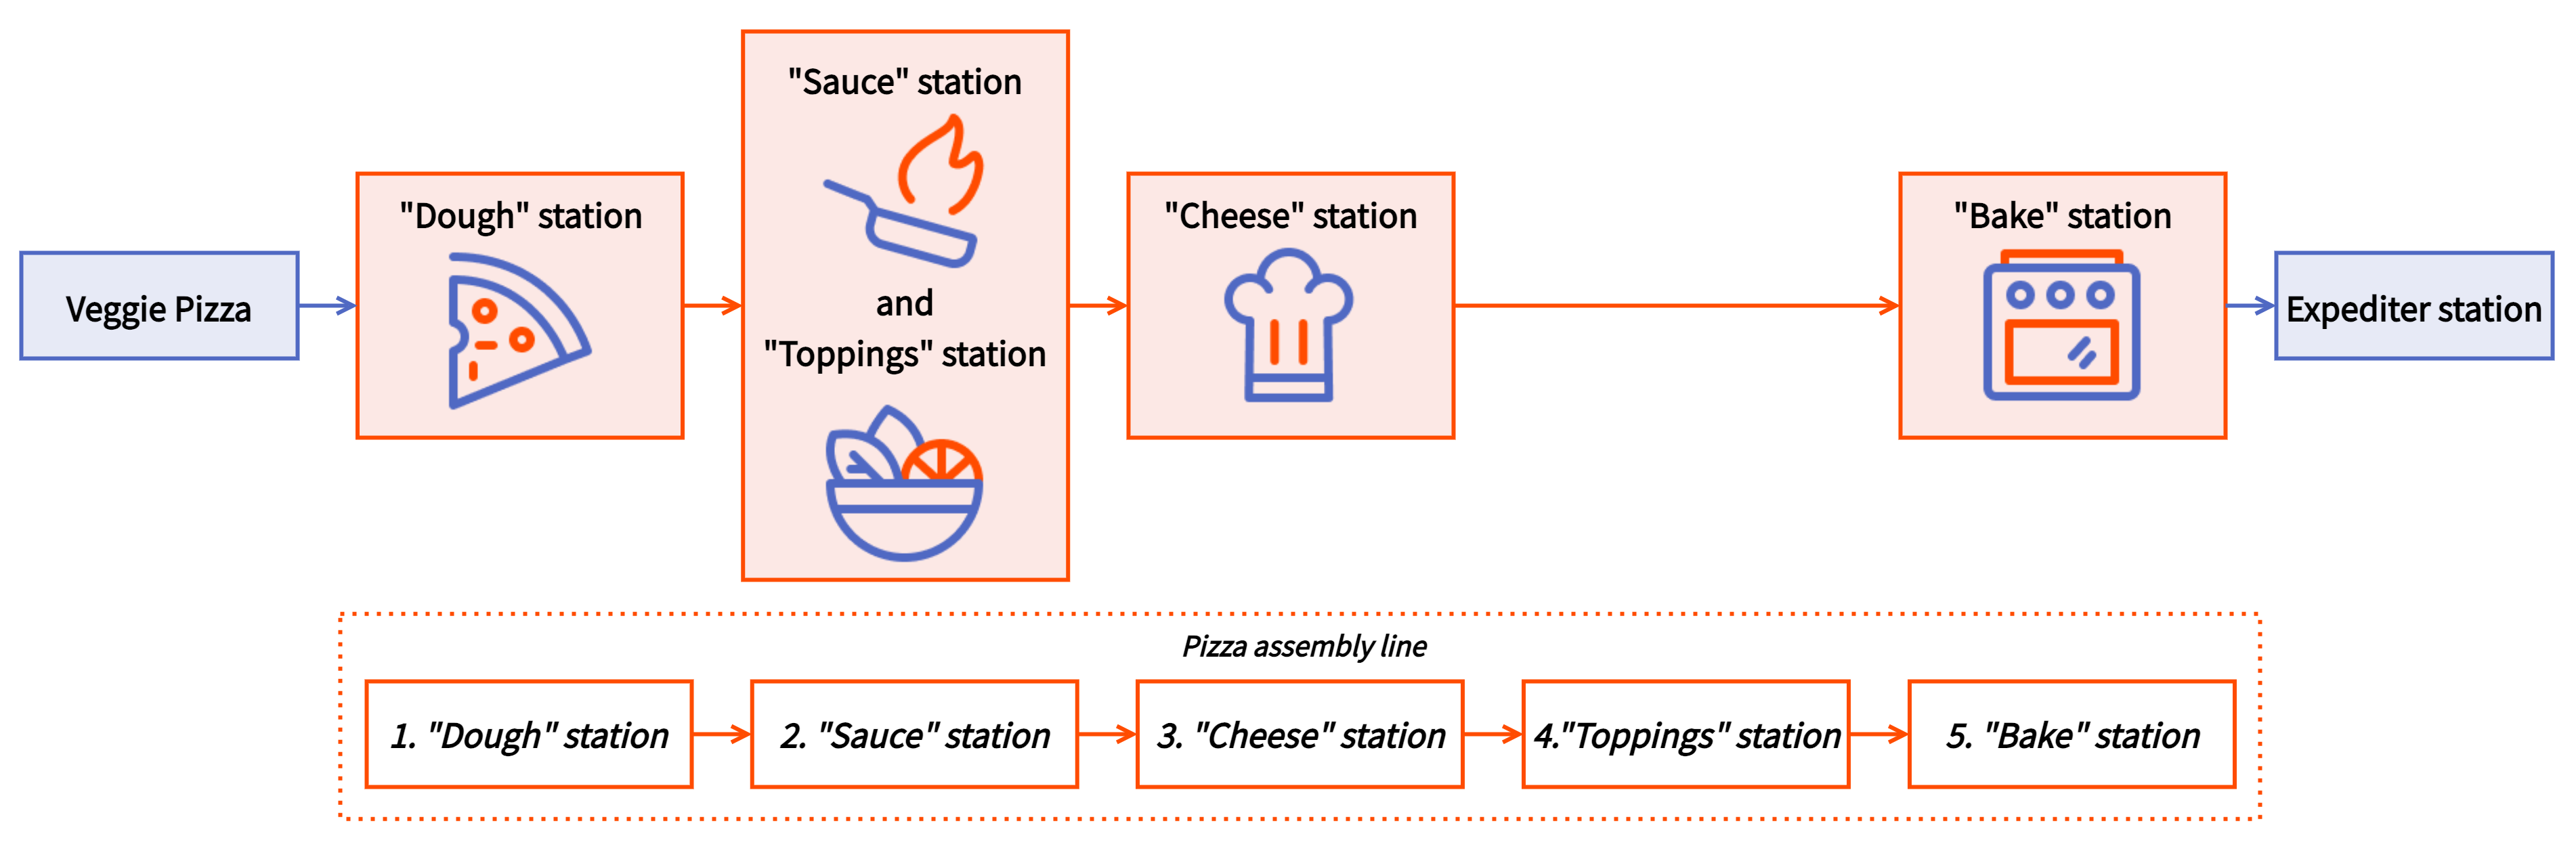
At a new location, the kitchen layout is different, so you decide to combine the Sauce and Toppings prep stations onto a single prep station. You do this by assigning both Sauce and Toppings prep stations to a single KDS device. When an item is fulfilled at this station, it is fulfilled at both prep stations at the same time. The item does not appear at the Toppings prep station again after it is fulfilled at the Cheese prep station because it was already fulfilled.
Here is a diagram illustrating the path of the item through the kitchen.
Modifiers automatically follow the same assembly line as their parent item. If a modifier is a menu item with an assembly line applied, it follows the assembly line applied to the parent item instead.
For example, you have a Cheese Pizza item with a Caesar Salad modifier, which can also be ordered as its own item. The Cheese Pizza item is assigned the following assembly line:
-
Dough
-
Sauce
-
Cheese
-
Toppings
-
Bake
It uses the Dough, Sauce, Cheese, and Bake prep stations, and does not use the Toppings prep station.
The Caesar Salad modifier is assigned the following assembly line and all prep stations used in the assembly line.
-
Salad
-
Toppings
-
Cheese
When the Caesar Salad item is a modifier for the Cheese Pizza item, the ticket for the Cheese Pizza item with a Caesar Salad modifier appears immediately at the Salad and Dough prep stations. The Salad prep station is outside of the Cheese Pizza item’s assembly line, so the ticket appears at the prep station immediately and not at a certain point in the assembly line sequence. Once the ticket is completed at the Dough prep station, it moves to the Sauce prep station. Once completed at the Sauce prep station, it moves to the Cheese prep station. Once completed at the Cheese prep station, the ticket moves to the Toppings prep station. The Cheese Pizza item still appears at the Toppings prep station, even though it is not an assigned prep station, because the Caesar Salad modifier does have Toppings as a prep station. The Caesar Salad item follows the sequence for the Cheese and Toppings prep stations used by the Cheese Pizza item’s assembly line, instead of the sequence originally assigned.
To configure items that act as modifiers to follow the assembly line they are assigned, you can choose to route modifiers separately from their parent items using the Modifier Routing setting. Otherwise, the parent item and modifier are shown together.
|
Note |
|
This feature is only available for assembly lines. |
If you enable individual item fulfillment, when you fulfill an individual item on a ticket in an assembly line, the item separates from the rest of the ticket and continues to the next prep station in the sequence. If you select more than one item, all items separate and appear on a new ticket on the next prep station in the sequence. The items appear on the next prep station in a sequence in the order they are fulfilled at the previous prep station.
For example, an order includes a BBQ Chicken Pizza item, Veggie Pizza item, and a Cheese Pizza item. They all use the same assembly line and are assigned all prep stations used in that assembly line:
-
Dough
-
Sauce/Toppings
-
Bake
You do not use individual item tickets, so all three items appear on the same ticket at the Dough prep station when sent to the kitchen.
The ticket is fulfilled at the Dough prep station, and appears at the Sauce/Toppings prep station.
The Cheese Pizza item is completed first and is fulfilled at the Sauce/Toppings prep station. It appears on a separate ticket by itself at the Bake prep station. The BBQ Chicken Pizza item and Veggie Pizza item are fulfilled at the same time, and appear on a ticket together at the Bake prep station, beneath the Cheese Pizza item ticket.
Assembly lines work with item routing rules differently depending on whether the rerouted prep stations are included in the assembly line or not. Item routing rules can be used to add or change prep stations depending on the dining option or service area condition. Depending on whether the rerouted prep station is included in the assembly line or not, an item can be routed to an additional prep station in the sequence once the condition is met, or appear immediately at the prep station in addition to the first prep station in a sequence. For more information about item routing rules, see Using item routing rules.
|
Note |
|
Assembly lines should never route to a prep station designated as NO PRINT because you cannot fulfill items from this prep station. |
For example, an item routing rule routes items to go to the Pack prep station in addition to their other stations when the dining option is Takeout. If you include the Pack prep station in the assembly line sequence, when the dining option is not Takeout, the Pack prep station is skipped in the sequence. If you do not include the Pack prep station in the assembly line, when the dining option is Takeout, the item immediately shows at the first prep station in the assembly line and the Pack prep station.
|
Note |
|
Prep stations used in an assembly line must overlap with at least one prep station used by the menu entity. |
You can use assembly lines to route menu items to prep stations in a specific order. You can set assembly lines at the menu, menu group, and menu item level. By default, menu groups inherit assembly lines from their parent menus. Menu items and subgroups inherit assembly lines from their parent menu groups. For more information on inheritance, see Understanding inheritance.
|
Note |
|
A menu entity can only be assigned one assembly line at a time. |
Menu items will only appear on prep stations in an assembly line if the prep station is assigned to the menu item itself or a parent menu entity. For information about how to assign prep stations to menu entities, see Assigning prep stations to menu entities.
The following procedure is for assigning assembly lines to multiple menu entities at once using the Menus > Bulk management > Advanced properties page in Toast Web.
To assign assembly lines to menu entities using the Advanced properties page
-
Choose Menus > Bulk management > Advanced properties. The Advanced Properties page with an interactive table with rows for each restaurant menu opens.
-
Expand the menu to show the menu groups in a menu. Continue to expand to see menu items, modifier groups, and modifiers.
-
Use the Show/Hide dropdown menu above the table to select Assembly Line. An Assembly Line column appears on the table.
-
In the Assembly Line column, you can assign an assembly line to an entire menu, a menu group, or menu item. To assign an assembly line, click the cell under the Assembly Line column for that menu entity and then select the assembly line from the dropdown menu.
Note
Modifiers use the same assembly line as their parent item.
-
Save and publish your changes.
|
Note |
|
Use the Full menu view of the menu manager page to add assembly lines to menus, menu groups, and menu items. |
Use the Full menu view of the menu manager page to add assembly lines to menus, menu groups, and menu items for single-location restaurants. For information about adding assembly lines to menu entities for multi-location restaurants, see Assigning assembly lines to menu entities for multi-location restaurants.
To set an assembly line for a menu, go to the Kitchen prep section of the menu's details page and select the assembly line to which items ordered from the menu should be routed.
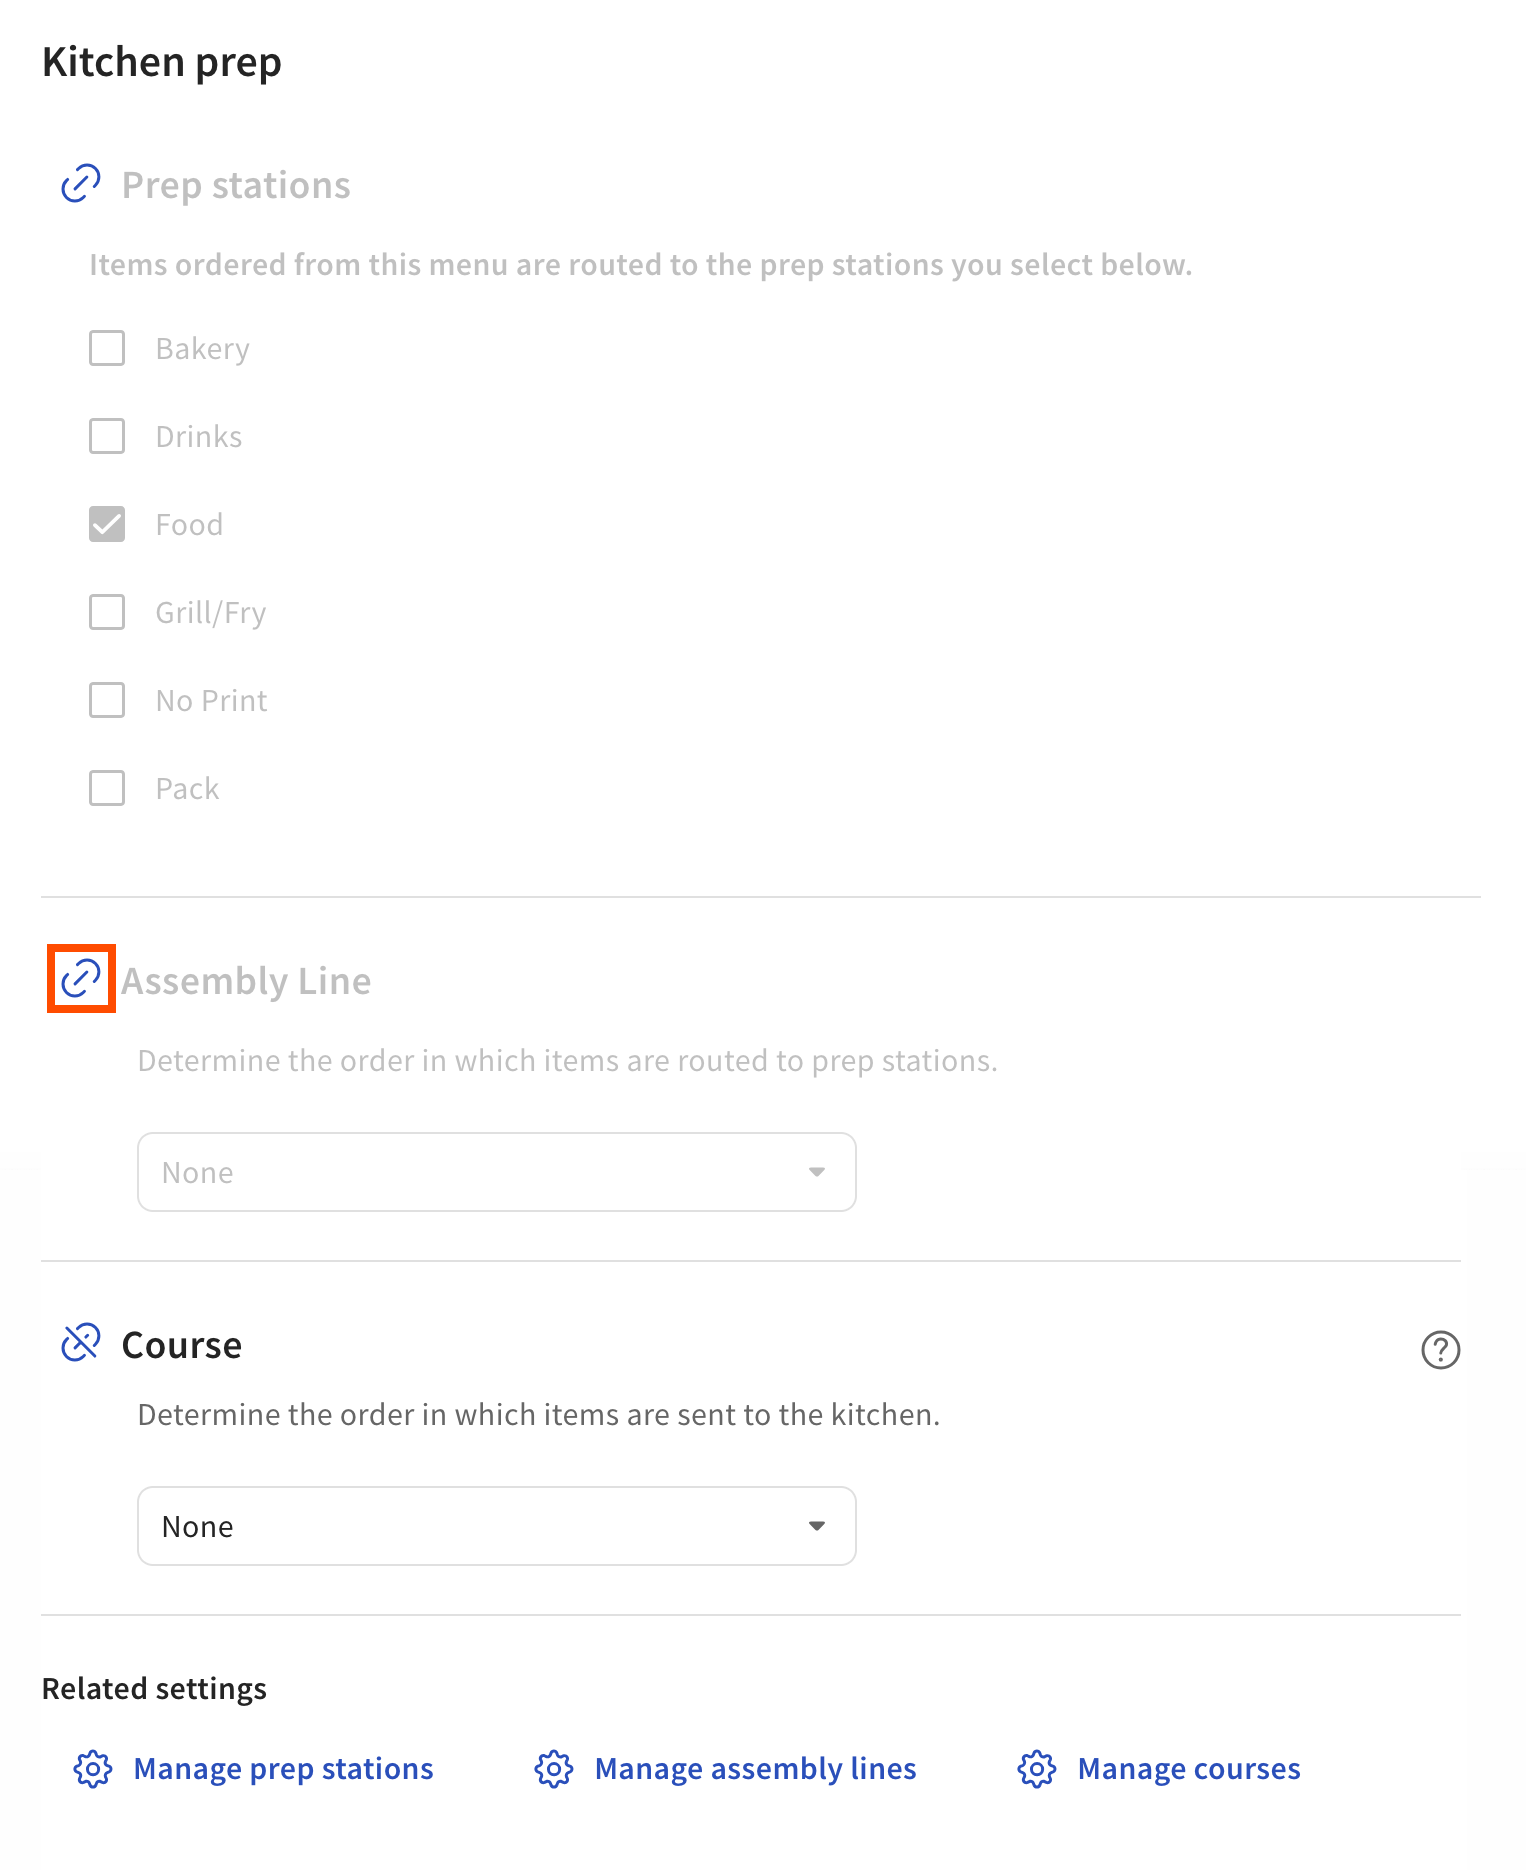
To override the inherited assembly line for a menu group, go to the Kitchen prep section of the group's details page, select the link icon next to Assembly lines to unlink the configuration, and then select the assembly line from the list.
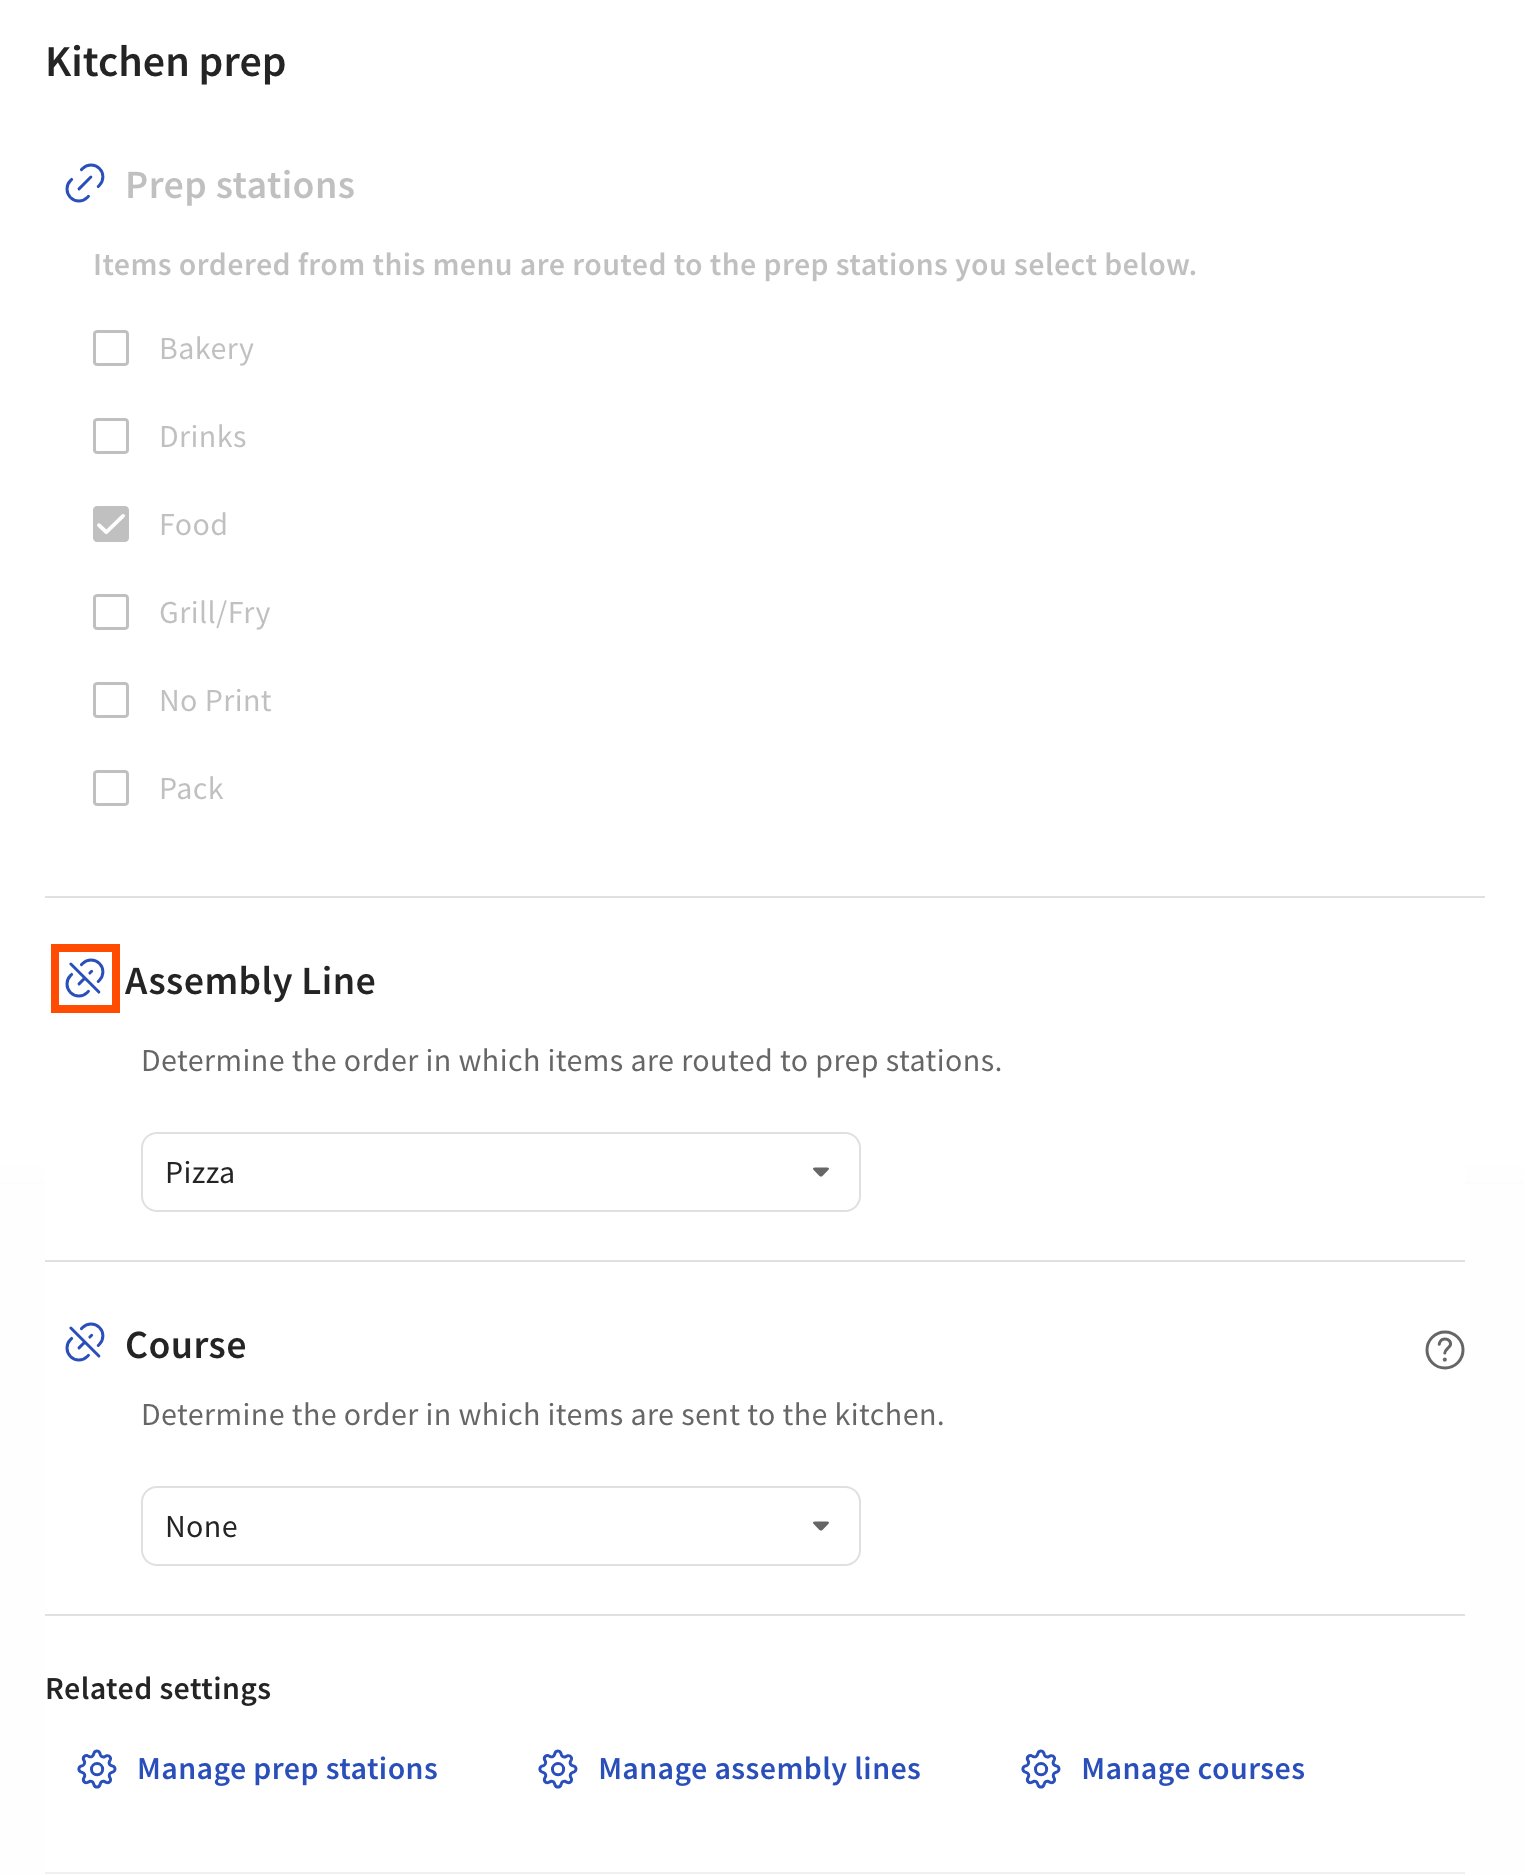
To configure a menu group so it inherits its assembly line, select the link icon next to Assembly lines so that the assembly line settings are grayed out.
To override the inherited assembly line for a menu item, go to the Kitchen section on its details page, set its Inherit assembly line? setting to No, and then select its assembly line from the dropdown menu. When you configure settings directly on a menu item, those settings apply any time the menu item is ordered from any menu path.
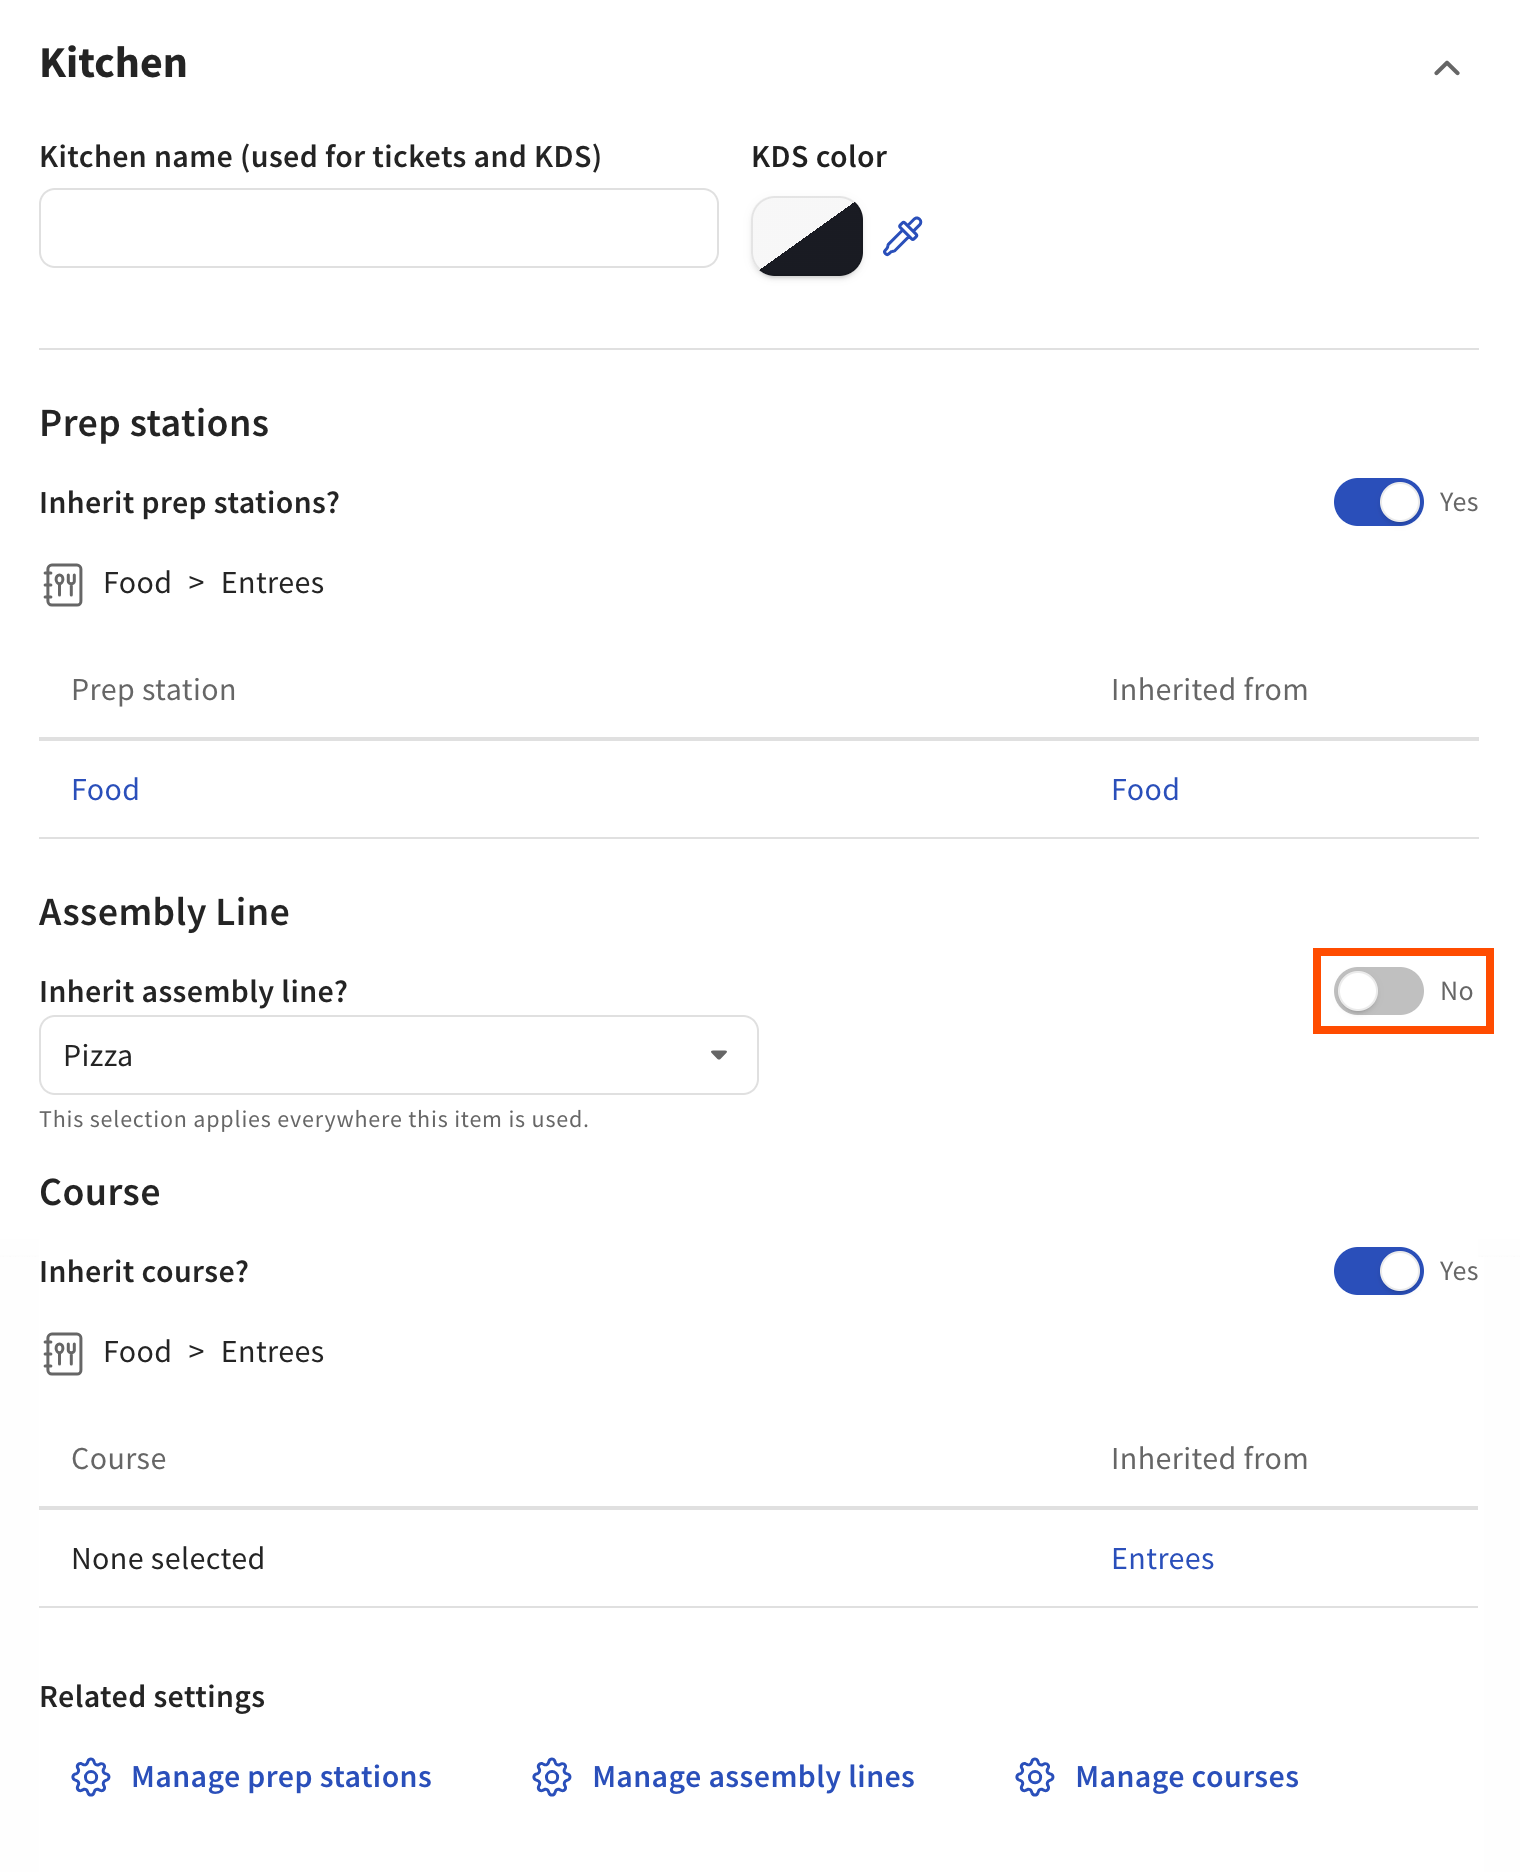
To configure a menu item to inherit its assembly line, set the Inherit assembly line? setting to Yes.
If you do not have any assembly lines configured yet, use the Manage assembly lines link to go to the Assembly Lines page where you can create them. For more information on creating assembly lines, see Creating an assembly line.
The following procedure is for assigning assembly lines to menu entities for multi-location restaurants. For information about adding assembly lines to menu entities for single-location restaurants, see Assigning assembly lines to menu entities for single-location restaurants.
To assign assembly lines to menu entities for multi-location restaurants
-
Choose Menus > Bulk management > Advanced properties. The Advanced Properties page with an interactive table with rows for each restaurant menu opens.
-
Expand the menu to show the menu groups in a menu. Continue to expand to see menu items.
-
Select the menu, menu group, or menu item you want to add an assembly line to. The details page for that menu entity opens.
-
Navigate to the Preparation section for that menu entity.
-
If you are assigning an assembly line to a menu, select an assembly line option from the Assembly Line setting.
-
If you are assigning an assembly line to a menu group:
-
Set the Inherit Assembly Line setting to Yes if you want the menu group to inherit the assembly line from the parent menu.
-
Set the Inherit Assembly Line setting to No, specify assembly line here, if you want a different assembly line from the parent menu. Select an assembly line from the Assembly Line setting.
-
-
If you are assigning an assembly line to a menu item:
-
Set the Inherit Assembly Line setting to Yes if you want the menu item to inherit the assembly line from the parent menu group.
-
Set the Inherit Assembly Line setting to No, specify assembly line here, if you want a different assembly line from the parent menu group. Select an assembly line from the Assembly Line setting.
-
-
Save and publish your changes.