The following sections provide information about the Kitchen settings in Toast Web.
In addition, the following topics provide information about other Kitchen categories.
To review and change settings on the Kitchen > Printers, tickets, & KDS devices > Kitchen and ticket setup page, you must have the Web Setup > 6.2 Kitchen / Dining Room Setup access permission.
For more information, see How orders are routed to KDS devices.
The following table provides information about the settings of the Printed Tickets and Ticket Screens section on the Kitchen > Printers, tickets, & KDS devices > Kitchen and ticket setup page.
| Setting | Options and Description |
|---|---|
|
These settings affect the way that tickets print or appear on Toast KDS devices. In addition, settings that you configure on the Front of house > Order screen setup > UI options page also affect the appearance of both printed and KDS device kitchen tickets. |
|
| Always Print and Show Dining Option |
Defines whether orders that have the default dining option print or show that dining option on tickets. You define your restaurant's dining options on the Kitchen > Dining options > Dining options page, and can specify one of your dining options as the default.
|
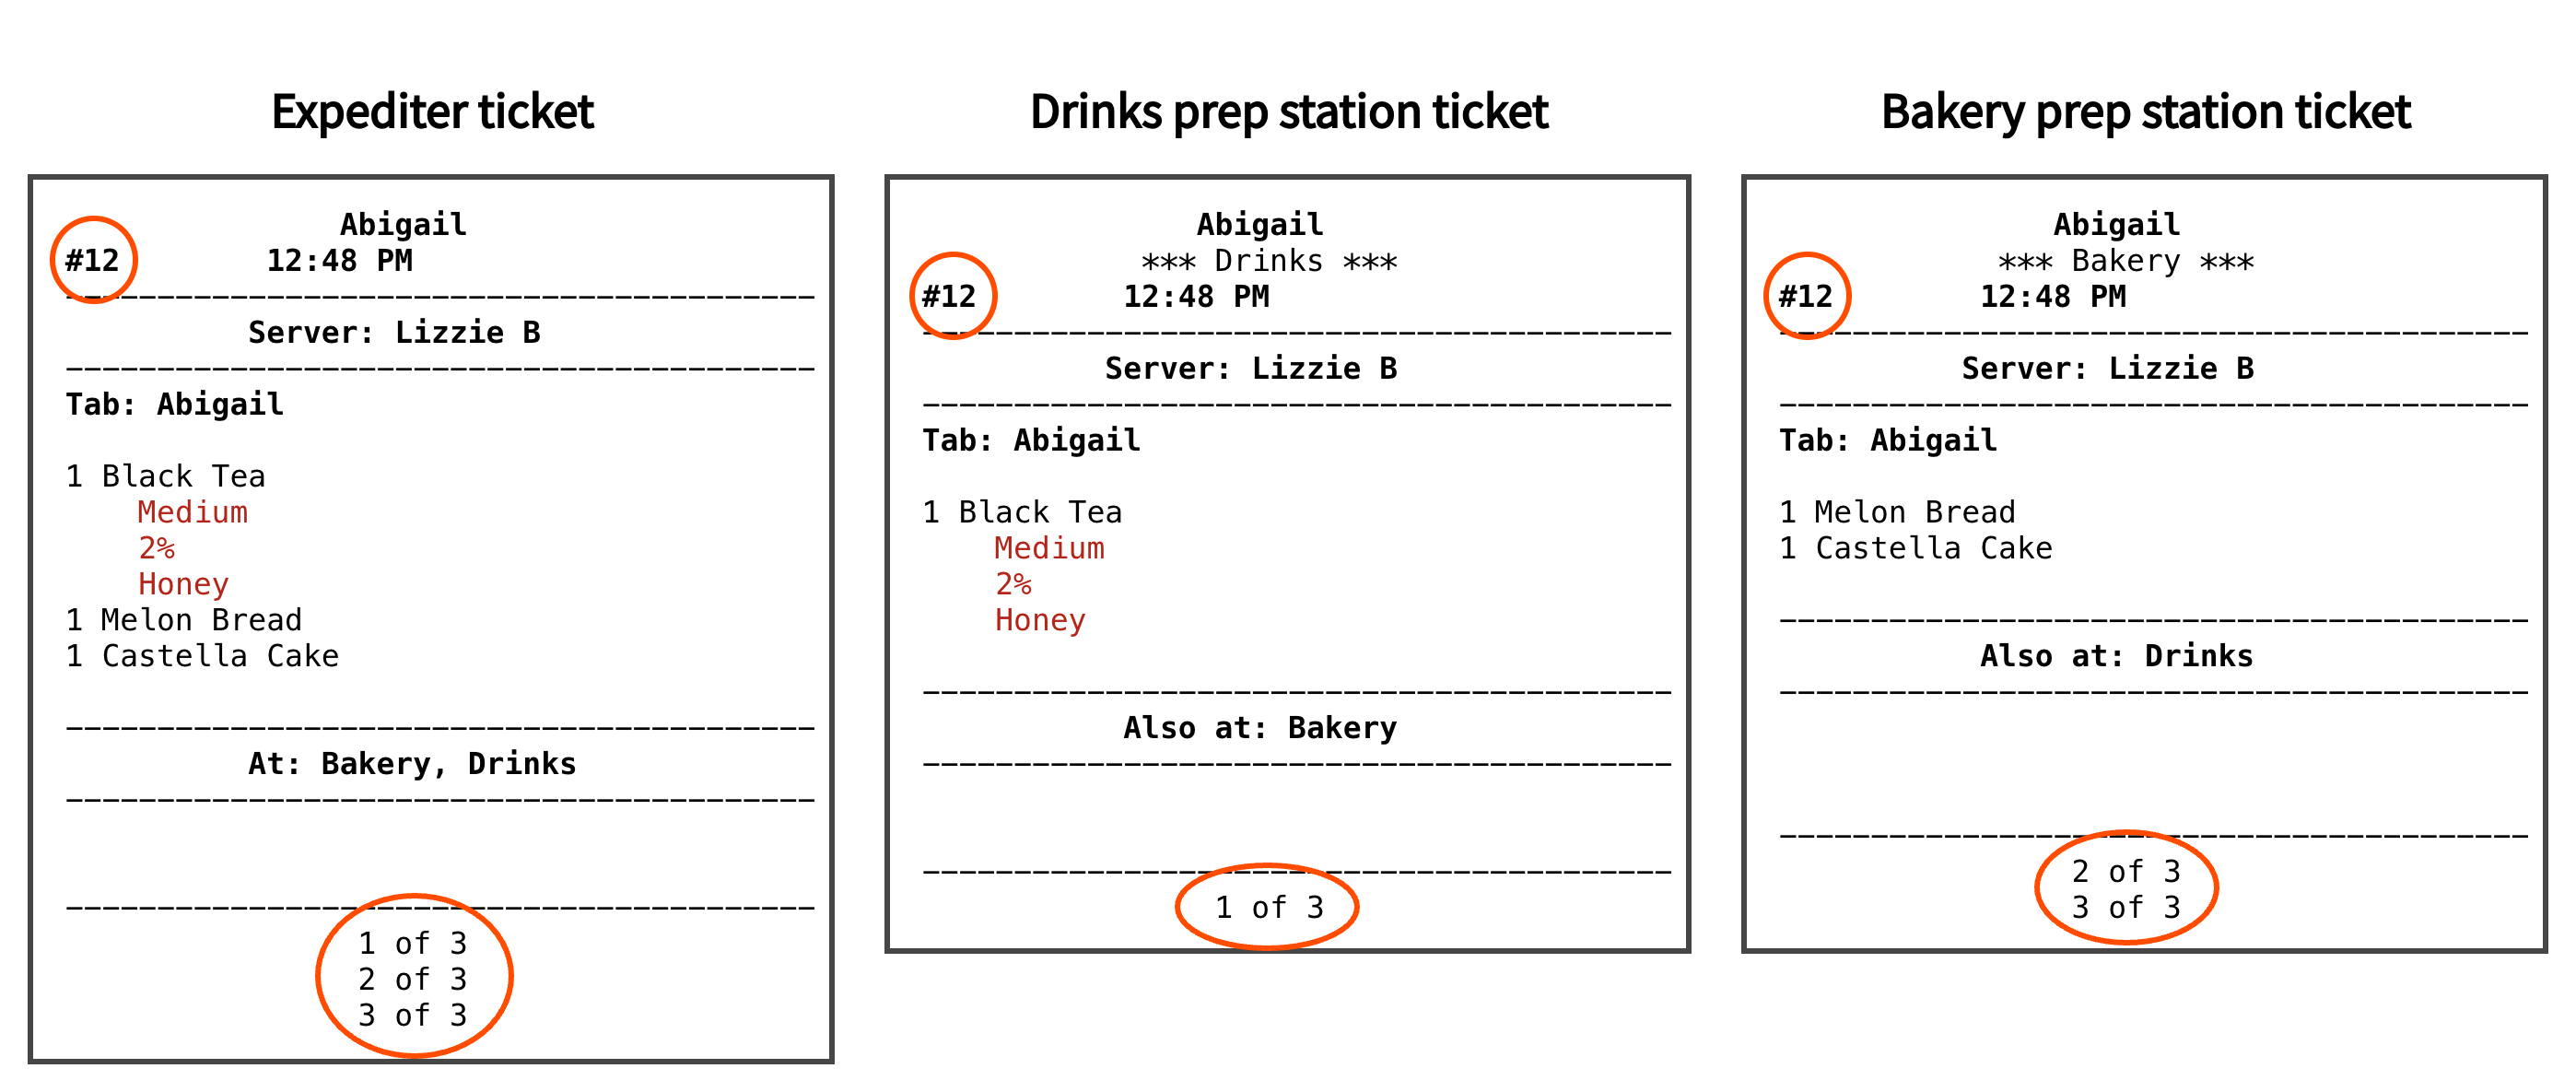
| Other Stations |
Defines whether items prepared at more than one
prep station display
For more information about the effects of these options, see KDS ticket contents. |
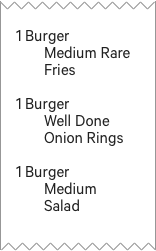
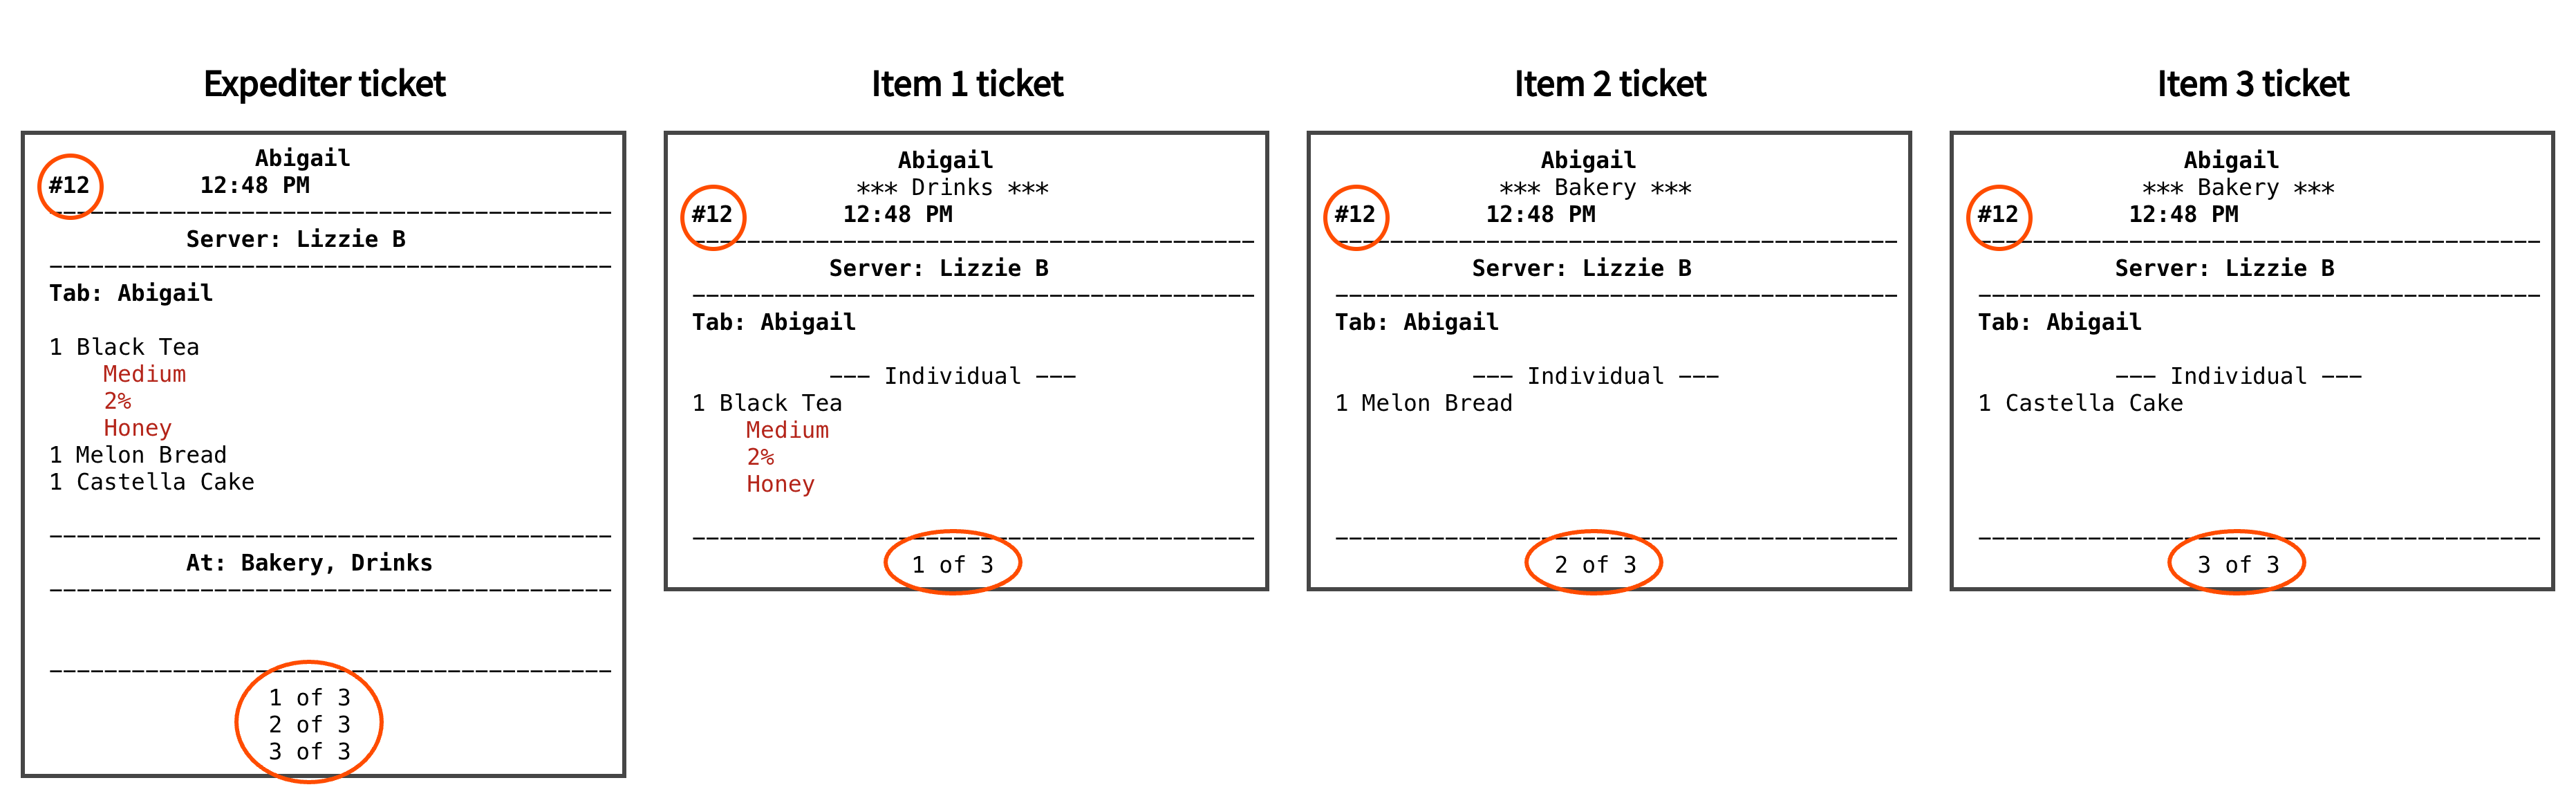
| Individual Item Tickets |
Defines how tickets for orders that have multiple items appear on both printed tickets and KDS tickets. These options are separated into Print Settings and KDS Settings respectively. For printed tickets:
For printed tickets, you can also
include For KDS tickets:
For more information about this setting, see Individual item kitchen tickets. |
| Consolidate Items with Multiple Quantities |
Defines whether menu items with a quantity of more than one are consolidated into a single ticket with the quantity included or displayed as individual tickets for each item.
For more information about this setting, see Consolidate identical items. |
| Item Sorting Priority |
For restaurants that set Individual Item Tickets to Print all items from an order on a single ticket for the Print Settings and Display all items from an order on a single ticket for the KDS Settings, this setting defines the sequencing method to use for items on a ticket.
|
| Modifier Routing |
Defines whether modifiers can be routed to prep stations separately from their parent items.
|
The following table provides information about the settings of the Expediter section on the Kitchen > Printers, tickets, & KDS devices > Kitchen and ticket setup page.
| Setting | Options and Description | ||||
|---|---|---|---|---|---|
|
These settings affect the way that tickets print or appear on Toast KDS devices for expediters. In order for tickets to be sent to an expediter printer or screen, you must define the prep station screens that send tickets on to the expediter screen on the Kitchen > Kitchen stations > Prep stations page. You then use these settings to specify additional workflow preferences for your expediters, and, for a KDS device, use Device Setup to identify the device located at the expediter seat. |
|||||
| Expediter Printer(s) |
You can select any of the printers previously set up on the Finance > Related > Settings > Printers & cash drawers page. Defaults to cleared for all printers. To specify the printers that you want to print the tickets for your expediter, select one or more printers. For more information about the effect of this setting, see Printing options for the KDS. To review or update which prep station orders are included on expediter tickets, see Verify order routing to an expediter. |
||||
| Printing Mode |
Defines whether all expediter tickets should print on the designated Expediter Printer(s).
For more information about the effects of these settings, see Printing options for the KDS. To verify that a KDS device is set up for use by an expediter, see Verify device setup. |
||||
| Two-Level Fulfillment |
For kitchens that use Toast KDS devices for expediter tickets, defines whether orders must be marked as fulfilled by two expediter screens in sequence (a kitchen expo and a food runner, for example), or if a single expediter screen is responsible for final order fulfillment.
For more information, see Using a KDS expediter screen. |
||||
| Sequenced Expediter Fulfillment |
Determines whether tickets are required to be fulfilled at Expediter-1 (first level) before they can be fulfilled at Expediter-2 (second level). This setting is available when Two-Level Fulfillment is set to Two levels.
|
||||
| Sequenced KDS fulfillment |
Defines whether items must be fulfilled at the first-level expediter before the second-level expediter if using two-level fulfillment, at prep stations before expediters, or both.
This is only applicable to KDS devices. For more information, see Sequencing fulfillment by station type and level. |
||||
| Show Guest Name in Bold on Expediter Tickets |
Defines the emphasis given to the guest name on tickets.
|
||||
| Override Item Prep Time |
Defines whether the expediters can assess items that are scheduled but not yet fired, and fire them manually as needed.
For more information, see Firing by item prep time. |
||||
The following table provides information about the settings of the Printed Tickets section on the Kitchen > Printers, tickets, & KDS devices > Kitchen and ticket setup page.
| Setting | Options and Description |
|---|---|
|
These settings affect the appearance of printed tickets. In addition, the settings you configure on the UI Options page also affect the appearance of printed tickets. |
|
| Print Guest Details |
For kitchens that use kitchen printers, defines whether guest information and special delivery notes print on tickets for orders with either takeout or delivery behavior. When you define dining options on the Kitchen > Dining options > Dining options page, you specify takeout, delivery, or dine-in behavior for each dining option.
|
| Print Default Modifiers Black |
For kitchens that use kitchen printers, defines the font color to use for a modifier option that is identified as the default in its modifier group. This setting only applies if you also configure your restaurant with the following settings:
In addition, the printer must be able to print in both black and red, such as an Epson U220 printer. This setting does not affect the appearance of tickets on KDS devices. You can select:
|
| Print Ticket Changes |
For kitchens that use kitchen printers, defines whether an additional ticket prints after a manager or employee changes or voids an order.
|
| Print Item Sizes Inline |
Defines where the item's size prints on a ticket.
|
| Group by Plate |
Sets whether identical items should be grouped for printed tickets.
You can use this setting in conjunction with the Consolidate menu items setting, which is located on the Front of house > Order screen setup > UI Options page. The effect of the Consolidate menu items setting on identical menu items with identical modifiers is not changed. |
| Split Tickets by Course |
For kitchens that use kitchen printers, defines whether to print a separate ticket for each course. This setting only applies if you also configure your restaurant with the following settings.
You can select:
|
| Header Spacing |
Defaults to 5 blank lines. To change the number of blank lines that appear at the top of printed tickets, select a value from 0 to 20. |
| Footer Spacing |
Defaults to 0 blank lines. To change the number of blank lines that appear at the bottom of printed tickets, select a value from 0 to 20. |
| Ticket Footer |
Defaults to cleared for all Section Name options. To include an additional section of information at the end of a printed ticket, you select the Prep Station check box, the Expediter check box, or both.
|

The following table provides information about the settings of the Ticket Screens section on the Kitchen > Printers, tickets, & KDS devices > Kitchen and ticket setup page.
| Setting | Options and Description | ||
|---|---|---|---|
|
The settings described in this table affect the way that tickets appear on Toast KDS devices. |
|||
| Preview Tickets |
This setting determines if your KDS devices display preview tickets. Preview tickets show a preview of the ticket as items are added to an order.
For more information about preview tickets, see Preview tickets. |
||
| Start Queue |
This setting determines if your KDS devices use start queue. Start queue divides prep station KDS screens into a section for cooking and a section for unstarted tickets to indicate whether or not a prep station is working on a ticket.
For more information about start queue, see Start queue overview. |
||
| Recently Fulfilled Timeframe |
This setting defines how long, in minutes, a fulfilled ticket can be reviewed on a KDS device using the Show Recently Fulfilled option. Must be greater than 0.
For more information, see Redisplaying tickets with recall and unfulfill. |
||
| Warning Colors |
Defaults to Disabled. After you select Enabled, this setting offers a series of options that give you control over the ticket heading colors that appear on the KDS device as cues to how long tickets remain unfulfilled. For more information about the effects of these options, see KDS notification options. |
||
| Level 1 - 4 Enabled |
Defaults to cleared. To specify the different timing threshold levels you want to set up select one or more levels. |
||
| Level 1 - 4 Threshold (minutes) |
To define how long the ticket heading appears with its associated color after it is fired, you select a value from 1-20 (in one-minute increments), 22-30 (in two-minute increments), or 35-90 (in five-minute increments). For example, at a quick service restaurant you might set thresholds of 2, 3, and 5 minutes, while in a fine dining restaurant you might set thresholds of 10, 20, and 30 minutes. |
||
| Level 1 - 4 Color |
Defaults to white. To assign a color to tickets that remain unfulfilled long enough to reach one of the defined threshold levels, select the white tile and then select a color from the palette that opens. |
||
| Ticket colors by dining behavior - Enabled | This setting specifies an outline color for KDS tickets depending on the dining behavior when selected. | ||
| Ticket colors by dining behavior - Color |
Defaults to white. To assign a color to the outline of tickets with a particular dining behavior, select the white tile and then select a color from the palette that opens. |
||
| Print On Demand |
Defines whether a Print option appears when you select a ticket on the KDS device.
For more information about the effects of these options, see KDS notification options or Printing options for the KDS. |
||
| Flash Changes |
Defines whether the KDS device alerts employees to new and changed tickets by intermittently changing the color of the ticket headers. To acknowledge the ticket and stop the flashing, you select the ticket.
For more information about the effects of these options, see KDS notification options. |
||
| Fulfill Items |
Defines whether selecting a ticket provides an option to fulfill all of the items on the ticket at once, or opens a dialog box in which you can select specific items and then select Fulfill for each one. For restaurants that set Individual Item Tickets to Display all items from an order on a single ticket for the KDS Settings, this setting is typically set to Enable individual item fulfillment.
For more information about the effects of these options, see KDS interaction options or Printing options for the KDS. |
||
| Fulfillment method |
Defines the way items assigned to multiple prep stations are fulfilled.
For more information about these fulfillment options, see Understanding item fulfillment. |
||
| All Day Display |
Defines whether a Show All Day View option appears in the KDS title bar.
For more information about the effects of these options, see About all day view. |
||
| KDS Ticket Headers |
Defines whether the check number or the table number is more prominent on KDS tickets.
|
||
The following table provides information about the settings of the Order ready text messaging section on the Kitchen > Printers, tickets, & KDS devices > Kitchen and ticket setup page.
| Setting | Options and Description |
|---|---|
|
The settings described in this section configure automated text messaging to guests, employees, or both when orders are fulfilled. For more information about the settings in this section, see Sending text messages on expediter fulfillment. |
|
| Fulfillment Text Level |
This setting determines when a text indicating an order is fulfilled is sent.
|
| Send text message |
This setting gives you fine-grained control over who receives SMS (text) messages and what they contain.
In each of these categories, To Guest and To Server default to cleared. To specify recipients for text messages you select To Guest, To Server, or both. (For kiosk orders, you can only set To Guest messaging.) After you select each recipient, you can review and customize the message to send.
|
The following table provides information about the settings of the Kitchen Names section on the Kitchen > Printers, tickets, & KDS devices > Kitchen and ticket setup page.
| Setting | Options and Description |
|---|---|
|
The read-only Original Names described in this section identify terms that appear on printed kitchen tickets and KDS devices.
|
|
| Kitchen Names |
These options customize the terms that appear on your kitchen tickets. Each option defaults to the corresponding Original Name. For example, if some of your back of house employees read English and others read Chinese, for the original name "VOIDED" you can supply a Kitchen Name of "Void- 作废". You can replace any of the original name values with a different value, but you cannot remove them completely. For example, if you do not want "No Course specified" to appear on tickets, you can replace it with a period (.) or hyphen (-) character. The kitchen names that you define appear on all printed tickets and Toast KDS devices. For more information about the effects of these settings, see KDS ticket contents. |
To review and change settings on the Kitchen > Pacing > Courses page, you must have the Web Setup > 6.2 Kitchen / Dining Room Setup access permission.
After you add courses, you can assign them to your menus, menu groups, menu items, or modifier options. You can update or review the course assignments for all of your menu entries at once on the Menus > Bulk management > Advanced properties page.
You can also give employees the option to specify the course for each item in an order with the Course additional modifier group. To give employees the ability to send an order with multiple courses, but fire each course separately, you can enable the Course Pacing setting.
The following table provides information about the settings of the Kitchen > Pacing > Courses page.
| Setting | Options and Description |
|---|---|
| Add |
To add a course, click + Add. The system adds a row to the interactive grid. |
| Course Name |
To identify the course on order screens, printed and KDS device kitchen tickets, and in Toast Web, enter a name. To change the name of a course, click into this cell in the grid to make edits. |
| Order |
To change the sequence in which courses display for selection, select Order. An Order column appears in the grid so that you can enter a sequence number next to each course. |
| Actions (menu icon) |
To remove a course, click the menu icon next to it and then select Archive. |
To review and change settings on the Kitchen > Kitchen stations > Prep stations page, you must have the Web Setup > 6.2 Kitchen / Dining Room Setup access permission.
For information about adding and customizing prep station behavior, see Adding a prep station and To configure a prep station to monitor another prep station.
| Setting | Options and Description |
|---|---|
| Add |
To add a prep station, click + Add. The system adds a row to the interactive grid. |
| Order |
To change the sequence in which prep stations display for selection, select Order. An Order column appears in the grid so that you can enter a sequence number next to each prep station. |
| Station Name |
To identify the prep station on printed and KDS device kitchen tickets, and in Toast Web, enter a name. To change the name of a prep station, click into this cell in the grid to make edits. |
| Send to |
Defines whether items assigned to the prep station are sent to the prep station, the expediter, or both.
This includes items on KDS or printed tickets. For more information, see Sending items to prep stations, expediters, or both. |
| Other Stations |
This setting prints the items worked on by the selected station. This setting only affects printed tickets. For example, an order contains an item sent to the Bakery prep station and an item sent to the Pack prep station. The Bakery prep station has Other Stations set to Pack. When the order is sent, the Bakery kitchen printer prints the Bakery item, and also lists the Other Station prep station name, Pack, and the item from the order. If you choose to print an overview ticket at each prep station, only the overview ticket lists items from the other prep station(s). If you enable course pacing, the information included on a ticket is determined by course. |
| Ticket Printer |
This setting chooses the printer that prints the prep station's tickets. |
| Always Print Tickets |
This setting determines whether prep station tickets are always printed, or only when the restaurant is in offline mode.
|
| Actions (menu icon) |
To remove a prep station, click the menu icon next to it and then select Archive. |
To change item routing behavior on the Kitchen > Kitchen stations > Item routing page, you must have the Web Setup > 6.2 Kitchen / Dining Room Setup access permission. These settings change the existing item behavior when certain conditions are met.
For information about setting up menu item routing to prep stations, see Assigning prep stations to menu entities. For more information about advanced item routing, see Routing overview.
The following table provides information about the settings of the Kitchen > Kitchen stations > Item routing page.
| Setting | Options and Description |
|---|---|
| Add |
To add an item routing rule, click + Add. The system adds a row to the interactive grid. |
| Order |
This setting changes the sequence in which item routing rules appear in the grid and the order in which the rules are applied. For example, if you have two rules applied to the Take Out dining option, the rule with a lower number is applied first and the second rule is ignored. Select Order, and enter a sequence number next to each rule in the Order column. |
| Rule Name |
The identifying name for the item routing rule. |
| Category |
The category of the item routing rule. This is the category that determines how an item is rerouted.
|
| Condition |
The condition of the item routing rule that must be met in order for the rule to apply to the item. This is either a dining option or a service area, depending on the chosen Category. |
| Reroute From | The original destination of items that meet the configured category and condition. If the item is not originally routed to this prep station, it is not rerouted to the new prep stations. |
| Reroute To | The new destination of items that meet the configured category and condition. The item can be rerouted to more than one prep station. |
| Actions (menu icon) |
To remove a routing rule, click the menu icon next to that routing rule and then select Archive. |
To review and change settings on the Kitchen > Kitchen stations > Production items page, you must have the Web Setup > 6.2 Kitchen / Dining Room Setup access permission.
For more information about production items, see About production items.
The following table provides information about the settings of the Kitchen > Kitchen stations > Production items page.
| Setting | Options and Description |
|---|---|
| Add |
To add a production item, click + Add. The system adds a row to the interactive grid. |
| Name |
To identify the production item on the KDS device and in Toast Web, enter a name. To change the name of a production item, click into this cell in the grid to make edits. |
| Order |
To change the sequence in which production items display along the bottom of the KDS device, select Order. An Order column appears in the table so that you can enter a sequence number next to each production item. |
| Actions (menu icon) |
To remove a production item, click the menu icon next to that production item and then select Archive. |
The Toast platform includes three dining options by default: Dine In, Take Out, and Delivery. On the Dining Options page, you define additional dining options that apply to your restaurant, and archive options that do not apply. When you define an additional dining option, you specify dine in, takeout, delivery, or curbside as the behavior for that option.
For example, your restaurant has an outdoor patio area with seating for guests. If you want the kitchen to package orders for the patio in takeout containers, you can set up a Patio dining option with a behavior of takeout.
Dining options can apply to a complete order or to an item within an order by using one of the Additional Modifier Groups.
The following table provides information about the settings of the Kitchen > Dining options > Dining options page.
| Setting | Options and Description |
|---|---|
| Add |
To add a dining option, select + Add. The system adds a row to the interactive grid. |
| Name |
Enter a name to identify the dining option on order screens and printed or KDS tickets. |
| Behavior |
To specify differences in how the kitchen plates or packages the order, you can select Dine In, Take Out, Delivery or Curbside. You can also specify None. |
| Future |
To identify a dining option to use for pending orders scheduled for fulfillment on a date in the future, select Future. |
| API |
This setting only applies to customers who use the Toast orders API. To allow an integration partner to access a dining option so that orders can be placed or information retrieved, select API. |
| Default |
To streamline ordering, you can specify the most frequently used dining option for your restaurant. On individual Toast POS devices you can override this restaurant-wide default by setting Setup > Device Setup > Device Default Dining Option. Specifying a default relabels the Dining button on order screens to the name of the default dining option. If you do not specify a default dining option, you can set the Prompt for Dining Option (Quick Order only) setting. |
| Actions (menu icon) |
To remove a dining option, select the menu icon next to that option and then select Archive. |
To review and change settings on the Kitchen > Pacing > Meal pacing page, you must have the Web Setup > 6.2 Kitchen / Dining Room Setup access permission.
You add courses on the Kitchen > Pacing > Courses page, and you can update or review the course assignments for all of your menu entries at once on the Menus > Bulk management > Advanced properties page.
The following table provides information about the settings of the Course Pacing section on the Kitchen > Pacing > Meal pacing page.
| Setting | Options and Description | ||
|---|---|---|---|
| Course Pacing |
This setting separates the send and fire actions for orders so that you can set the pace of item firing and fulfillment either manually or automatically. Select Enable course pacing to enable this feature. Additional options are available after you enable course pacing. If a course is not specified for an item, the system includes a "No Course" heading and lists that item on tickets first, followed by headings for each course and the related items. A course can be configured for a menu item or modifier, or, if enabled, can be added or changed by the employee on the Toast POS app. To send all items in an order simultaneously or one at a time from the Orders screen using the Server Item Firing feature, clear Enable course pacing. |
||
| Modifier Course Firing |
This setting determines whether modifiers are fired with the configured course or with the same course as the parent menu item. This setting is available when Course Pacing is set to Enable course pacing.
|
||
| Sending Courses |
This setting determines when courses are sent to the kitchen. This setting is available when Course Pacing is set to Enable course pacing.
|
||
| Firing Courses |
This setting determines how courses are fired to the kitchen. This setting is available when Sending Courses is set to Send all courses to kitchen immediately.
|
||
| Automated Firing |
This setting determines what conditions need to be met for a course to fire automatically. This setting is available when Firing Courses is set to Automate course firing.
|
||
| Optional delay between courses |
This setting adds a delay, in seconds, between when a course is fulfilled and when the next course is automatically fired to the KDS device. For example, if a course is configured to fire when the previous course is fulfilled, and it uses a 15 second delay between courses, once the first course is fulfilled, 15 seconds pass before the second course is fired.
This option appears if Automated Firing is set to either When previous course is fulfilled by all prep stations or When previous course is fulfilled by the expediter. |
||
| Course Firing Schedule |
This setting lists each course and allows you to set the time for when the next course is automatically fired. This option appears if Automated Firing is set to On a timed schedule. The Course Firing Schedule lists each configured course, and in the Fire Next Course After column you can enter the time, in seconds, between that course being fired and the next course firing. |
||
| Expediter Override |
This setting determines whether the expediter can fire courses before meeting the configured conditions. This option appears if Firing Courses is set to either Server fires courses individually or Automate course firing.
|
||
| Held Tickets |
This setting determines whether prep station screens show held courses. This option appears if Sending Courses is set to Send all courses to kitchen immediately.
|
||
| All day view with held items |
This setting includes both held and fired tickets in the all day view and production items counts. This option appears if Held Tickets is set to Show at both expediter and prep stations.
To include only fired tickets or items in the all day view and production items counts, clear the Include held items in all day view and production item counts option. |
||
| Previous Course Status |
This setting determines whether tickets include information about the status of the previous courses. All menu items and modifiers in a course must be fulfilled in order for the course to be marked as fulfilled. Select the Show the status of previous courses on kitchen tickets check box to enable this setting. This option appears if Sending Courses is set to Send courses individually.
The status information is either Not Fulfilled, or Fulfilled accompanied by the time since the course was fulfilled. |
The following table provides information about the settings of the Item Pacing section on the Kitchen > Pacing > Meal pacing page.
| Setting | Options and Description | ||||
|---|---|---|---|---|---|
| Item Fire by Prep Time |
This setting determines whether the Toast platform uses preparation times to schedule and fire items in an order or course ticket. For more information, see Firing by item prep time.
Menu items and modifiers are assigned a time it takes to prepare so that they are fulfilled at the same time. Select Enable item fire by prep time to enable this feature.
|