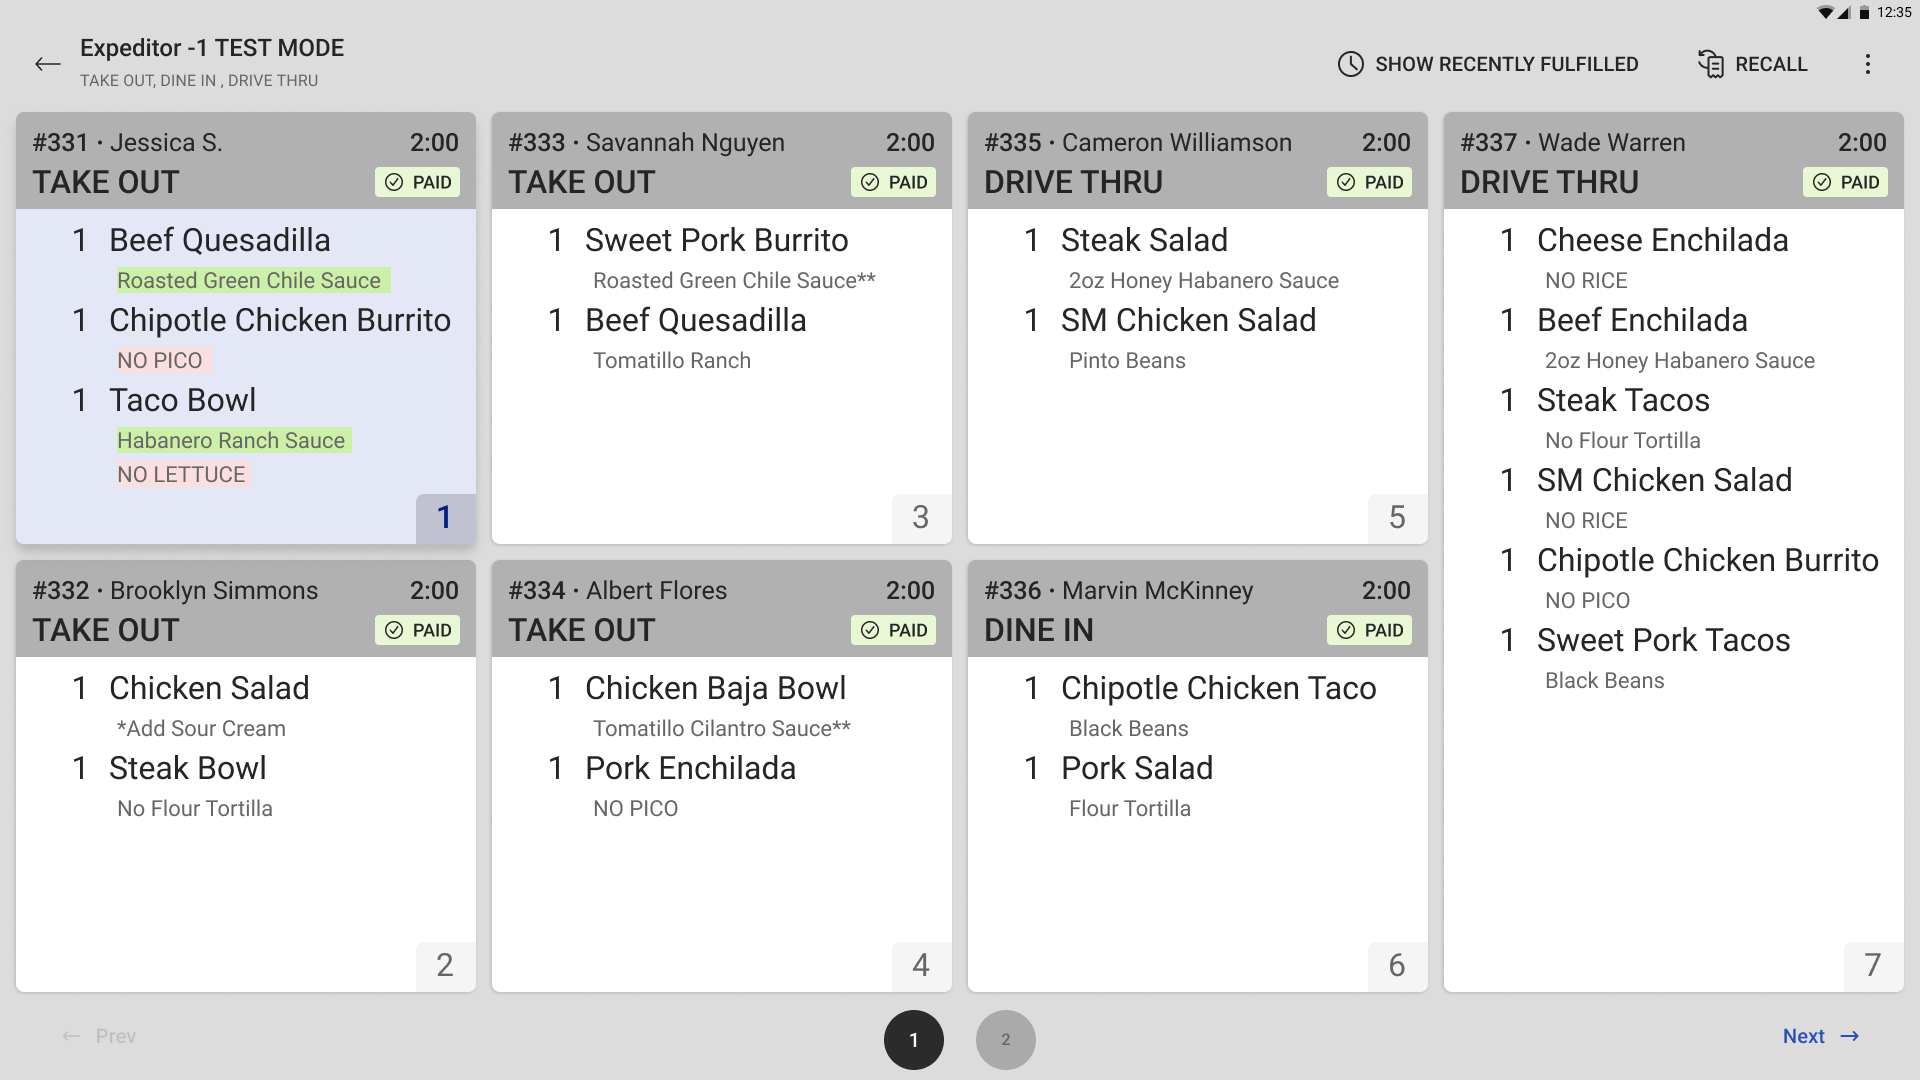
After the bump bar is connected, you can start using it to navigate the Kitchen Display System (KDS) device and perform various actions. When the bump bar is connected, the kitchen tickets include a bump bar number on the bottom right corner. The selected ticket is indicated by a darker shaded background for light mode, and a lighter shaded background for dark mode.
Here is an example of a KDS device with the bump bar connected, in light mode.
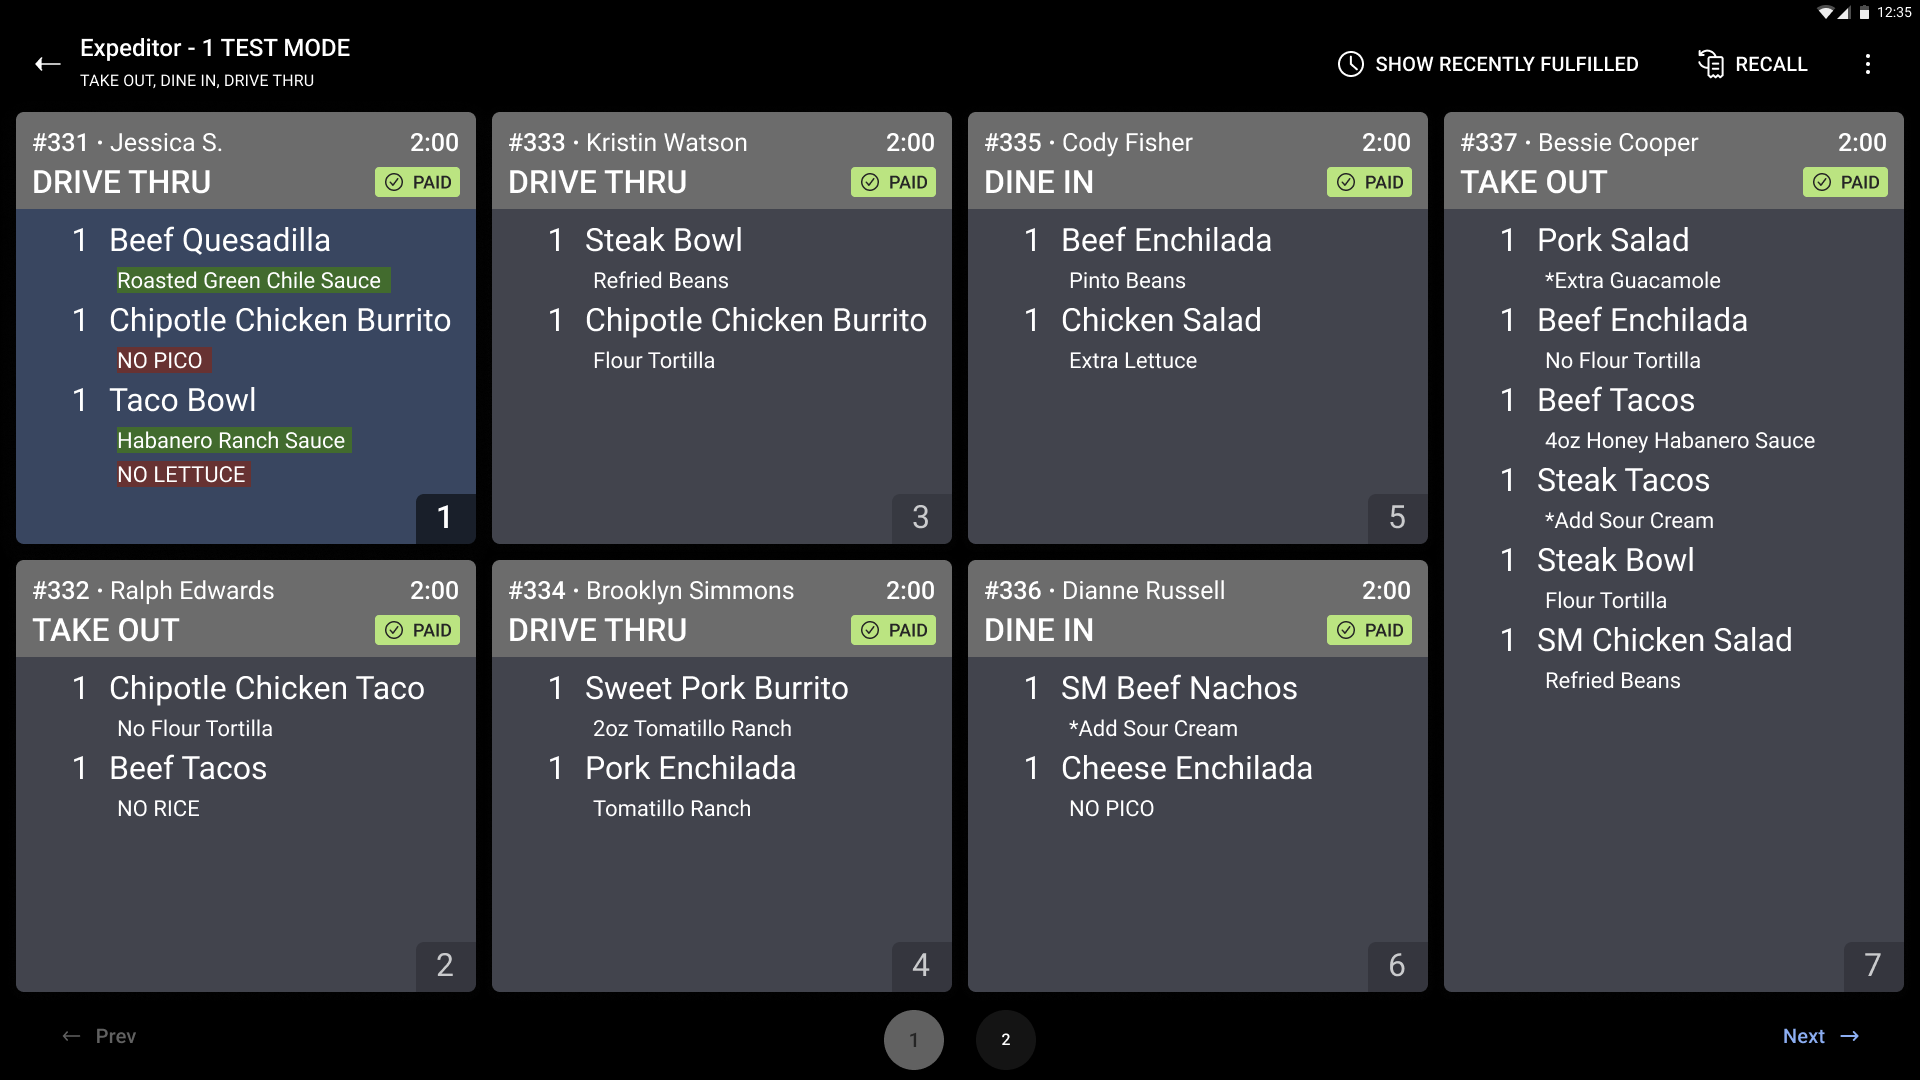
The ticket in focus (on the top left) is emphasized with a different background color.
Here is an example of the same KDS device with a bump bar connected, in dark mode.
Each ticket has a bump bar number in the bottom right corner. The bump bar number corresponds to the numbered buttons on the bump bar. Tickets are numbered from top to bottom, going left to right.
While the bump bar is connected, temporary messages appear on the bottom of the KDS device that reflect certain actions. The actions are:
-
Acknowledging a flashing ticket
-
Firing a ticket
-
Rushing a ticket
-
Printing a ticket
-
Fulfilling an item or ticket
-
Recalling a ticket
|
Note |
|
If you use the touchscreen while the bump bar is connected, the action messages still appear. |
You can navigate using the bump bar by:
-
Changing the ticket page
-
Changing the focus ticket by rotating through each ticket
-
Jumping to a specific ticket using the numbered buttons
-
Changing the focus of a selection on a ticket details or menu dialog
The ticket in focus is indicated by a darker shaded background for light mode, and a lighter shaded background for dark mode.
Here is an example of the KDS device, in light mode, with the top left ticket in focus.
Changing the page can be done using the page buttons on the bump bar. The page (arrow pointing left) button moves to the previous page of tickets, and changes the focus to the ticket in the top left. The page (arrow pointing right) button moves to the next page of tickets, and changes the focus to the ticket in the top left. The page buttons allow you to quickly move to the correct page of tickets.
If there are no previous and next pages, pressing the page (arrow pointing left) and page (arrow pointing right) buttons respectively has no effect.
Once you are on the correct page, you can use either the up and down buttons, or the numbered buttons (1-10) to reach the ticket.
The up button rotates through the tickets on the screen from bottom to top and right to left. The down button rotates through the tickets on the screen from top to bottom and left to right.
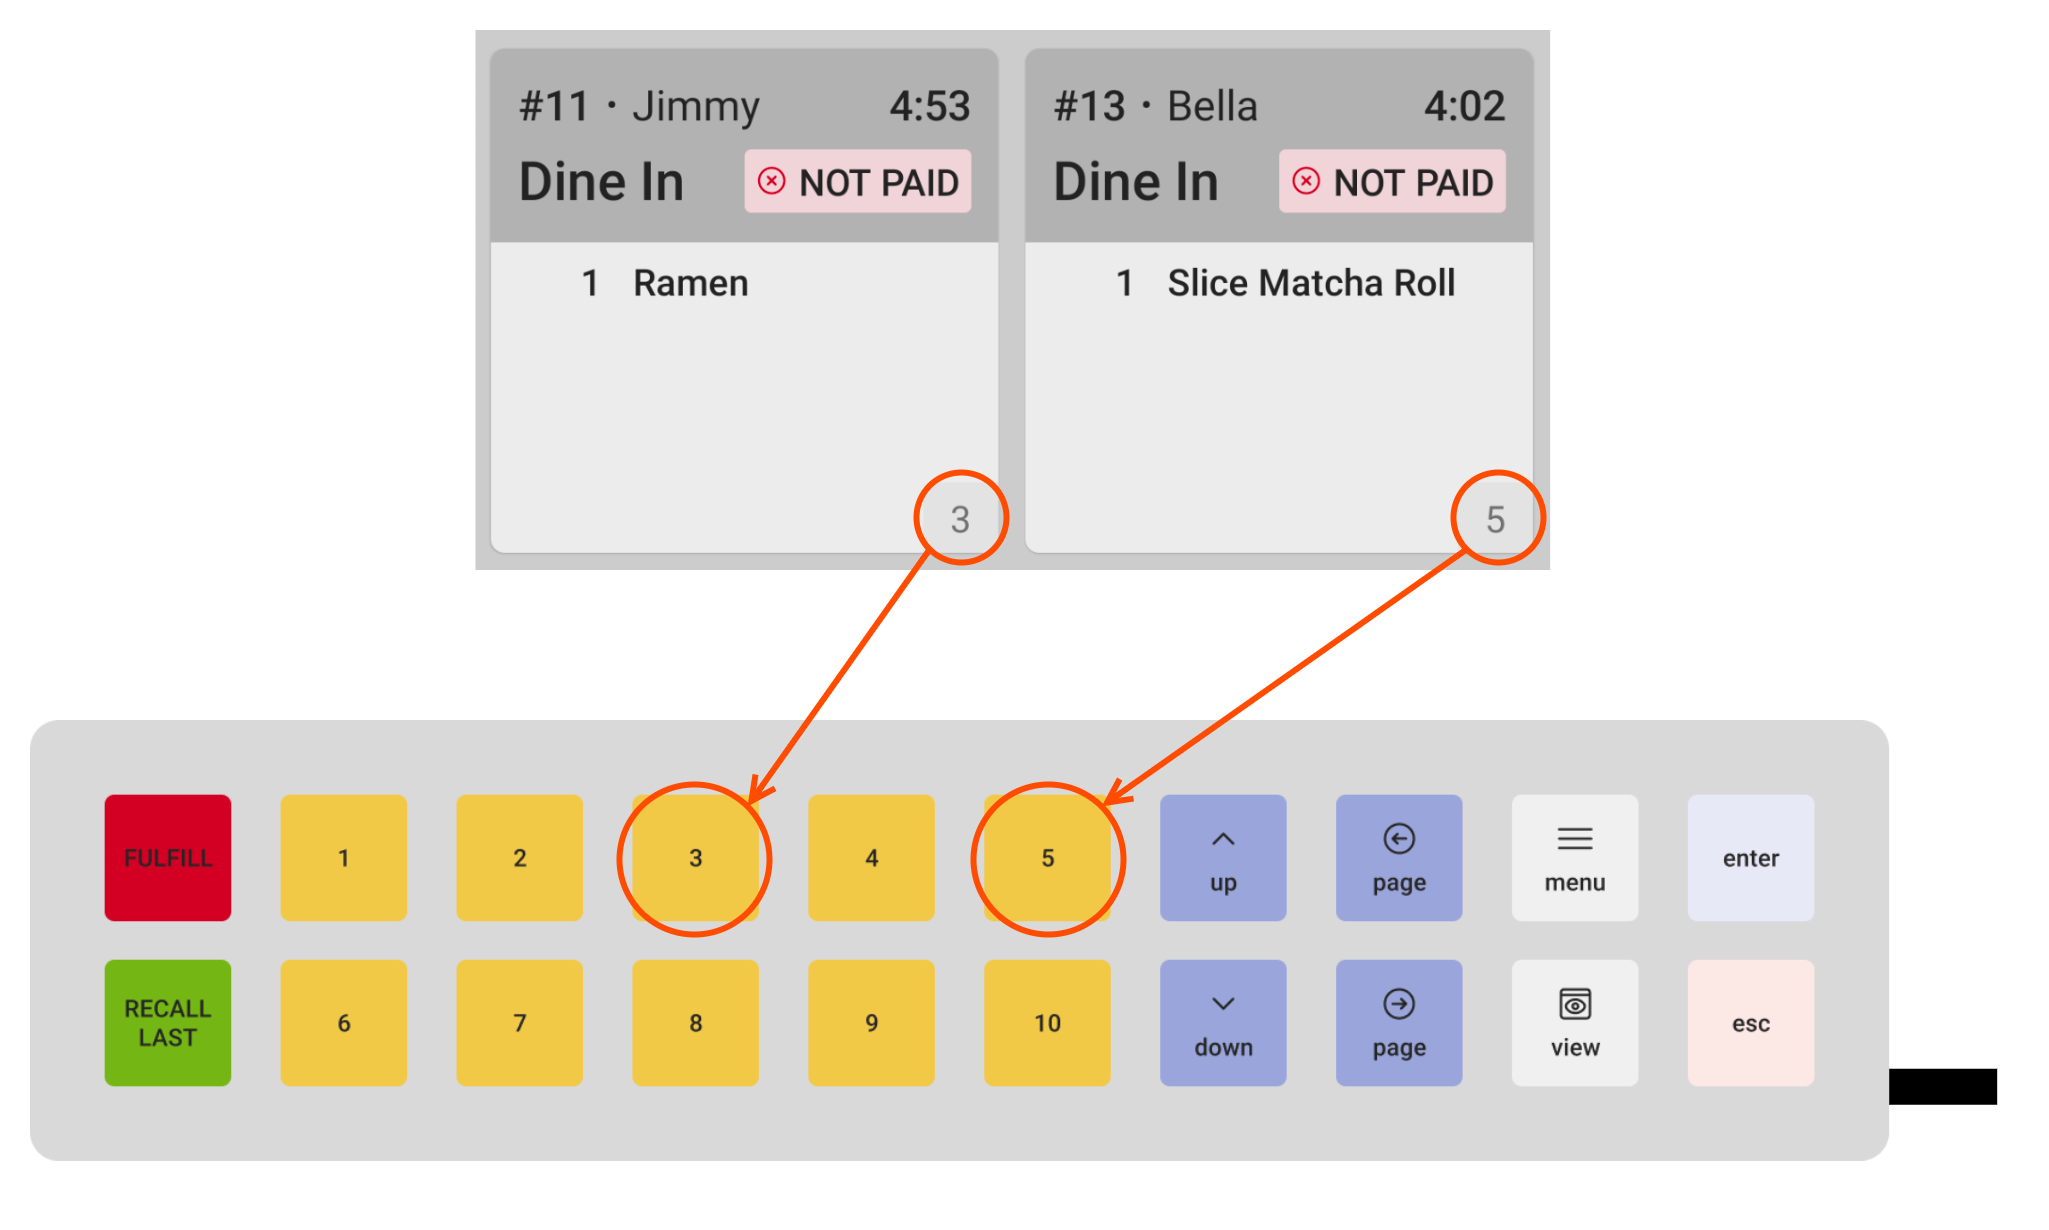
Alternatively to the up and down buttons, you can use the numbered buttons (1-10) to change the focus to a specific ticket. The numbered buttons (1-10), correspond to specific tickets on the KDS device. When you press a numbered button, the bump bar focus changes to the ticket with the corresponding bump bar number on the bottom right. Here is an example of a couple of tickets with bump bar numbers on the KDS device and the number buttons they correspond to on the bump bar.
If there is no ticket number that corresponds to a numbered button, pressing that button has no effect. Depending on how your KDS device is configured, there can be more than 10 tickets on the KDS screen. You must use the up and down buttons to interact with tickets that are not numbered.
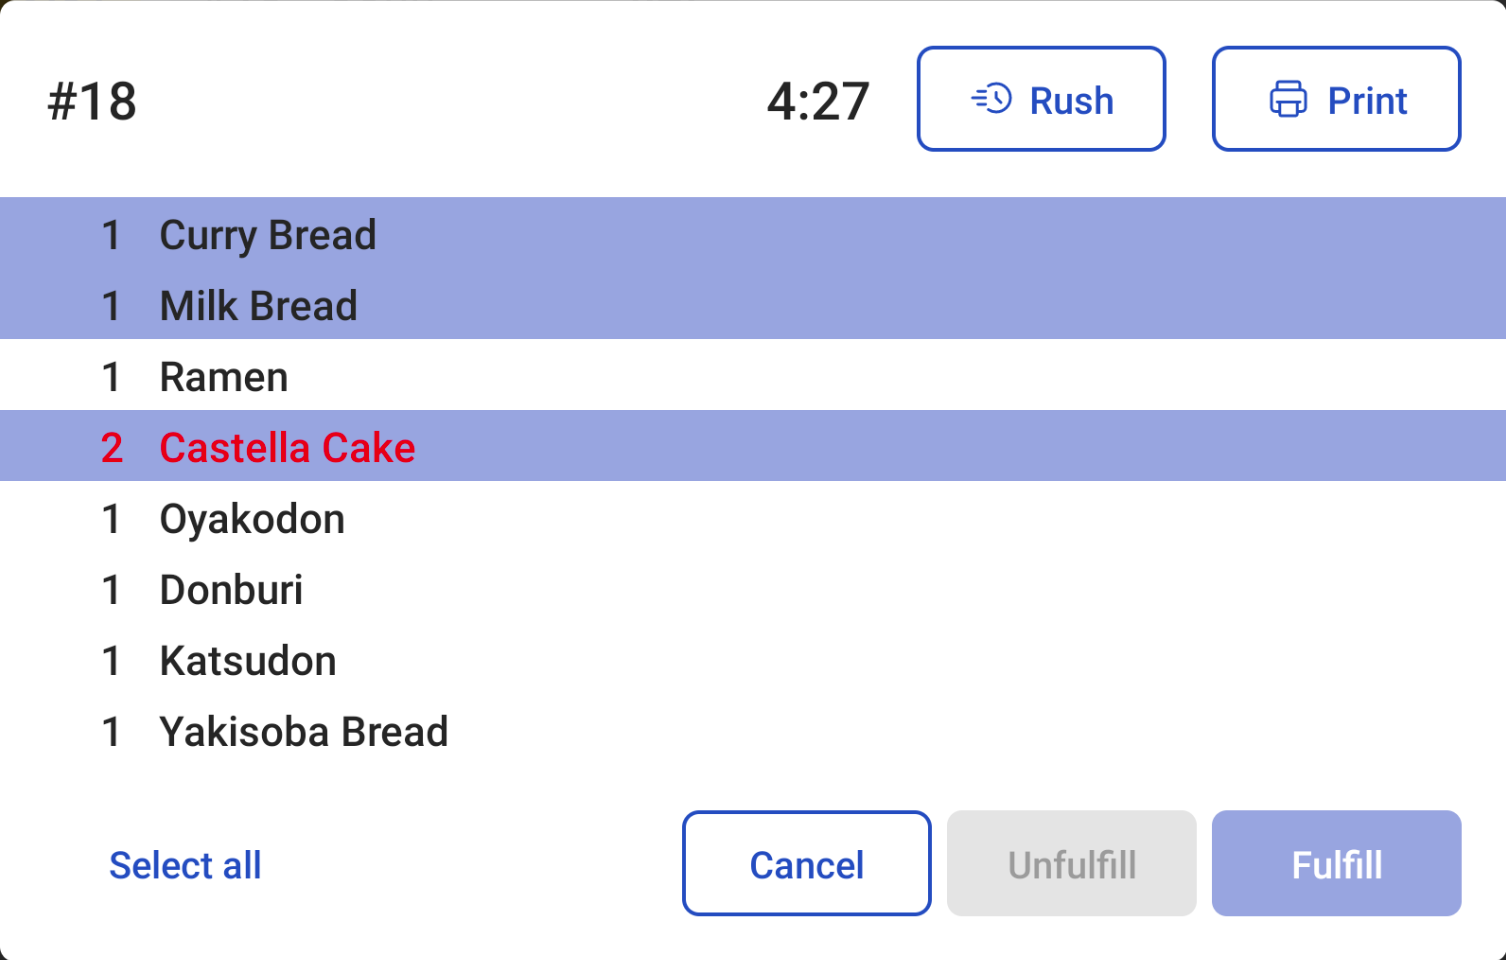
When viewing a ticket dialog, the up and down buttons rotate through the actions and items available. An option in focus is shaded differently while in focus. A selected item is shaded until the selection is removed. Here is an example of the ticket dialog with the Fulfill option in focus and several items selected.
If your restaurant configuration uses the Flash Changes setting, the ticket intermittently changes the color of the ticket header to indicate there are changes. You need to acknowledge a ticket to stop the flashing behavior.
To acknowledge a flashing ticket
-
Change the focus to the ticket you want to acknowledge. To do this, you can either:
-
Press the up and down buttons until the focus is on the desired ticket.
-
Press the numbered button that corresponds to the bump bar number on the bottom right corner of the ticket once.
The focus changes to the ticket you want to acknowledge.
-
-
Press the enter button once. The ticket stops flashing.
If you want to make a specific ticket a priority, you can choose to rush it, which moves the ticket to the top left of the KDS screen for all devices and marks it with RUSH.
|
Note |
|
You can only rush tickets from an expediter KDS device. |
To rush a ticket
-
Change the focus to the ticket you want to acknowledge. To do this, you can either:
-
Press the up and down buttons until the focus is on the desired ticket.
-
Press the numbered button that corresponds to the bump bar number on the bottom right corner of the ticket once.
The focus changes to the ticket you want to acknowledge.
-
-
To access the Rush option you can either:
-
Press the enter button. The ticket dialog opens.
-
Press the menu button. The ticket menu opens.
-
-
Use the up and down buttons to focus on the Rush option.
-
Press the enter button. The ticket dialog or menu closes and the ticket is marked with RUSH and moved to the top left of the screen.
If a kitchen printer is configured, you can choose to print specific tickets from your KDS device to your kitchen printer. For more information on configuring a kitchen printer, see Adding a kitchen printer.
|
Note |
|
If every ticket needs to be printed, consider using the Auto-print fulfilled tickets setting. |
To print a ticket
-
Change the focus to the ticket you want to acknowledge. To do this, you can either:
-
Press the up and down buttons until the focus is on the desired ticket.
-
Press the numbered button that corresponds to the bump bar number on the bottom right corner of the ticket once.
The focus changes to the ticket you want to acknowledge.
-
-
To access the Print option you can either:
-
Press the enter button. The ticket dialog opens.
-
Press the menu button. The ticket menu opens.
-
-
Use the up and down buttons to focus on the Print option.
-
Press the enter button. The Choose ticket/receipt type dialog opens.
-
Use the up and down buttons to focus on the type of ticket or receipt that you want to print. These options vary depending on your device and restaurant configurations.
-
Press the enter button. The ticket dialog or menu closes and the ticket is printed to the configured kitchen printer.
You can fulfill a ticket, which marks all items on the ticket as fulfilled. For more information on what happens when fulfilling at a prep station, see Understanding item fulfillment.
There are two ways to fulfill a ticket:
-
Press the numbered button that corresponds to the bump bar number on the bottom right corner of the ticket twice in quick succession.
-
Navigate to the ticket using the numbered or arrow keys and press the FULFILL button.
If your restaurant configuration enables the Fulfill Items setting, you can choose to fulfill individual items on a ticket instead of the entire ticket.
To fulfill an item or items
-
Change the focus to the ticket you want to acknowledge. To do this, you can either:
-
Press the up and down buttons until the focus is on the desired ticket.
-
Press the numbered button that corresponds to the bump bar number on the bottom right corner of the ticket once, if available.
The focus changes to the ticket you want to acknowledge.
-
-
Press the enter button. The ticket dialog opens.
-
Use the up and down buttons to focus on the item you want to fulfill.
-
Press the enter button to select the item. The shading of the item changes to indicate that it's selected.
Note
To remove the selection, focus on the item again and press the enter button. The shading of the item changes to indicate that it is no longer selected for fulfillment.
-
To fulfill the item or items, you can either:
-
Use the up and down buttons to focus on the Fulfill option, and then press the enter button. This option fulfills the selected items.
-
Press the FULFILL button on the bump bar. This option fulfills both selected items and the item in focus.
The ticket dialog closes and a green check mark appears next to the item, indicating it is fulfilled.
-
To show recently fulfilled tickets, press the view button on the bump bar. This displays both unfulfilled and recently fulfilled tickets. Press the view button again to hide recently fulfilled tickets. Here is an example of a page that shows fulfilled and unfulfilled tickets.
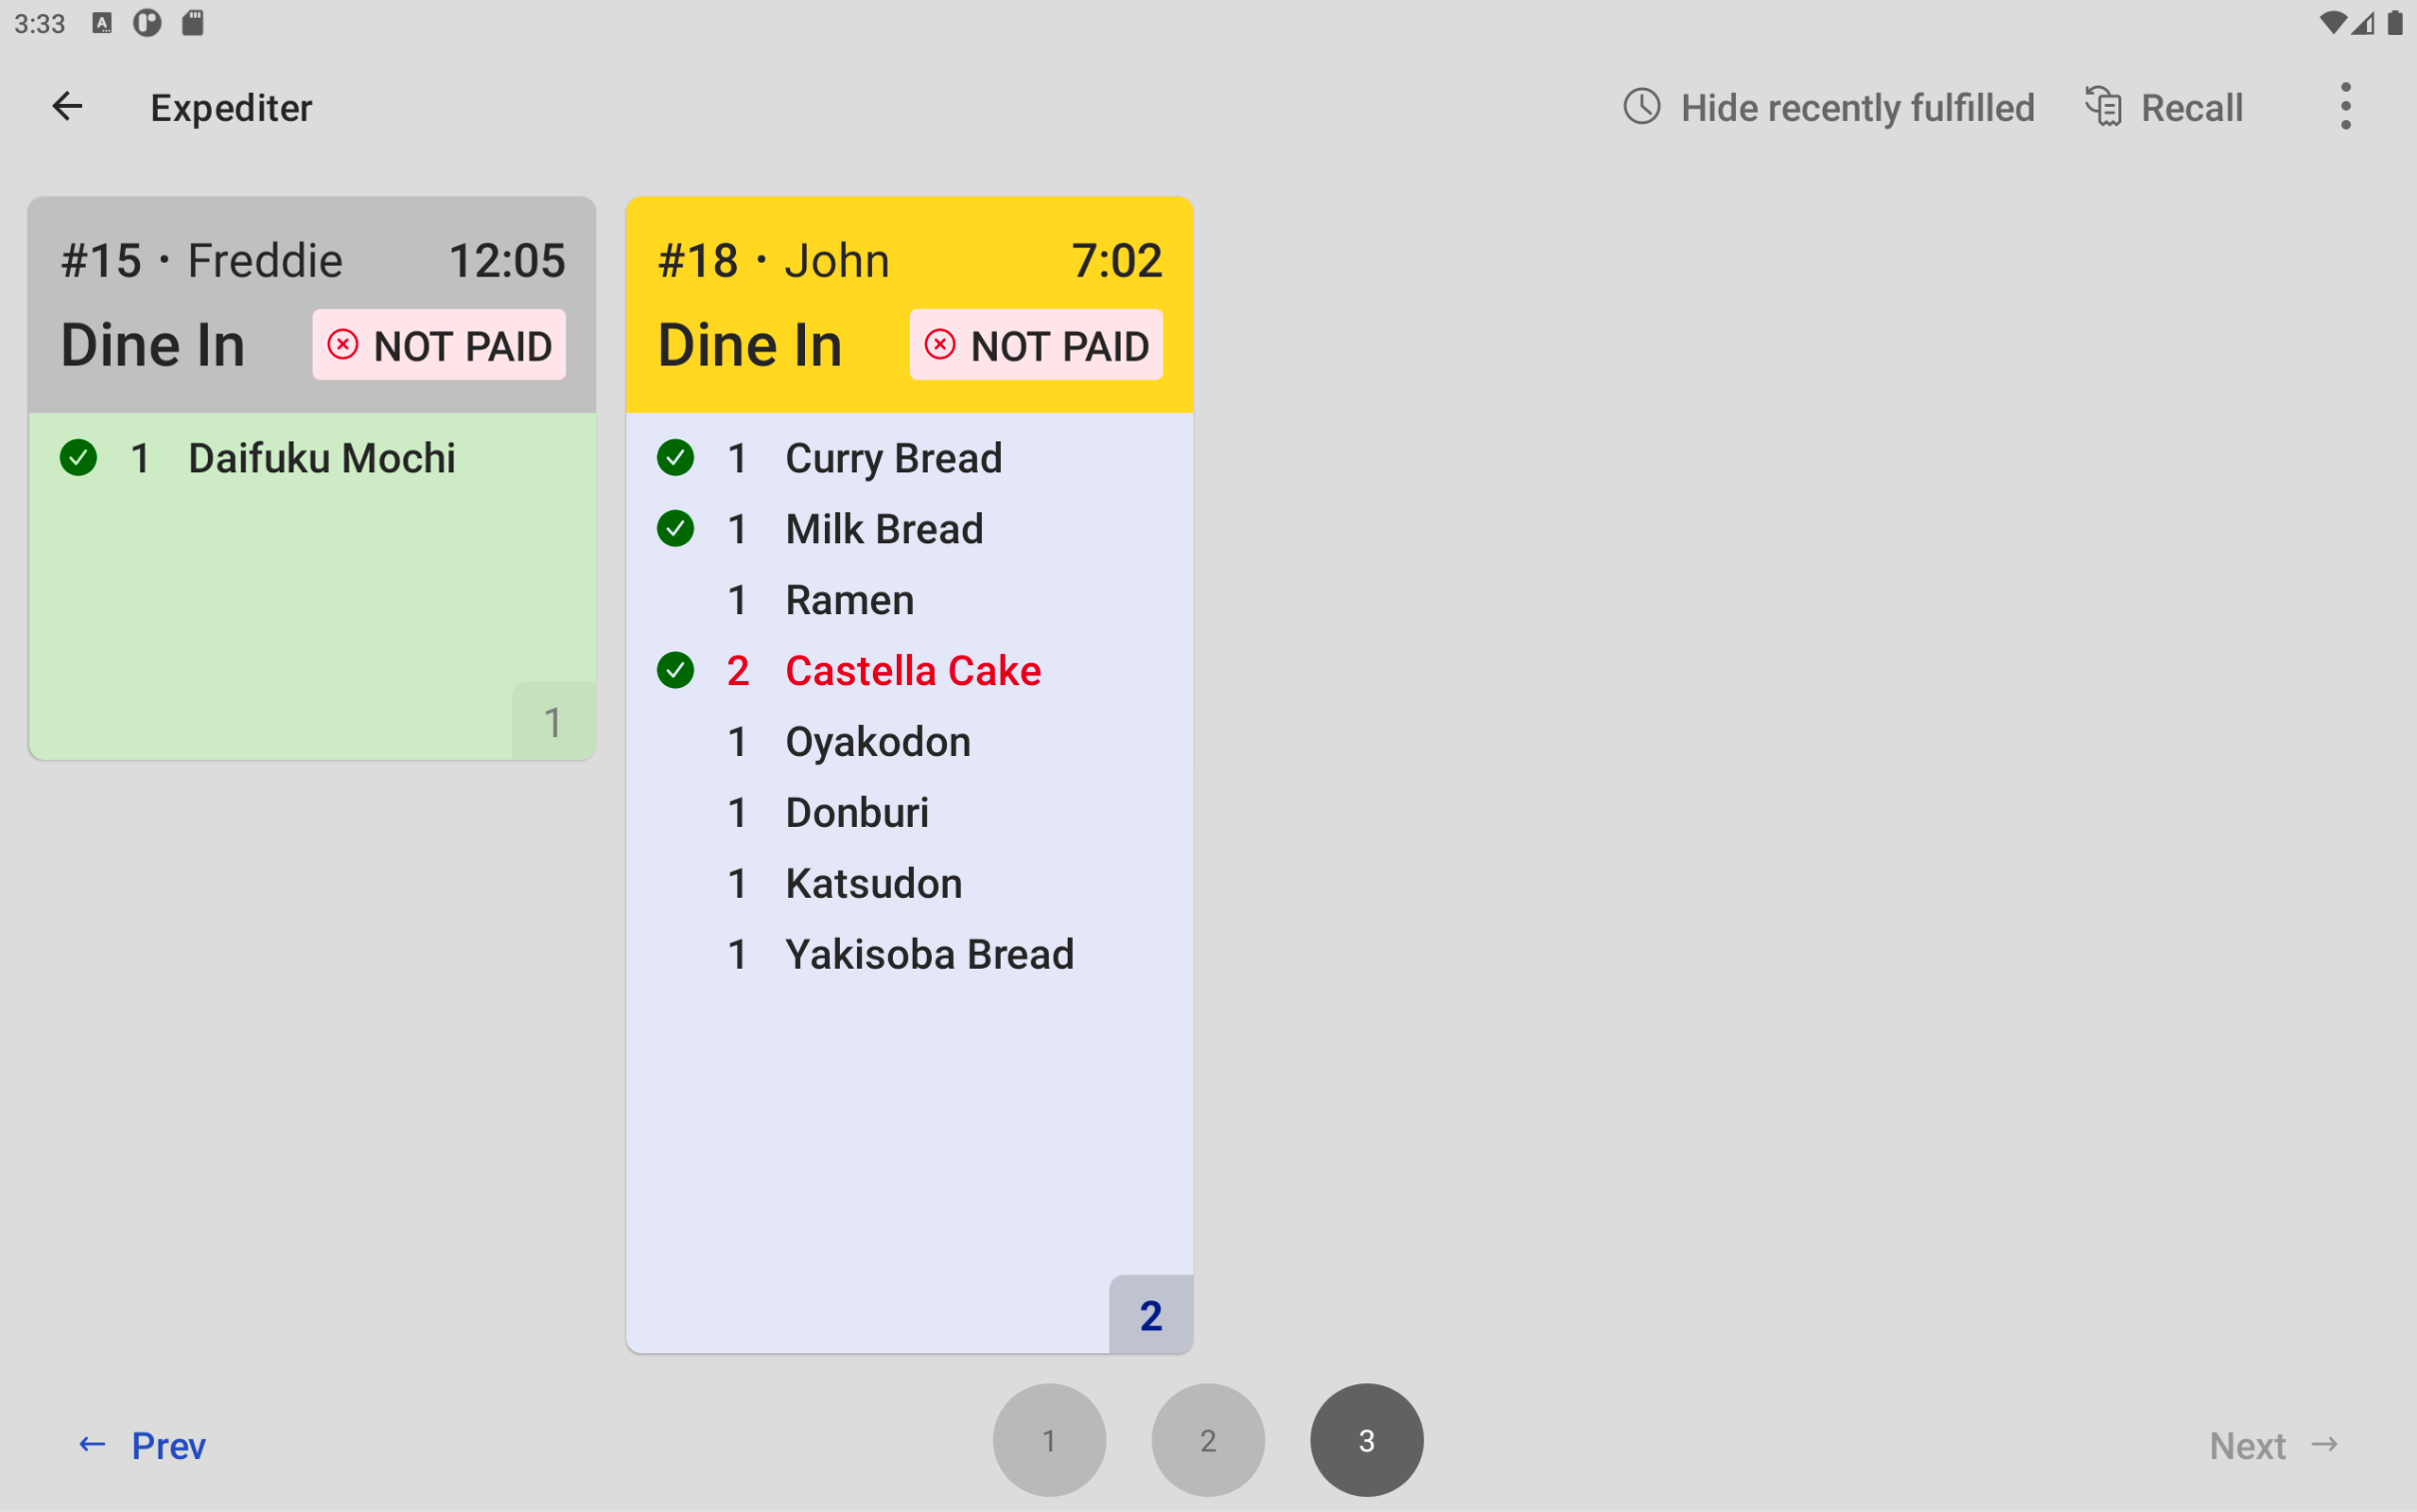
The fulfilled ticket is on the left and the unfulfilled ticket is on the right.
You can choose to unfulfill or recall a fulfilled item on a ticket so that the kitchen works on the item again.
|
Note |
|
You can only unfulfill items currently marked as fulfilled. |
To unfulfill an item or items
-
Change the focus to the ticket with the fulfilled item you want to unfulfill. To do this, you can either:
-
Press the up and down buttons until the focus is on the desired ticket.
-
Press the numbered button that corresponds to the bump bar number on the bottom right corner of the ticket once.
The focus changes to the ticket you want to acknowledge.
-
-
Press the enter button. The ticket dialog opens.
-
Use the up and down buttons to focus on the fulfilled item you want to unfulfill.
-
Press the enter button to select the item. The shading of the item changes to indicate that it's selected.
Note
To remove the selection, focus on the item again and press the enter button. The shading of the item changes to indicate that it is no longer selected for unfulfillment.
-
To unfulfill the item or items, you can either:
-
Use the up and down buttons to focus on the Unfulfill option, and then press the enter button.
Note
When you select an unfulfilled item, the Unfulfill option is unavailable. Only fulfilled items can be unfulfilled.
-
Press the RECALL LAST button on the bump bar. This option unfulfills both selected items and the item in focus.
Note
If you select an unfulfilled item or have one in focus, pressing the RECALL LAST button has no effect. Only fulfilled items can be unfulfilled.
The ticket dialog closes. The changes to the ticket depend on the fulfillment status of the ticket and items:
-
If the entire ticket was fulfilled, the ticket is marked as recalled, moved from recently fulfilled, and green check marks next to the fulfilled item or items disappear, indicating it is unfulfilled.
-
If a single item on a ticket is unfulfilled, the green check marks next to the fulfilled item or items disappear, indicating the item is unfulfilled.
-
To recall the ticket most recently fulfilled on a device, press the RECALL LAST button. For more information about recall behavior, see Redisplaying tickets with recall and unfulfill.