The kitchen display system (KDS) allows you to use screens instead of printed tickets to route and display orders in the kitchen. Using KDS devices allows for better communication between back of house and front of house when the food is ready for guests, and transparency on which parts of an order are completed. If changes are made on Toast POS devices in the front of house, those changes appear on KDS devices in the kitchen in real time. KDS devices also provide visual and auditory settings to inform kitchen employees about order details. These settings include:
-
Sound notifications when there is a new ticket, a ticket is ready to be fulfilled at the expediter KDS device, an item is changed, and an item is voided.
-
Different ticket heading colors based on the age of the ticket.
-
A flash animation to indicate a ticket is new or was changed.
KDS devices are used in the kitchen as either an expediter or prep station KDS device. An expediter device serves as the intermediary place between the front of house and back of house to inform the front of house that an order is ready. A prep station device displays items to prepare at specific preparation areas. You can configure your restaurant to use both expediter and prep station KDS devices, or only expediter or prep station KDS devices.
The following diagram shows how an order might be routed to different KDS devices for a restaurant that uses expediter and prep station KDS devices.
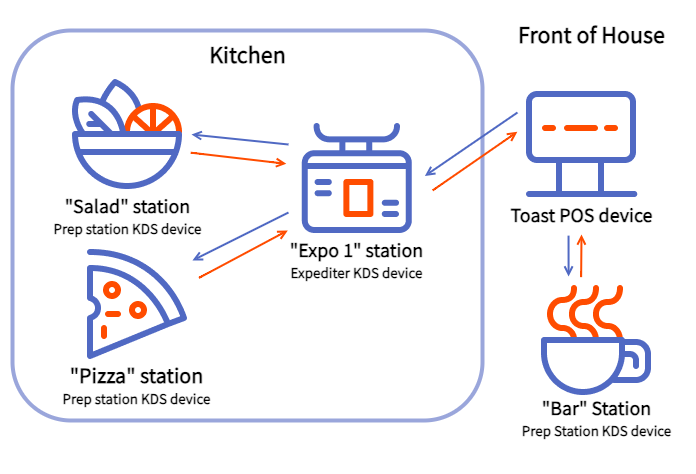
For this example, fired items are sent to both the expediter KDS device and the appropriate prep station KDS devices. When all items are marked as fulfilled at the prep station, the ticket turns green on the expediter KDS device, indicating that all items are ready. Once the items are physically at the expediter station, the ticket is marked as fulfilled. If you have notifications configured to appear when tickets are fulfilled, the Toast POS device that placed the order initially receives a notification. In this case, the prep stations are configured to send items and tickets to both prep stations and expediter stations, and the kitchen uses a single-level expediter. You can also configure a prep station to not send fulfilled items and tickets to the expediter. For example, the Bar prep station is not in the kitchen, so it does not need to send fulfilled items to the expediter KDS device located in the kitchen.
The following diagram shows how an order might be routed to different KDS devices for a restaurant that uses only expediter KDS devices.
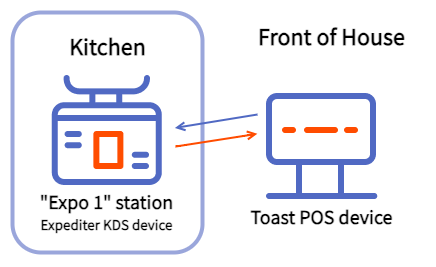
For this example, fired items are sent to the expediter KDS device. When individual items are marked as fulfilled on the expediter KDS screen, a green check appears next to the item. Once all items on a ticket are marked as fulfilled, the ticket disappears. If you have notifications configured to appear when tickets are fulfilled, the Toast POS device that placed the order initially receives a notification.
You can choose to use two-level expediter fulfillment and enable whether tickets must be at one expediter before the next one with that two-level expediter fulfillment. For example, to be marked as ready, the ticket needs to be fulfilled at the first expediter before being marked as fulfilled at the second expediter.
The following diagram shows how an order might be routed to different KDS devices for a restaurant that uses only prep station KDS devices.
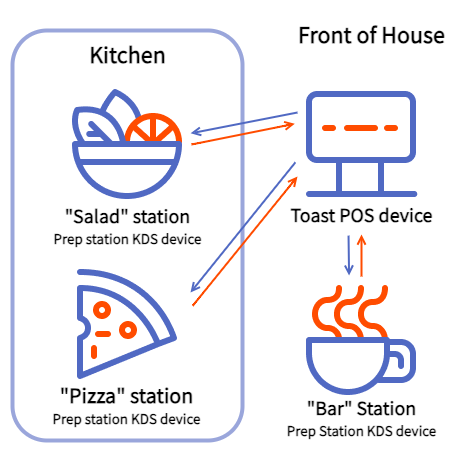
For this example, fired items are sent to the appropriate prep station KDS devices. When individual items are marked as fulfilled on the prep station screen, a green check appears next to the item. Once all items on a ticket are marked as fulfilled, the ticket disappears. If the prep station is configured to not send items and tickets to the expediter and you have notifications configured to appear when tickets are fulfilled, the Toast POS device that placed the order initially receives a notification.
You can also choose to send items to multiple prep stations. For more information, see Multiple prep stations for an item.
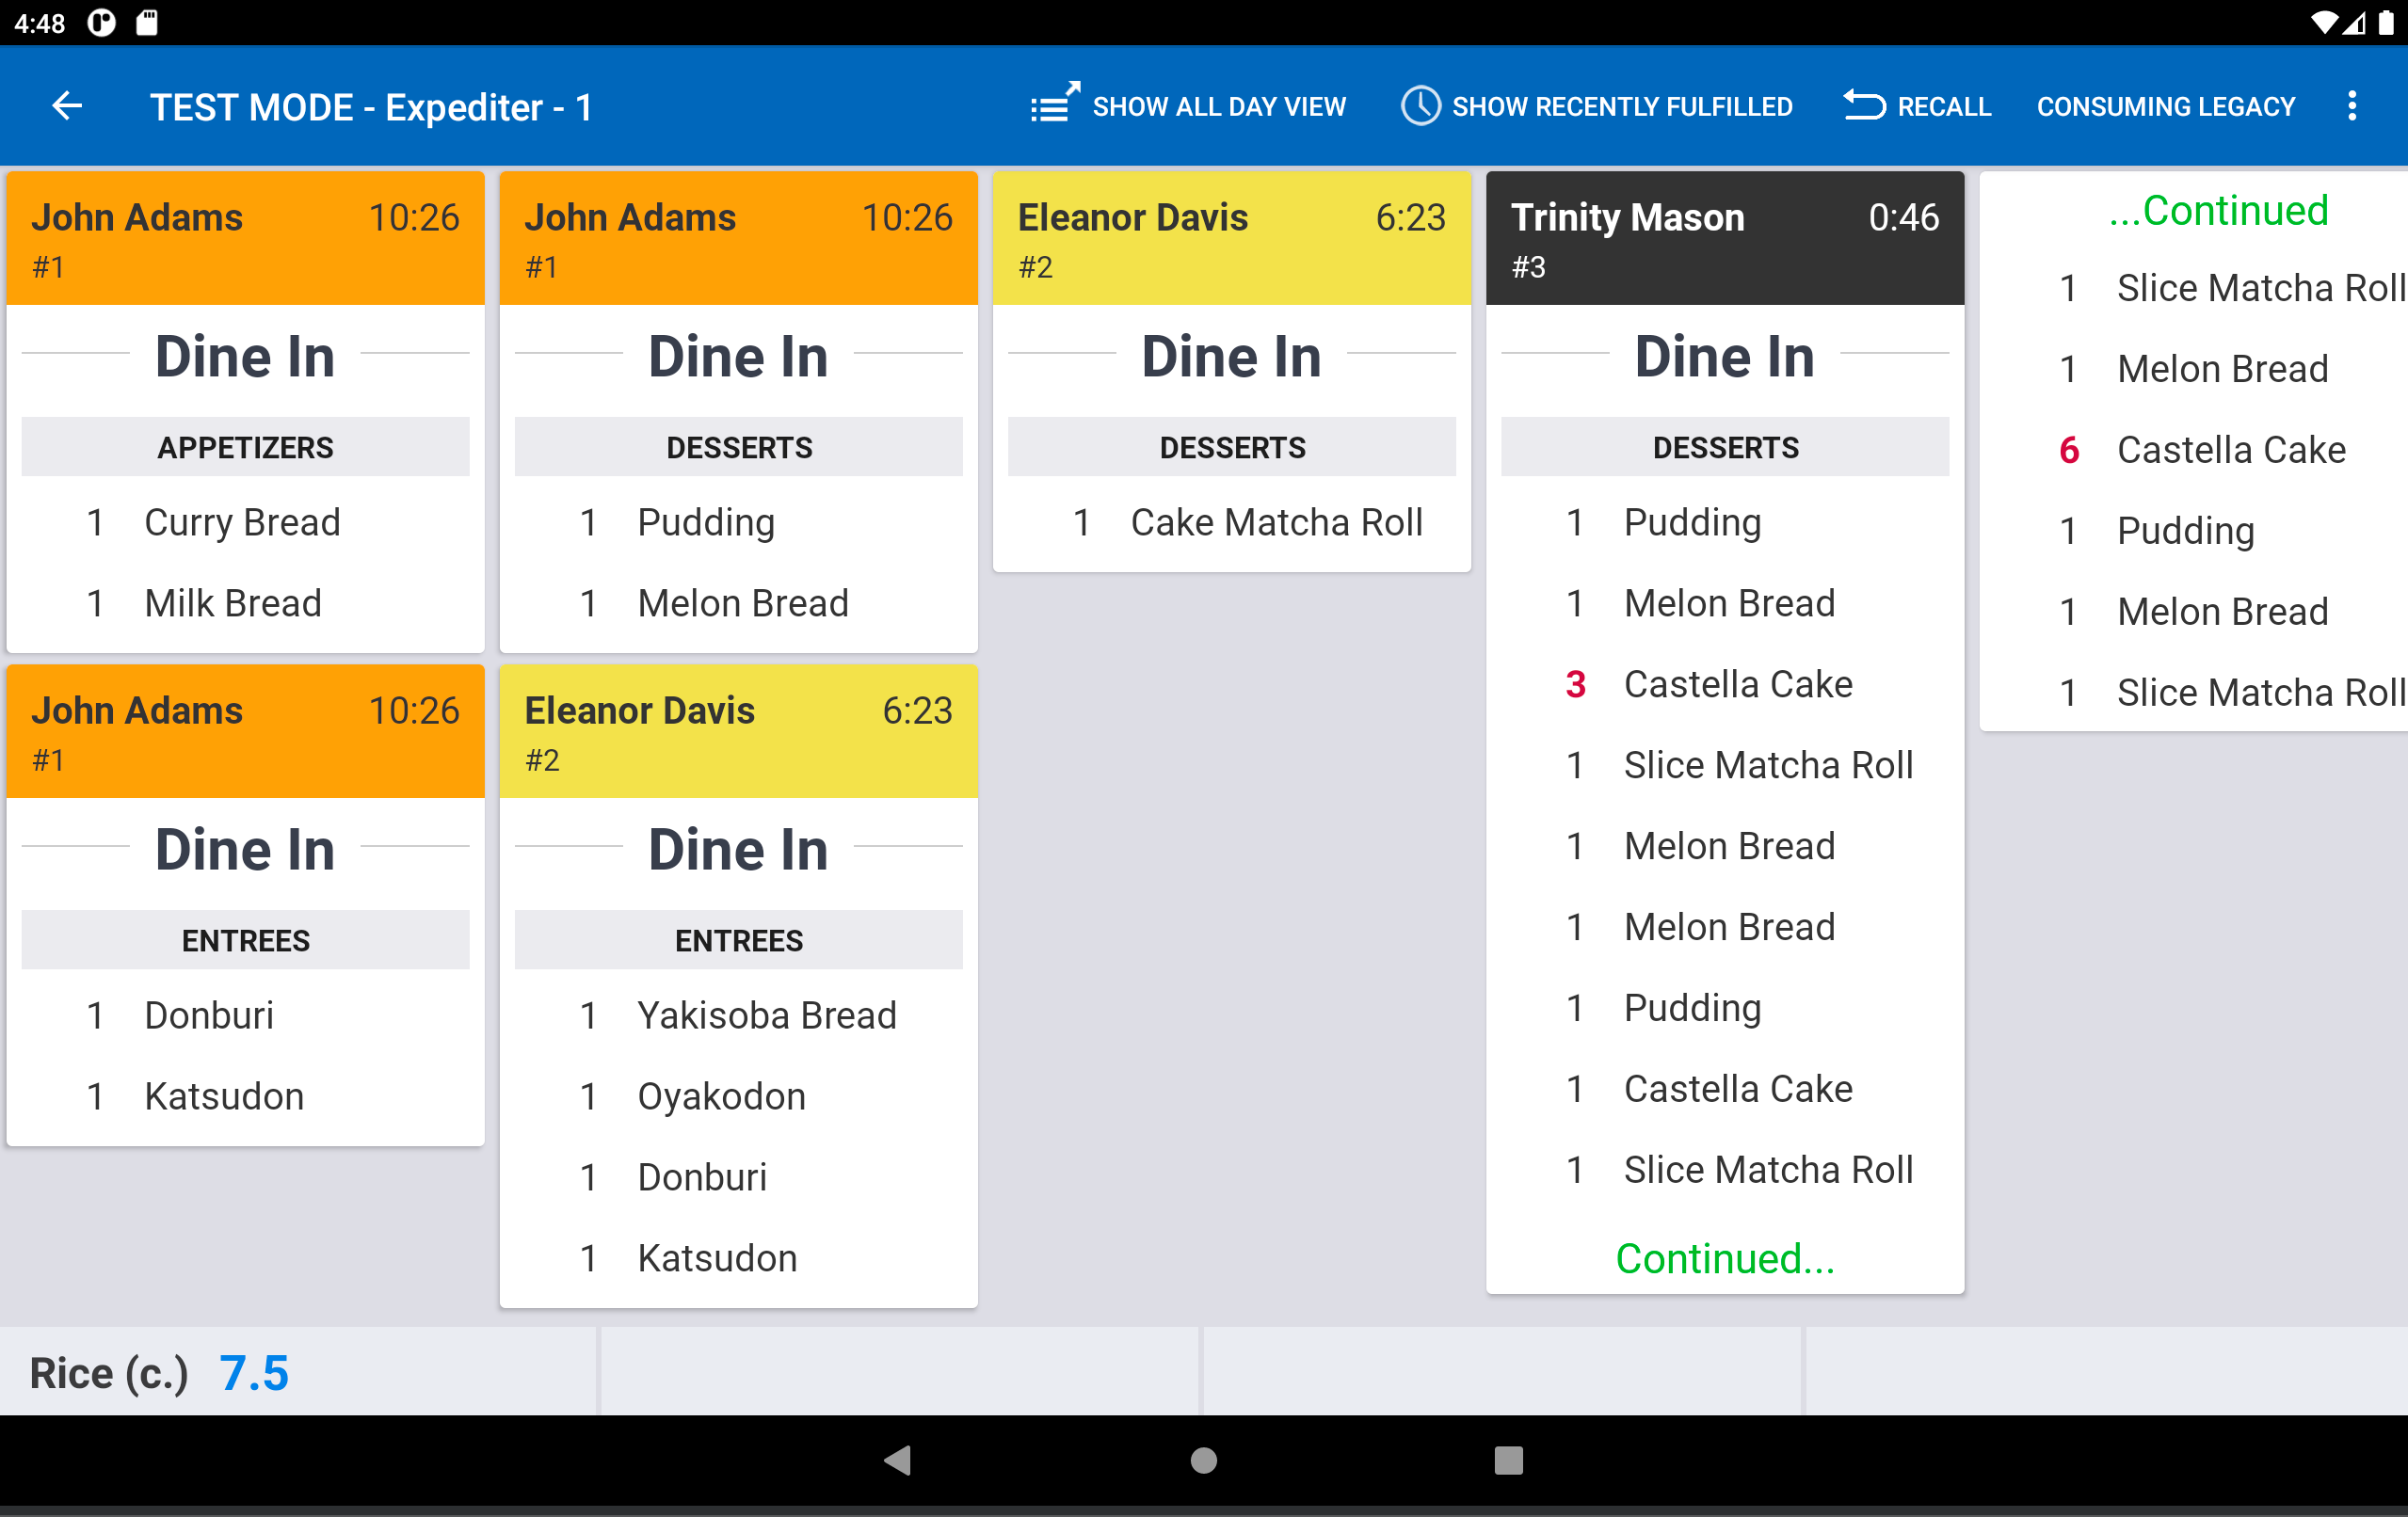
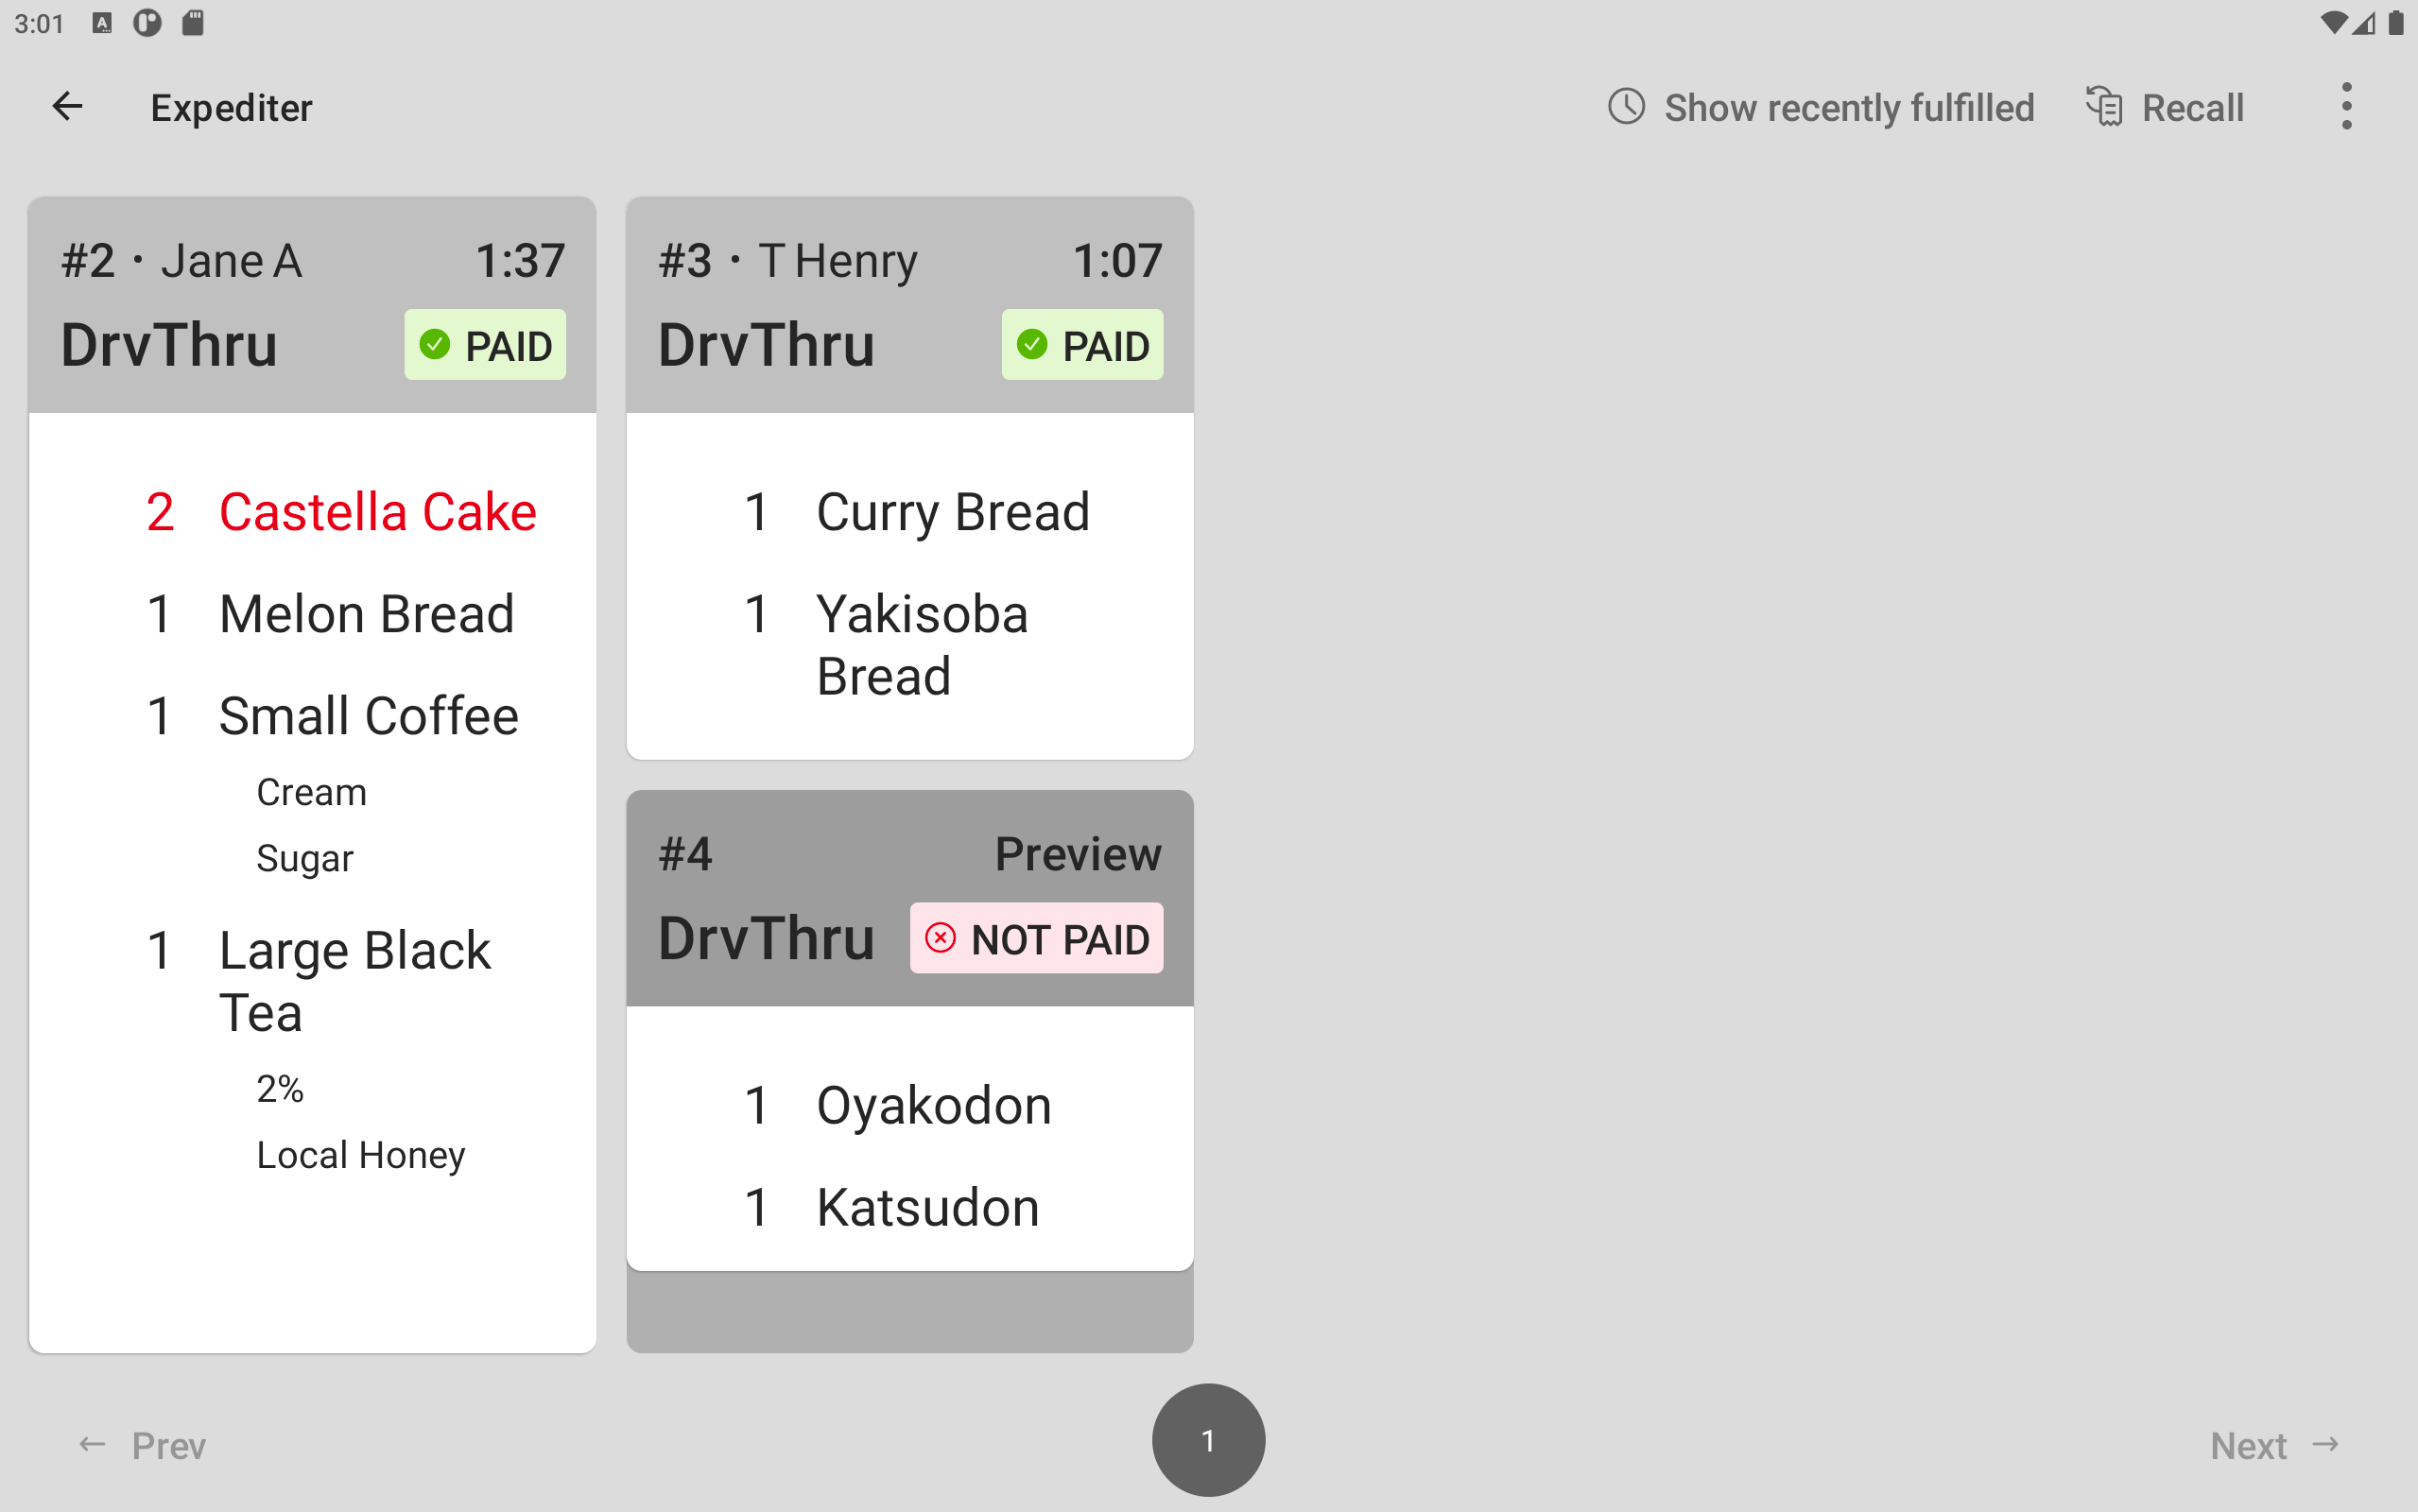
Here is an example of the expediter KDS device interface, with multiple tickets.
|
Note |
|
Though the KDS device functions differently as either an expediter or prep station, the screen layout remains the same. |
At the top-left of the screen, the arrow icon returns you to the Toast home page. On the top-right, there are options to show the all day view, show recently fulfilled tickets, and recalling the last fulfilled ticket. If there is not enough space at the top to display these options, they can appear in the overflow menu. The overflow menu, represented by three vertically stacked dots, provides additional actions and shortcuts.
-
Language: This option opens a dialog that allows you to change the language of the KDS user interface.
-
Switch to Legacy View: This option changes the KDS from using new KDS view to legacy KDS view.
Note
If you are using legacy KDS view, there is a Try New KDS (Grid View) option that changes the KDS device from legacy KDS view to new KDS view.
-
Change ticket size: This option changes the ticket size and layout used by new KDS view. For more information, see Layout options. This is not available for legacy KDS view. Legacy KDS view uses the Text Size option to change the text size used by tickets.
Note
The Change ticket size option will be deprecated. Instead, use the KDS appearance pane.
-
KDS appearance: This option opens the KDS appearance pane for new KDS view, which allows you to choose the ticket layout, text size, and display theme. For more information, see KDS appearance pane.
Note
This feature is in limited release.
-
Device Setup: This option opens the Device Setup screen on a POS device. This option is not limited to KDS mode.
-
Switch user: This option opens the passcode screen, allowing a new employee to enter a passcode and open the Toast POS app. This option is not limited to KDS mode.
-
Device Status: This option opens a dialog that displays device information, including status for connectivity and services. This option is not limited to KDS mode.
The middle of the screen is the area where tickets display. Tickets appear at the top left and move downward and to the right. If a ticket is longer than the screen, the ticket continues to the next column. Ticket size is not standard, and changes to fit the number of items on the ticket. If the amount of tickets exceeds the screen size, you can swipe right and left on the screen to see tickets beyond the current view.
At the bottom of the screen, there are production items, if configured. For more information about production items, see About production items.
|
Note |
|
Grid view for KDS will now be referred to as the new KDS view. Dynamic view for KDS will now be referred to as legacy KDS view. |
New KDS view is the next iteration of Toast's kitchen display system, with a new design and features that set it apart from legacy KDS view:
-
KDS appearance pane: Provides a way to choose and personalize the layout, select a text size, and choose a display theme from the overflow menu (the ⋮ icon) on the KDS device.
Note
This feature is in limited release.
-
Multiple layouts: In addition to a dynamic layout, provides a grid layout option for kitchen tickets, which sets a maximum number of tickets on a screen in a grid pattern.
-
Preview tickets: Provides kitchen employees a preview of upcoming tickets as items are added to an order.
-
Pagination: Indicates how many pages of tickets exist and can be tapped to quickly move to a specific page.
-
Payment status: Displays whether the order was paid or unpaid.
-
Dark mode: A color scheme for the screen that is more optimal for low light or prolonged screen use.
-
Assembly lines: Creates a sequence of prep stations for an item.
-
Load balancing: Divides prep station tickets between multiple prep station KDS devices with the same prep station assigned.
-
Partial fulfillment indicator: A yellow dot icon indicating that the item was fulfilled by at least one prep station.
-
Food runner fulfillment: Individual items can be marked as fulfilled on expediter KDS devices. If already fulfilled at the previous level (prep station KDS devices for one expediter and the first level expediter for two-level fulfillment), fulfillment of an item on an expediter ticket uses a double check mark.
-
Viewing recipes: Adds a recipe to a menu item that can be viewed on KDS devices.
Note
This feature is in limited release.
|
Important |
|
New KDS view is only compatible with the local data synchronization method. This local sync method allows for offline mode using local sync. For more information on how local sync works, see Offline mode with local sync. |
Here is an example of the new KDS view on an expediter KDS device:
At the top-left of the screen, the arrow icon returns you to the Toast POS home screen. On the other side, there are options to show all day view, recently fulfilled tickets, and to recall the last fulfilled ticket. These options may be included in the overflow menu, depending on the screen size of your KDS device.
The overflow menu (the ⋮ icon) options includes:
-
Language: Opens the KDS language dialog. This dialog allows you to change the language used in the user interface for KDS mode.
-
Change ticket size: Opens the Change ticket size dialog. This dialog allows you to change the size and maximum number of tickets shown on the screen for the grid layout or to change to the dynamic layout.
-
KDS appearance: Opens the KDS appearance pane, which allows you to choose the ticket layout, text size, and display theme. For more information, see KDS appearance pane.
Note
This feature is in limited release.
-
Device Setup: Opens the Device Setup page.
-
Switch user: Opens the POS passcode screen.
-
Device Status: Opens a dialog showing the device connection and service statuses.
The middle of the screen is the ticket area.
The bottom of the screen is for navigation and page indicators. For more information, see Pagination.
|
Note |
|
The Android navigation bar is hidden on new KDS view to maximize screen space. Swipe upward from the bottom of the screen to reveal it. |
|
Note |
|
This feature is in limited release and will replace the Change ticket size option on the overflow menu. |
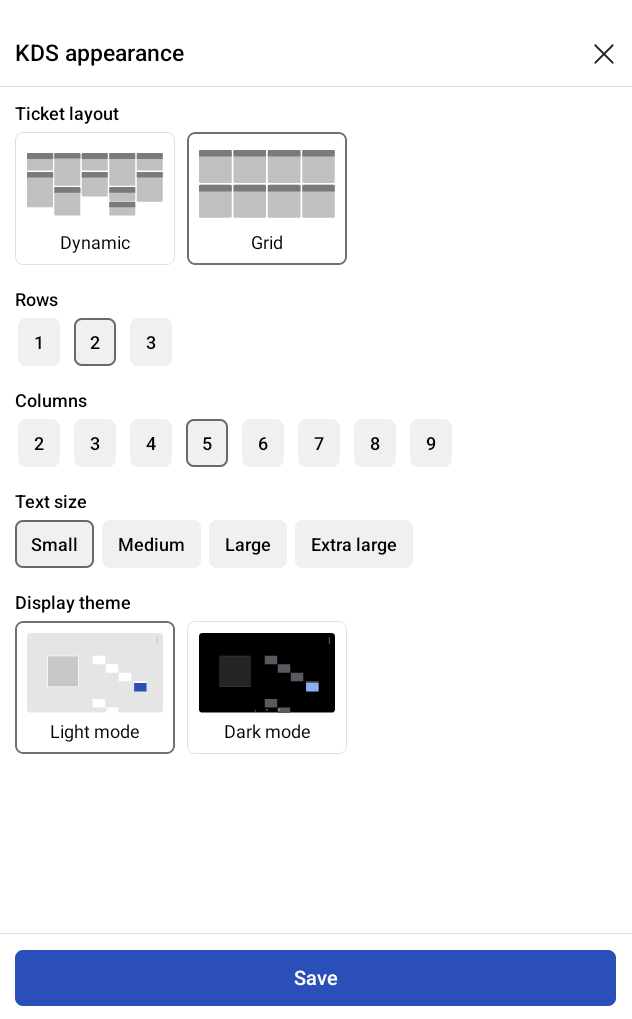
You can use the KDS appearance pane to change the appearance of your KDS device without leaving the screen. On the KDS appearance pane, you can:
-
Choose the ticket layout.
-
Choose the maximum number of rows of tickets on a screen. This is only available if you choose the grid layout.
-
Choose the maximum number of columns of tickets on a screen.
-
Choose the text size used by the tickets.
-
Choose the display theme.
Note
This changes the display theme for the device, not just KDS mode.
To customize the appearance of your KDS device
-
From the Kitchen Display System screen, select the overflow menu (the ⋮ icon) on the top right and select KDS appearance. The KDS appearance pane opens.
-
Choose a Ticket layout:
-
Dynamic: This uses dynamically-sized tickets that change according to the number of items on the ticket.
-
Grid: This uses a set number of spaces that are used for tickets. Longer tickets can include multiple spaces.
-
-
If you selected Grid, choose the number of Rows. This sets the number of rows of tickets you see on the KDS device.
The number of rows you can choose from depends on the size of your device.
Note
The Rows option is only available for the Grid ticket layout.
-
Choose the number of Columns. This sets the number of columns of tickets you see on the KDS device when the device is in landscape orientation.
Note
When the device is in portrait orientation, the number of columns determines the number of rows. For example, if you set Columns to 3, in landscape orientation you have three columns and in portrait orientation you have three rows. Changing the Rows setting has no effect while in portrait orientation.
The number of columns you can choose from depends on the size of your device.
-
Choose a Text size. This sets the text size used by KDS tickets.
You can choose Small, Medium, Large, or Extra large.
-
Choose a Display theme. This sets the colors used by the user interface.
This can be Light mode or Dark mode. For more information, see Dark mode.
-
Select Save. Your changes are saved and the appearance of your KDS device screen updates to reflect your choices.
|
Note |
|
New accounts are configured to use new KDS view automatically. You can change the view to legacy KDS view using the Device Setup screen. |
When you initially set up your KDS device, you can choose legacy KDS view (Legacy View) or new KDS view (New Grid View). This sets the default kitchen view for your Toast POS device. You can change the view by using the Try New KDS (Grid View) option at the top of the legacy KDS view screen and selecting the Try New KDS (Grid View) button from the dialog, or from the Device Setup screen.
|
Note |
|
When you switch from legacy KDS view to new KDS view using the Device Setup screen, you are prompted to select the ticket sizing. |
To change the KDS view using the Device Setup screen
-
Go to the Device Setup screen. You can either:
-
From the Toast POS home screen, navigate to the Setup section and select Device Setup.
-
From the Kitchen Display System mode screen, select the overflow menu (the ⋮ icon) on the top right and select Device Setup.
The Device Setup screen opens.
-
-
Select KDS View.
-
Choose Legacy View or New Grid View.
-
Select Save. The Device Setup screen appears.
There are two layout options for new KDS view:
-
Dynamic: This layout is the classic layout, where the size of tickets adjusts according to the number of items.
-
Grid: This layout divides the screen into a number of rows and columns, forming a grid. A ticket fills at least one of the grid spaces, and combines with additional spaces depending on the number of items on the ticket.
|
Note |
|
The layout options for new KDS view are configured at the device-level. For example, if you want two KDS devices to use a different layout, you need to configure each device. |
When using the grid layout, the first ticket fills the top-left grid space and the next ticket fills the grid space below it. Once that grid column is filled, tickets continue to be added to the next column and move downward. Here is an example of the path tickets added to the grid layout take:
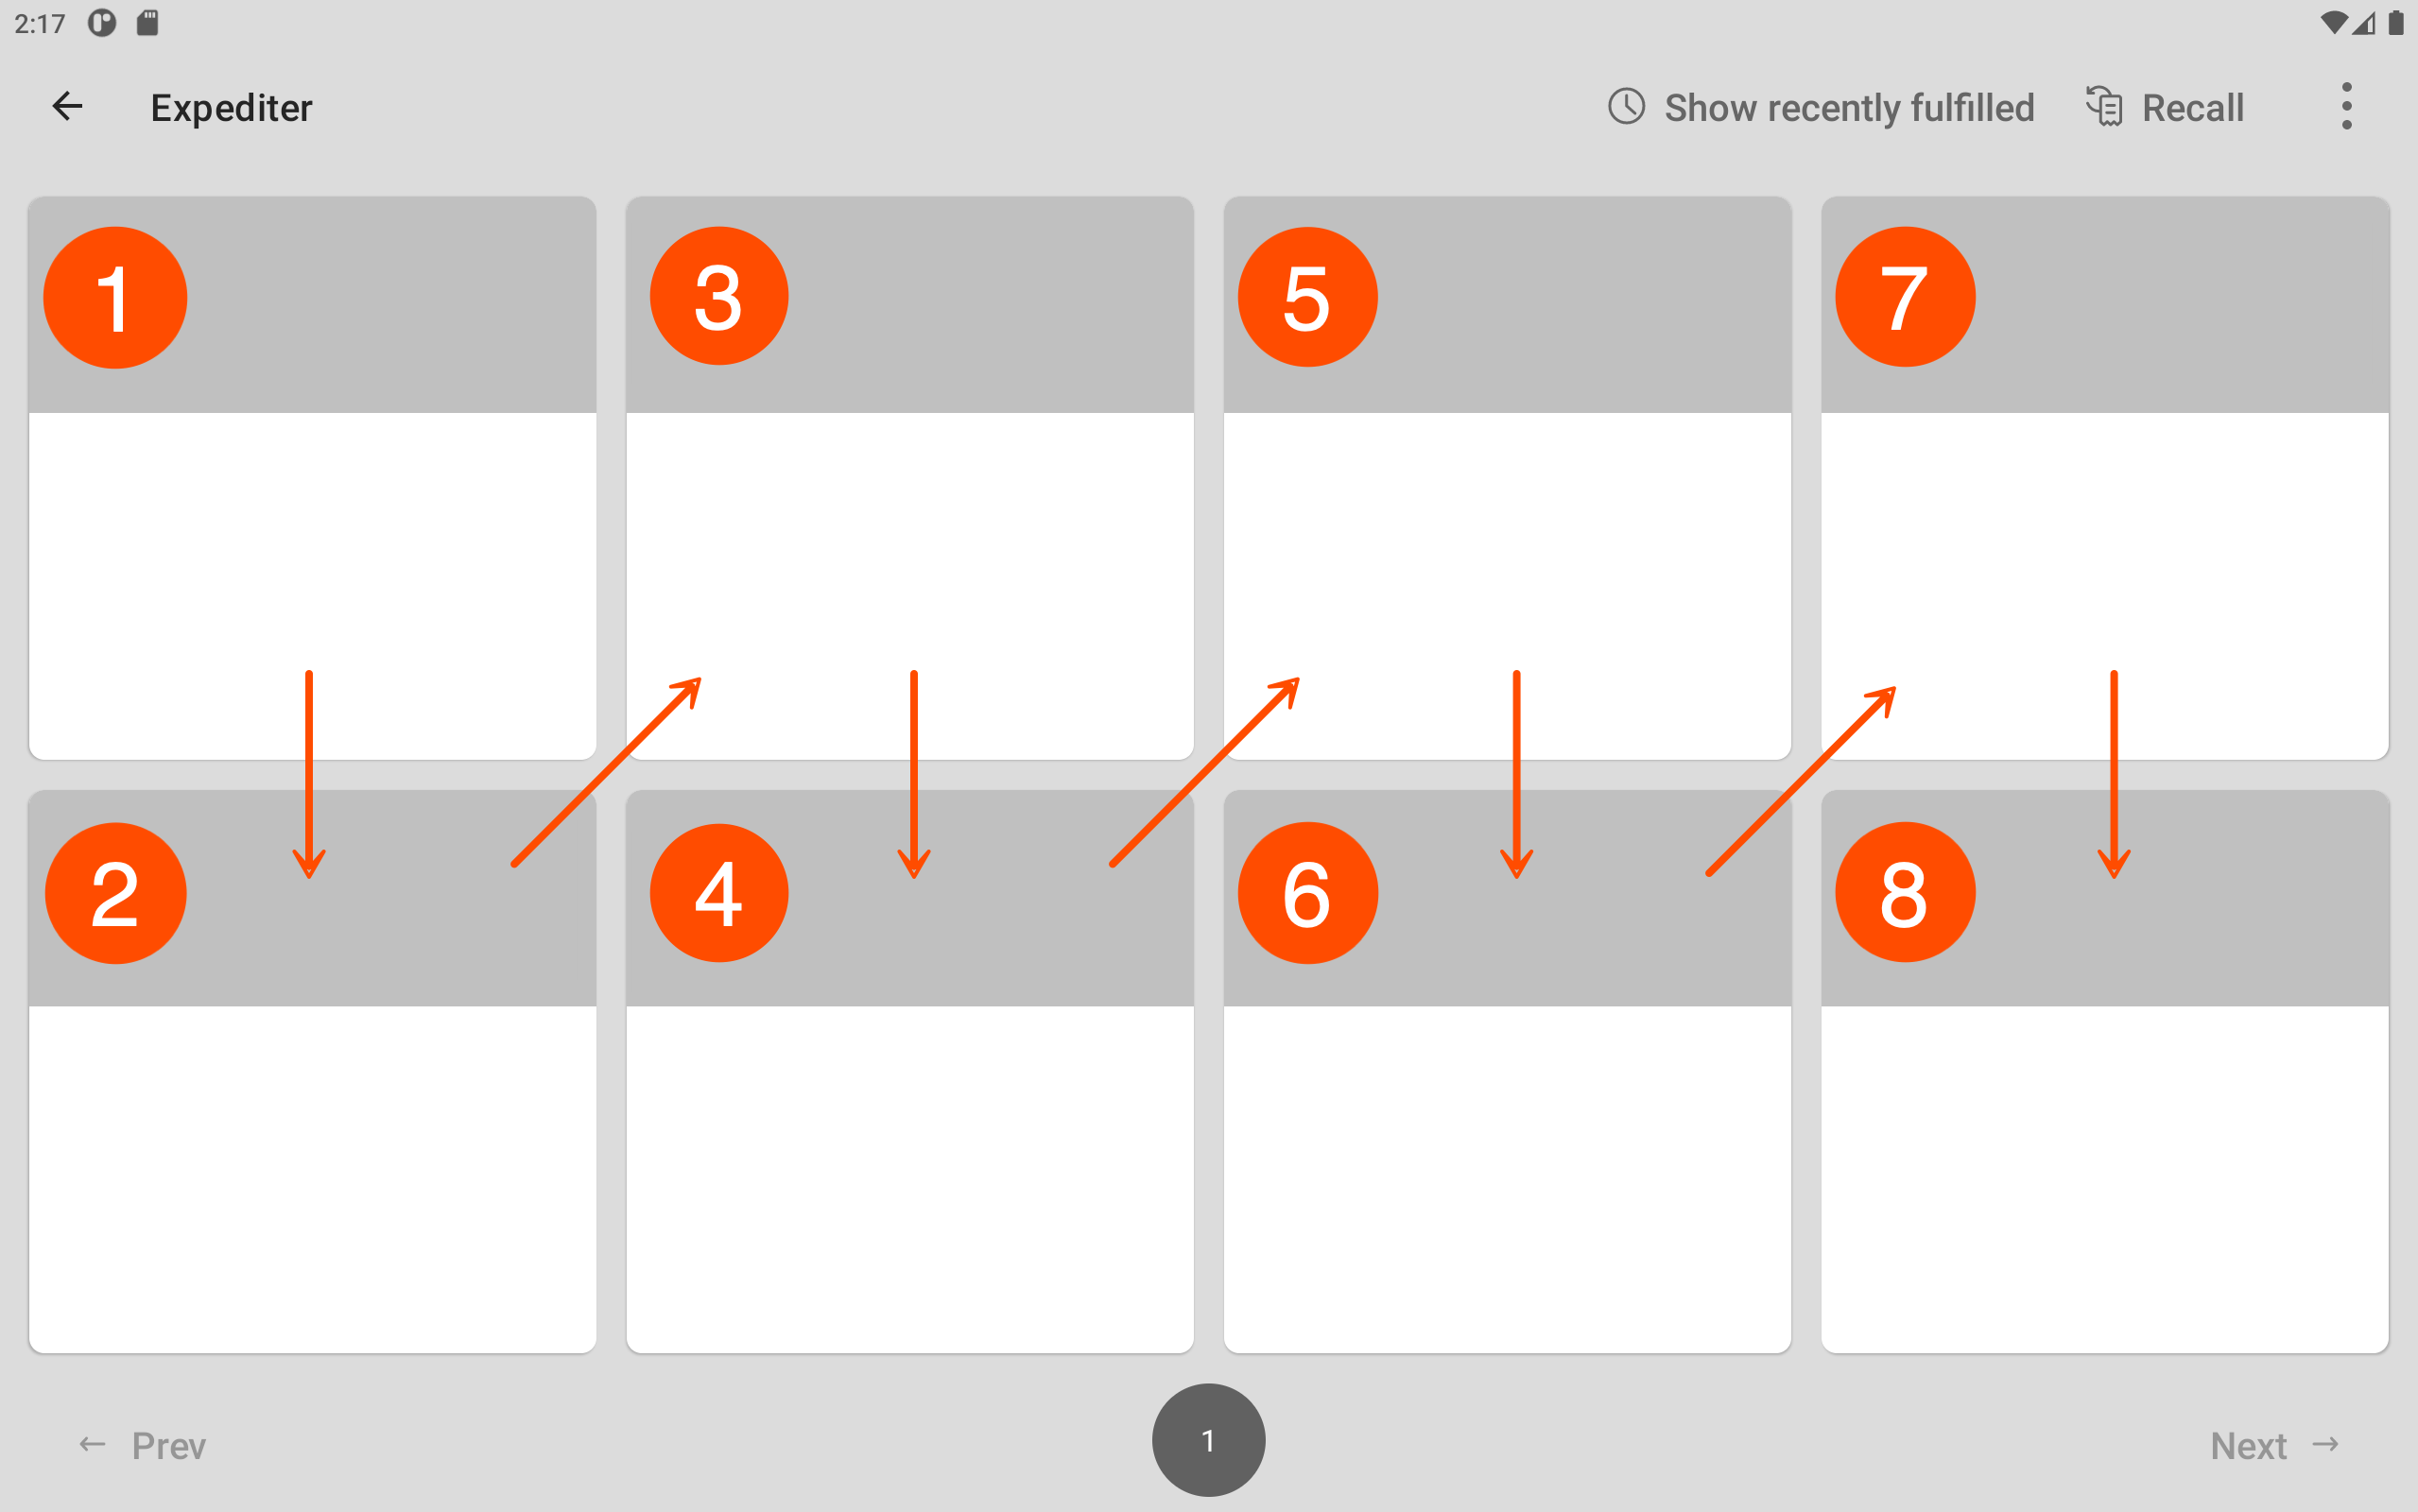
For tickets that take up more than a single grid space, the ticket expands to the grid space below it. If it continues past that grid space, it continues until the column is filled and then continues to the top grid space of the next column and moves downwards.
Here is an example of a ticket that takes up almost the entire single grid space.
Here is an example of the same ticket after it expands to two grid spaces to allow for additional items.
If a ticket is added that is larger than the remaining grid spaces on a screen with tickets, the new ticket is moved to the next page, and the previous page has the earlier tickets.
Here is an example of a KDS device using the grid layout with three tickets, the third of which is larger than the remaining grid spaces, and is moved to the next page.
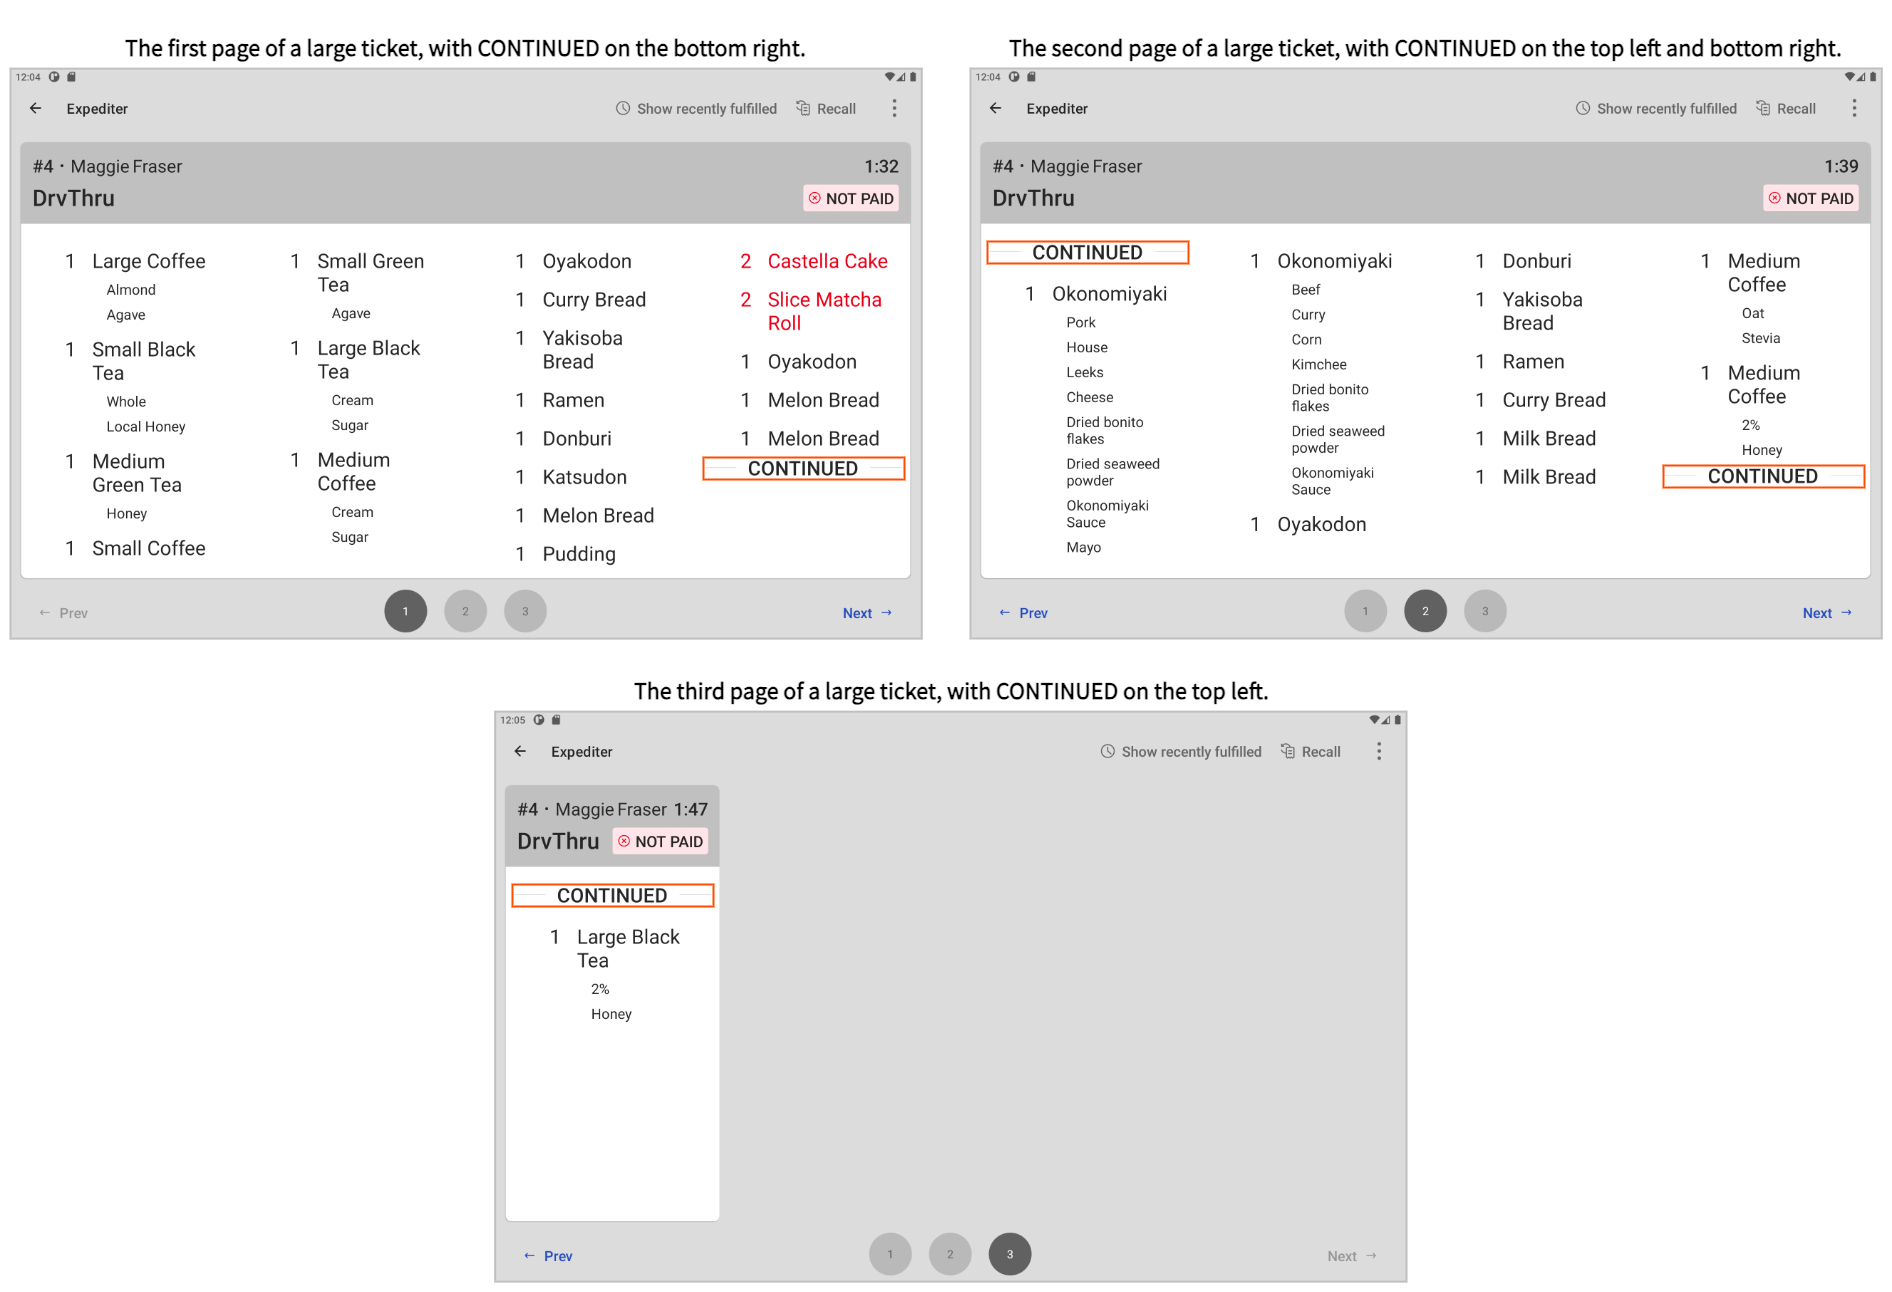
If a ticket is larger than all the grid spaces on a screen, it is continued on the next page. The first section of the ticket is marked with CONTINUED on the bottom right corner of the ticket. The last section of the ticket is marked with CONTINUED on the top left corner of the ticket. If there are any middle sections, the ticket is marked with CONTINUED on both the bottom right and top left corners of the ticket to indicate it is continued on the next and previous pages.
Here is an example of a ticket that is across three pages.
You can change the ticket size at any time using either the KDS appearance pane, or the Change ticket size dialog, described below.
|
Note |
|
Changing the number of rows and columns using the Change ticket size option will be deprecated. Instead, use the KDS appearance pane. For more information, see KDS appearance pane. |
To configure the layout using the Change ticket size dialog
-
From the Toast POS home screen, navigate to the Mode section and select Kitchen Display System.
-
Select the overflow menu (the ⋮ icon) on the top right. The content menu opens.
-
Select Change ticket size. The Change ticket size dialog opens.
-
Choose your desired ticket size.
-
Dynamic Sizing: Dynamically-sized tickets, with a maximum of 20 to 30 tickets depending on your device and settings.
-
Small Tickets: A 5 by 2 grid with a maximum of ten tickets per page.
-
Medium Tickets: A 4 by 2 grid with a maximum of eight tickets per page.
-
Large Tickets: A 3 by 2 grid with a maximum of six tickets per page.
Note
Each ticket size has a different text size. To change the text size, you need the KDS appearance pane.
-
-
Select Confirm. The KDS device now displays with the chosen layout and ticket size.
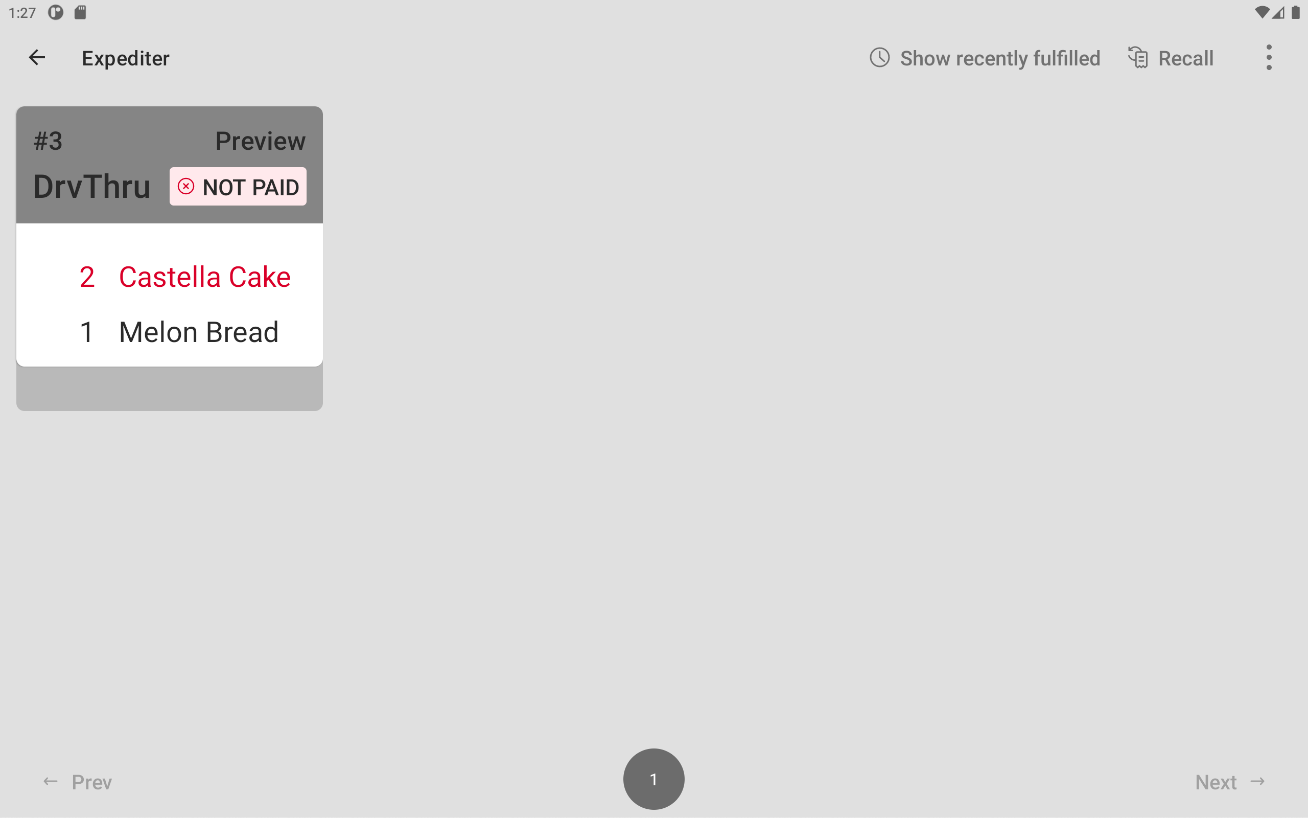
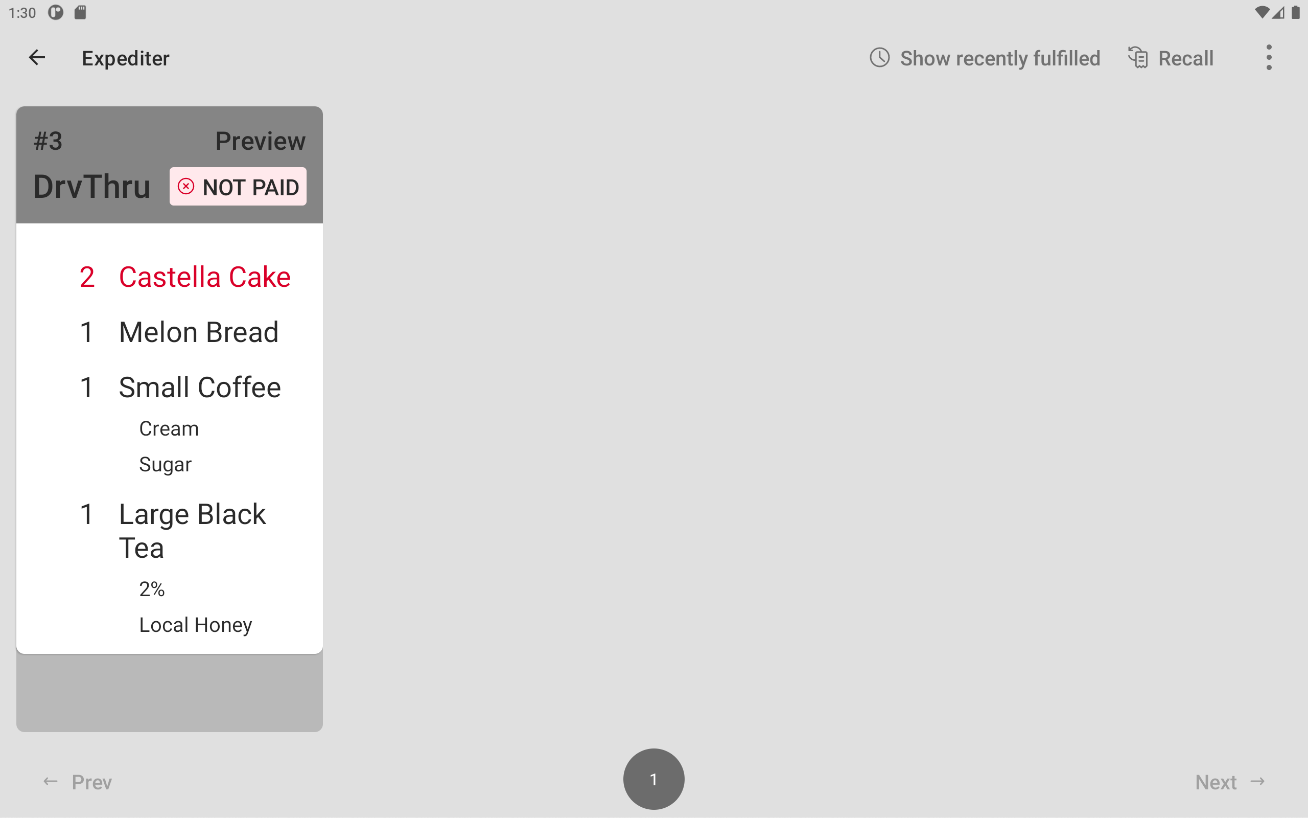
Preview tickets (fire on next) allow kitchen staff to see items as they are added to an order by providing a preview ticket. The item appears on the preview ticket after the restaurant employee adds the item to the order and begins to enter the next item.
|
Note |
|
Preview tickets are configured at the restaurant level. |
The preview ticket is indicated by a shaded portion below the ticket, the word Preview replacing the fire time, and the ticket header fading between light and dark gray repeatedly.
|
Note |
|
You cannot see preview tickets for orders placed online or from a kiosk. The ticket appears on the KDS device after the entire order is finalized and sent to the kitchen. |
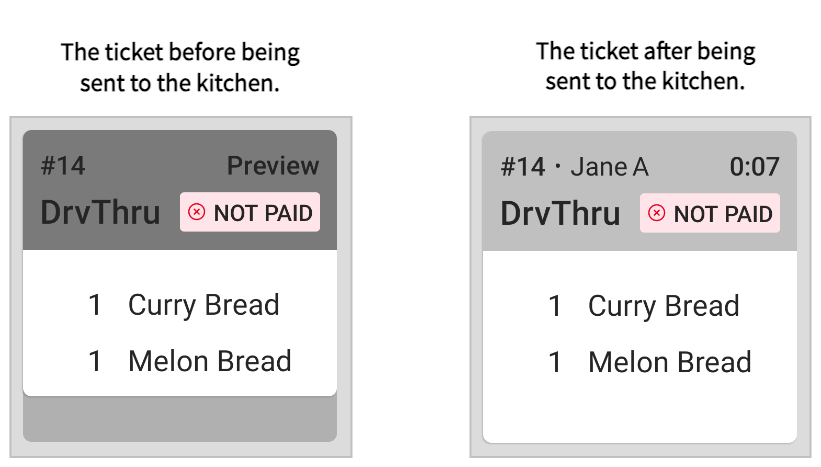
After the ticket is Sent, the Preview label and ticket shadow disappear, the fading between light and dark gray stops, and the ticket enters a Sent state. The Preview label is replaced with the fire timer.
|
Note |
|
Preview tickets cannot be fulfilled. |
After an order is sent to the kitchen, subsequent additions to the order do not display as a preview ticket. These items are visible on the KDS device once they are sent to the kitchen. For example, if you add two items to an order, these items show on the preview ticket. Once you send the order to the kitchen and then add another item, the item does not appear on the KDS device until you send the order again.
If a future or scheduled order is placed on a Toast POS device, the order appears as a preview ticket until the fire time is met.
Before configuring KDS devices to display preview tickets, consider that preview tickets show all items as they are added to an order. If you configure your restaurant to not send items or courses to the kitchen, once fired, items that did appear on preview tickets disappear from the KDS tickets. For example:
-
If the Kitchen > Pacing > Meal pacing > Sending Courses setting is set to Send courses individually, after an order is sent, only the courses chosen by an employee at the front of house to send to the kitchen appear, with items belonging to courses not sent disappearing from the KDS device. This can lead to confusion for kitchen employees.
-
If Front of house > Order screen setup > Individually Hold and Send Items is enabled, once the initial items are sent to the kitchen, the kitchen tickets only show the fired items. This can lead to confusion for kitchen employees.
If you exit or close the Toast POS app while an order is in progress, the preview ticket remains on the screen until the Toast platform clears any outdated tickets. The preview ticket may remain on your device for up to thirty minutes.
To configure KDS devices to display preview tickets
-
Choose Kitchen > Printers, tickets, & KDS devices > Kitchen and ticket setup to open the Kitchen page.
-
In the Ticket Screens section, use the Preview Tickets setting to turn the preview tickets feature on or off.
-
Select Save and Publish.
Note
To avoid updating while the restaurant is open, Toast support recommends publishing outside restaurant operating hours.
For an example workflow of a KDS device using preview tickets, see KDS workflow using new KDS view.
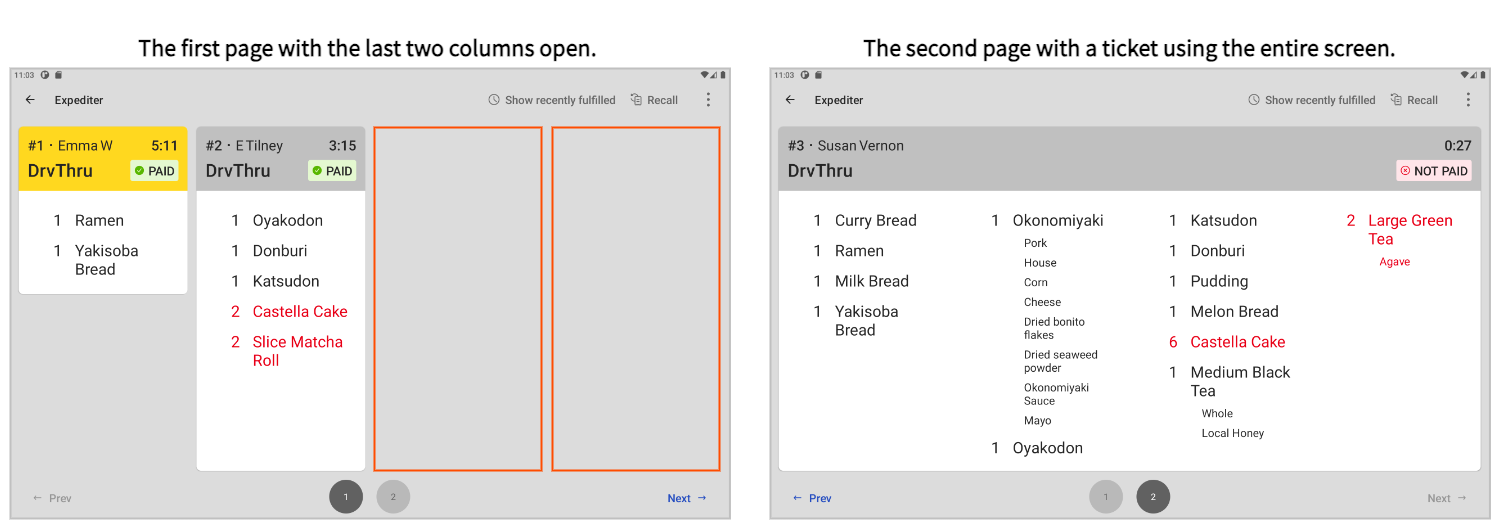
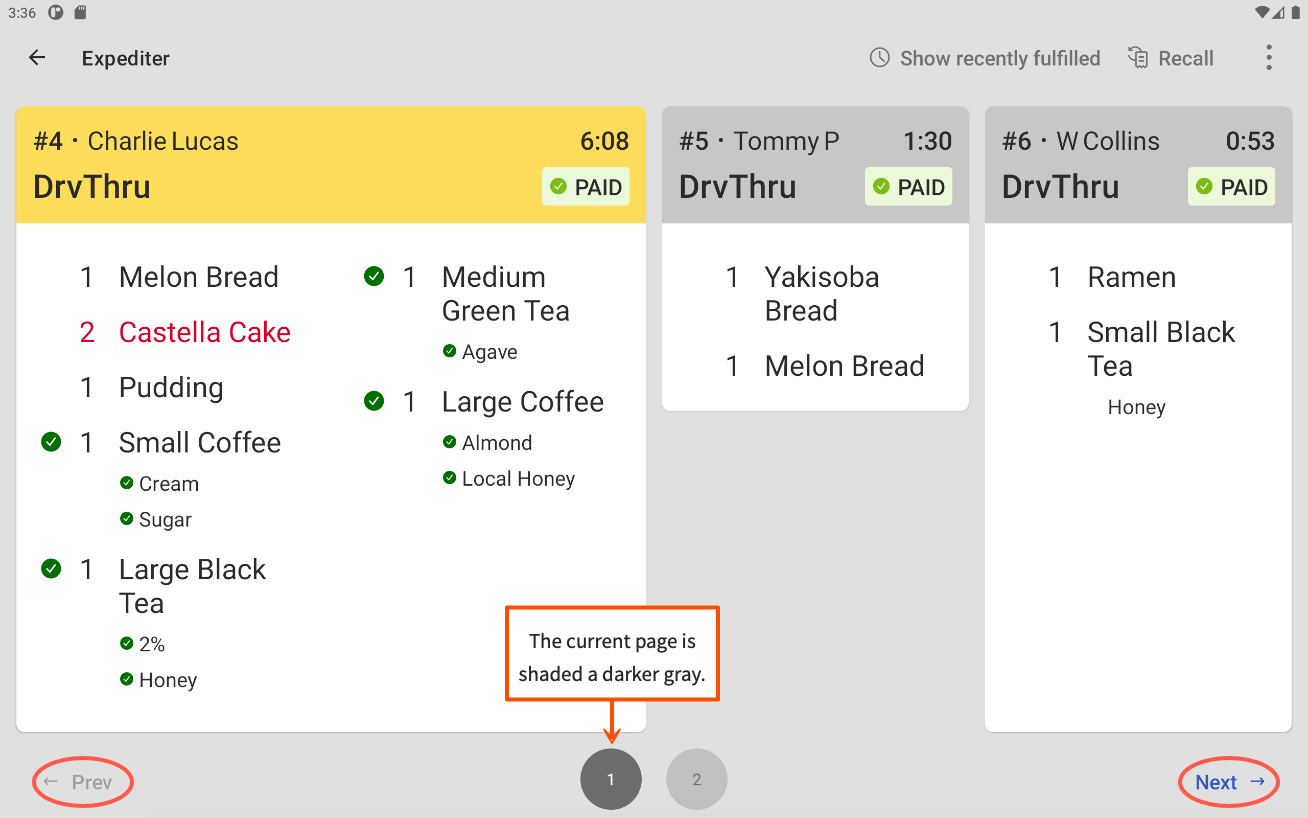
The new KDS view uses Next and Previous on the bottom right and left of the KDS screen to navigate to the next and previous pages. You can also swipe right and left to navigate to the next and previous pages.
The page number indicator icon on the bottom center is shaded dark gray to indicate the page currently being viewed. You can select a different page number icon to navigate to that specific page.
Here is an example of KDS device with multiple pages.
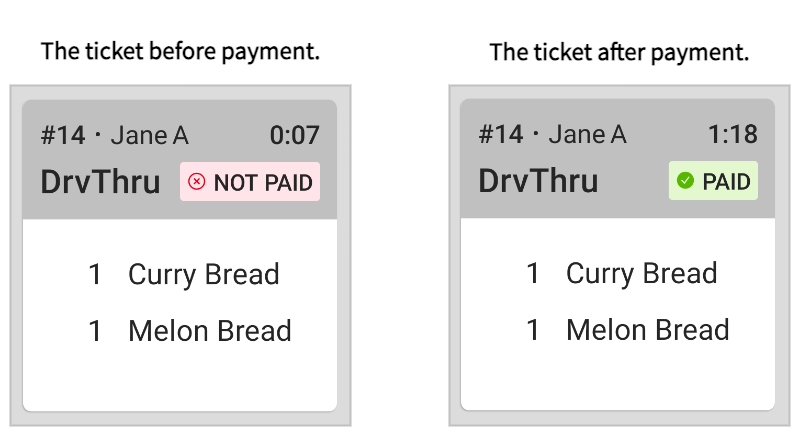
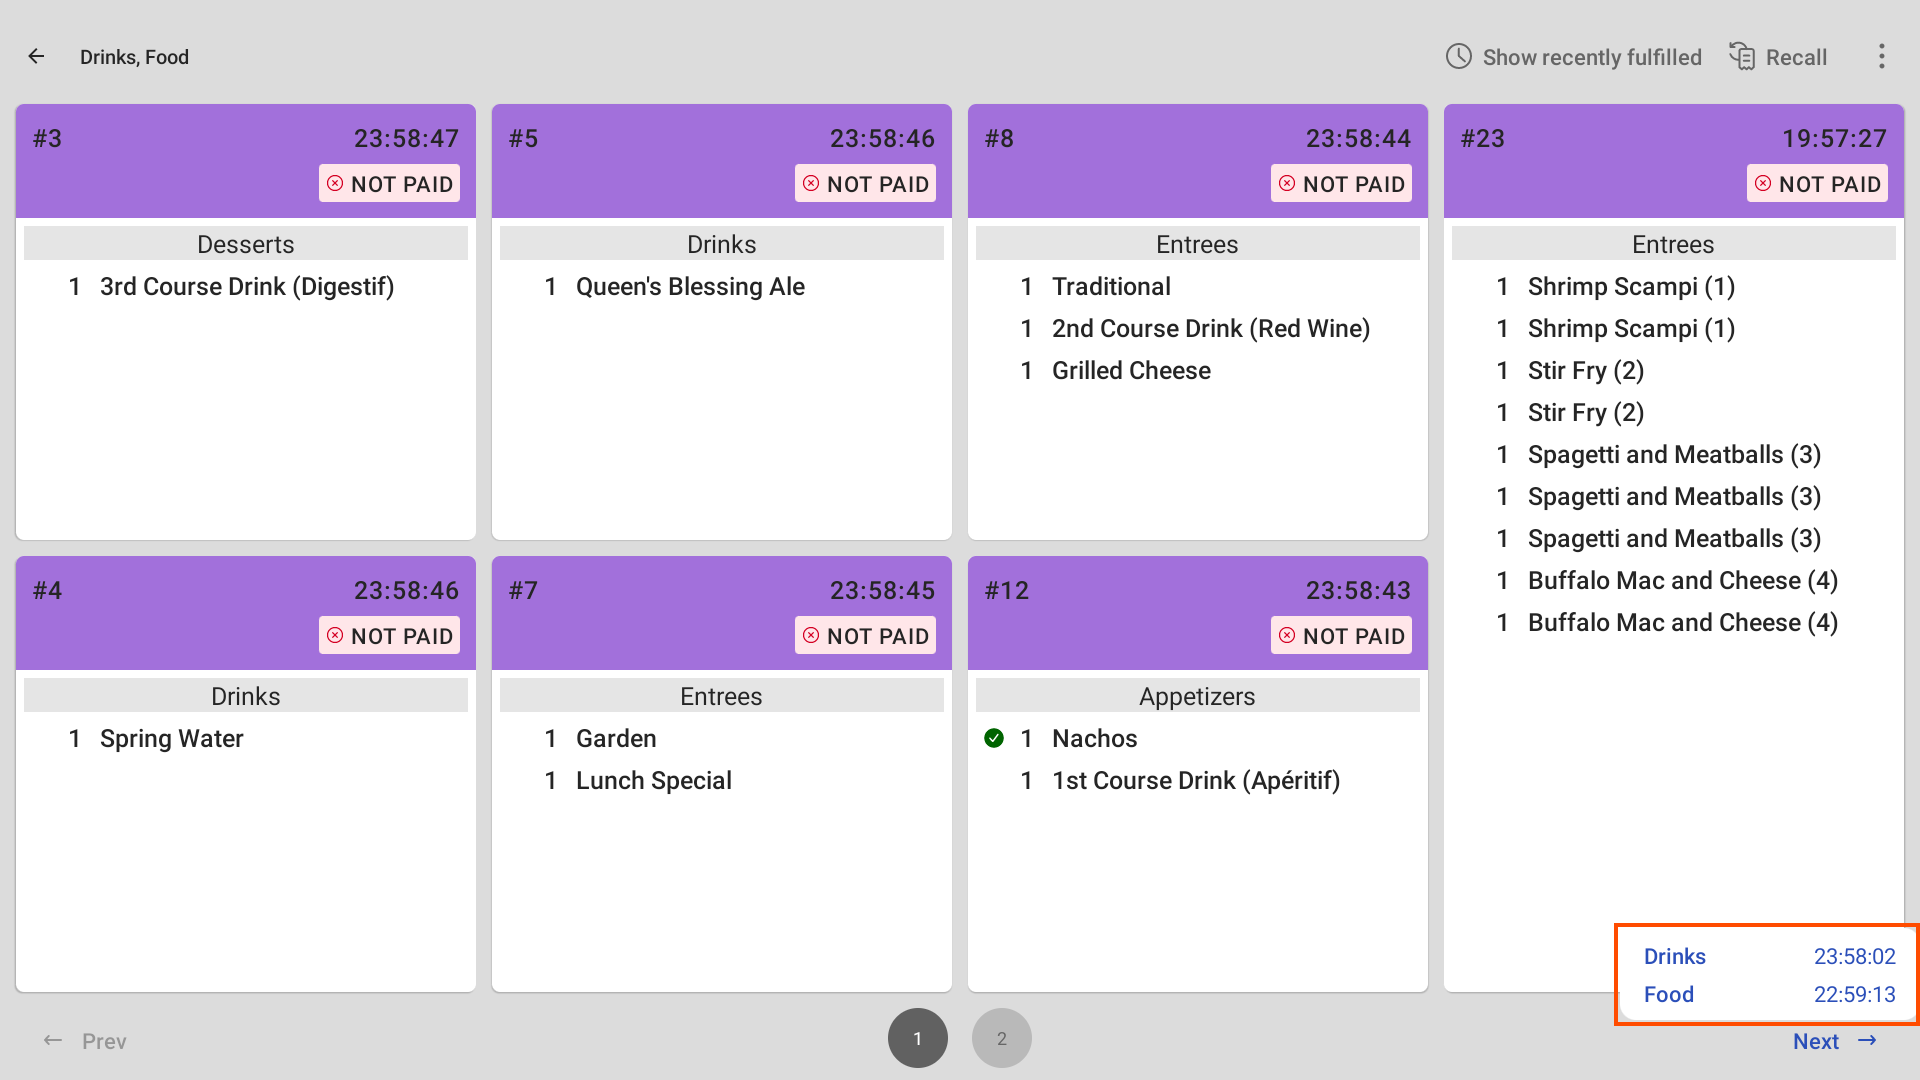
New KDS view tickets display a payment status, which indicates whether the order for the ticket is paid or not. The payment status can be:
-
NOT PAID: The entire amount for the order is not received and processed by the restaurant.
-
PAID: The entire amount for the order is received and processed by the restaurant.
Here is an example of a ticket before and after it is paid.
|
Note |
|
You can also change the display theme using the KDS appearance pane. For more information, see KDS appearance pane. |
The new KDS view is available in dark mode. To change to dark mode, select the overflow menu (the ⋮ icon), choose Device Setup, and select the POS Display Theme setting to choose between the Light mode and Dark mode options. Select Save to implement the theme.
Here is an example of a KDS device using dark mode.

An assembly line is a sequence of prep stations that you can assign to menu entities that an item follows in the kitchen. Once an item is sent to the kitchen, it appears on the first prep station in the sequence, and once fulfilled at that prep station, it moves to the second prep station in the sequence. This continues until the sequence is completed.
Assembly lines are ideal for kitchens with items that move in a standard path through kitchen prep stations. For example, a pizza restaurant has a menu for pizza items that all go to the Dough, Sauce/Toppings, and Bake prep stations in that order. Using an assembly line keeps other prep stations from seeing an item before it is fulfilled at the previous prep station in a sequence. For more information about how assembly lines work, see Routing using assembly lines. For information about how to create an assembly line, see Creating an assembly line.
Before you start creating and assigning assembly lines, verify the following:
-
You created prep stations.
-
You set the Fulfillment Method setting to Fulfill at each station independently.
-
You verified that the menu entity and the assembly line you plan to assign to that menu entity use at least one of the same prep stations.
Load balancing divides kitchen tickets between multiple prep station KDS devices that are assigned the same prep station. This feature allows tickets to be worked on between the load-balancing groups without tickets appearing multiple times on the prep station KDS devices assigned to the same prep station. A ticket can be claimed for a load-balancing group, and does not appear on prep station KDS devices in another load-balancing group.
For information about how to set up load balancing, see Configuring load balancing. For information about how load balancing works, see Routing using load balancing.
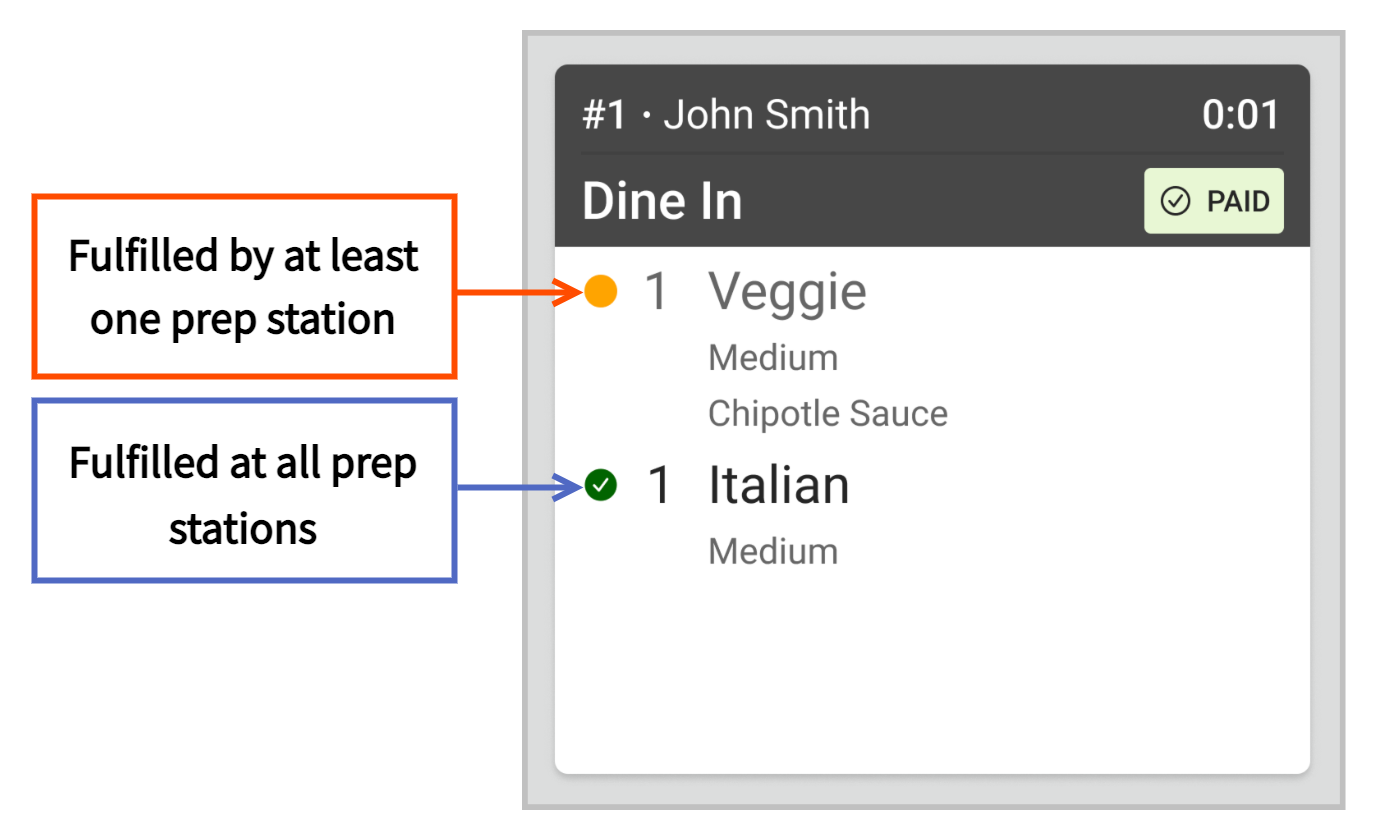
If you set the Fulfillment Method setting to Fulfill at each station independently, a partial fulfillment indicator appears on expediter KDS tickets for items that have been partially fulfilled.
|
Note |
|
The prep station assigned to an item must send to prep station and expediter in order to start partial fulfillment on the expediter KDS device tickets. |
The partial fulfillment indicator appears as a yellow dot to the left of the item name. It indicates that an item was fulfilled by at least one prep station, but not all assigned prep stations. Once the item is fulfilled at all prep stations, the indicator changes to a green check mark, indicating that the item was fulfilled at all prep stations.
Here is an example of a ticket on an expediter KDS device with one item using the partial fulfillment indicator and another item marked as fulfilled at all prep stations.
|
Note |
|
To use food runner fulfillment, the Fulfill Items setting must be set to Enable individual item fulfillment. |
The food runner fulfillment feature allows employees to fulfill individual items on expediter KDS device tickets. Food runner fulfillment is useful in situations where items are given to the guest as soon as they are ready, giving a visual indication of the fulfillment status of an individual item for that KDS device and fulfillment level.
If a ticket with multiple items contains an item that is fulfilled at a prep station KDS device, or at the previous station or stations for expediter KDS devices, it is marked with a green check mark. When an item on a ticket is fulfilled at the highest fulfillment level by an employee, the Toast platform marks the item with a green double check mark on that expediter KDS device.
-
If you use two-level fulfillment, the highest level of fulfillment is at the second-level expediter KDS device. The green double check mark appears when the item is fulfilled at the second-level expediter KDS device.
-
If you use single-level fulfillment, the highest level of fulfillment is at the expediter KDS device. The green double check mark appears when the item is fulfilled at the expediter KDS device.
Here is an example of two tickets on the expediter KDS device: one with the green check mark, and another with the double check mark.
Food runner fulfillment only works for expediter KDS device tickets with multiple items. Once a ticket or all of the items on a ticket are fulfilled, the ticket disappears from the KDS device.
|
Note |
|
This feature is in limited release. |
If a menu item has a recipe associated with it and the Fulfill Items setting is set to Enable individual item fulfillment, you can view the recipe on a KDS device.
For information about how to add a recipe to a menu item, see Adding a recipe view.
|
Note |
|
Recipes can only be added to menu items. |
To view a menu item recipe on a KDS device
-
On the KDS device, select a ticket to open the ticket dialog.
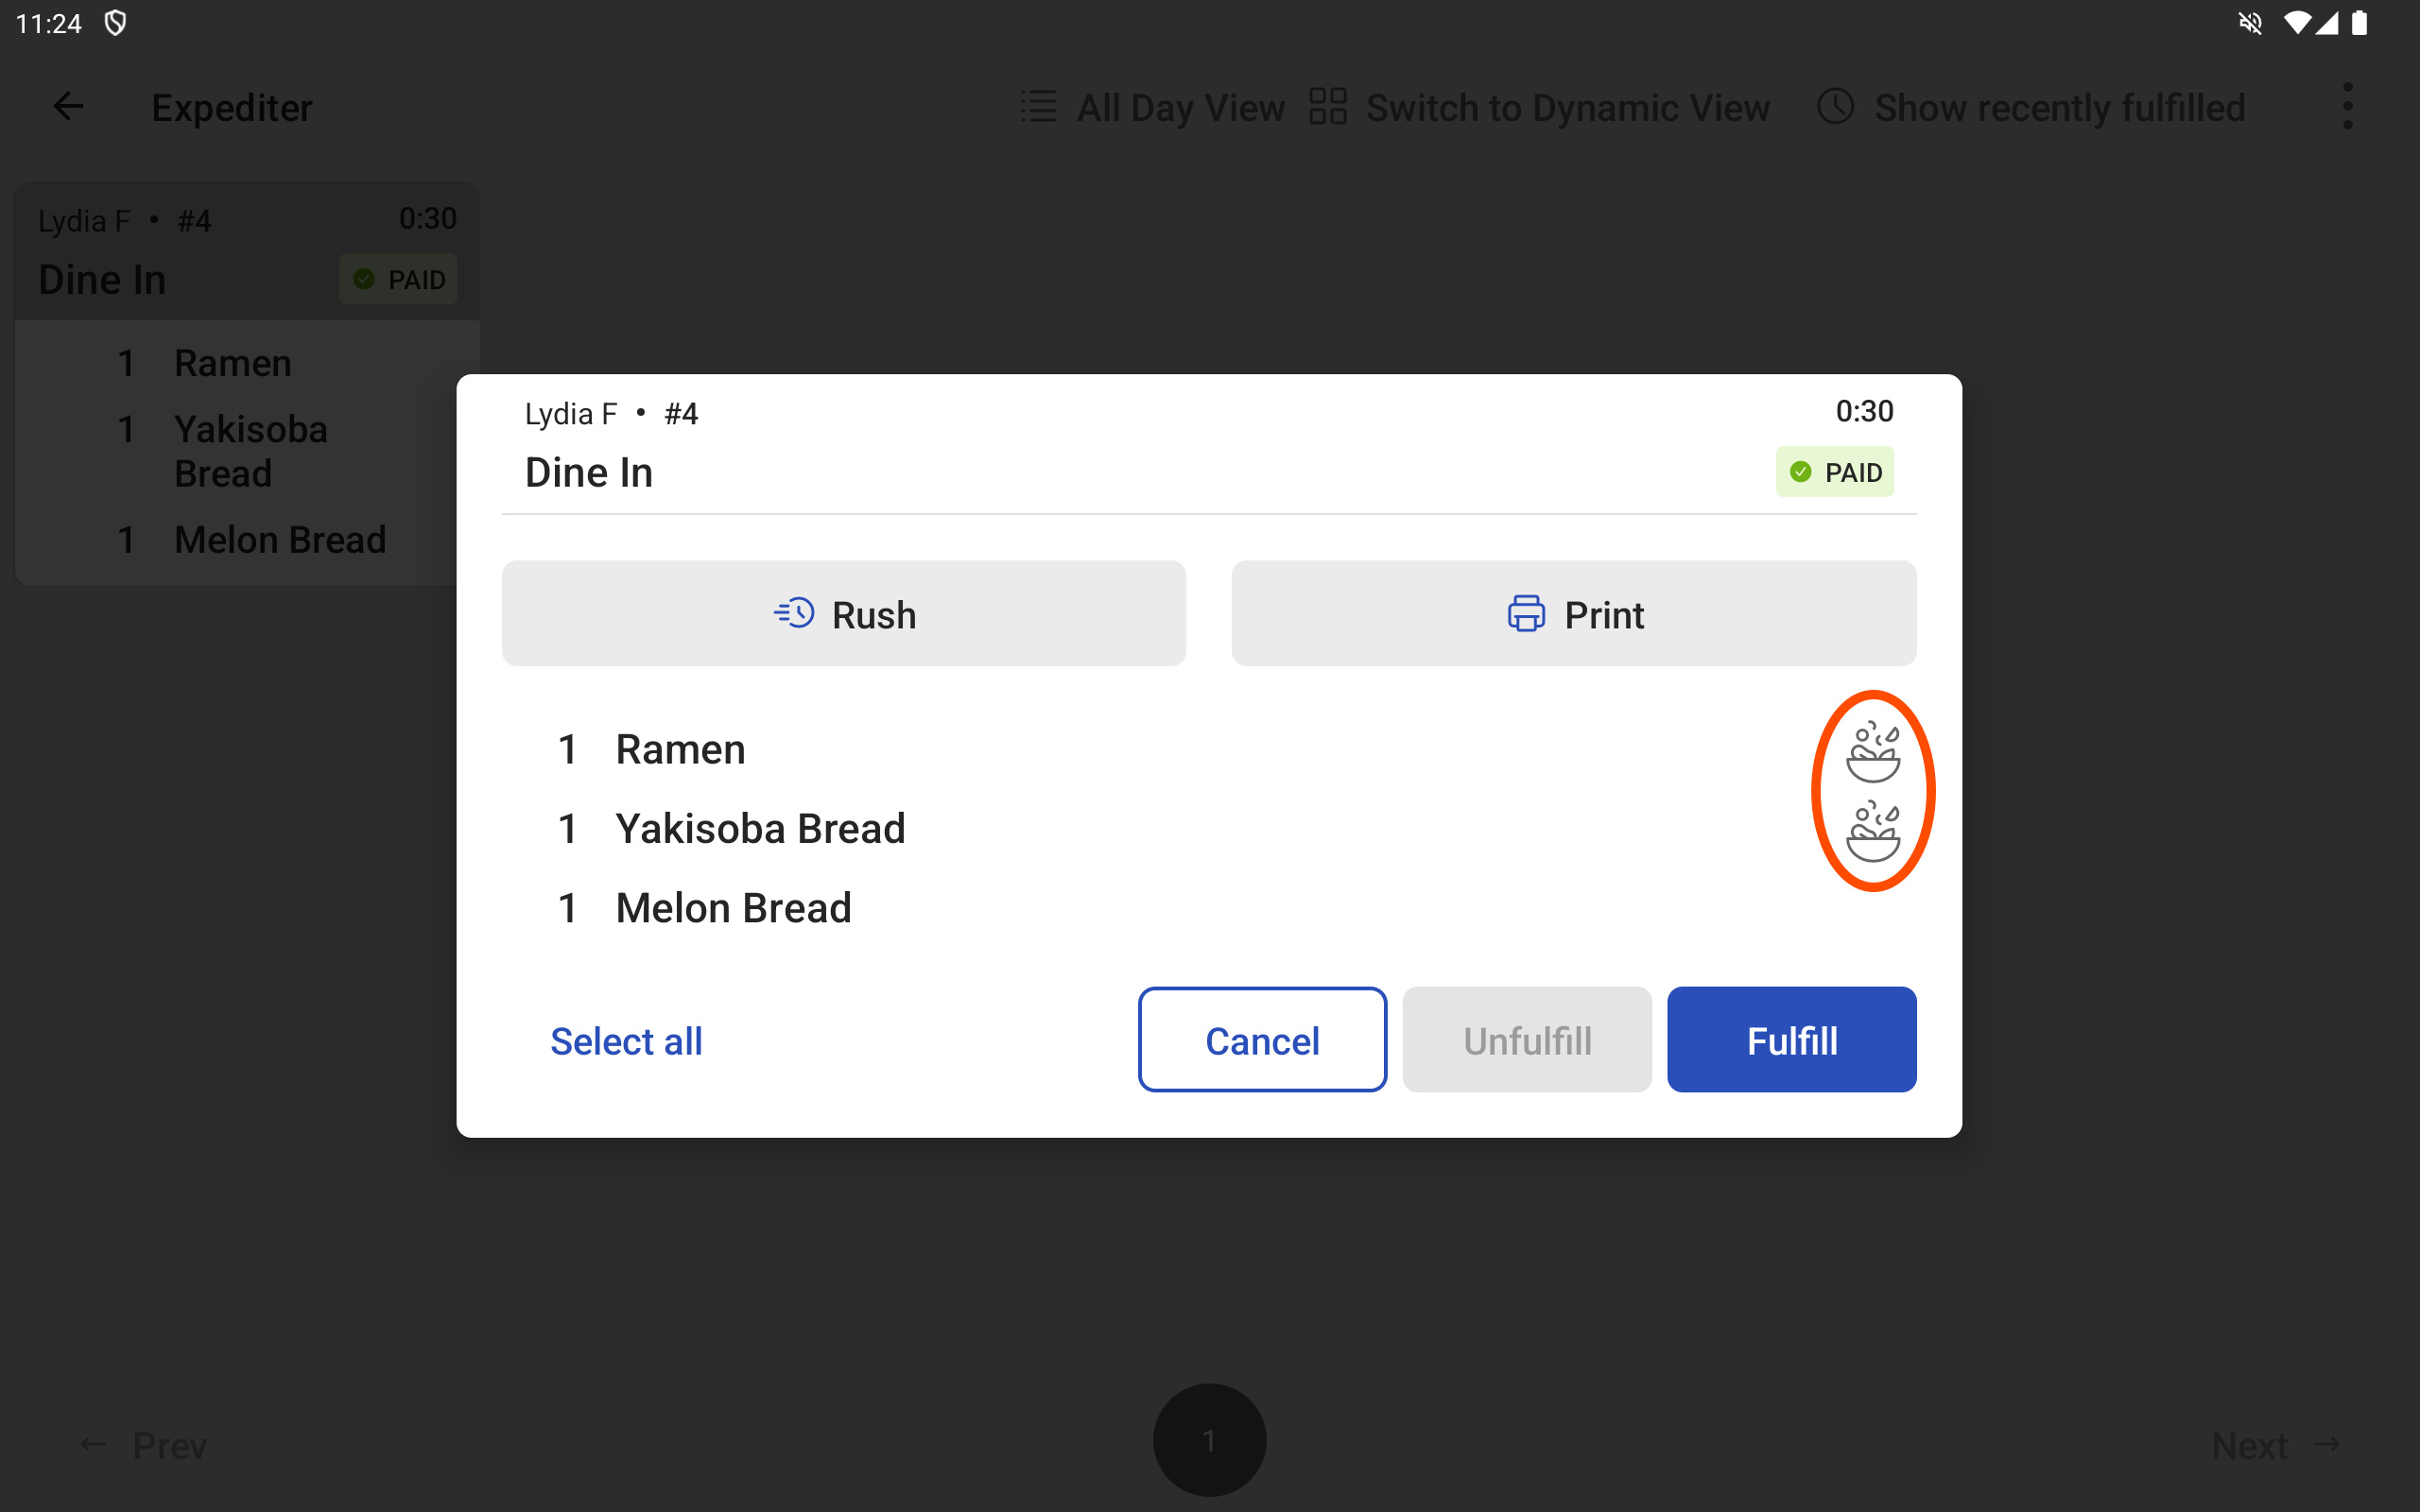
-
Select one item that has the recipe icon.
Note
Selecting more than one item, even if both have recipes, hides the View Recipe button.
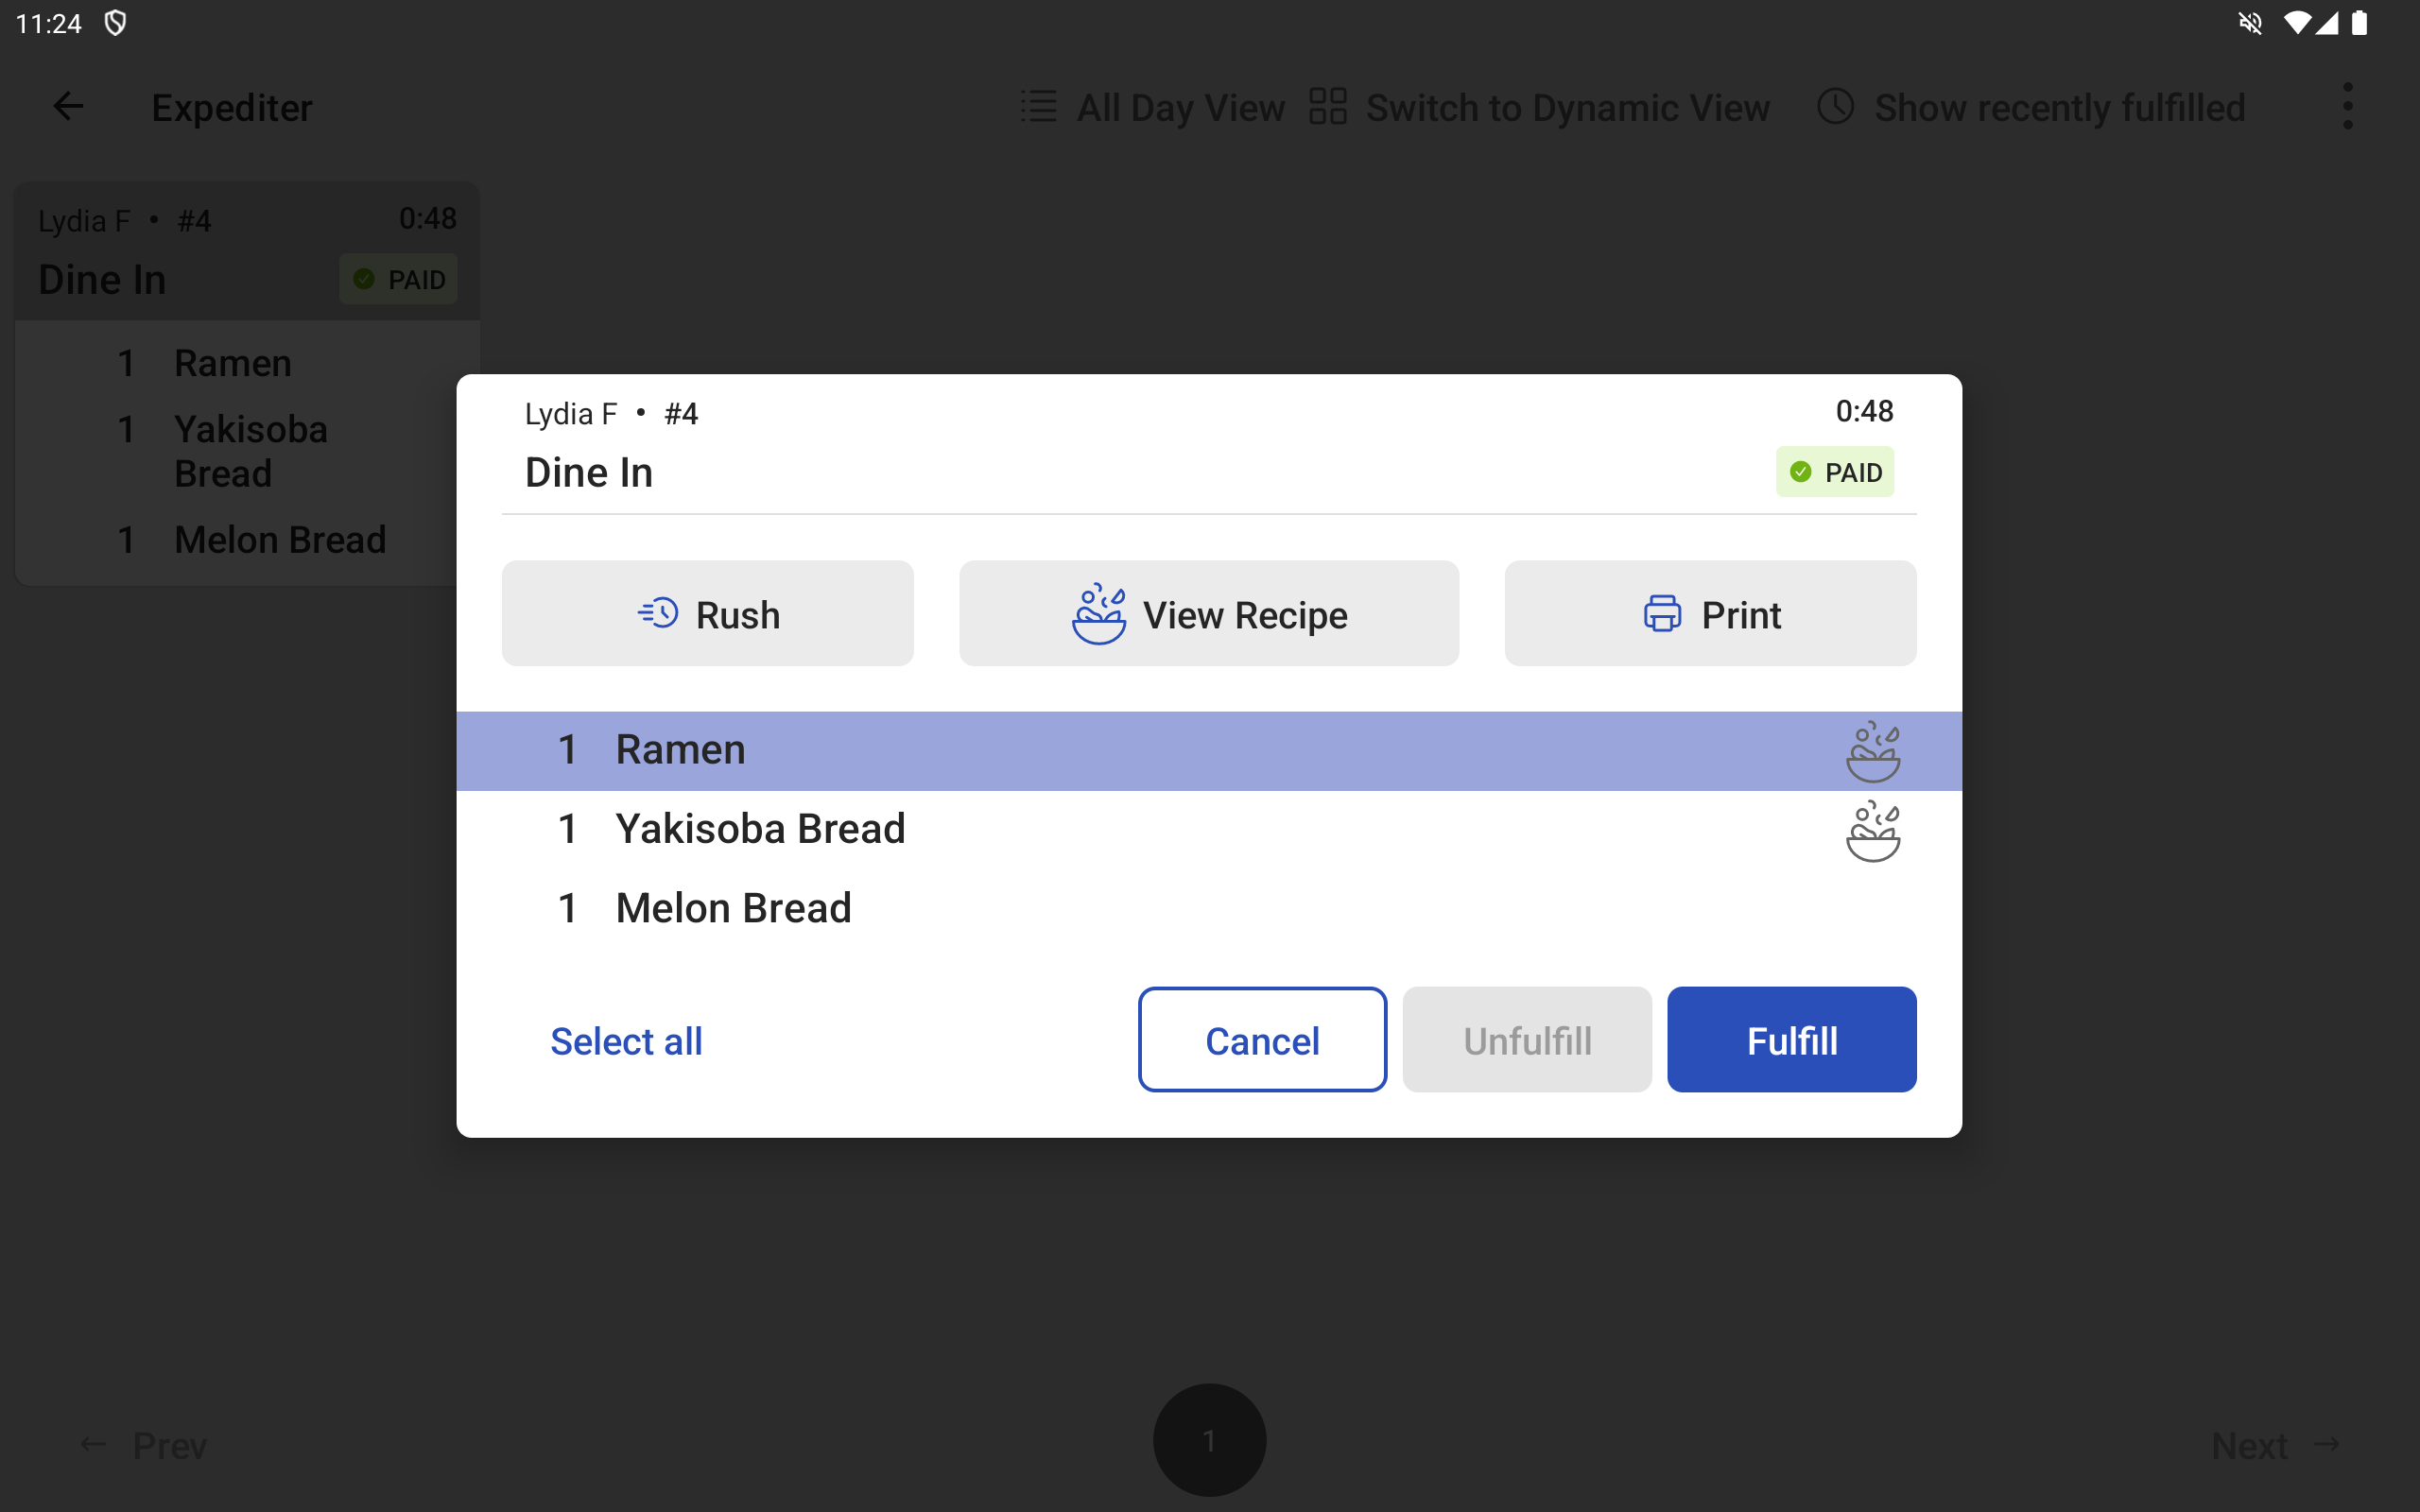
-
Select the View Recipe button. The recipe file opens.
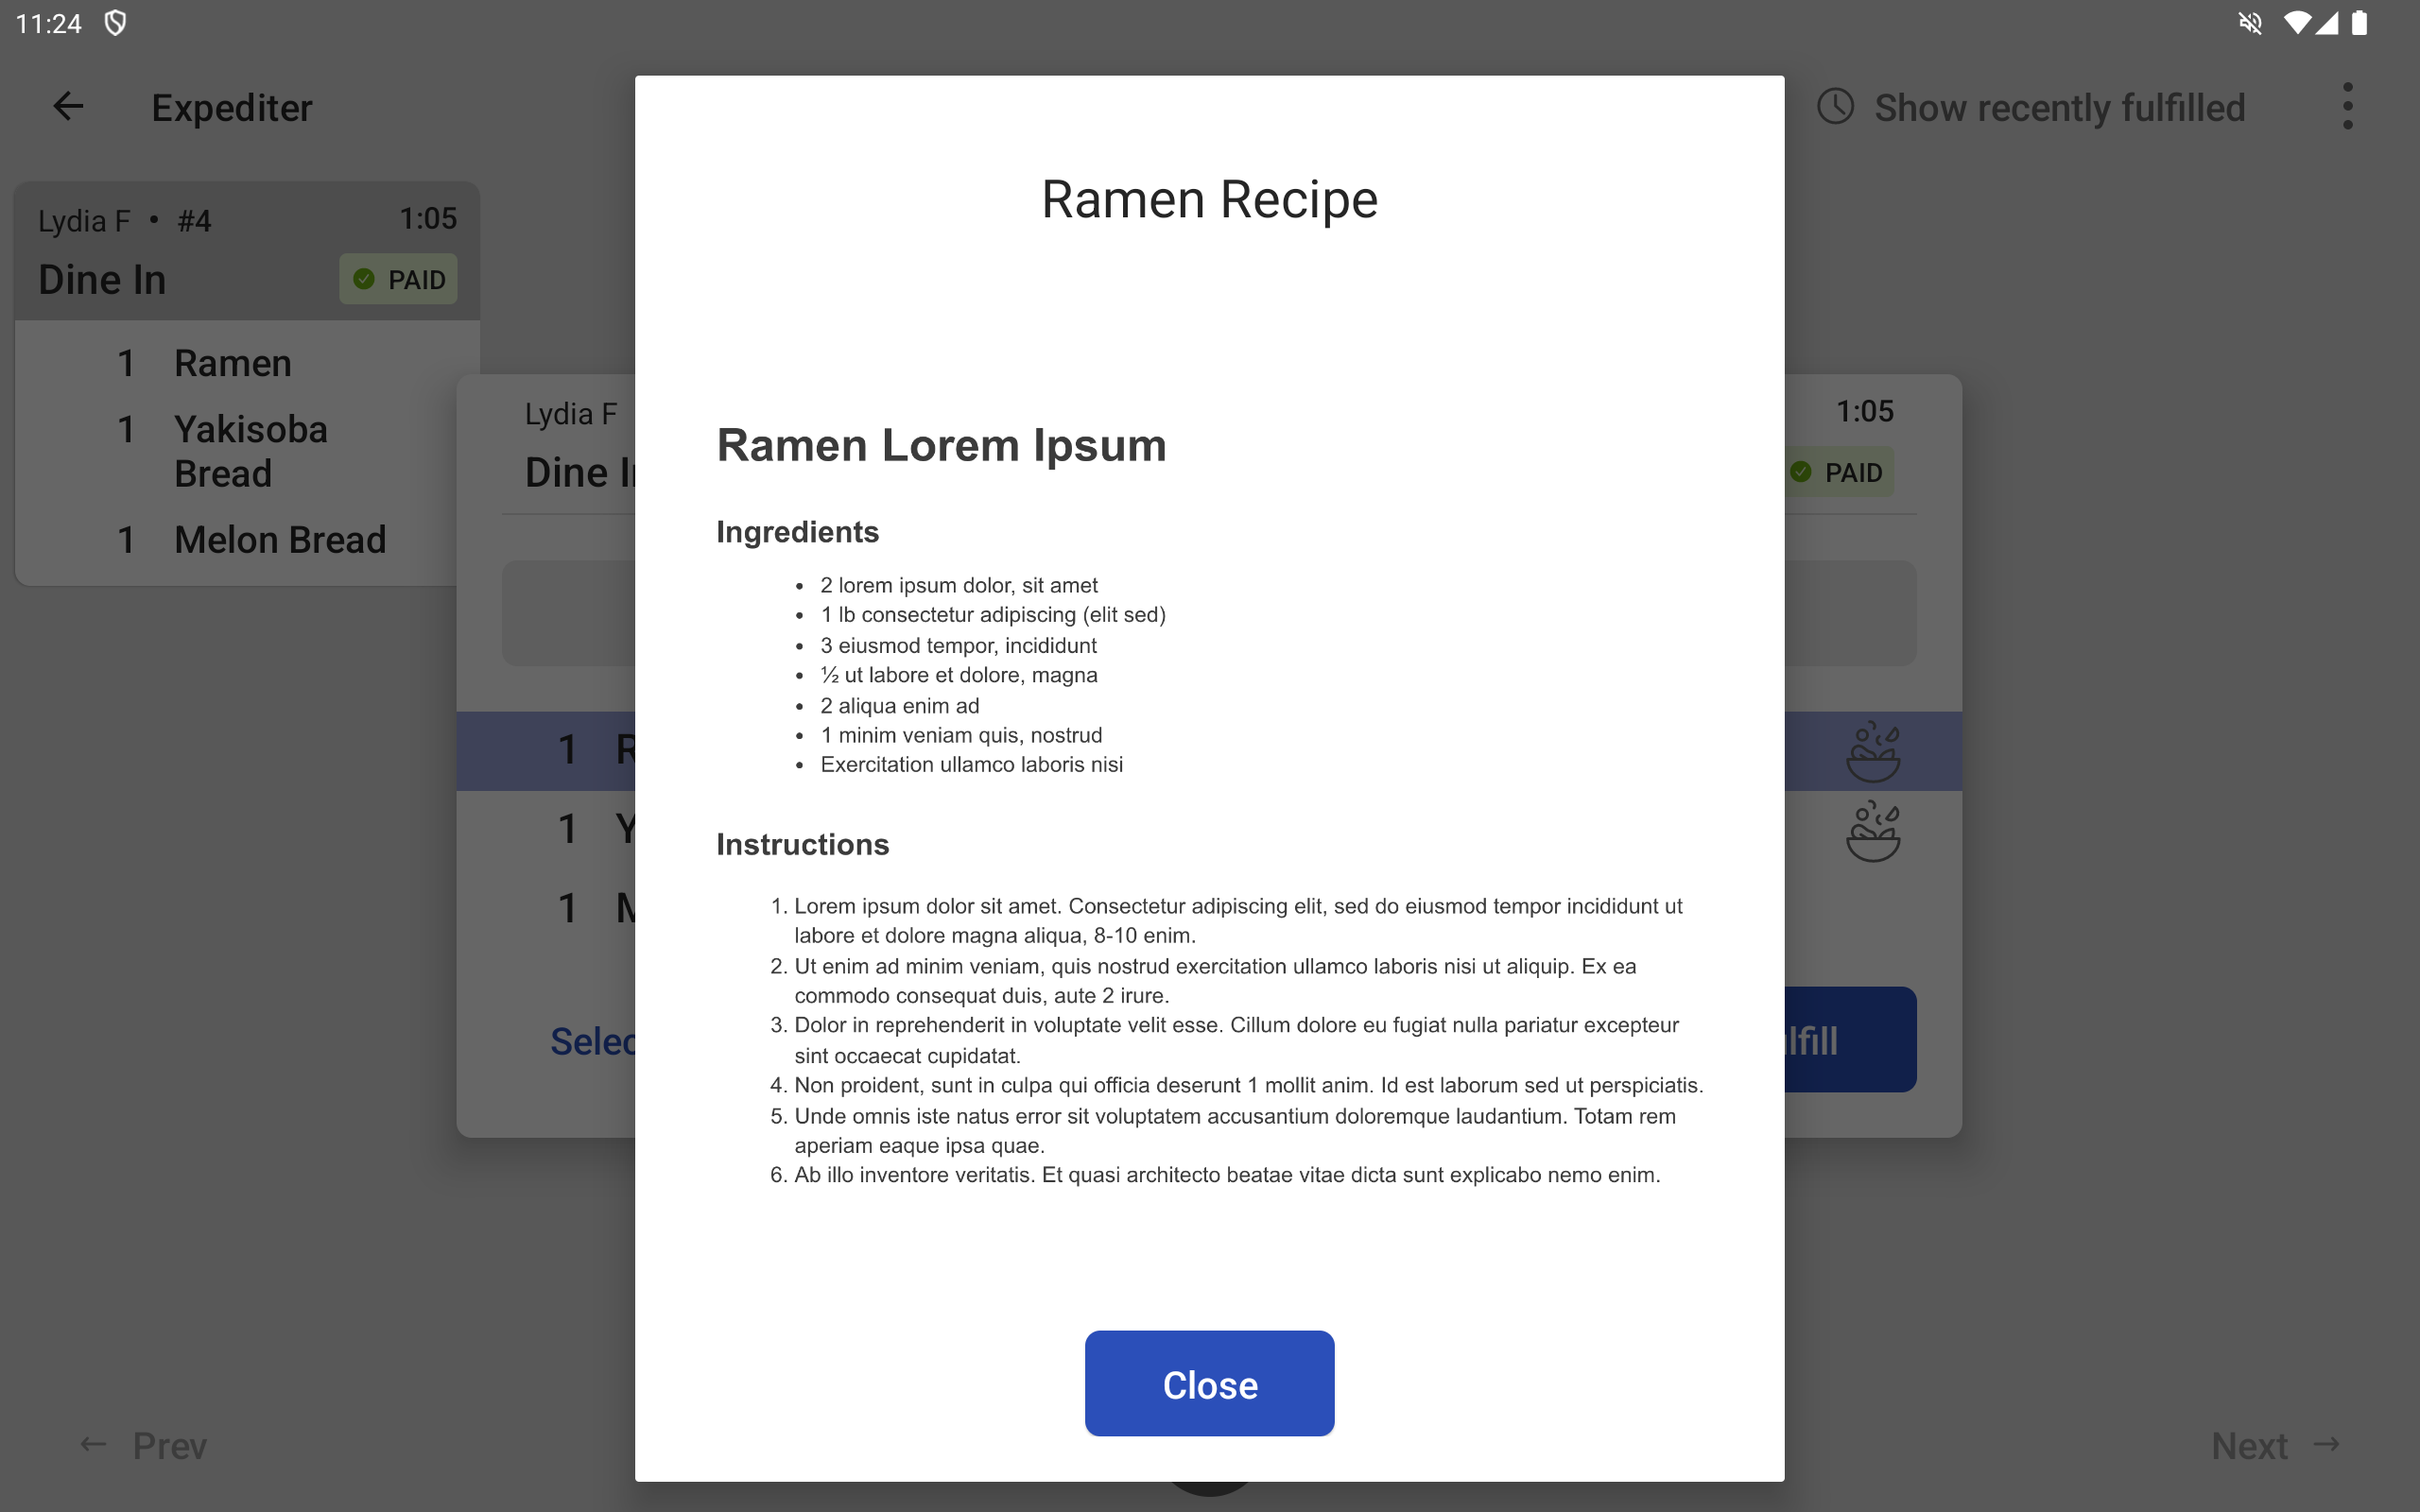
-
When you are done reading the recipe, select the Close button or tap outside of the recipe dialog.
In addition to new features only on the new KDS view, new KDS view also implements several existing features differently from legacy KDS view to maximize efficiency. These differences apply to:
-
Production items
-
Ticket header
-
Action to fulfill
-
Average fulfillment timer
While legacy KDS view supports any number of production items, new KDS view supports a maximum of 30 production items. When viewing a new KDS view device in landscape orientation, 30 production items appear as five rows, with six items in each row. In portrait orientation, 30 production items appear as six rows, with five items in each row.
Here is an example of the new KDS view with eight production items.
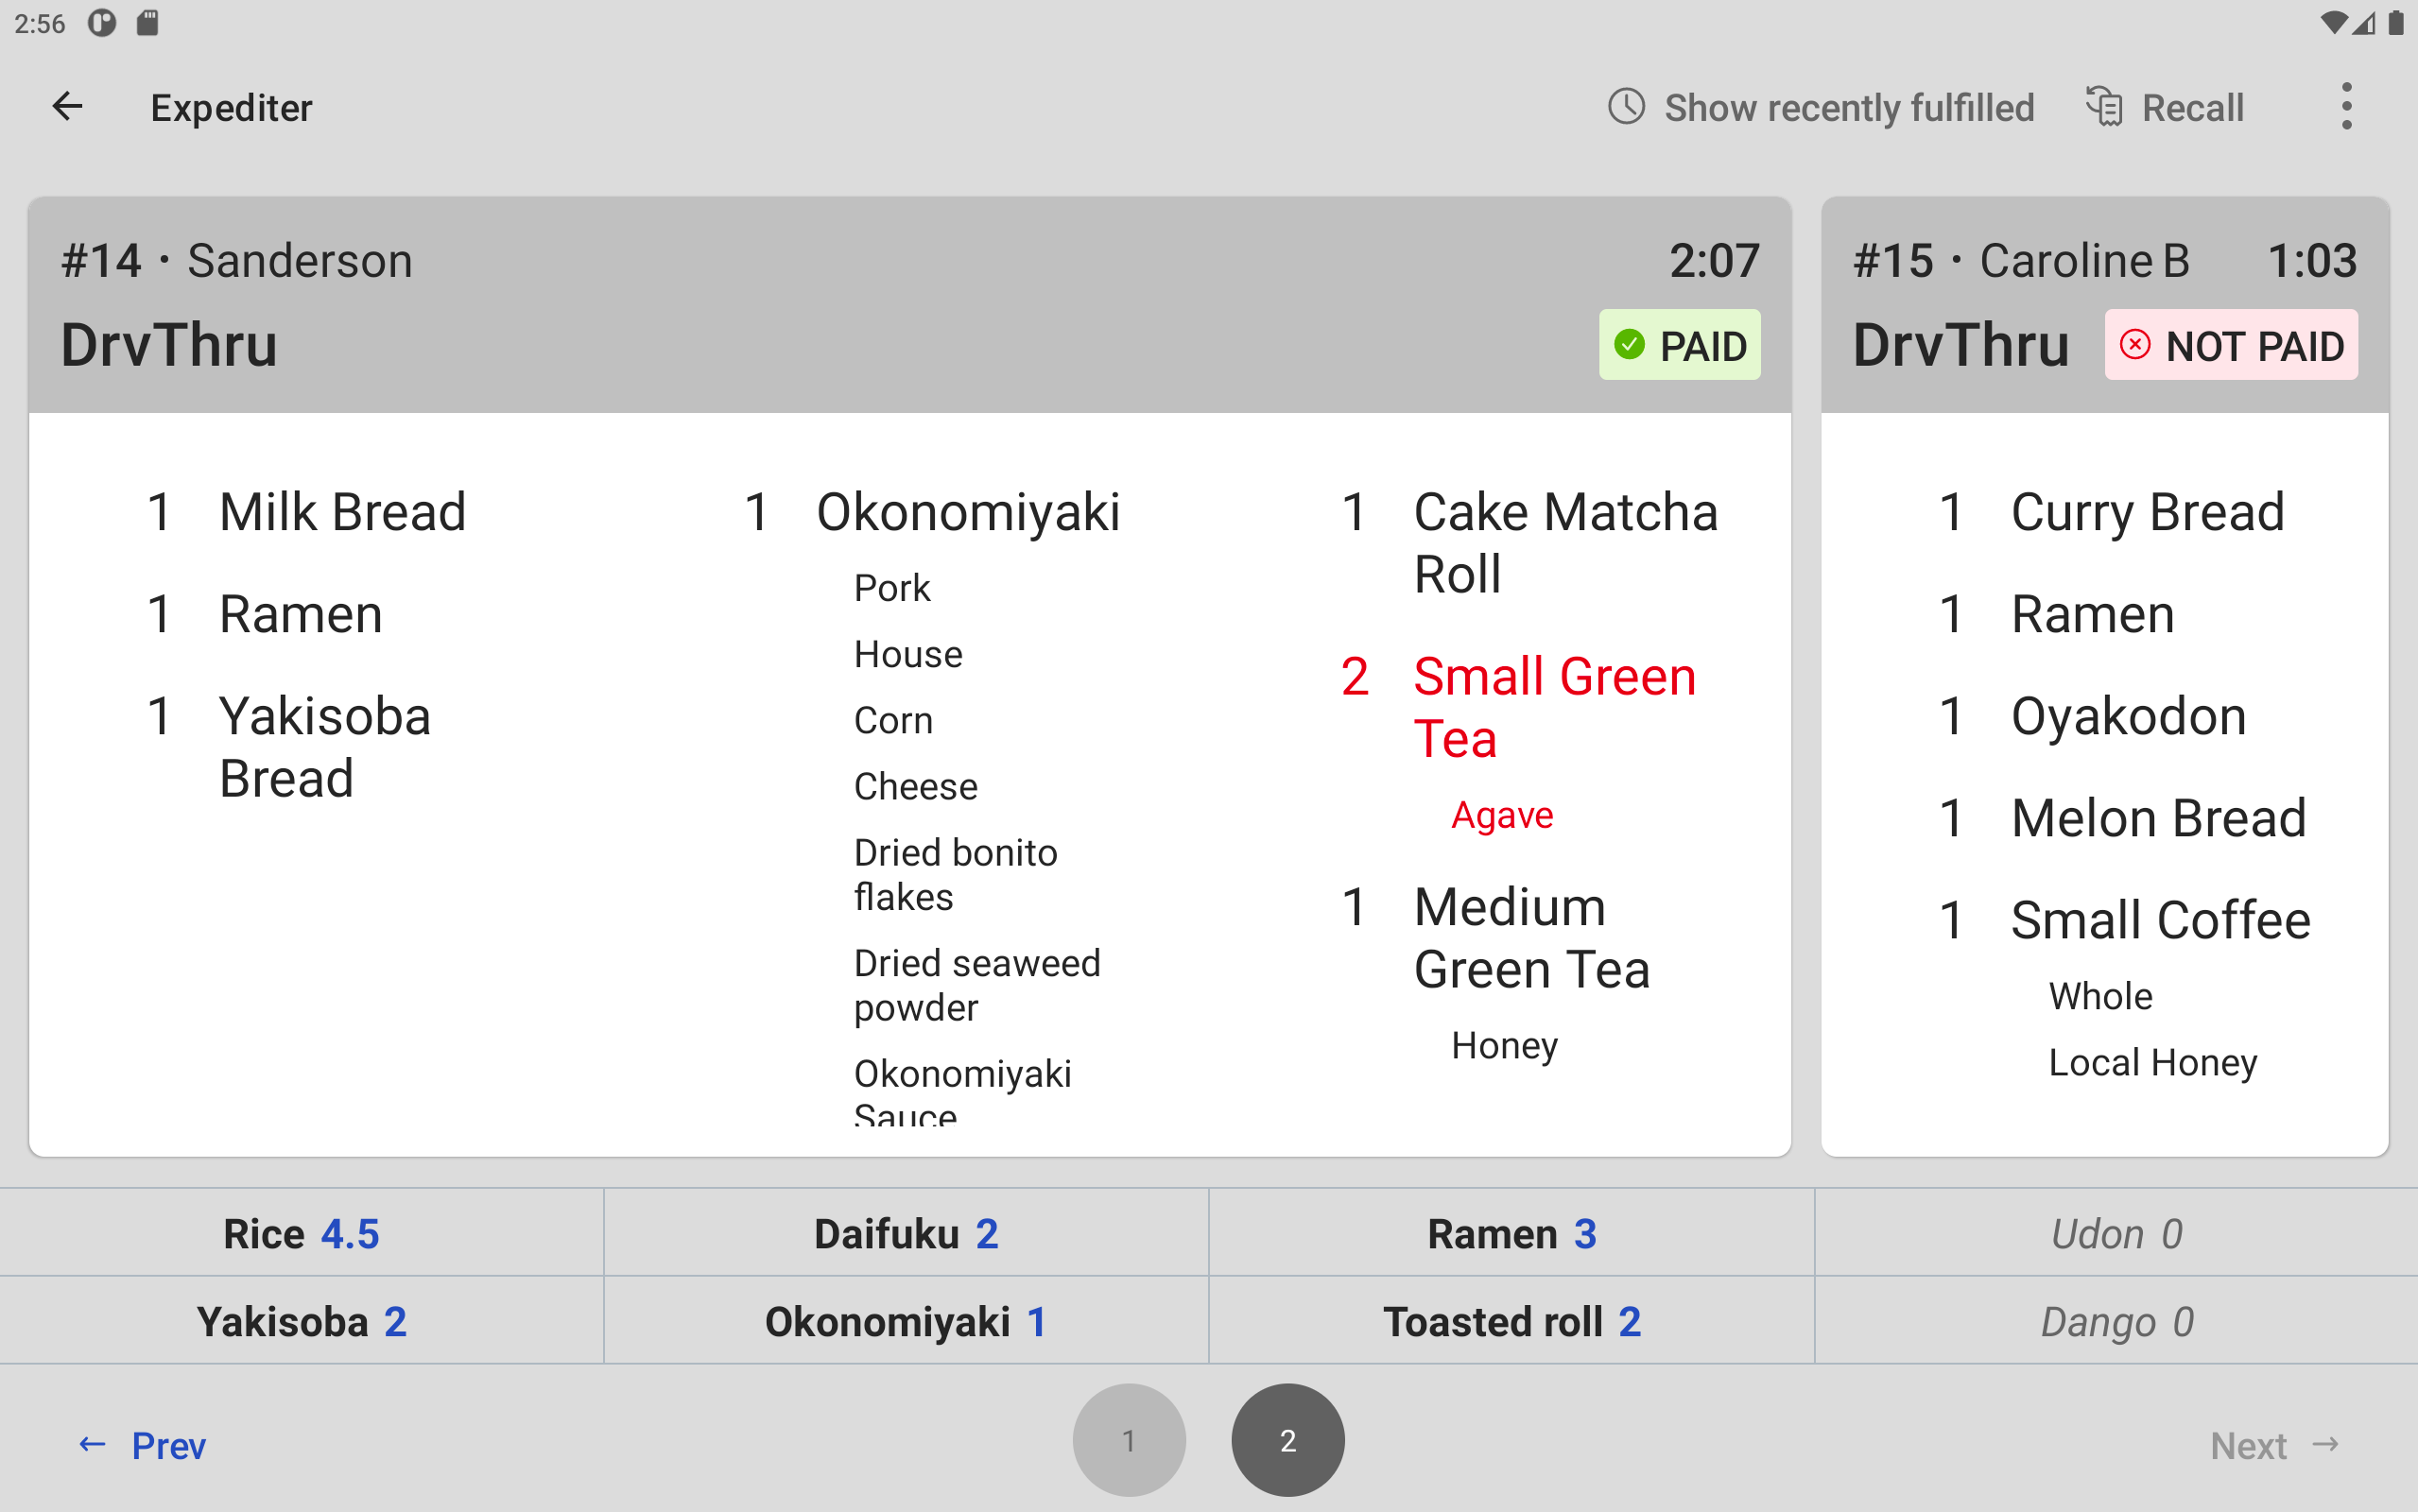
For more information about production items, see About production items.
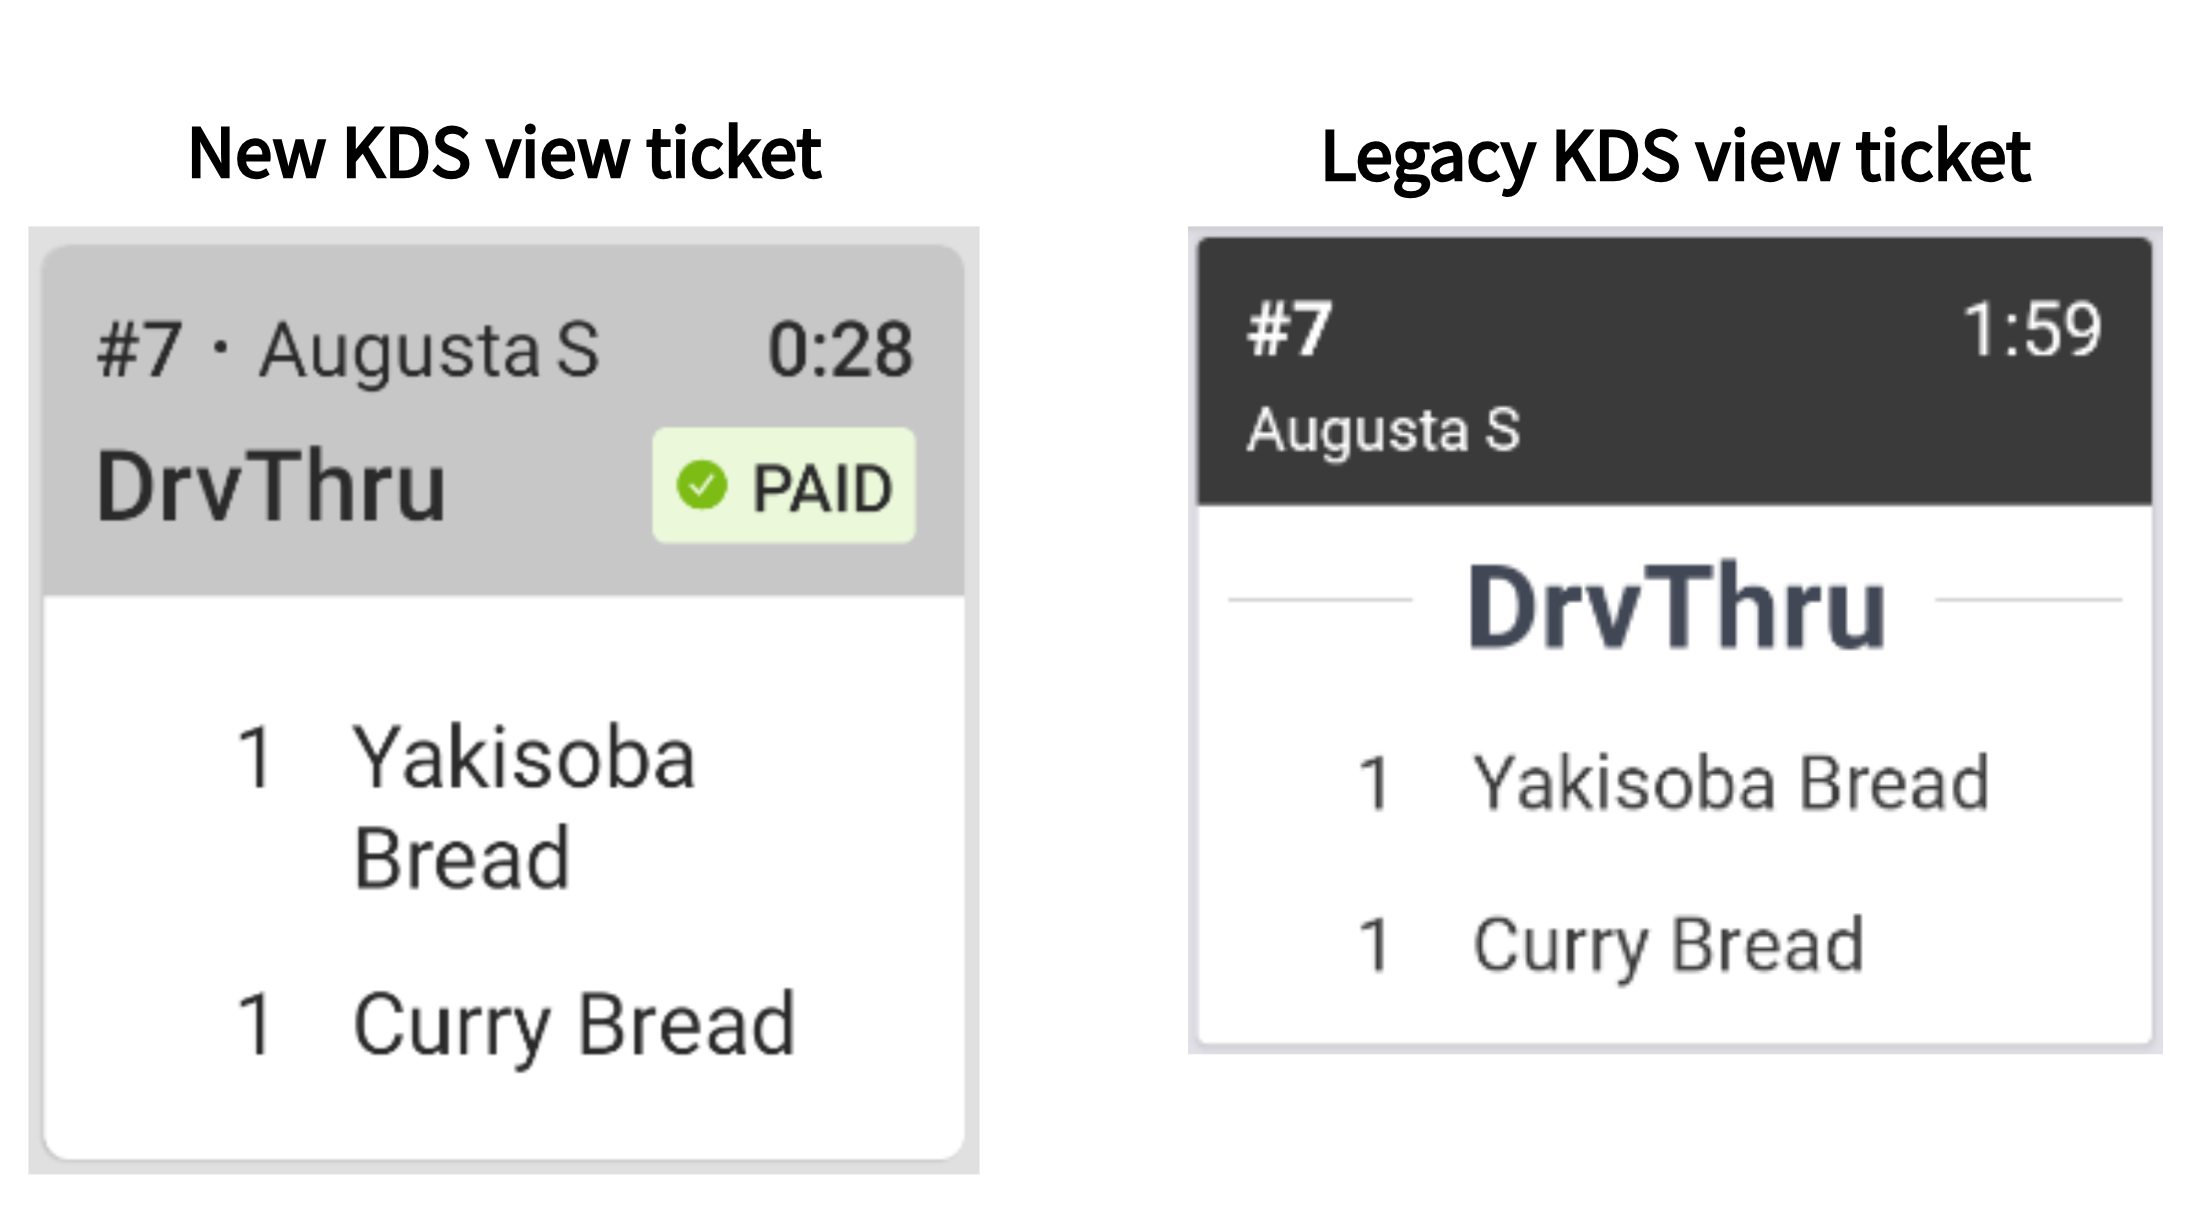
While legacy KDS view displays the dining option beneath the header, new KDS view has moved the dining option to the header itself.
Here is an example of a ticket on new KDS view, compared to a ticket on legacy KDS view.
In addition to the double-tap action, you can also swipe downwards anywhere on the ticket itself to either fulfill or unfulfill it for new KDS view. The motion fulfills or unfulfills the ticket depending on whether you have Double tap to fulfill or Double tap to unfulfill enabled. By default, the setting is Double tap to fulfill, meaning swiping downwards or double tapping fulfills the ticket.
While the average fulfillment timers for legacy KDS view are visible on the top left of the KDS device, average fulfillment timers for new KDS view appear on the bottom right and on top of kitchen tickets. On expediter KDS devices, the timer can be collapsed to only show the first expediter timer, or expanded to see all prep stations timers related to the expediter KDS device.
Here is an example of the average fulfillment timers on a prep station KDS device using new KDS view.
Here is an example of the average fulfillment timers on an expediter KDS device using new KDS view with most timers hidden.
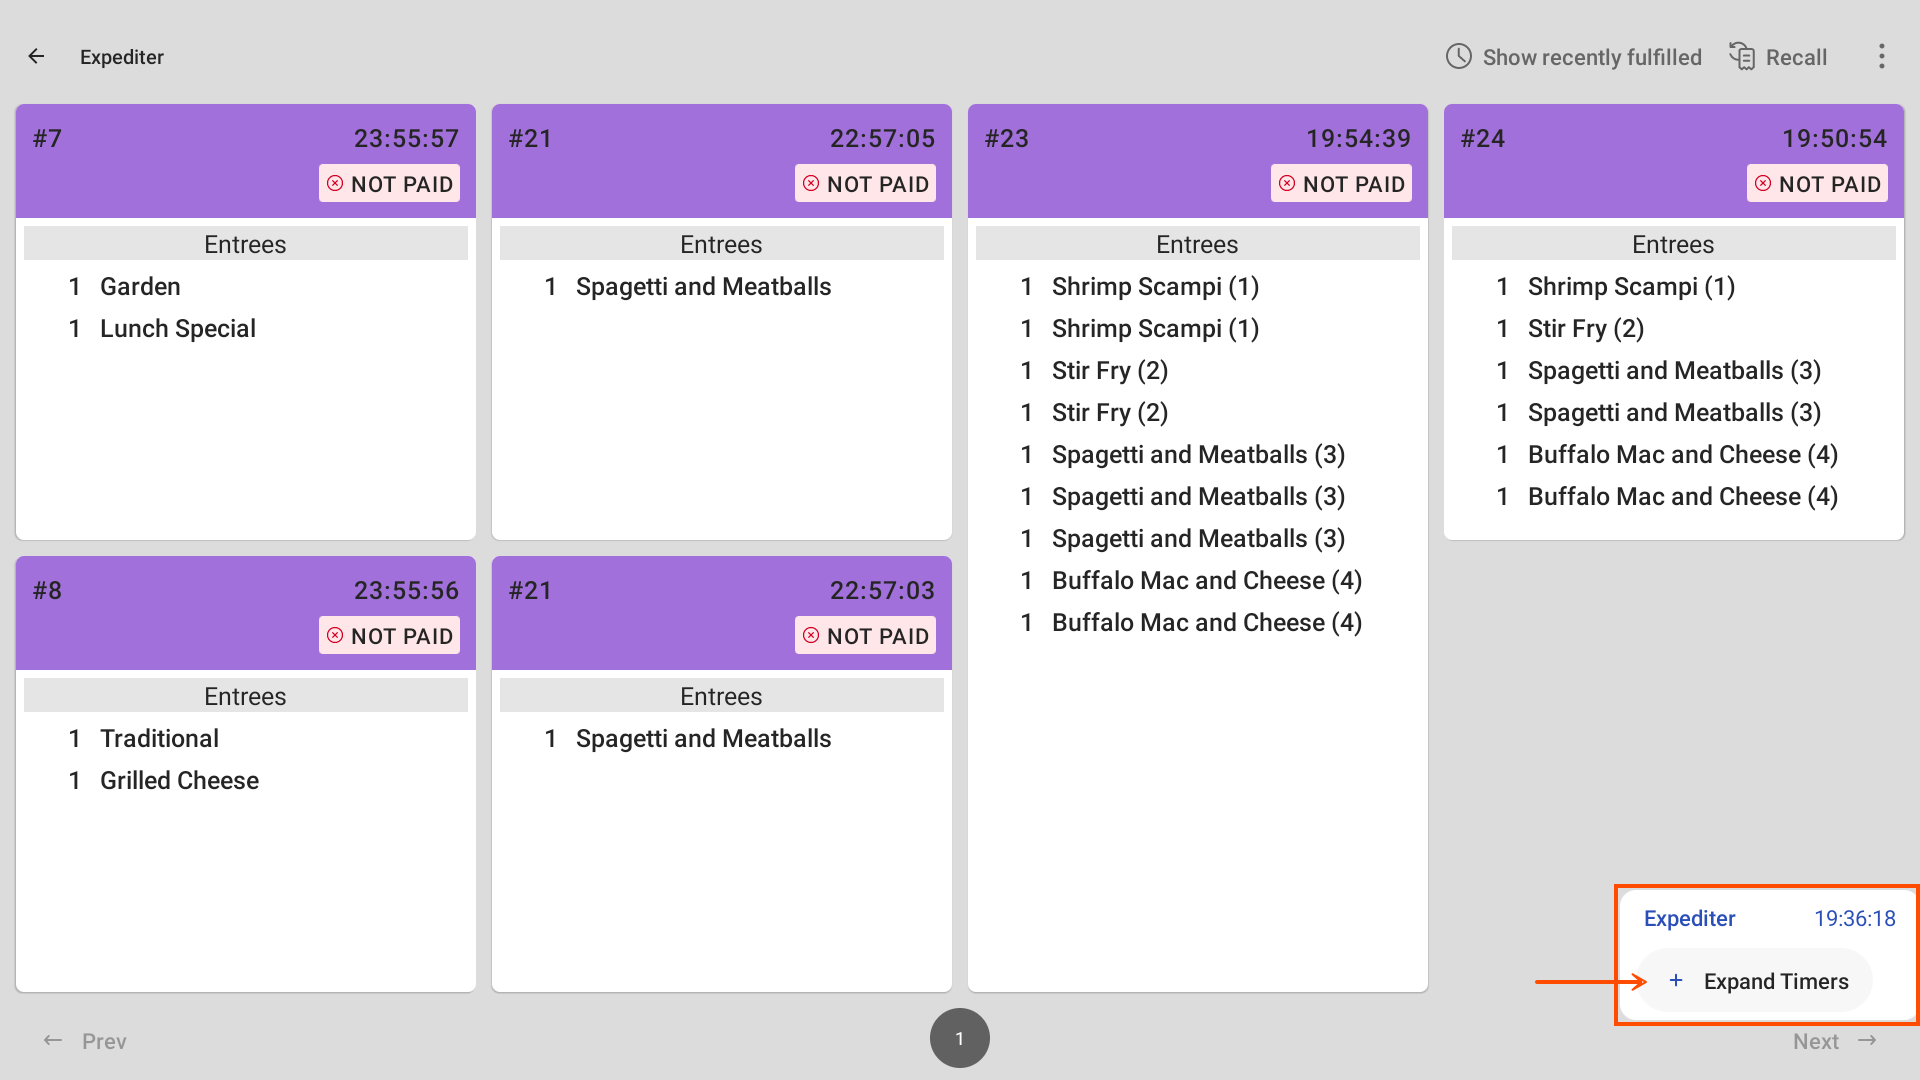
Select + Expand Timers to show all timers related to the expediter KDS device.
Here is an example of an expediter KDS device with all average fulfillment timers visible.
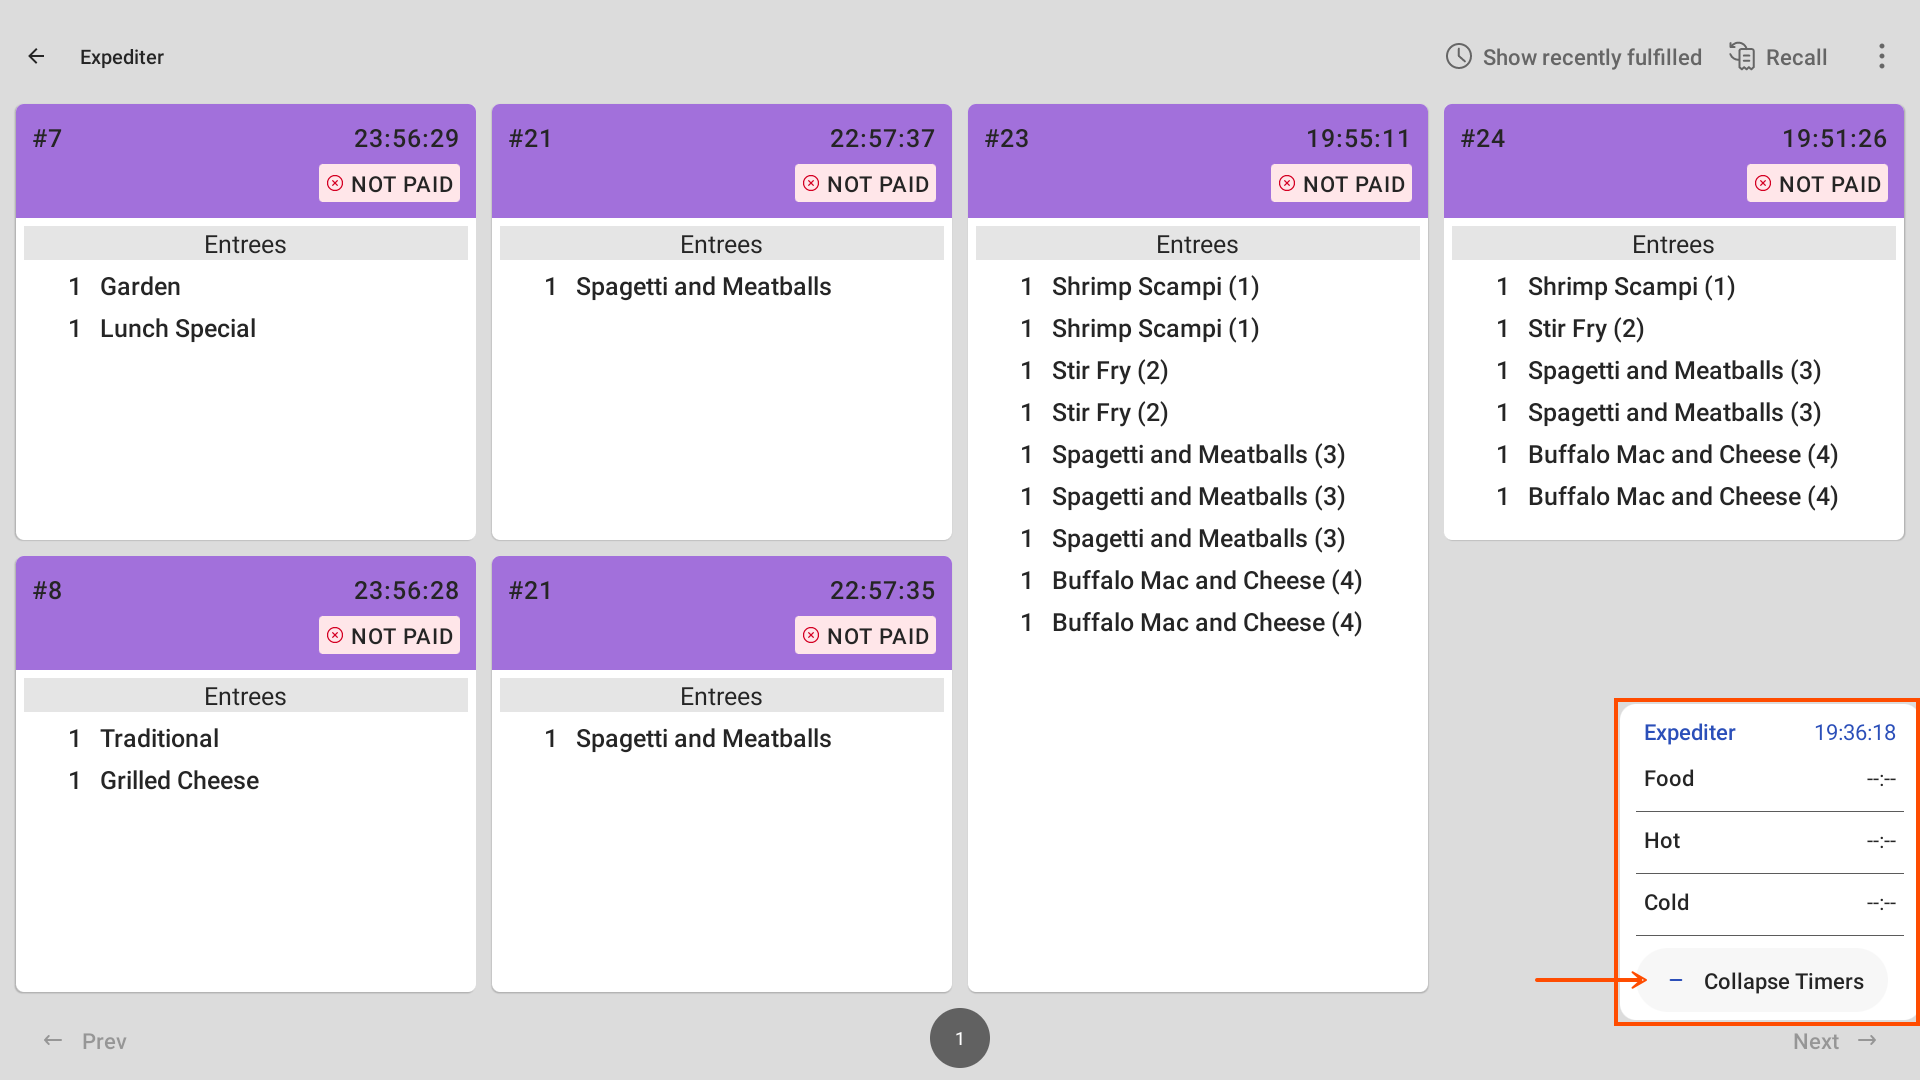
If there are more timers that do not fit on the expanded view, you can swipe up and down within the average fulfillment timer dialog to see timers that are not visible.
Select + Collapse Timers to hide all timers except for the expediter timer on the expediter KDS device.
For more information about average fulfillment timers, see Understanding average fulfillment timers.
When using new KDS view, use the following guidelines:
-
Do not use new KDS view on portable devices. New KDS view is not currently compatible with ToastGo1 and ToastGo2 devices. Using new KDS view on these devices can result in cropped contents and poor formatting.
-
Do not disconnect your local hub device from your router. The local hub device is required for offline mode with local sync. For more information about the local hub device, see Local hub devices.
-
Be aware that clearing the app data or uninstalling the Toast POS app on a new KDS view device will prompt you to choose settings that configure the appearance of your KDS device.