Timing order preparation is important, so that every component of the course or meal is ready at the same time. This helps increase guest satisfaction and reduce waste. Typically, employees send all of the items in an order to the kitchen at once (or all of the items in a course for a restaurant that uses courses). For online orders, items are sent to the kitchen at the same time automatically. In restaurants that use Toast KDS devices, this can result in all sent items firing immediately to the prep station KDS devices.
If the Toast platform fires all of the items in an order or course when they are sent to the kitchen, some items are fulfilled quickly and can end up getting cold (or warm) while waiting for the other items to be completed.
|
Note |
|
The item fire by prep time setting requires the Individual Item Tickets setting for KDS Settings to be set to Display all items from an order on a single ticket on the Kitchen > Printers, tickets, & KDS devices > Kitchen and ticket setup page to work properly. |
For example, an order contains Mozzarella Sticks, which take 60 seconds to prepare, and a Double Turkey Burger, which takes 240 seconds to prepare. The Mozzarella Sticks are ready 180 seconds before the Double Turkey Burger, which means it cools down at the expediter station while waiting to be served with the Double Turkey Burger.
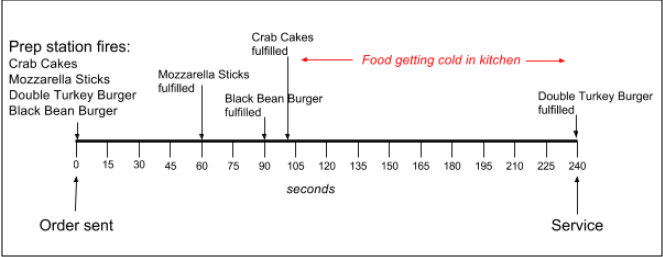
Many kitchens that experience this situation rely on employee experience or training to time when to actually fire items, or have an employee organize prep station efforts or send items based on timing requirements. While these approaches can be helpful, they can have uneven results, particularly in kitchens that use KDS devices in place of printed kitchen tickets.
An alternative is to provide a scheduling framework that fires the items in an order or course sequentially and automatically. The Toast platform bases this scheduling framework on how long it takes to prepare each menu item. If you configure prep times for your menu items and modifiers, employees can send all items to the kitchen, and the items do not appear on the prep station KDS device until the Toast platform automatically fires each one.
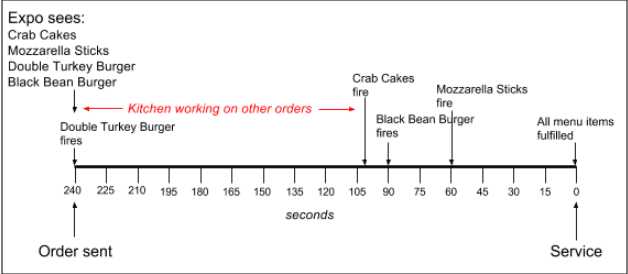
In this example, the Double Turkey Burger, which takes the longest time to prepare in this order, fires and appears on the prep station KDS device when the employee sends the items to the kitchen (or the online order is received). The other items do not fire or appear on a prep station KDS device until automatically scheduled to do so based on their prep times.
If an assigned prep station is configured to send to the expediter, tickets for all items appear on the expediter KDS device as soon as the employee sends the order to the kitchen. The expediter ticket includes the following visual cues to indicate item status:
-
Fired items appear in normal font (with KDS color-coding as configured).
-
Unfired items appear in gray italic font (with KDS color-coding as configured).
-
Fulfilled items have green check mark icons.
When the order illustrated in the timeline above is sent to the expediter KDS device, it appears like the following example.
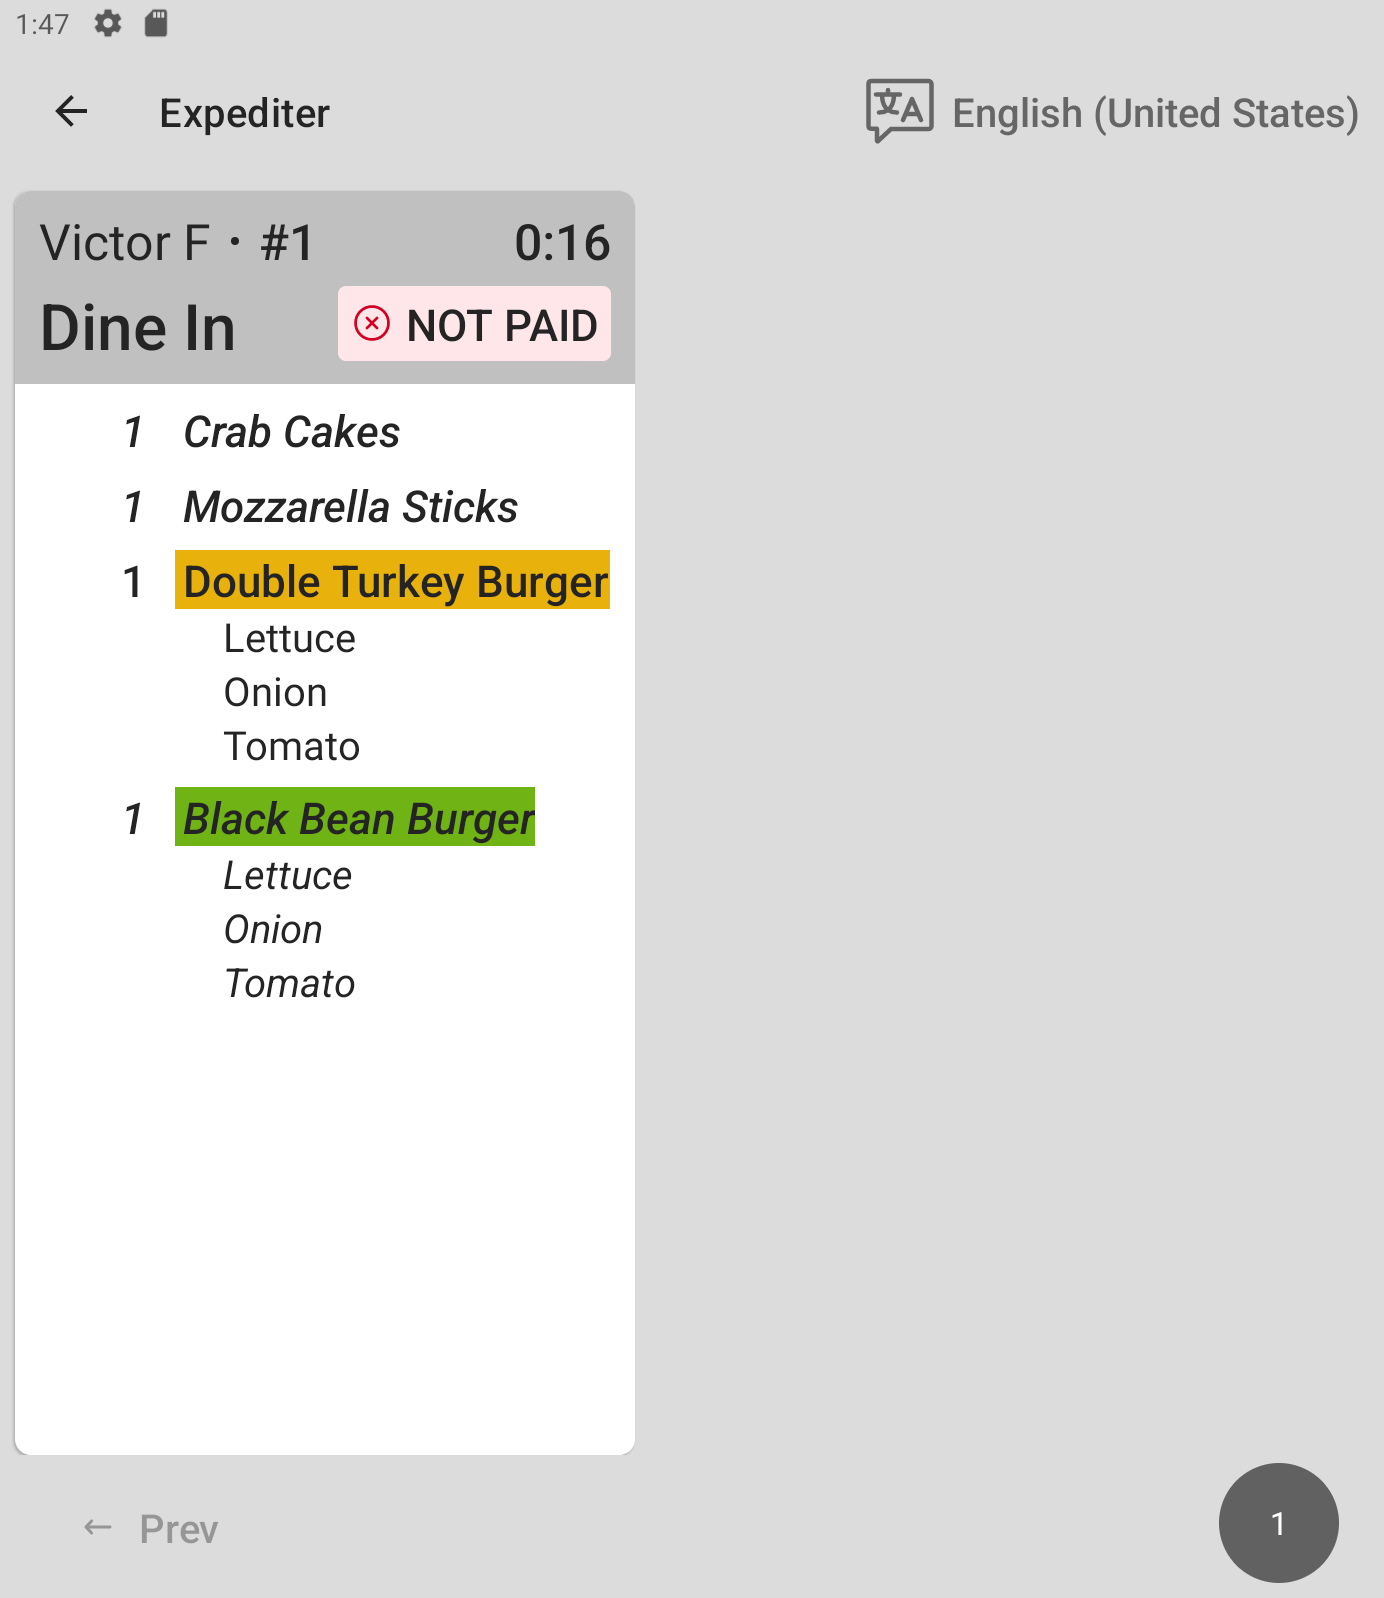
The Double Turkey Burger is fired first. The other items appear in italic font until they are fired.
On the prep station KDS device, the menu items appear as they are fired. Menu items and modifiers show up as separate tickets depending on the item prep time.
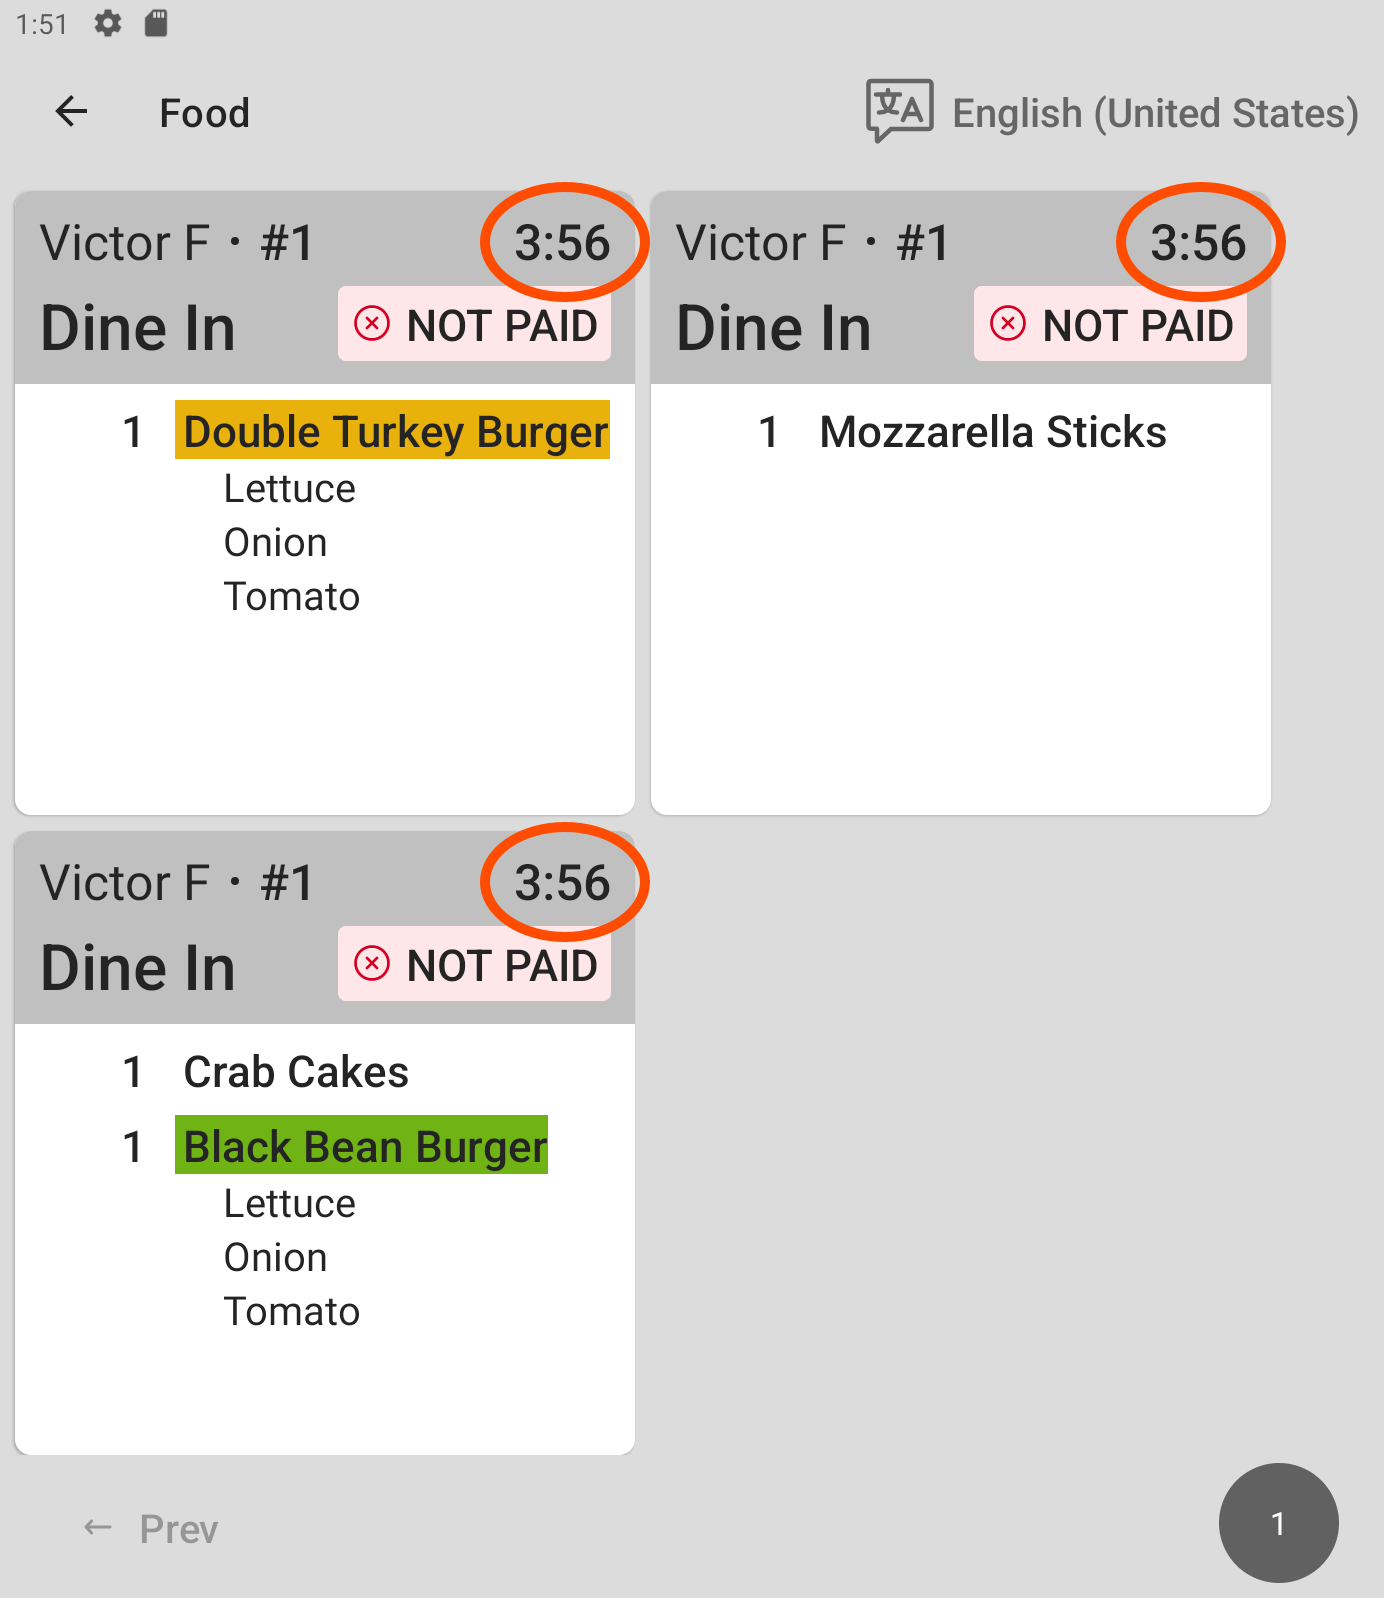
The Double Turkey Burger is fired first and appears first on the prep station KDS device. The Crab Cakes and Black Bean Burger have the same prep time, and are fired after the Double Turkey Burger. The Mozzarella Sticks have the shortest prep time and are fired last.
|
Note |
|
The ticket time in the top right of the ticket shows when the item was sent to the kitchen, not when the item was fired. |
For more information about ticket and fire times, see Interpreting ticket times and fire times.
If you decide to enable the item fire by prep time feature, consider the following:
-
This feature is only available in kitchens that use KDS devices to display prep station and expediter tickets. This feature is not supported for use with kitchen printers.
-
In addition to configuring menu items with their prep times, you can also configure prep times for modifiers that can have a direct effect on how long it takes to prepare a menu item.
-
You can give expediter KDS devices the ability to override configured prep times and fire or fulfill items ahead of their scheduled times.
-
If you void an item after it is fired, the Toast platform uses the original timeline to fire the remaining items. It does not adjust the scheduled firing times for the other items in the order.
-
In a restaurant that serves in courses, each course has its own timeline for item firing by prep time.

-
If you use online ordering, note that the quote time that displays when an online order is placed does not change based on the prep times of the items in the order. For more information about quote times and quote time strategies, see Quote time strategy overview.
-
To use the item fire by prep time feature, you must set the Individual Item Tickets setting for KDS Settings to Display all items from an order on a single tickets. To configure this setting, navigate to the Kitchen > Printers, tickets, & KDS devices > Kitchen and ticket setup page. The item fire by prep time feature applies only to an order or course with more than one item.
-
You can update all of your menu items and modifiers with prep times first, and then enable the item fire by prep time feature for automated scheduling when you are ready.
To configure your menu items to include prep times, you must have the 4. Restaurant Admin > 4.5 Edit Full Menu access permission. For information about adding prep times to modifiers, see Using prep times for modifiers.
To use the item fire by prep time feature, you must enable the item fire by prep time feature.
To add prep times to multiple items
-
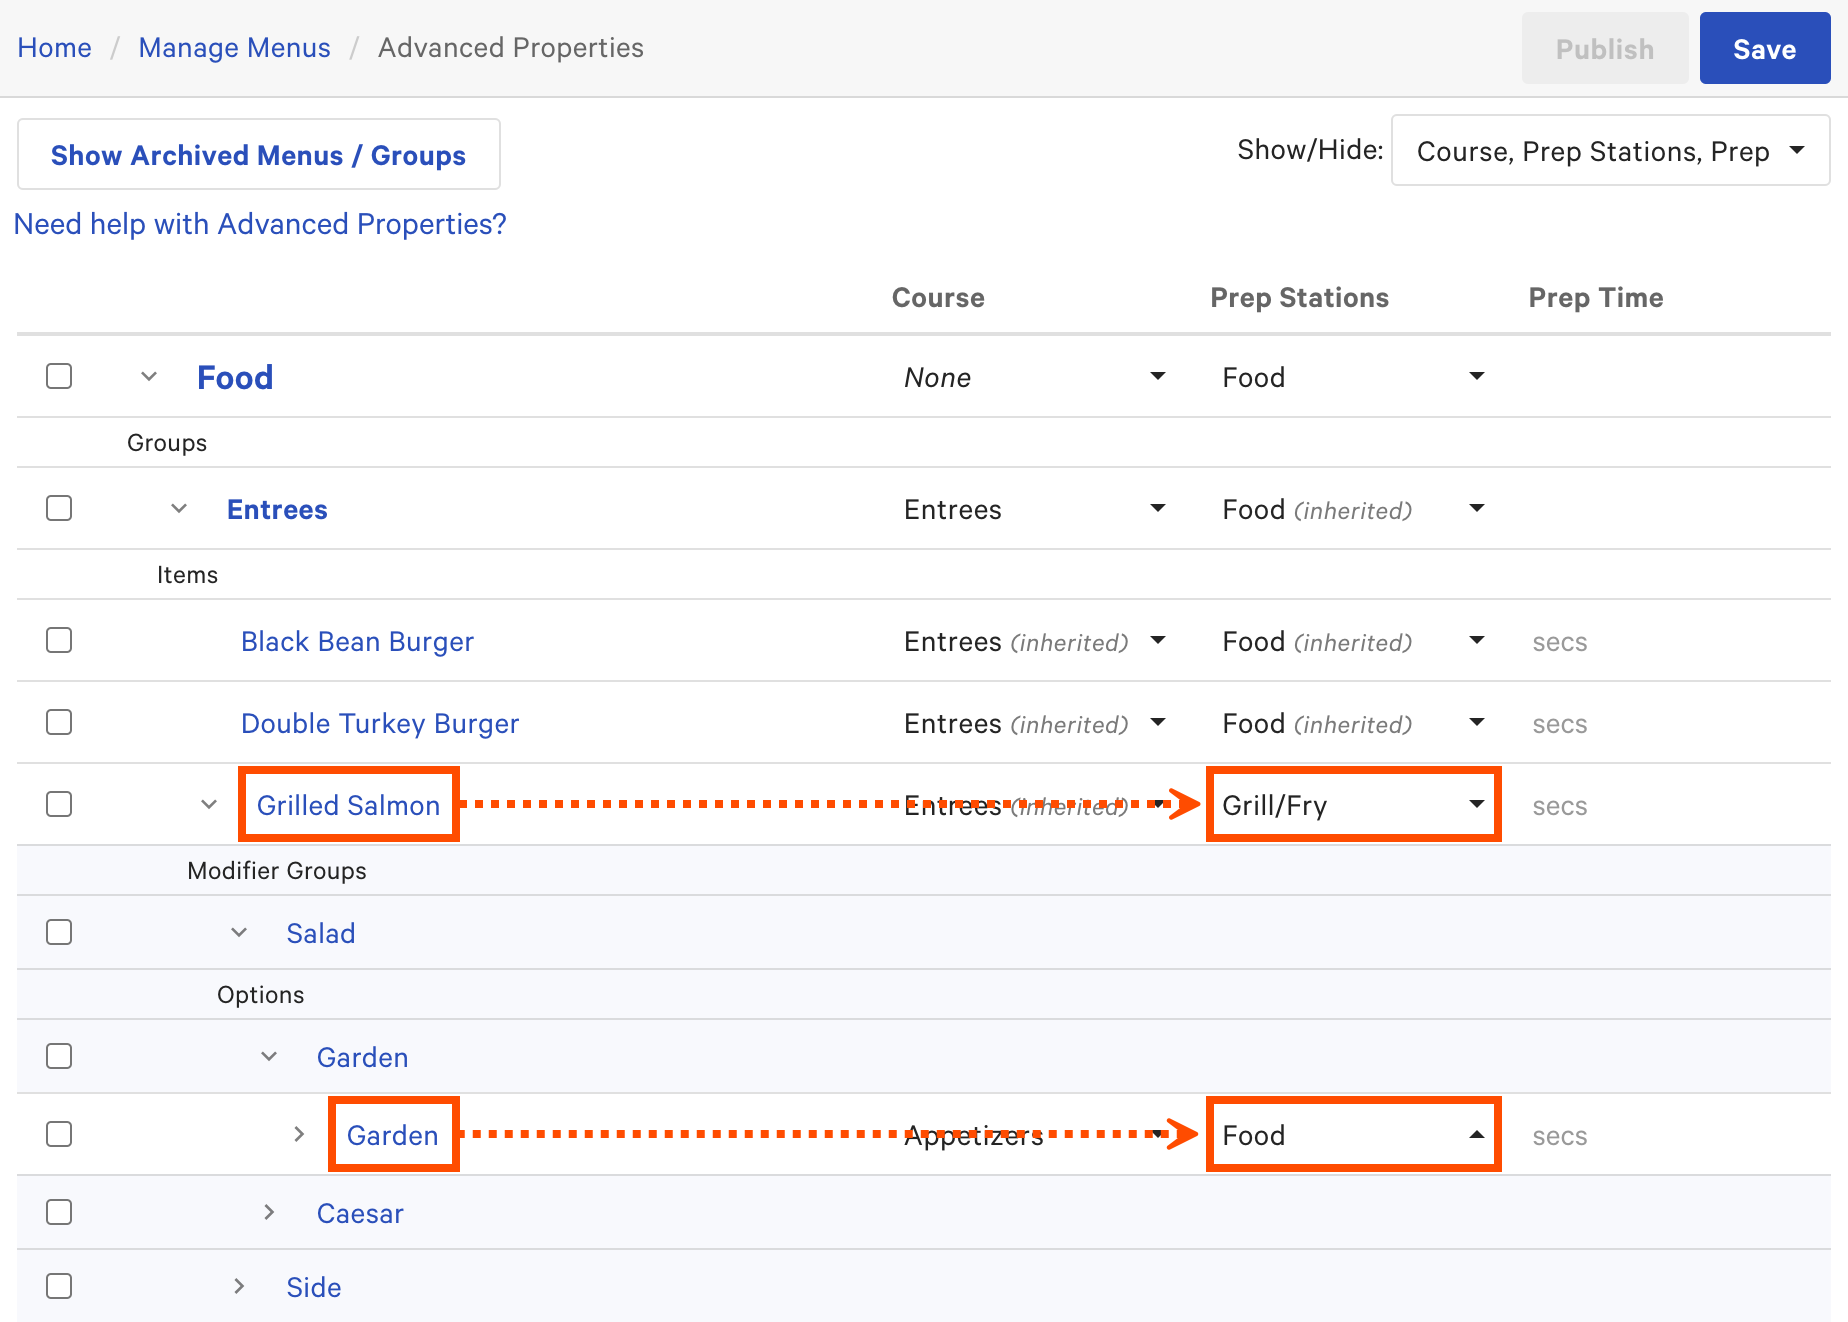
Choose Menus > Bulk management > Advanced properties to open the Advanced Properties page. An interactive grid is on the page.
-
To include the column for prep time values, navigate to the Show/Hide dropdown menu and select Prep Time.
-
Expand the corresponding menu and menu group for the menu items you want to add prep times to. Each editable prep time cell includes the secs placeholder text.
-
For each menu item, enter the number of seconds it takes to prepare in the Prep Time cell.
-
Enter all prep times in seconds.
-
To fire an item last in every order or course (no prep time required), enter 0 seconds.
-
To fire an item as soon as an order or course is sent (always start prep as early as possible), leave the cell blank.

-
-
Save and publish your changes.
If the Item Fire by Prep Time setting has the Enable item fire by prep time checkbox selected, your changes take effect as soon as you publish.
To add a prep time to a single item
-
Access Toast Web and then choose Menus > Menu manager.
-
Select Full menu view, then navigate to the menu item you want to edit. Select the item to see its side pane.
-
Scroll down to the bottom of the side pane and select More item settings to open the menu item's classic details page.
-
Navigate to the Preparation section, and in the Preparation Time field, enter the number of seconds the menu item takes to prepare.
-
Enter the time in seconds.
-
To fire an item last in every order or course (no prep time required), enter 0 seconds.
-
To fire an item as soon as an order or course is sent (always start prep as early as possible), leave the cell blank.
-
-
Save and publish your changes.
If the Item Fire by Prep Time setting has the Enable item fire by prep time checkbox selected, your change takes effect as soon as you publish.
To enable the item fire by prep time feature, you must have the 6. Web Setup > 6.2 Kitchen / Dining Room Setup access permission.
To enable item fire by prep time
-
Choose Kitchen > Pacing > Meal pacing to open the Meal pacing page.
-
Verify that the Item Fire by Prep Time setting has the Enable item fire by prep time checkbox selected.
-
Save your changes.
-
Choose Kitchen > Printers, tickets, & KDS devices > Kitchen and ticket setup to open the Kitchen page.
-
Verify that the Individual Item Tickets setting is set to Display all items from an order on a single ticket for KDS Settings. The item fire by prep time feature applies only to tickets with more than one item, so selecting another setting prevents you from benefiting from the prep times you configure.
-
Save and publish your changes. The Toast platform uses prep times to schedule item firing as soon as you publish your changes.
The ability to override the automated firing setting gives expediter KDS devices a way to fire items to prep stations ahead of their scheduled times, and mark scheduled items as fulfilled or unfulfilled as needed. If you use two-level fulfillment, enabling the overriding prep times setting gives both levels of expediter KDS devices the option to fire, fulfill, and unfulfill items.
Your expediter KDS devices interact with tickets differently based on whether you have the Fulfill Items setting set to Enable individual item fulfillment or to Disable individual item fulfillment. To configure this setting in Toast Web, navigate to Kitchen > Printers, tickets, & KDS devices > Kitchen and ticket setup and scroll to the Ticket Screens section.
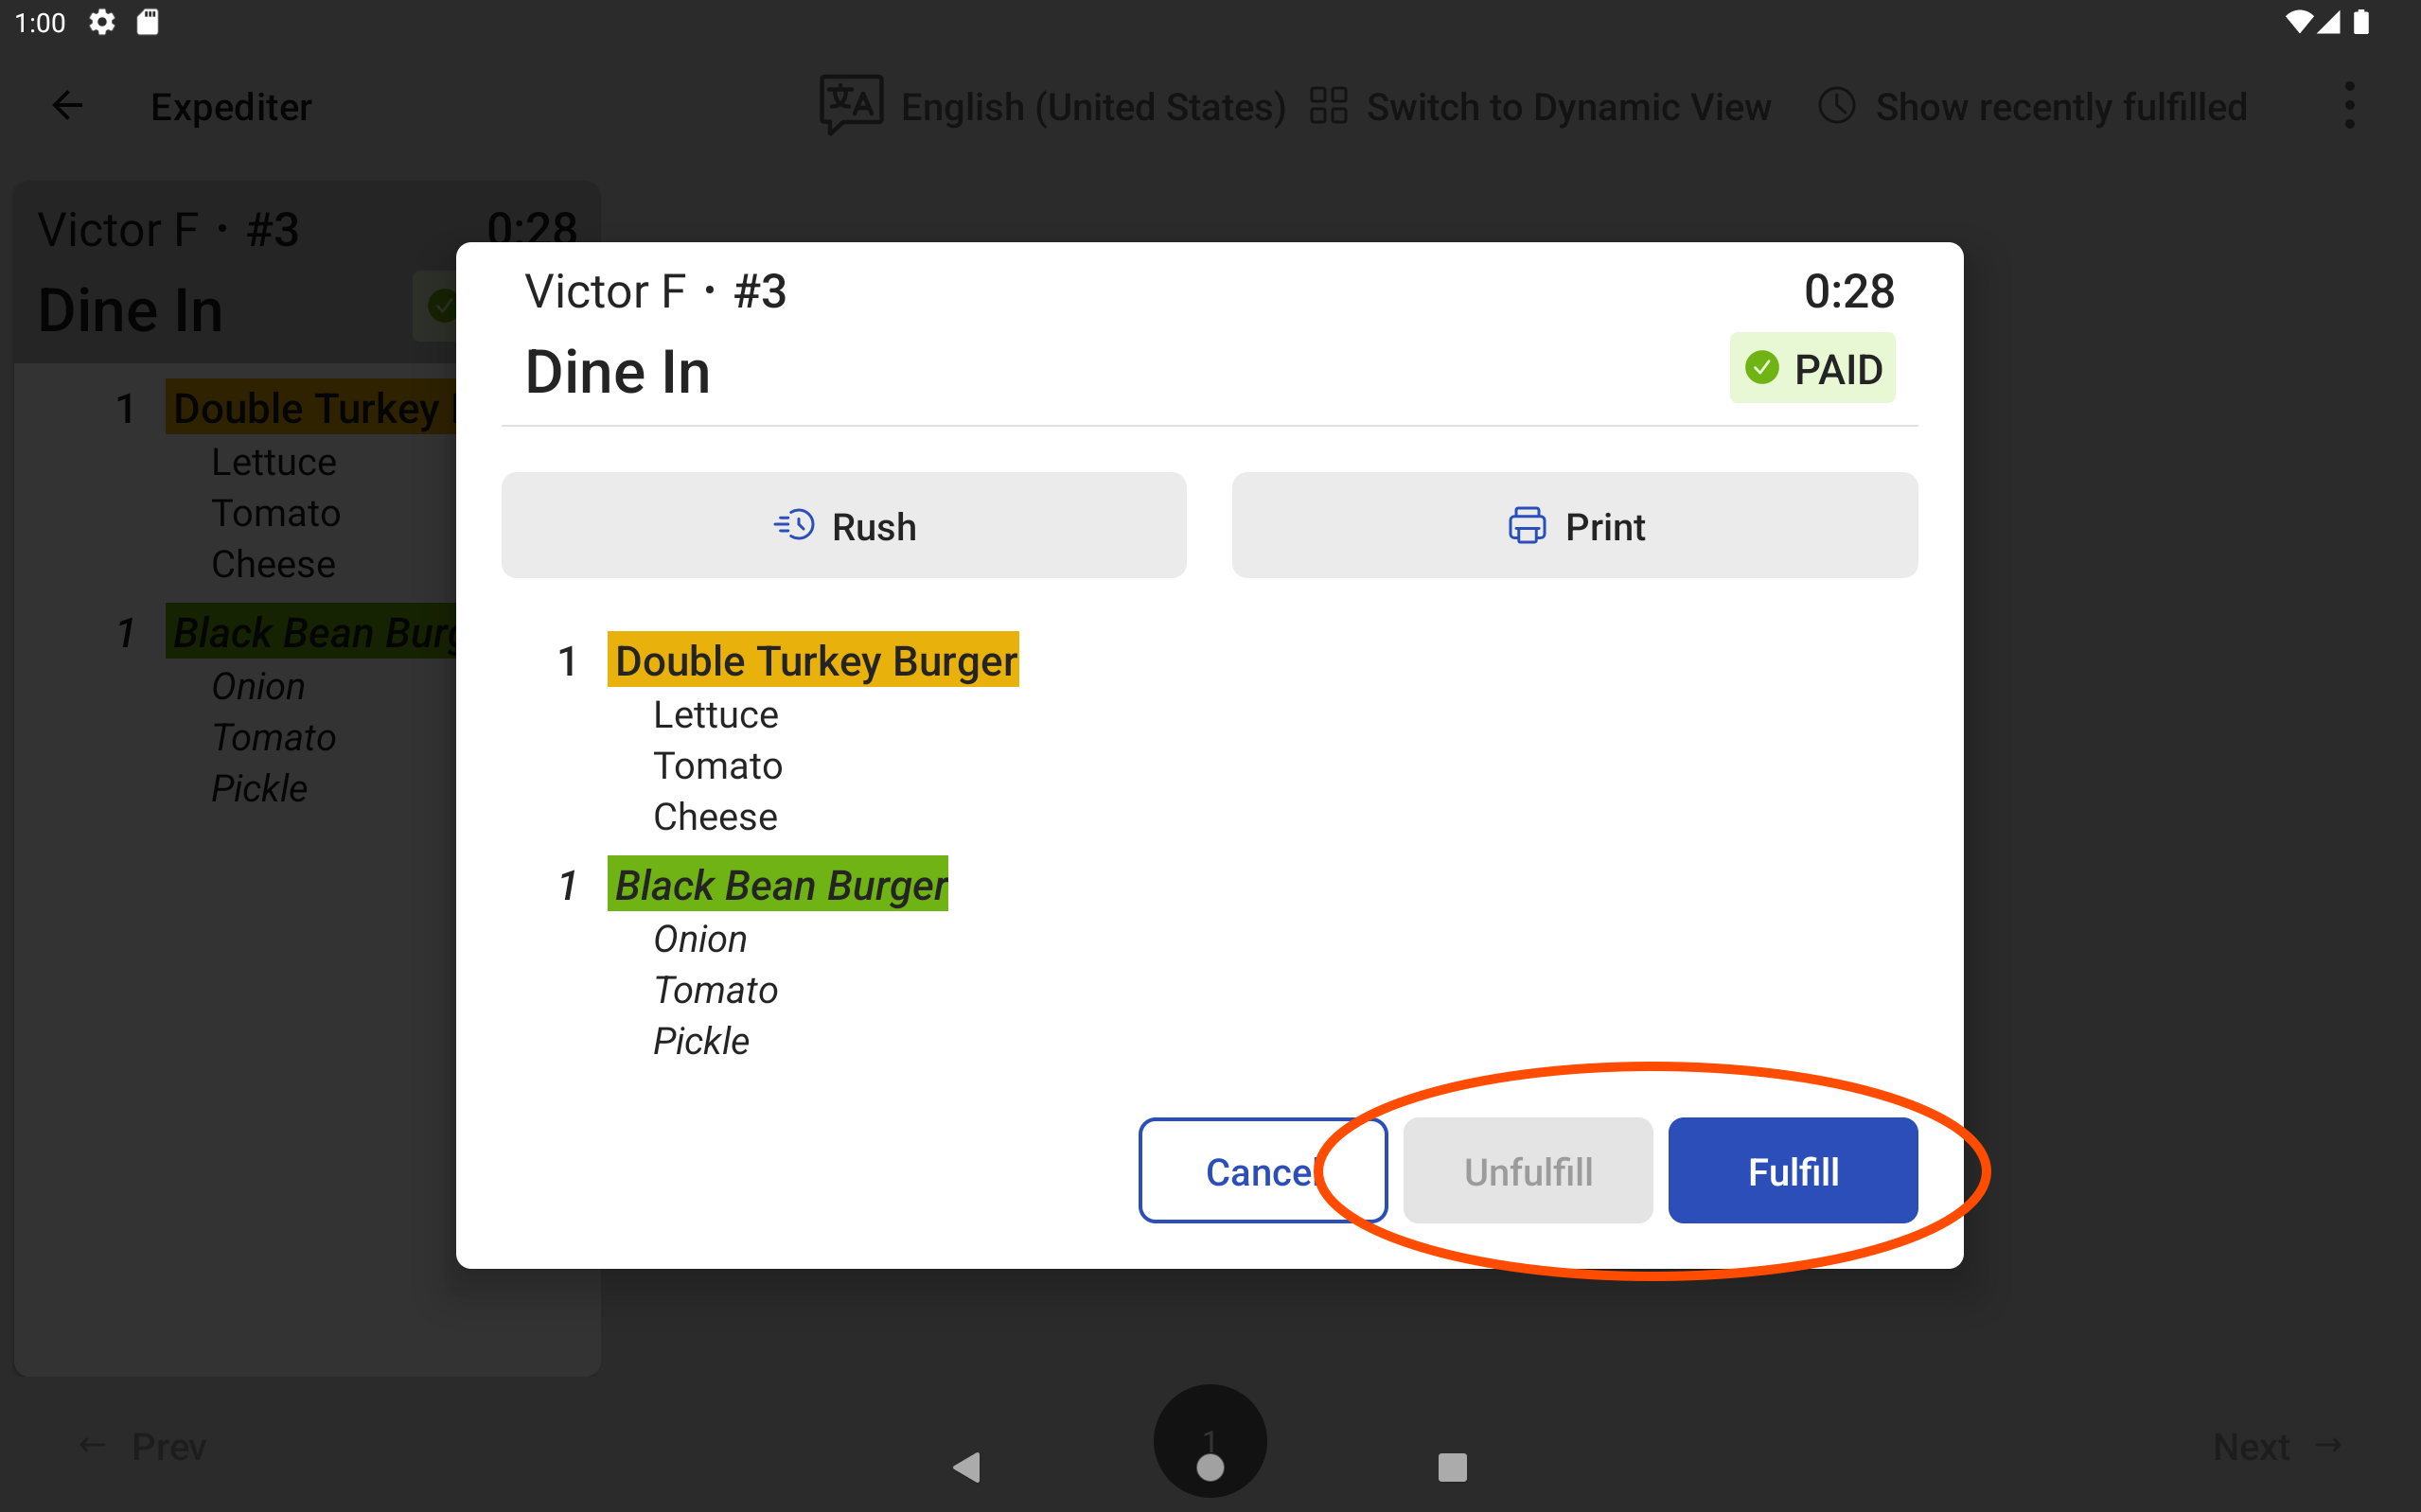
When the Fulfill Items setting is set to Enable individual item fulfillment, to fire or fulfill items ahead of schedule, an employee selects a ticket on the expediter KDS device and a dialog opens. The employee then selects one or more of the items in the dialog to fire or fulfill.
In the example, the Double Turkey Burger item was fired, and the only available option is Fulfill.
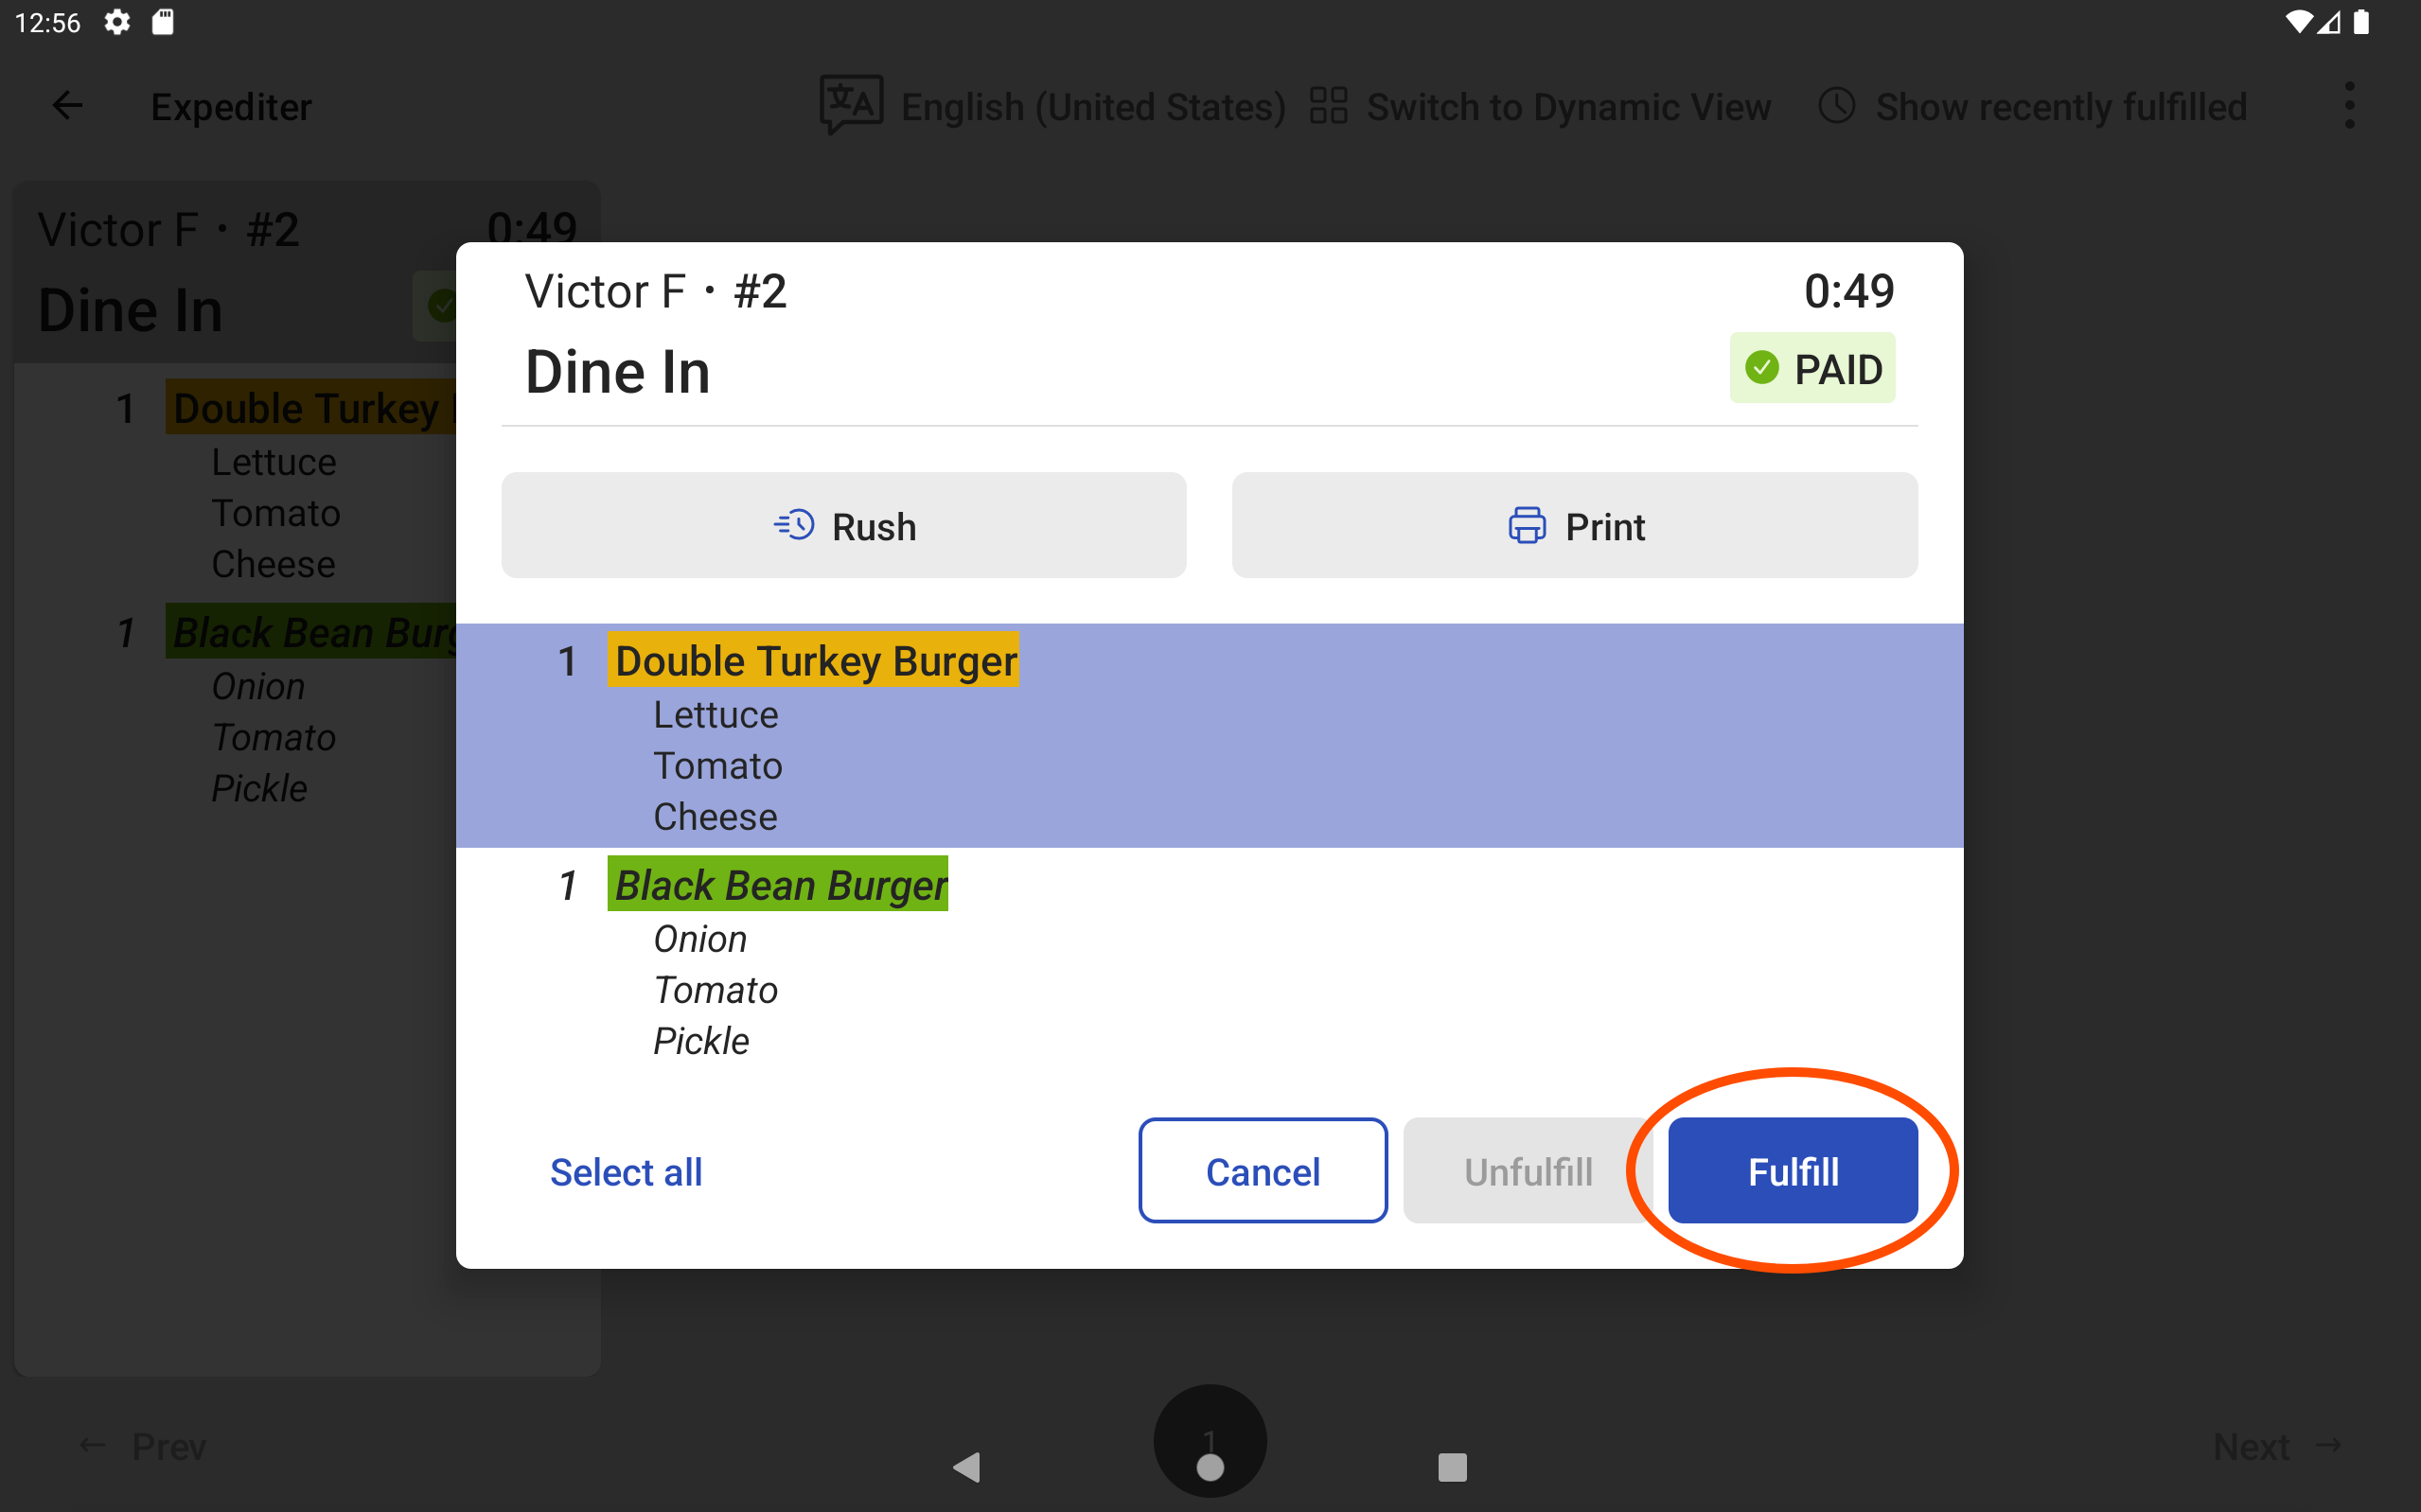
The Black Bean Burger item has not been fired and has the options to Fire before its prep time is reached or to Fulfill when selected.
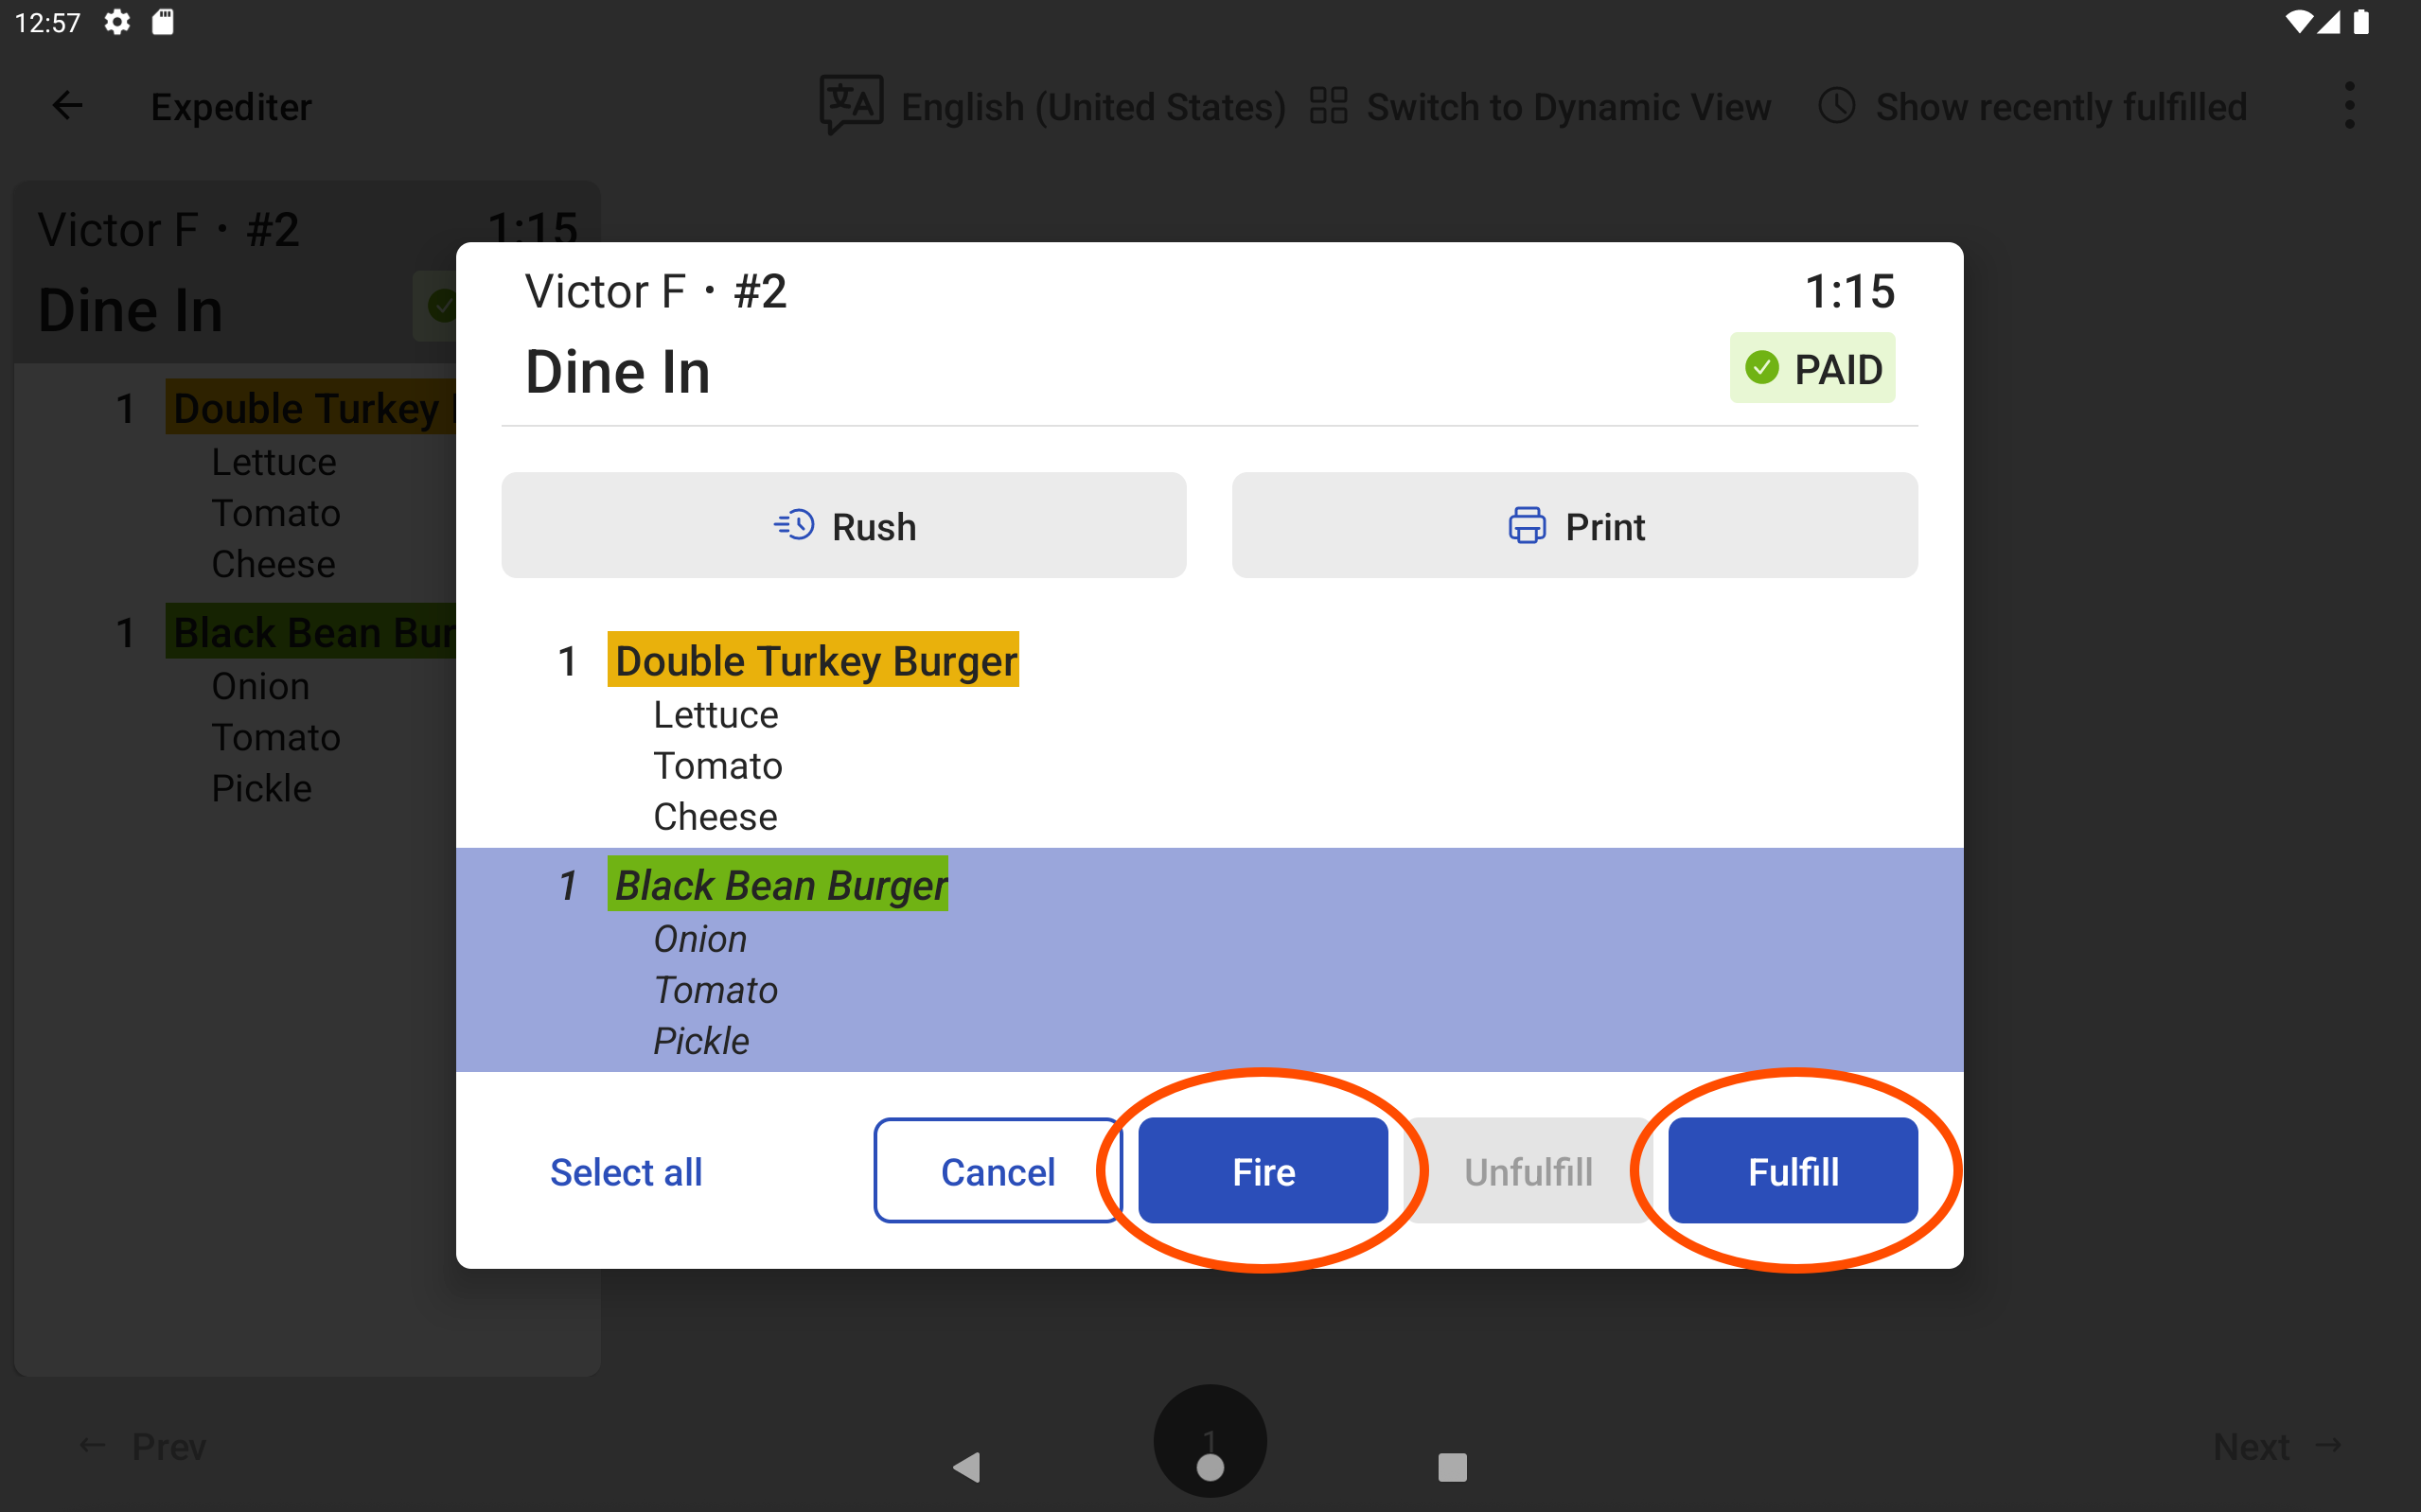
If the employee selects more than one item, only actions that apply to all of the selected items are shown and available. In the above example, selecting both items only enables the Fulfill option because the Double Turkey Burger item was already fired. Selecting a fulfilled item enables the Unfulfill option.
When the Fulfill Items setting is set to Disable individual item fulfillment, to fire or fulfill items ahead of schedule, an employee selects a ticket on the expediter KDS device and new actions are shown and available.
In new KDS view, these options are available in a dialog that opens when you select the ticket. Here is an example of the options.
The following actions for a ticket in new KDS view include Fulfill, which fulfills all of the fired and unfired items on the ticket.
|
Note |
|
Currently, in new KDS view you cannot fire a ticket that contains an unfired item. You can only fire an individual item if you have the Fulfill Item setting set to Enable individual item fulfillment. |
To unfulfill a ticket, select the Show Recently Fulfilled option at the top of the screen and then select the ticket. In the ticket dialog, the Unfulfill action appears.
In legacy KDS view, these options appear when you select the ticket in the title bar at the top of the screen. Here is an example of the options.

Legacy KDS view includes:
-
Fire: This action fires all of the unfired items on the ticket. The Fire action appears only if the ticket includes an unfired item.
-
Fulfill: This action fulfills all of the fired and unfired items on the ticket.
To unfulfill a ticket, select the Show Recently Fulfilled option at the top of the screen and then select the ticket. The Unfulfill action appears in the title bar.
To configure your KDS device so that an expediter can fire items ahead of schedule, you must have the 4. Restaurant Admin > 4.5 Edit Full Menu access permission.
To configure prep time override for expediter KDS devices
-
Choose Kitchen > Printers, tickets, & KDS devices > Kitchen and ticket setup to open the Kitchen page and scroll to the Expediter section.
-
Set the Override Item Prep Time setting to Yes.
-
Save and publish your changes. If you enable this option in a kitchen with two-level fulfillment, both expediter KDS devices have the same options to fire, fulfill, and unfulfill items.
You can define prep times for modifiers as well as for menu items. Based on the configuration settings for your restaurant and for the associated menu item and modifier, the Toast platform uses a modifier's prep time in one of the following ways.
-
For an integral modifier, which is a modifier that is necessary to the completeness of its parent menu item, the Toast platform combines the prep times of the modifier and the menu item to calculate the prep time for the item.
-
For an independent modifier, which is a modifier that is prepared separately from its parent menu item, the Toast platform uses the modifier prep time to schedule and fire the modifier on its own ticket.
Some modifiers have a direct effect on how long it takes to prepare the parent menu item. For example, how thoroughly to cook a beef item affects how long it is cooked. A hamburger that is ordered rare takes less time to prepare than a hamburger that is ordered well done. For modifiers like these, which are integral to the parent menu item, you configure prep times that add to, or subtract from, the parent menu item's prep time.
For example, most guests order your Hamburger cooked medium, so you set the menu item to have a prep time of 460 seconds. To accommodate guests who want the item cooked to other temperatures, which take more or less time than a medium burger to prepare, the menu item has a modifier group of meat temperature options.
-
The prep time for the Medium modifier is set to 0.
-
It takes a minute less time to cook a burger to rare than to medium, so you set the prep time for the Rare modifier to -60.
-
It takes two minutes longer to cook a burger to well done than to medium, so you set the Well Done modifier to 120.
The Toast platform combines the prep time of the parent menu item with the prep time of the specified integral modifier. In this example, the result is that orders for the Hamburgers with the Rare modifier are scheduled to take 400 seconds, with the Well Done modifier are scheduled to take 580 seconds, and with the Medium modifier are scheduled to take 460 seconds.
To create an integral modifier:
-
Verify that the modifier shares at least one prep station with the parent menu item.
-
If using courses or pacing, either:
-
The modifier must inherit its assigned course from the parent entity, or
-
The modifier must have no course assigned, or
-
The Modifier Course Firing setting must be set to Do not fire modifiers separately.
-
Before you configure prep times for integral modifiers, consider the following.
-
If the integral modifier group is associated with more than one menu item, the prep time is affected for every parent menu item that uses that modifier.
-
You cannot configure prep times for pre-modifiers. For more information about pre-modifiers, see this Toast Support article.
To configure prep times for modifiers that have a direct effect on how long it takes to prepare an item you must have the 4. Restaurant Admin > 4.5 Edit Full Menu access permission. You must also enable the item fire by prep time feature.
To configure prep times for integral modifiers
-
Determine how much time each modifier adds to, or subtracts from, the menu item's prep time.
-
Choose Menus > Bulk management > Advanced properties. An interactive grid appears.
-
To include the column for prep time values, from the Show/Hide dropdown select Prep Time.
-
Expand the corresponding menu, menu group, items, modifier groups, and modifiers for the modifiers you want to add prep times to. The notation "secs" appears in each editable prep time cell.
-
Enter the number of seconds that the modifier adds to or subtracts from the menu item prep time in the Prep Time cell.
-
Enter all times in seconds.
-
To reduce the item prep time, enter a negative number in the format
-{seconds}. For example, -60.Note
If the total prep time for a menu item and its modifier(s) is negative, the Toast platform uses a prep time of 0 seconds, which fires last in every order or course.
-
If a modifier does not change the item's prep time, set the prep time to 0 seconds or leave it blank.
-
-
Save and publish your changes.
In some cases, the modifier selected for a menu item is prepared and served separately from the menu item. For example, an entree includes a side salad that is included with the menu item, but prepared and served before the entree. You can configure prep times for independent modifiers so that the Toast platform automatically schedules and fires independent modifiers in the same way that menu items are scheduled and fired.
For example, you offer several salad options with your entrees, including a Caesar Salad that is prepared tableside and a Garden Salad that is prepared in the kitchen. You can define a different prep time for each salad so that, when the same party includes multiple orders, all of the salads will be served at the same time.
To create an independent modifier, you can either:
-
Verify that the modifier does not share any assigned prep stations with the parent menu item, or
-
Assign a course to the modifier (do not inherit from the parent entity) and, if course pacing is enabled, set the Modifier Course Firing setting to Fire separately from its configured course.
Before you configure prep times for independent modifiers, consider the following.
-
If the independent modifier group is associated with more than one menu item, all of those menu items must be configured to specify a course, and not inherit it. Otherwise, the Toast platfrom treats the modifier as an integral modifier for some menu items, and as an independent modifier for other menu items.
-
If you use different prep stations between parent menu items and modifiers to configure independent modifiers and an independent modifier group is associated with more than one menu item, all of those menu items must have different prep stations from the independent modifier group. Otherwise, the Toast platform treats the modifier as an integral modifier for some menu items and as an independent modifier for other menu items.
To configure a prep time for a modifier that is prepared independently of its associated menu item, you must have the following access permissions to Toast Web.
-
4. Restaurant Admin > 4.5 Edit Full Menu
-
6. Web Setup > 6.2 Kitchen / Dining Room Setup
You must also enable the item fire by prep time feature.
To configure prep times for independent modifiers
-
Determine how many seconds the modifier requires to prepare.
-
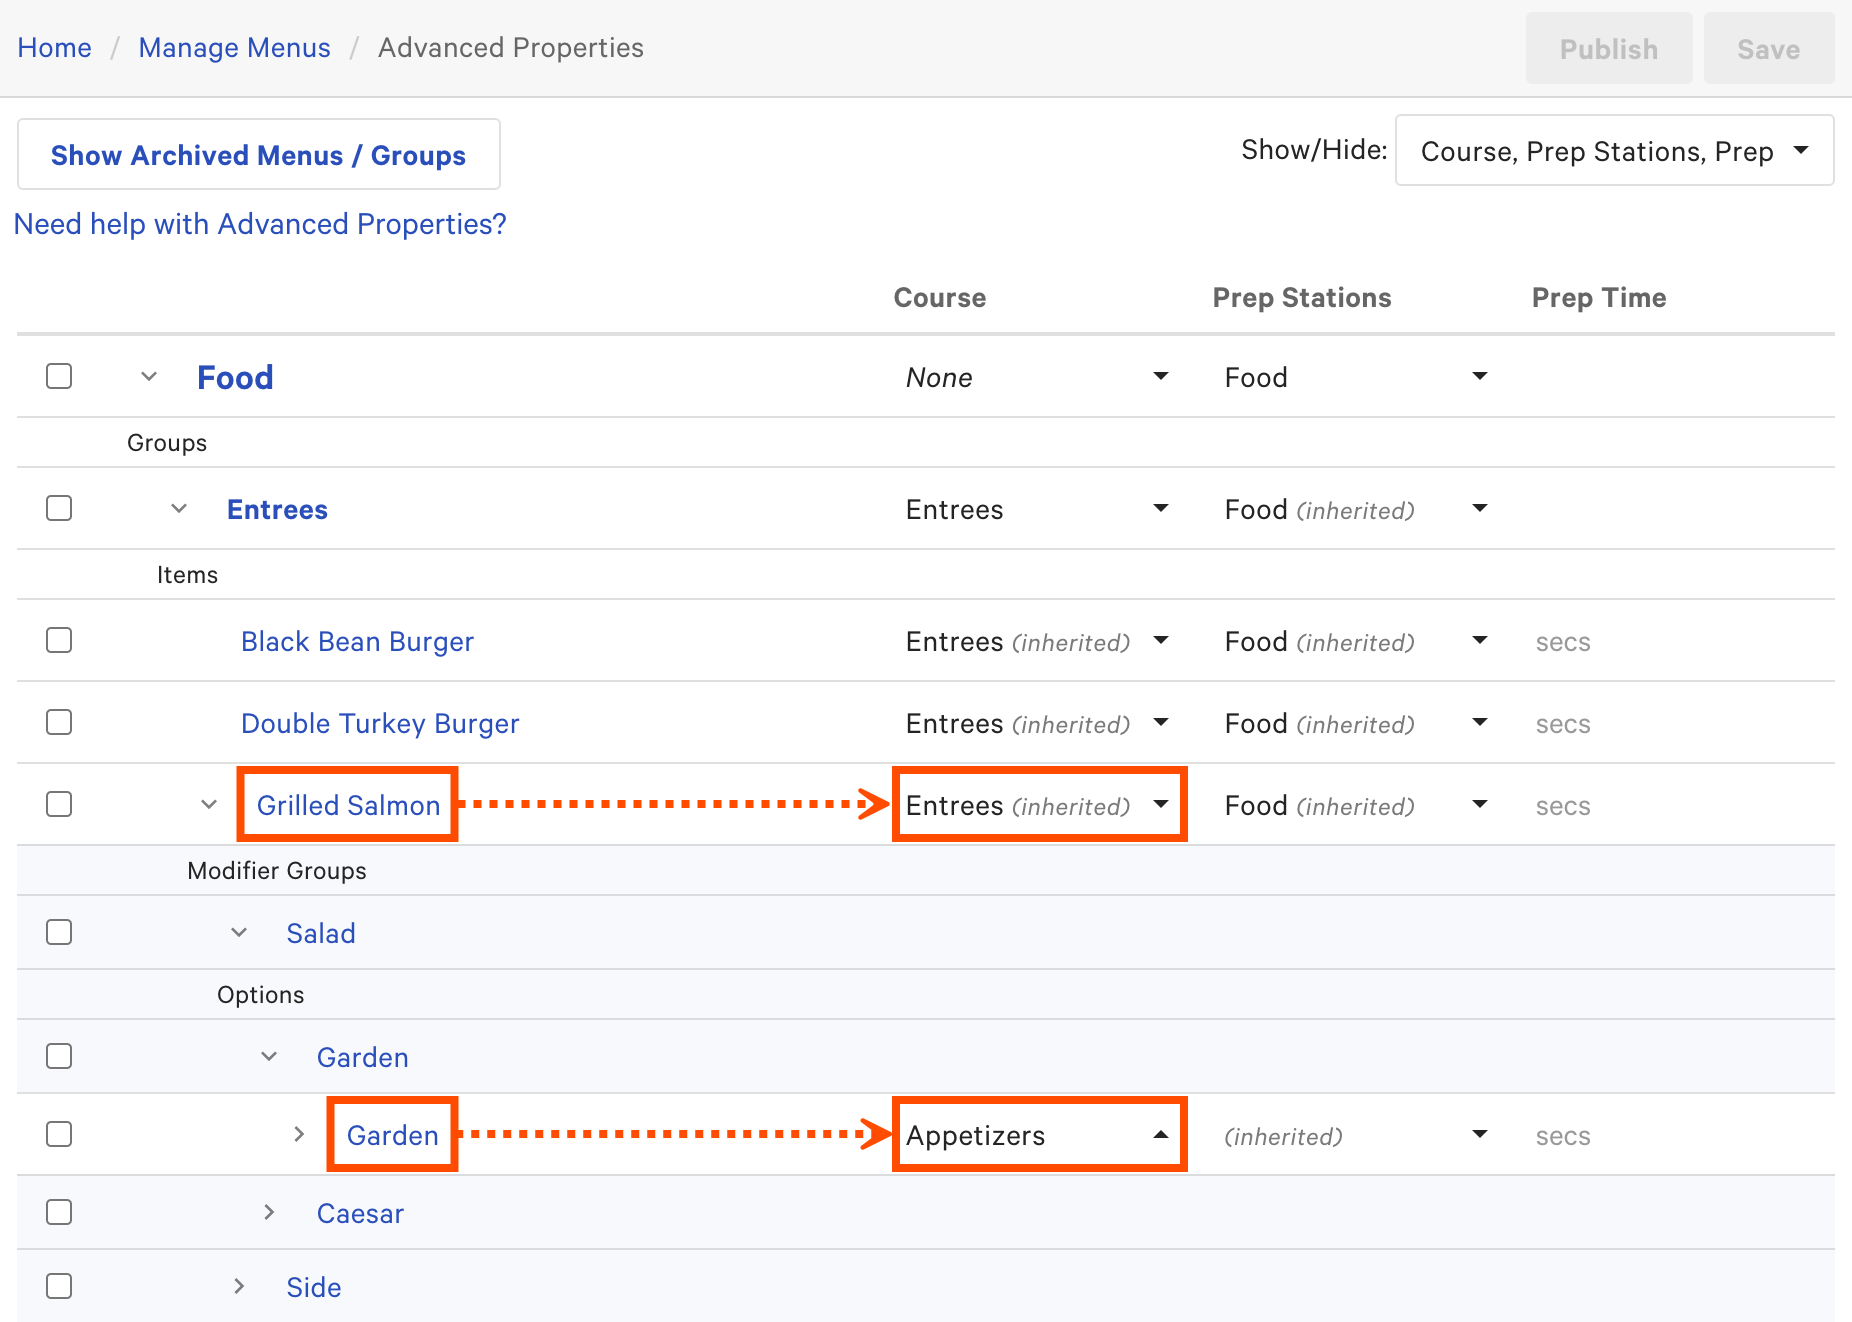
Choose Menus > Bulk management > Advanced properties. An interactive grid appears.
-
From the Show/Hide dropdown list, select Course, Prep Stations, and Prep Time.
-
Expand the corresponding menu, menu group, items, modifier groups, and modifiers for the modifiers you want to add prep times to. The notation "secs" appears in each editable prep time cell.
-
Enter the number of seconds the modifier takes to prepare in the Prep Time cell.
-
Enter the time in seconds.
-
To fire a modifier last in the course (no prep time required) enter 0 seconds.
-
To fire a modifier as soon as the course is sent (always start prep as early as possible) leave the cell blank.
-
-
If using course pacing to create independent modifiers:
-
Verify that the course for the modifier option is not inherited from the menu item by looking at the Course column. The modifier can be set to a different course or to the same course, but it cannot be inherited.
Note
Inherited courses are followed by (inherited) after the course name.
-
Save your changes.
-
Choose Kitchen > Pacing > Meal pacing to open the Meal pacing page.
-
Verify that the Course Pacing setting is set to Enable course pacing and the Modifier Course Firing setting is set to Fire modifier to its configured course.
-
-
If using different prep stations from the parent menu item to create independent modifiers, verify that the prep stations used by the parent menu item and the modifier are different by looking at the Prep Stations column.
Note
Inherited prep stations are followed by (inherited) after the prep station name.
-
Save and publish your changes.