In some restaurants, the kitchen staff includes an expediter. The responsibilities of the expediter, or expo, can include managing communication between the front and back of the house, organizing item timing, and finalizing orders for service. In this workflow, the expediter determines when an order is completely fulfilled and ready for service, rather than the cooks.
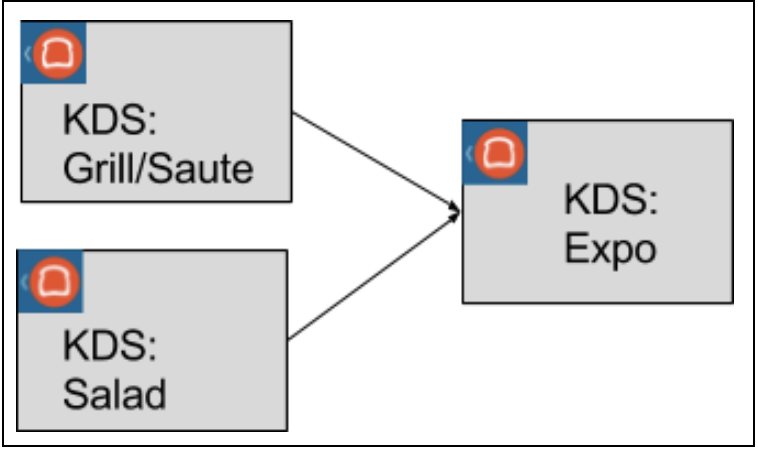
You select which of your prep station screens should route orders to the expediter screen. The tickets that display at the expediter screen show a consolidated view of all tickets for the supervised prep station screens, and provide visual cues when each prep station cook marks an order or item fulfilled.
A variation on this workflow uses two expediters. Typically, the first expediter screen finalizes orders as they leave the kitchen, and then the second expediter screen manages delivery of orders to diners.
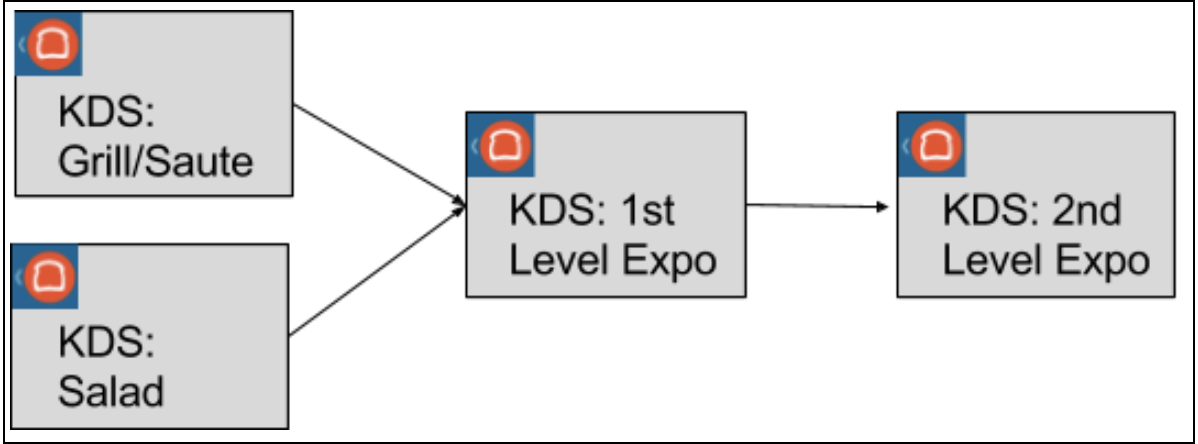
In this "two-level fulfillment" workflow, both expediters are responsible for marking orders as fulfilled on the KDS device, but final order fulfillment is the responsibility of the second expediter.
With the Toast POS, you can configure your KDS devices to display orders to one or two expediter seats.
If your kitchen includes either one or two expediter screens, additional features are available, including options to send SMS text messages to guests or servers or send on-screen notifications to server devices when an expediter marks orders as fulfilled.
For more information about setting up prep stations, see Routing with prep stations.
To configure your kitchen workflow to include one or two expediters, you must have the following access permissions to Toast Web.
-
Restaurant Admin > Edit Full Menu
-
Web Setup > Kitchen / Dining Room Setup
To set up the Toast POS devices as expediter screens, you must also have at least one of the "mode" access permissions. For more information, see Accessing the Toast POS Device Setup screen.
Follow one of these procedures to configure the expediter workflow.
To configure a single expediter screen
-
Determine which prep stations should route orders to the expediter.
You can review the menu items and modifiers that are assigned to each prep station in Toast Web. For more information, see Verify order routing to prep stations.
-
Access Toast Web and choose Kitchen > Kitchen stations > Prep stations to open the Prep stations page. An interactive grid with rows for each prep station appears.
-
To send orders to the expediter, a prep station must have a check mark in the Send to Expediter column. Check this setting for each prep station you identified in Step 1, and then save your changes.
Note
If you have the limited release Send to setting instead of the Send to Expediter setting, select the Prep stations and expediters option. For information about having items appear only on expediter KDS devices, see Sending items to prep stations, expediters, or both.
-
Choose Kitchen > Printers, tickets, & KDS devices > Kitchen and ticket setup, and in the Expediter section, set Two-Level Fulfillment to Single level.
-
Save and publish your changes.
-
On the Toast POS device that is an expediter screen, tap the Toast logo in the top corner until the Toast POS home screen appears.
-
In the Setup section, select Device Setup and then tap Primary Mode. Make the following selections.
-
Kitchen Display/Expo Screen is the primary device usage.
-
Expediter to indicate that this is an expediter screen.
-
-
Tap the left arrow in the top corner until the Toast POS home screen appears.
To configure two expediter screens
-
Complete Steps 1-3 from the single expediter configuration procedure to define which prep stations send orders to the expediter.
-
Choose Kitchen > Printers, tickets, & KDS devices > Kitchen and ticket setup, and in the Expediter section set Two-Level Fulfillment to Two levels.
Note
If you have the limited release Send to setting instead of the Send to Expediter setting, select the Prep stations and expediters option. For information about having items appear only on expediter KDS devices, see Sending items to prep stations, expediters, or both.
-
Save and publish your changes.
-
On the Toast POS device that is located at the first expediter seat, tap the Toast logo in the top corner until the Toast POS home screen appears.
-
In the Setup section, select Device Setup and then tap Primary Mode. Make the following selections.
-
Kitchen Display/Expo Screen is the primary device usage.
-
Expediter to indicate that this is an expediter screen.
-
First to indicate this is the first expediter.
-
-
On the Toast POS device that is located at the second expediter seat, access Device Setup, tap Primary Mode, and then make the following selections.
-
Kitchen Display/Expo Screen is the primary device usage.
-
Expediter to indicate that this is an expediter screen.
-
Second to indicate this is the second expediter.
-
-
Tap the left arrow in the top corner until the Toast POS home screen appears.
If your kitchen includes a KDS device for one or two expediters, you can configure the Toast platform to send notifications to server devices when an expediter marks the order fulfilled.
|
Note |
|
Notifications are only sent to non-KDS devices after orders are fulfilled on an expediter screen. You cannot configure notifications to be sent after fulfillment on a prep station KDS device. |
On-screen notifications have the following characteristics.
-
Servers receive notifications on the device where they are currently signed in. If the server is not signed in to a device when the order is fulfilled, the notification does not display.
-
When a device receives a notification, a sound plays and an exclamation point (!) icon appears near the Toast logo. When the server taps the icon, the message "Table
{n}/Check#{n}: Dishes are ready to be served" followed by the time appears. -
If your kitchen is configured to Enable individual item fulfillment, the notification is sent after all items are marked fulfilled.
-
If your kitchen workflow has two expediters, the notification is sent as soon as either of the two expediters marks the order fulfilled.
To configure on-screen notifications for servers, you must have the Web Setup > Restaurant Operations Setup access permission to Toast Web. Then, follow these steps.
-
Choose Front of house > POS notifications > Notification setup to open the Notification setup page.
-
For the Enabled Notifications option, select Fulfilled tickets (alerts person who placed the order).
-
Save and publish your changes.