|
Note |
|
To make Toast API requests, you need to include an OAuth 2 bearer authentication token. For more information, see Authentication and restaurant access. |
To use the hosted checkout integration, you need to use a different hostname in your requests. The hosted checkout integration APIs use a different hostname to maintain security.
You use the different API request hostname with the following APIs:
You get the hostname for the hosted checkout integration APIs from the Toast integrations team.
The hosted checkout integration uses two credential sets:
-
Hosted checkout - payment credentials: Use this set of credentials to read and write to the hosted checkout payments APIs. For more information, see Toast hosted checkout API reference.
-
Hosted checkout - iframe credentials: Use this set of credentials to initiate and perform hosted checkout SDK functions. For more information, see SDK functions.
The following procedure is a high-level overview of how to accept a payment using the hosted checkout integration APIs.
-
Use your hosted checkout - payment credentials to send a
POSTrequest to the /v1/payment-intents endpoint of the payment intents API to create a payment intent. Include the payment amount in the request. Generate and include an identifier for the payment intent in the request. -
Initiate a payment session and display the hosted checkout
iframeinterface to your customer using hosted checkout integration APIs JavaScript SDK. Include the OAuth bearer token that you get with the hosted checkout - iframe credentials for your hosted checkout client. -
Monitor the result of the customer payment authorization using functions of the hosted checkout integration APIs JavaScript SDK.
-
Apply the payment identifier you successfully generated as a payment for a Toast orders API check. The payment must be applied to a Toast order within five minutes of the payment card authorization. After five minutes the Toast platform automatically voids the payment.
A payment intent represents your intent to take a payment from a customer on your checkout page. A payment intent is associated with a single shopping cart or an individual customer shopping session during the checkout phase. For example, you might create a payment intent to pay for a customer's online order. When you create a payment intent, you must include the payment amount and the currency type.
|
Note |
|
To create a payment intent, the Toast location has to enable the integration with your hosted checkout provider on the Integrations page in Toast Web. The location has to enable the integration even if your hosted checkout integration is developed by the organization itself. |
There are two options to create a payment intent. You can choose to either create a payment intent for keyed-in card transactions or saved card transactions. For detailed information on how to create a payment intent, see Keyed-in card transactions or Saved card transactions.
If the payment intent is successfully created, the payment
intents API generates and returns a PaymentIntentResponsesessionSecret. The sessionSecret is used to
verify communication between your integration and the Toast platform
in the iframe. You need to pass an active
sessionSecret that you get from a payment intent to the
client-side of your application in order to initialize and display the
hosted checkout iframe and to create and confirm
payments.
|
Note |
|
The payment intent expires after 24 hours. If the payment
intent has expired, you need to create a new payment intent. When
you create a new payment intent, this creates a new, corresponding
|
In a keyed-in card transaction, a customer manually enters payment card details into card input fields for authorization. When a customer places an order, they enter their payment card details on a checkout page to complete the order.
To create a payment intent for keyed-in card transactions,
send a POST request to the /v1/payment-intents
endpoint of the payment intents API to create a PaymentIntentResponse.
Include the Toast-Restaurant-External-ID as a header
parameter in the request to specify the GUID of the Toast location
that you are creating a payment intent for.
|
Note |
|
Do not make this request from the ordering interface client browser. You send hosted checkout integration API requests from a server component of your integration. |
You can also include a
paymentMethodConfigurationId value to enable a
customized payment method configuration. A payment method
configuration allows you to present various payment methods in your
hosted checkout iframe. If you do not include a
paymentMethodConfigurationId, your integration uses the
default payment method configuration. The default payment method
configuration only enables Google
Pay®, keyed-in card and saved card payment
methods.
You can add, view, and manage payment method configurations on the Payment methods page in the Toast developer portal. For more information, see Managing payment method configurations.
|
Note |
|
If the hosted checkout integration fails to retrieve your
payment method configuration, the |
Example request body
{
    "amount": 1000,
    "currency": "USD",
    "externalReferenceId": "73edc827-0c18-485f-b581-1ef79f93b940",
    "captureMethod": "MANUAL",
    "email": "john.smith@email.com",
    "paymentMethodConfigurationId": "497f6eca-6276-4993-bfeb-53cbbbba6f08",
    "paymentMethodId": "f718c101-70e4-45fe-8fc1-67ba0a12a8c5"
}
}|
The payment amount in minor units represented as a
positive integer. The minimum amount is |
|
|
The supported currency type is the United States Dollar (USD). |
|
|
The identifier for the payment intent generated by the
Toast location or your integration. The
|
|
|
Controls when funds are captured from the customer's bank account.
|
|
|
The customer's email address. The customer's email address only needs to be provided once when you create, update, or confirm the payment intent. |
|
|
(Optional) The identifier of the payment method
configuration. The |
|
|
(Optional) The identifier of the payment method associated with the payment intent. For more information, see Getting a list of payment methods attached to a customer record. |
Example response body
{
    "id": "86bbcf0c-b483-4bbc-81bf-c2a9cd2baa2c",
    "externalReferenceId": "73edc827-0c18-485f-b581-1ef79f93b940",
    "sessionSecret": "PI_86bbcf0c-b483-4bbc-81bf-c2a9cd2baa2c_SECRET_EqYQ5^CgQWc4J?KBwq2jfv&Ov",
    "amount": 1000,
    "currency": "USD",
    "captureMethod": "MANUAL",
    "status": "REQUIRES_PAYMENT_METHOD",
    "paymentMethodId": "f718c101-70e4-45fe-8fc1-67ba0a12a8c5",
    "creationDate": "2023-09-29T16:42:36.239579Z",
    "usage": null,
    "customerId": null,
    "amountDetails": {
        "tip": 0
    },
    "email": "john.smith@email.com",
    "paymentMethodConfigurationDetails": {
        "id": "497f6eca-6276-4993-bfeb-53cbbbba6f08"
    },
    "latestPayment": null,
    "offSession": false,
    "standingInstructionType": null
}
"offSession": false,
"standingInstructionType": null
}|
The identifier of the payment intent. You use this identifier to update the payment intent. |
|
|
The identifier for the payment intent generated by the
Toast location or your integration. The
|
|
|
A unique identifier for the payment intent that you use to create a payment method. |
|
|
The status of the payment intent. Values are:
For more information, see Payment intent statuses. |
|
|
The date and time the payment intent was created in
ISO 8601 format. Toast support recommends that you store the
|
|
|
Used to determine if the customer will save the
payment method for future use. If the payment method can
only be used one time, the response returns a
|
|
|
The |
|
|
The |
|
Note |
|
To initiate the saved cards transaction workflow, your
customer must be signed into their profile in your integration.
This allows you to include the |
Saved card transactions use payment cards that have been
stored for future use by a customer. If you store profiles for
easier checkout, you can allow your customers to save payment cards
for future use. For more information, see Setup intents.
To allow customers to use saved cards, you must create a customer
record and include the customerId in the payment intent
request body. For more information, see Creating a customer record.
To create a payment intent for saved card transactions, send a
POST request to the /v1/payment-intents
endpoint of the payment intents API to create a PaymentIntentResponse.
Include the customerId in the POST request
body, as well as the Toast-Restaurant-External-ID as a
header parameter. You can also include a
paymentMethodConfigurationId value to enable a
customized payment method configuration.
|
Note |
|
Do not make this request from the ordering interface client browser. You send hosted checkout integration API requests from a server component of your integration. |
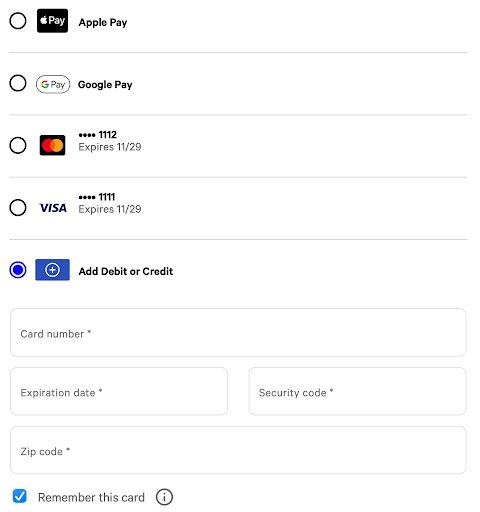
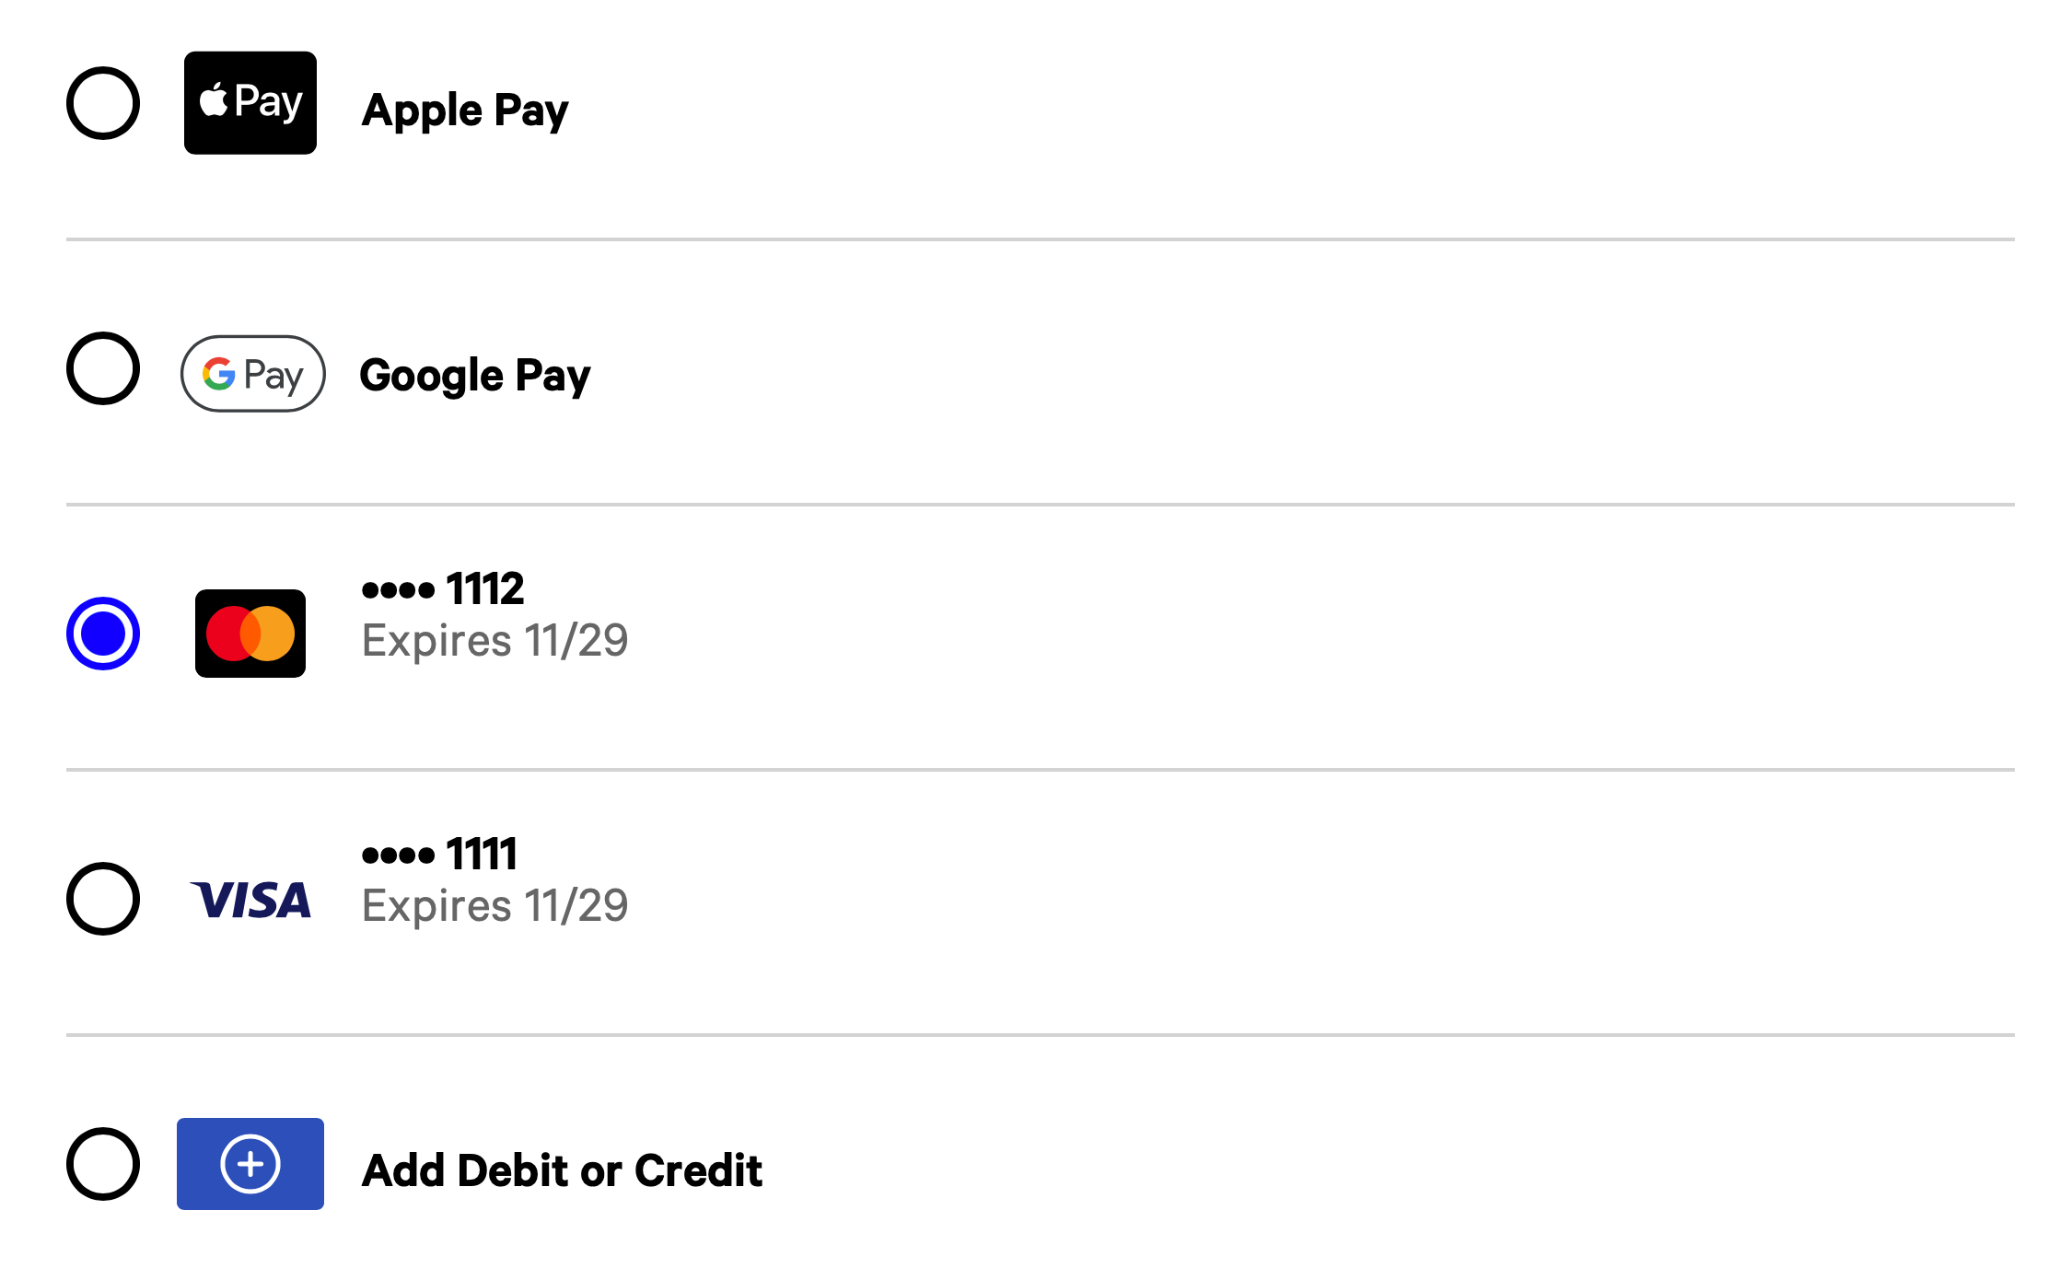
The saved cards transaction workflow displays the Remember this card checkbox. Customers can then choose to checkout with a saved card or choose to enter their payment card details and then select the Remember this card checkbox to save the payment card to their customer profile.
If your customer signs into their profile after the payment
intent was created, send a POST request to update the
payment intent with the customerId. This allows the
iframe to detect and initiate the save cards
transaction workflow. For more information, see Updating a payment intent.
Example request body
{
    "amount": 1000,
    "currency": "USD",
    "externalReferenceId": "73edc827-0c18-485f-b581-1ef79f93b940",
    "captureMethod": "MANUAL",
    "customerId": "4b2dfc5a-88a3-11ee-b9d1-0242ac120002",
    "email" : "john.smith@email.com",
    "paymentMethodConfigurationId": "497f6eca-6276-4993-bfeb-53cbbbba6f08",
    "paymentMethodId": "f718c101-70e4-45fe-8fc1-67ba0a12a8c5"
}|
The identifier for the payment intent generated by the
Toast location or your integration. The
|
|
|
The identifier for the customer record that identifies the customer in the Toast platform and allows them to choose from payment cards saved to their profile. |
|
|
The customer's email address. |
Example response body
{
    "id": "86bbcf0c-b483-4bbc-81bf-c2a9cd2baa2c",
    "externalReferenceId": "73edc827-0c18-485f-b581-1ef79f93b940",
    "sessionSecret": "PI_86bbcf0c-b483-4bbc-81bf-c2a9cd2baa2c_SECRET_EqYQ5^CgQWc4J?KBwq2jfv&Ov",
    "amount": 1000,
    "currency": "USD",
    "captureMethod": "MANUAL",
    "status": "REQUIRES_PAYMENT_METHOD",
    "paymentMethodId": "f718c101-70e4-45fe-8fc1-67ba0a12a8c5",
    "creationDate": "2023-09-29T16:42:36.239579Z",
    "usage": null,
    "customerId": "4b2dfc5a-88a3-11ee-b9d1-0242ac120002",
    "amountDetails": {
        "tip": 0
    },
    "email": "john.smith@email.com",
    "paymentMethodConfigurationDetails": {
        "id": "497f6eca-6276-4993-bfeb-53cbbbba6f08"
    },
    "latestPayment": null,
    "offSession": false,
    "standingInstructionType": null
}|
The identifier of the payment intent. |
|
|
A unique identifier for the payment intent that you use to create a payment method. |
|
|
The status of the payment intent. For more information, see Payment intent statuses. |
The response contains a payment intent and
sessionSecret and initializes and loads the
iframe onto your checkout page. In the
iframe, the customer can see and select from their
saved cards to use as a payment method.
|
Note |
|
Before updating the payment intent, check that the payment
intent has not expired. The payment intent is valid for 24 hours
from the |
If your customer adds a tip, applies a discount, or adds more
items to their order, you must update the payment intent to reflect
the new amount. You send a POST request to the /v1/payment-intents/{paymentIntentId}
endpoint of the payment intents API with the final amount to be
charged upon checkout.
You must include the tip amount in the AmountDetails
object with the updated payment amount. You must update the payment
intent with the final amount and tip before the customer enters
payment details in the hosted checkout integration
iframe. You update the payment intent from the server
component of your integration (not from the client browser).
If your customer has not signed into their profile during the
checkout process, they can choose to sign in when they update the
payment intent. Include the customerId in the
POST request body to
/v1/payment-intents/{paymentIntentId} endpoint to
update the payment intent. Then invoke the fetchUpdates
function to fetch the updates applied to the payment intent, including
the updated amount and the customerId. The client-side of
your integration calls the fetchUpdates function in the
Toast object, which re-renders the hosted checkout
integration iframe to show the customer’s saved cards and
the Remember this card checkbox.
|
Note |
|
If you only want to update the customer's email address, you
do not have to update the |
Example request body
{
    "amount" : 2000,
    "email": "john.smith@email.com",
    "amountDetails": {
        "tip": 100
    }
} |
The updated payment amount to be charged. In this example,
|
|
|
This value only appears if you include a customer's email address when you create or update a payment intent. |
|
|
The tip amount to be charged. Tip can only be added when
you update the payment intent. In this example, |
Example response body
{
    "id": "86bbcf0c-b483-4bbc-81bf-c2a9cd2baa2c",
    "externalReferenceId": "73edc827-0c18-485f-b581-1ef79f93b940",
    "sessionSecret": "PI_86bbcf0c-b483-4bbc-81bf-c2a9cd2baa2c_SECRET_EqYQ5^CgQWc4J?KBwq2jfv&Ov",
    "amount": 2000,
    "currency": "USD",
    "captureMethod": "MANUAL",
    "status": "REQUIRES_PAYMENT_METHOD",
    "paymentMethodId": null,
    "creationDate": "2023-09-29T16:42:36.239579Z",
    "usage": null,
    "customerId": "4b2dfc5a-88a3-11ee-b9d1-0242ac120002",
    "amountDetails": {
        "tip": 100
    },
    "email": "john.smith@email.com",
    "paymentMethodConfigurationDetails": {
        "id": "497f6eca-6276-4993-bfeb-53cbbbba6f08"
    },
    "latestPayment": null,
    "offSession": false,
    "standingInstructionType": null
}|
The status of the payment intent. A payment intent with a
status of For more information, see Payment intent statuses. |
After you have created a payment intent and attached a payment method, the next step is to confirm the payment intent. Confirming the payment intent represents your customer’s intention to pay the amount with the attached payment method. If the payment intent is successfully confirmed, the hosted checkout client SDK initiates and authorizes the payment.
For more information on how to create a payment intent, see Creating a payment intent. For more information on creating a payment method, see Creating a payment method.
There are two ways to confirm a payment intent. You can choose either:
-
Customer-initiated confirmation: You use the
confirmIntentfunction to initiate a payment based on your customer's actions in the hosted checkoutiframe.Note
The
confirmIntentSDK function can be used to confirm both payment intents and setup intents. -
Integration backend-initiated confirmation: You send a
POSTrequest to the/v1/payment-intents/{paymentIntentId}/confirmendpoint of the payment intents API after you collected your customer’s payment method details. For example, you can use the integration backend-initiated confirmation if your integration allows dine-in orders and needs to auto-close checks at the end of the day or when a customer leaves your restaurant without paying their check.Important
If you collected customer payment information outside the
iframe, you might need to consider regulatory compliance related to the way you store and handle that information. For example, Payment Card Industry Data Security Standard (PCI DSS) regulations might apply to the way you handle customer payment method information. Toast does not provide legal guidance. Make sure you seek legal guidance for regulatory compliance.
After you pass the sessionSecret into the
initialize
SDK function, the SDK function inserts the iframe in a
webpage in your integration. The iframe renders the
keyed-in card input fields in the iframe for the
customer to enter their payment card details. The monitor
function observes customer actions within the iframe.
The monitor function checks that the customer has
entered valid payment card details. If the action has been
successfully completed, the SDK sets the isValid value
to true, and your integration invokes the createPaymentMethod
function to create a payment method. If the payment method was
successfully created, your integration invokes the confirmIntent
function to authorize the payment intent using the payment method
created.
To confirm a payment intent without customer initiation, send
a POST request to the /v1/payment-intents/{paymentIntentId}/confirm
endpoint of the payment intents API to authorize the payment method.
Include the paymentIntentId in the request path.
Include the customer's email address in the request body if the
email was not provided when the payment intent was created or
updated. Include the Toast-Restaurant-External-ID as a
header parameter. Include the sessionSecret and
paymentMethodId in the request body.
There are multiple ways to retrieve the
paymentMethodId to include in the request body:
-
Retrieve the
paymentMethodIdby sending aGETrequest to the/v1/customers/{id}/payment-methodsendpoint of the customers API. -
Retrieve the
paymentMethodIdfrom theCreatePaymentMethodResultEventContentif the payment method was successfully created using thecreatePaymentMethodfunction. -
Retrieve the
paymentMethodIdfrom thePaymentMethodResponseif the payment method was successfully created using the create payment method API endpoint.
Example request body
{
    "paymentMethodId": "f718c101-70e4-45fe-8fc1-67ba0a12a8c5",
    "sessionSecret": "PI_86bbcf0c-b483-4bbc-81bf-c2a9cd2baa2c_SECRET_EqYQ5^CgQWc4J?KBwq2jfv&Ov",
    "email": "john.smith@email.com"
}|
The identifier of the payment method. For more information about payment methods, see Creating a payment method or Getting a list of payment methods attached to a customer record. |
|
|
Used to verify communication in the |
|
|
The customer's email address. The customer's email address only needs to be provided once when you create, update, or confirm the payment intent. |
Example response body
{
    "id": "86bbcf0c-b483-4bbc-81bf-c2a9cd2baa2c",
    "externalReferenceId": "73edc827-0c18-485f-b581-1ef79f93b940",
    "sessionSecret": "PI_86bbcf0c-b483-4bbc-81bf-c2a9cd2baa2c_SECRET_EqYQ5^CgQWc4J?KBwq2jfv&Ov",
    "amount": 2000,
    "currency": "USD",
    "captureMethod": "MANUAL",
    "status": "REQUIRES_CAPTURE",
    "paymentMethodId": "f718c101-70e4-45fe-8fc1-67ba0a12a8c5",
    "creationDate": "2023-09-29T16:42:36.239579Z",
    "usage": "ON_SESSION",
    "customerId": "4b2dfc5a-88a3-11ee-b9d1-0242ac120002",
    "amountDetails": {
        "tip": 100
    },
    "email": "john.smith@email.com",
    "paymentMethodConfigurationDetails": {
        "id": "497f6eca-6276-4993-bfeb-53cbbbba6f08"
    },
    "latestPayment": {
        "card": {
             "brand": "VISA",
             "lastFour": "1111",
             "expiry": {
                 "month": "12",
                 "year": "27"
             }
         }
    },
    "offSession": false,
    "standingInstructionType": null
}|
The unique identifier of the payment intent. |
|
|
The status of the payment intent. For more information, see Payment intent statuses. |
|
|
Payment card details associated with the latest payment intent. |
The statuses represent the various states of a customer's payment as it interacts with the hosted checkout integration.
-
REQUIRES_PAYMENT_METHOD: The initial status of the payment intent. A payment method must be attached to the payment intent before the payment intent can be confirmed and the payment amount captured. Attempts to confirm a payment intent with this status will fail. A payment intent moves back to theREQUIRES_PAYMENT_METHODstatus if the payment method fails to authorize the payment. -
PROCESSING: The payment intent moves to thePROCESSINGstatus once your integration calls theconfirmIntentfunction. The payment intent cannot be modified while in thePROCESSINGstatus.Important
In the event of a payment processor outage, the confirm payment intent endpoint results in the payment intent remaining in the
PROCESSINGstatus. The hosted checkout integration invokes the success callback function in the SDK, but it is up to you to decide if a payment intent in thePROCESSINGstatus after confirm payment intent returns is acceptable as a success or a failure. If you accept the risk that the payment authorization may fail once the payment processor comes back online, you can consider the payment intent as a success and proceed with creating the order. If you do not accept the risk and want to consider the payment intent as a failure, you should not proceed with creating the order. -
REQUIRES_CAPTURE: The payment intent moves into the REQUIRES_CAPTURE status if the payment intent has been successfully confirmed. The payment method has an associated authorization that can capture the payment amount in the payment intent. Modifications to the payment intent in this status return an HTTP 409 conflict response code. You use theexternalReferenceIdin the payment intent as the payment identifier for a Toast platform check. -
REQUIRES_CONFIRMATION: This status is reserved for future use. -
SUCCEEDED: The payment intent moves to theSUCCEEDEDstatus if the payment amount was successfully captured. -
REQUIRES_ACTION: This status is reserved for future use. -
FAILED: The payment intent failed to authorize or capture the payment amount. -
CANCELLED: The payment was cancelled before authorization or the payment was voided.
A setup intent allows customers to save a payment card without having to initiate a transaction or complete a payment. Customers can choose to save a payment card outside the checkout workflow, for example when they set up their profile in your integration or before they start an order. Benefits to saving a payment card include improving the customer checkout experience, simplifying the checkout process, and reducing the need for a customer to manually enter their card details every time they complete a payment.
The following procedure is a high-level overview of how to create and confirm a setup intent.
-
Use your hosted checkout - payment credentials to send a
POSTrequest tov1/setup-intentsendpoint of the setup intents API to create a setup intent.Note
The
sessionSecretfrom theSetupIntentresponse expires after 30 minutes. If the setup intent has expired, you need to create a new setup intent. -
Use your hosted checkout - iframe credentials to get an OAuth bearer token and pass the token and
sessionSecretto your hosted checkout client. This renders theiframeonto a webpage in your integration. Theiframedisplays keyed-in card input fields where the customer can enter their payment card details.Note
The customer must enter their payment card details and select the Remember this card checkbox in the
iframeto proceed to confirming the setup intent. -
Monitorthe result of the customer’s actions using the functions of the hosted checkout integration APIs JavaScript SDK. If the customer’s payment card details are valid, the SDK invokes thecreatePaymentMethod -
Invoke the
confirmIntentSDK function to confirm the setup intent. If the payment method is valid, the SDK saves the payment card to thecustomerId.
|
Note |
|
You must confirm a setup intent within 30 minutes of when you
create it. The time you created a setup intent is indicated by the
|
The process to create and confirm a setup intent uses some of the
same hosted checkout integration Javascript SDK functions used to create
a payment intent. The SDK functions used are the monitor
and createPaymentMethod
functions. The setup intent workflow uses a new SDK function, the
confirmIntent
function, which is used to confirm a payment intent and setup
intent.
|
Note |
|
The setup intents API only supports keyed-in card payment methods. |
To create a setup intent, you send a POST request
to the v1/setup-intents
endpoint of the setup intents API. Include the customerId
and usage in the request body. The
customerId represents the customer’s identity in your
integration. For more information about customer identifiers, see
Creating a customer record.
Example response body
{
    "id":"1fdd6e15-8471-4853-8862-b755a23816d2",
    "customerId": "611c1e47-8ba3-457b-8879-196da2c427ff",
    "sessionSecret": "1fdd6e15847148538862b755a23816d2_SECRET_1234abw125",
    "paymentMethodId": null,
    "status": "REQUIRES_PAYMENT_METHOD",
    "usage": "ON_SESSION",
    "creationDate": "2024-03-26T16:17:27Z"
}|
The unique identifier for the setup intent. |
|
|
The status of the setup intent. The initial status is
|
For more information, see Setup intent statuses.
If the customerId in the request body cannot be
found, the Toast platform returns an error response.
If you need to update a setup intent, send a POST
request to the v1/setup-intents/{id}
endpoint of the setup intents API. You can update the following
values:
-
customerId -
usage
For example, you can update the customerId if you
need to change the customer profile the setup intent is saved to. You
can also update the usage, which indicates how the setup
intent will be used in the future.
Example request body
{
    "usage": "ON_SESSION",
    "customerId": "611c1e47-8ba3-457b-8879-196da2c427ff",
    "sessionSecret": "1fdd6e15847148538862b755a23816d2_SECRET_1234abw125"
}|
Used to determine if the customer will save the payment
method for future use. This value should always be set to
|
|
|
The unique identifier for the customer record that identifies the customer in the Toast platform. |
Example response body
{
    "id": "c607bdc3-df3d-45d7-8dff-fcfd461d48fb",
    "customerId": "611c1e47-8ba3-457b-8879-196da2c427ff",
    "sessionSecret": "1fdd6e15847148538862b755a23816d2_SECRET_1234abw125",
    "paymentMethodId": null,
    "status": "REQUIRES_PAYMENT_METHOD",
    "usage": "ON_SESSION"
}|
The status of the setup intent. For more information, see Setup intent statuses. |
To get the details of a setup intent or to check if a setup
intent was successfully created, send a GET request to
the v1/setup-intents/{id}
endpoint of the setup intents API. Include the id, the
identifier of the setup intent in the request path.
Example response body
{
    "id":"1fdd6e15-8471-4853-8862-b755a23816d2",
    "customerId": "611c1e47-8ba3-457b-8879-196da2c427ff",
    "sessionSecret": "1fdd6e15847148538862b755a23816d2_SECRET_1234abw125",
    "paymentMethodId": null,
    "status": "REQUIRES_PAYMENT_METHOD",
    "usage": "ON_SESSION",
    "creationDate": "2024-03-26T16:17:27Z"
}|
Note |
|
You must confirm a setup intent within 30 minutes of the
|
Confirming the setup intent represents your customer’s intention to save their payment card to their profile in your integration. After you have successfully created the setup intent and attached a payment method, you confirm the setup intent to save the payment card. If the setup intent is successfully confirmed, the hosted checkout SDK initiates an authorization for $0.00 and saves the card.
Similar to a payment intent, there are two ways to confirm a setup intent:
-
Customer-initiated confirmation: You use the
confirmIntentfunction to initiate a payment based on your customer's actions in the hosted checkoutiframe.Note
The
confirmIntentSDK function can be used to confirm both payment intents and setup intents. -
Integration backend-initiated confirmation: You send a
POSTrequest to the/v1/setup-intents/{id}/confirmendpoint of the setup intents API after you have collected your customer’s payment method details. For example, you can use the integration backend-initiated confirmation to save a customer’s payment card to be used for a future merchant-initiated transaction, such as if you charge a reservation deposit (no-show fee) for customers to book a table at your restaurant.Important
If you collected customer payment information outside the
iframe, you might need to consider regulatory compliance related to the way you store and handle that information. For example, Payment Card Industry Data Security Standard (PCI DSS) regulations might apply to the way you handle customer payment method information. Toast does not provide legal guidance. Make sure you seek legal guidance for regulatory compliance.
After you pass the sessionSecret into the
initalize
SDK function, the SDK function inserts the iframe in a
webpage in your integration. The iframe renders the
keyed-in card input fields in the iframe for the
customer to enter their payment card details. The monitor
function observes customer actions within the iframe.
The monitor function checks that the customer has
entered valid payment card details and selected the
Remember this card checkbox. If both actions
have been successfully completed, the SDK sets the
isValid value to true, and your
integration invokes the createPaymentMethod
function to create a payment method.
To confirm a setup intent without customer initiation, send a
POST request to the /v1/setup-intents/{id}/confirm
endpoint of the setup intents API to authorize the payment method.
Include the setupIntentId in the request path. Include
the Toast-Restaurant-External-ID as a header parameter.
Include the sessionSecret and
paymentMethodId in the request body.
There are multiple ways to retrieve the
paymentMethodId to include in the request body:
-
Retrieve the
paymentMethodIdby sending aGETrequest to the/v1/customers/{id}/payment-methodsendpoint of the customers API. -
Retrieve the
paymentMethodIdfrom theCreatePaymentMethodResultEventContentif the payment method was successfully created using thecreatePaymentMethodfunction. -
Retrieve the
paymentMethodIdfrom thePaymentMethodResponseif the payment method was successfully created using the create payment method API endpoint.
Example request body
{
    "paymentMethodId": "3169e4f9-6a60-40dd-b87d-f4862f71d3b5",
    "sessionSecret": "SI_4b30480b-848c-4667-ae68-045304a6edc9_SECRET_ObsDO490P.7mCeIxkUWlM6W0I"
}
Example response body
{
    "id": "4b30480b-848c-4667-ae68-045304a6edc9",
    "customerId": "87d8e330-2878-4742-a86f-dbbb3bf522ac",
    "sessionSecret": "SI_4b30480b-848c-4667-ae68-045304a6edc9_SECRET_ObsDO490P.7mCeIxkUWlM6W0I",
    "paymentMethodId": "3169e4f9-6a60-40dd-b87d-f4862f71d3b5",
    "status": "SUCCEEDED",
    "usage": "ON_SESSION"
}|
The unique identifier of the setup intent. |
|
|
The status of the setup intent. For more information, see Setup intent statuses. |
The following statuses represent the various states of a payment card being set up and saved by a customer for future use. For more information about how to get the details of a setup intent, see Getting a setup intent.
-
REQUIRES_PAYMENT_METHOD: The initial status of the setup intent. A payment method must be associated with the setup intent before the payment method can be saved.A setup intent moves back to the
REQUIRES_PAYMENT_METHODstatus if the setup intent fails to be confirmed. -
PROCESSING: The setup intent moves to thePROCESSINGstatus once your integration calls theconfirmIntentPROCESSINGstatus. -
SUCCEEDED: The setup intent moves into theSUCCEEDEDstatus if the setup intent has been successfully confirmed and associated with the customer record. The payment method can be used for future transactions and payments.