You use menu groups and subgroups to further organize the offerings in a menu. For example, a Dinner menu could have an Entrees menu group that, in turn, contains Grill Entrees and Vegetarian Entrees subgroups.
Subgroups can be used to make navigating your menu easier. However, each subgroup requires an additional selection by the user who is trying to find a specific menu item in that subgroup. For this reason, the menu manager limits the nesting of subgroups to three subgroups below a parent menu group:
-
Menu
-
Menu group
-
Subgroup 1
-
Subgroup 2
-
Subgroup 3 (this is the limit of subgroup nesting)
-
-
-
-
|
Note |
|
Menu groups and subgroups have the same configuration options and are effectively the same except for their location in the menu hierarchy. This guide uses the term menu group to generically refer to both and only uses the term subgroup when it is necessary to make a distinction between the two. |
This section provides information about creating menu groups.
For multi-location restaurants:
-
Newly created menu groups inherit the target and owner of their parent menu or menu group by default. For more information, see Defaults for targets and owners.
-
You must have the Edit Full Menu permission to the owner of a menu or menu group in order to create a new child menu group inside it.
To create a menu group
-
Choose Menus > Menu management > Menu manager to open the Menu manager page.
-
From the Show section, choose Full menu.
-
(Multi-location only) Select the locations whose menu data you want to edit from the locations control.
-
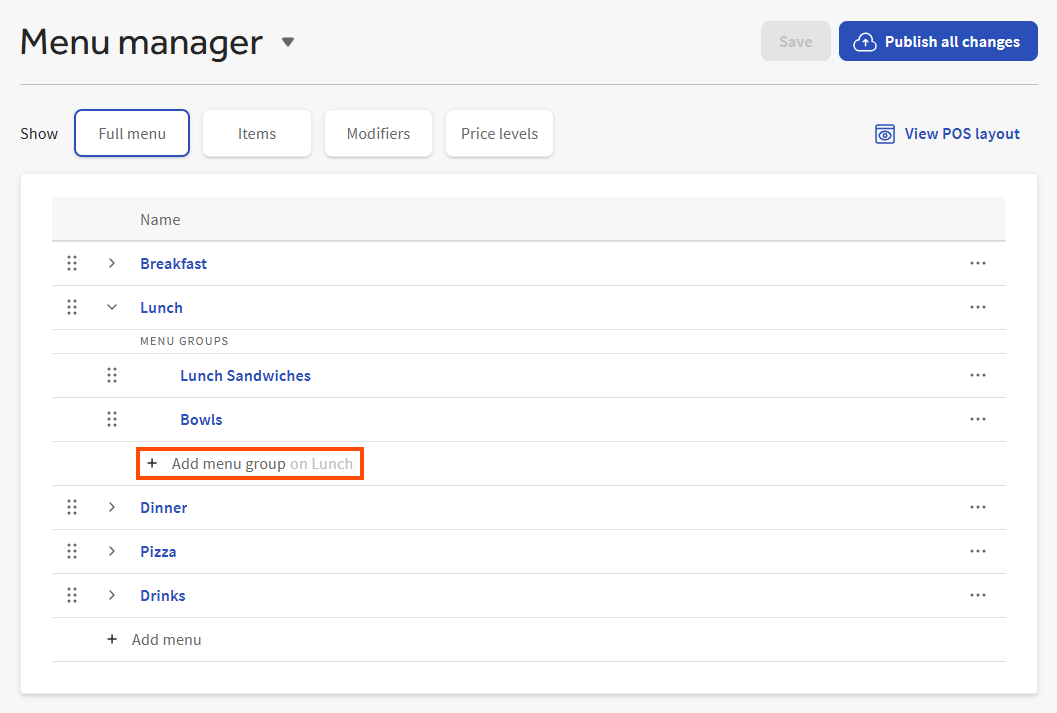
Expand the menu that will contain the new menu group. If the new menu group will be a subgroup of an existing menu group, expand the existing menu group.
-
Select + Add menu group (or + Add subgroup if you are adding a subgroup), enter a name for the new menu group, and select the check icon. Alternatively, you can press Enter on your keyboard or select anywhere outside the text box to complete the entry. Your changes are automatically saved.
-
Manually publish your changes when you are ready for guests and employees to see them.
Follow the procedure below to rename a menu group.
To rename a menu group
-
Choose Menus > Menu management > Menu manager to open the Menu manager page.
-
From the Show section, choose Full menu.
-
(Multi-location only) Select the locations whose menu data you want to edit from the locations control.
-
Select the menu group's name to open its side panel.
-
Enter the new name in the Menu group name field.
-
Select Save.
-
Manually publish your changes when you are ready for guests and employees to see them.
Your Toast ordering channels display your menu groups in the order you see them in the Full menu view. You can reorder your menu groups so they appear in the order you want them to.
Menu group reordering is limited to:
-
Reordering the menu groups contained in a single parent menu. You cannot move a menu group from one menu to another.
-
Reordering the subgroups contained in a single parent menu group. You cannot move a subgroup from one parent menu group to another.
|
Note |
|
If you have a multi-location restaurant, you cannot reorder menu groups in Full menu view. You must use the classic pages instead. |
To reorder a menu group
-
Choose Menus > Menu management > Menu manager to open the Menu manager page.
-
From the Show section, choose Full menu.
-
Expand the menu to locate the menu group you want to reorder.
-
Select the reorder icon for the menu group you want to move and drag it to its new location. Your changes are automatically saved.

-
Manually publish your changes when you are ready for guests and employees to see them.
You can remove a menu group from its parent menu or menu group to hide it from your Toast ordering channels.
For multi-location restaurants:
-
You must have the Edit Full Menu permission to the owner of a menu group's parent in order to remove the menu group. For example, consider a Food menu that contains a Sandwiches menu group. You must have Edit Full Menu permission to the owner of the Food menu to remove the Sandwiches menu group from it.
-
If the parent of the menu group you want to remove is versioned, you must pick the version you want to remove the menu group from. The menu group is removed from that version only. The other versions continue to use the menu group.
-
If the menu group you want to remove is versioned, removing the menu group from its parent removes all versions of the menu group from the parent.
|
Note |
|
To undo a menu group archive, go to the Menus > Bulk management > Items database page in Toast Web. Select the Menu Groups tab and then choose Show Archived. Select the checkbox for the menu group you want to restore and choose Restore. |
To remove a menu group
-
Choose Menus > Menu management > Menu manager to open the Menu manager page.
-
From the Show section, choose Full menu.
-
(Multi-location only) Select the locations whose menu data you want to edit from the locations control.
-
Expand the menu to locate the menu group you want to remove.
-
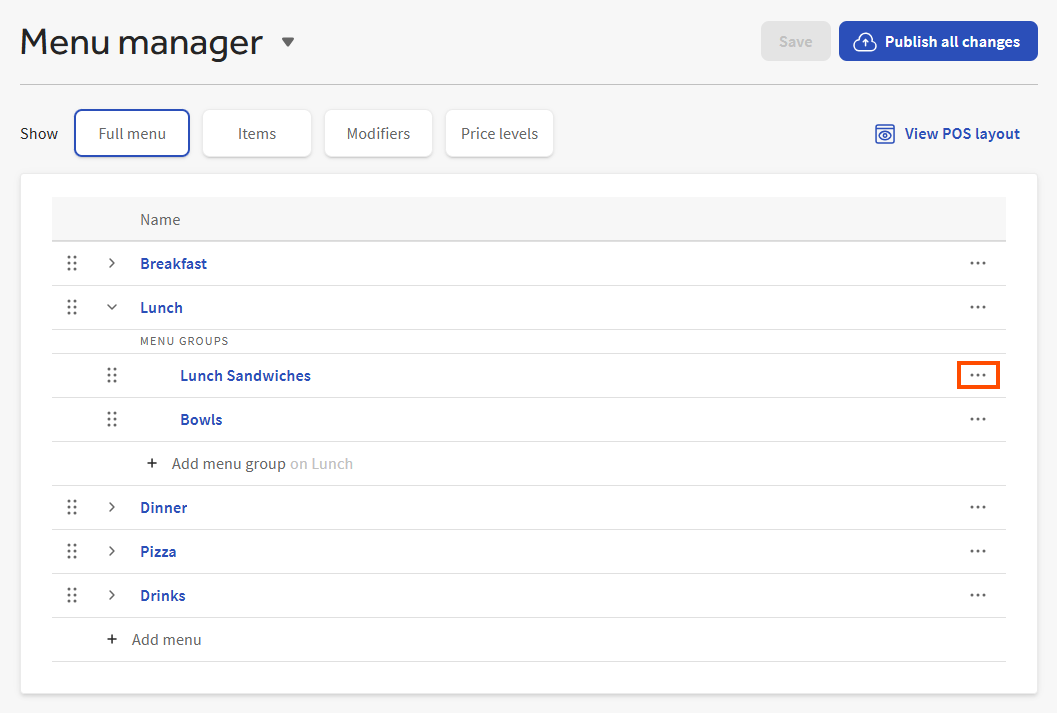
Select the overflow menu (...) for the menu group you want to remove and choose Remove menu group.
-
To confirm, select Remove in the Remove the menu group dialog.
-
Manually publish your changes when you are ready for guests and employees to see them.
You can alphabetize the menu items in a menu group, making them easier for employees and guests to find.
The Toast platform sorts menu items by name alphabetically using this sort order priority:
-
Special characters
-
0 - 9
-
A - Z
For multi-location restaurants:
-
If a menu group is versioned, you must select the version whose items you want to alphabetize. The other versions are not affected by the alphabetization.
-
If a menu item is versioned, the Toast platform treats the menu item's set of versions as a single menu item for the purposes of sorting. If the versions have different names, the Toast platform uses the version name that has the highest sorting priority. For example, consider the following Menu Group A. It has two unversioned menu items,
1-MenuItemand2-MenuItem, and a third menu item that is versioned. The versioned menu item has two versions with the names@MenuItemandMenuItem.Menu Group A before alphabetizing
Menu Group A
-
1-MenuItem -
2-MenuItem -
Versioned menu item with two versions named
@MenuItemandMenuItem
The Toast platform starts by evaluating the names associated with the versioned menu item. In this example, the name
@MenuItemhas a higher sorting priority thanMenuItem, so the Toast platform uses@MenuItemas the sorting name for this versioned item. After determining the sorting names for any versioned menu items, the Toast platform sorts all the menu items. For Menu Group A, the menu items appear in this order:Menu Group A after alphabetizing
Menu Group A
-
Versioned menu item with two versions named
@MenuItemandMenuItem -
1-MenuItem -
2-MenuItem
-
-
If you have a multi-location restaurant, you cannot drag menu items to reorder them in Full menu view yet. This means that, after alphabetizing, to further reorder your items (for example, to move a popular item to the top of the list), you must use the classic page for the parent menu group instead.
-
Using the location picker, it is possible to hide some of the menu items in a menu group. Hidden menu items are still alphabetized along with any visible items in the menu group and you will see their new sort order the next time you view them in Full menu view.
To alphabetize the menu items in a menu group
-
Choose Menus > Menu management > Menu manager to open the Menu manager page.
-
From the Show section, choose Full menu.
-
(Multi-location only) Select the locations whose menu data you want to edit from the locations control.
-
Expand the menu to locate the menu group whose items you want to alphabetize.
Note
(Multi-location only) If the menu group is versioned, be sure to locate the version whose items you want to alphabetize. The other versions will not be affected.
-
Select the overflow menu (...) for the menu group you want to remove and choose Alphabetize items. The Alphabetize the items in the menu group dialog opens.
-
To confirm, select Alphabetize.
-
Manually publish your changes when you are ready for guests and employees to see them.
You can customize the names and colors of the buttons employees see in the Toast POS app for the various menu entities:
-
For menus, menu groups, subgroups, menu items, and modifier groups, go to the details section of the menu entity's details page. For example, for a menu, go to Menu details.
Enter a name in the POS name field. To specify a button color, select the Button color option and then select a color from the color palette.
-
For modifiers, go to the Edit modifier dialog for the modifier, select the POS button color option and then select a color from the color palette. Modifiers do not have a POS name. The Toast POS app displays the Modifier name.
By default, the POS name field is empty and the button color is set to white.
You use prep stations to route menu items to the appropriate stations in the kitchen for fulfillment. A prep station represents the location of a kitchen printer or KDS device that receives orders for fulfillment.
|
Important |
|
If a menu item does not have any prep stations assigned to it, the Toast platform automatically routes that menu item to all prep stations. |
You can set prep stations at the menu, menu group, subgroup, or menu item level. By default, menu groups inherit prep stations from their parent menus. Menu items and subgroups inherit prep stations from their parent menu groups. For more information on inheritance, see Understanding inheritance.
To set prep stations for a menu, go to the Kitchen prep section of the menu's details page and select the prep stations to which items ordered from the menu should be routed.
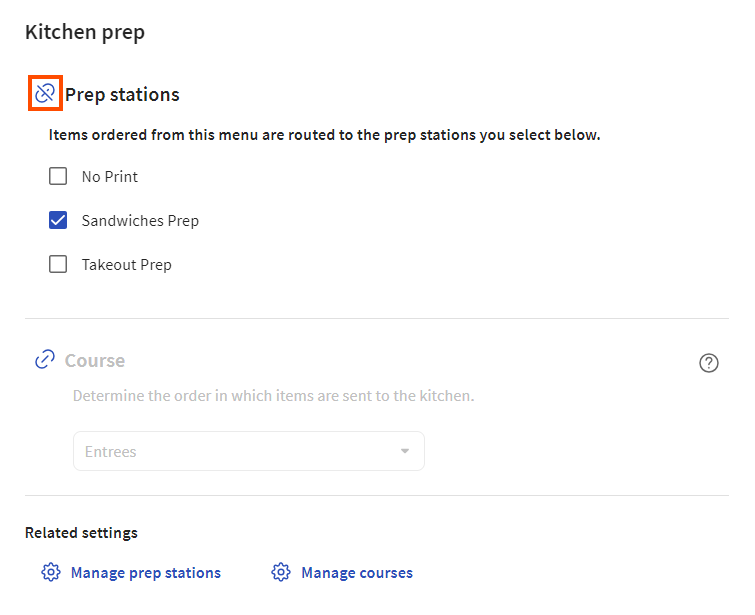
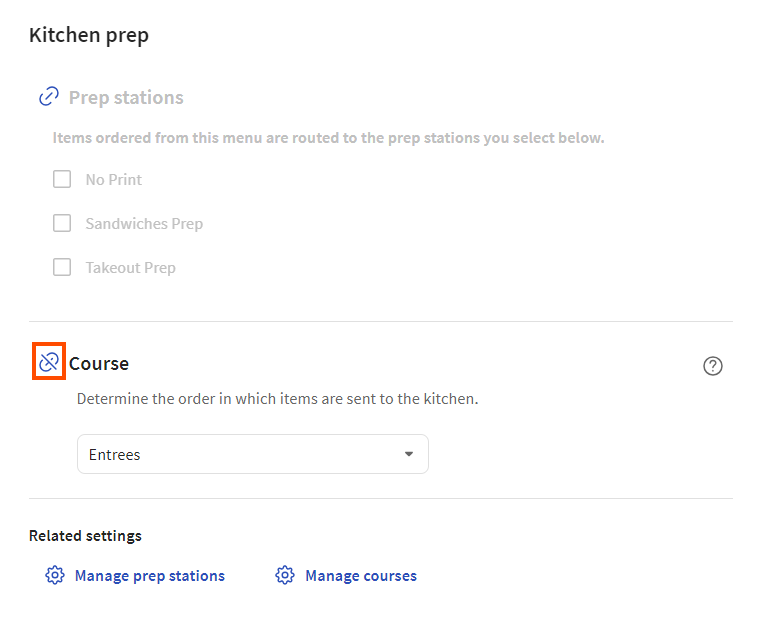
To override the inherited prep stations for a menu group or subgroup, go to the Kitchen prep section of the group's details page, select the link icon next to Prep stations to unlink the configuration, and then select the prep stations from the list.
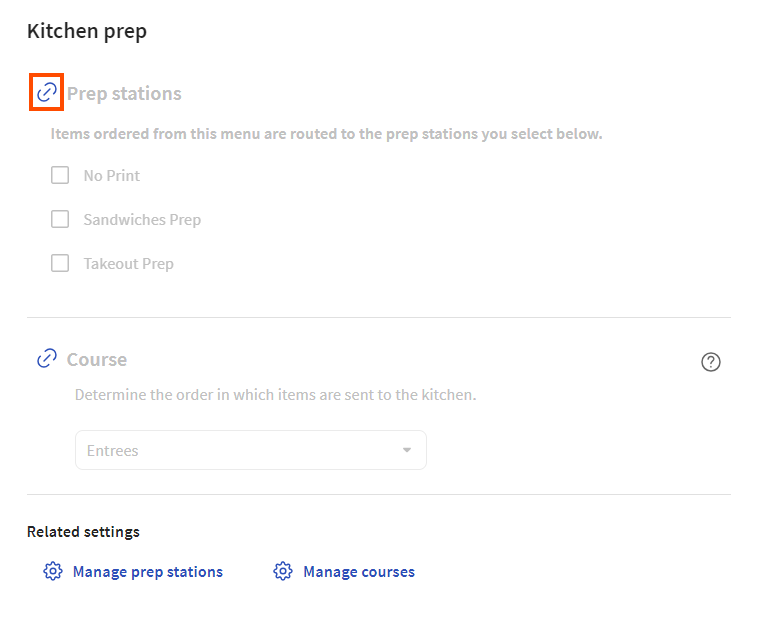
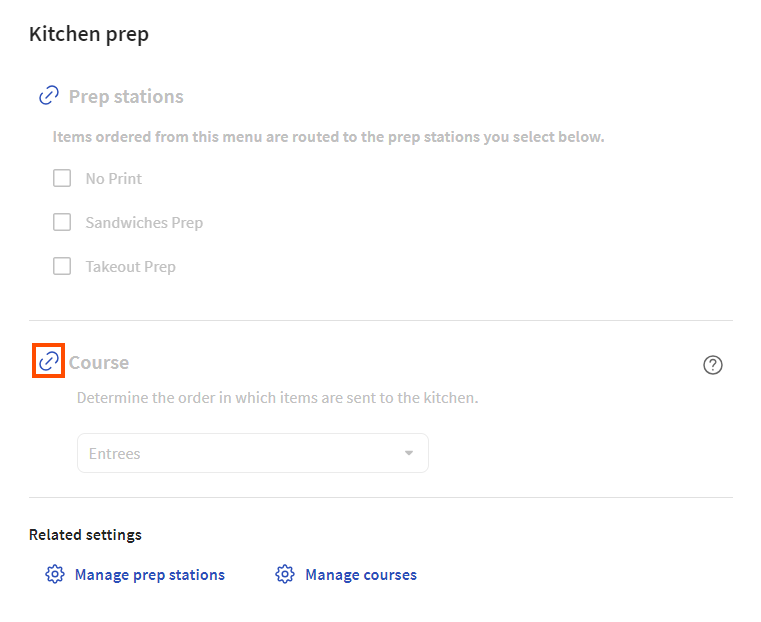
To configure a menu group or subgroup so it inherits its prep stations, select the link icon next to Prep stations so that the prep station settings are grayed out.
To override the inherited prep stations for a menu item, go to the Kitchen section on its details page, set its Inherit prep stations? setting to No, and then select its prep stations from the dropdown list. When you configure settings directly on a menu item, those settings apply any time the menu item is ordered from any menu path.

To configure a menu item to inherit its prep stations, set the Inherit prep stations? setting to Yes.
If you do not have any prep stations configured yet, use the Manage prep stations link to go to the Prep Stations page where you can create them. For more information on creating and using prep stations, see Adding a prep station and Routing with prep stations.
You use courses to manage the firing of tickets to the kitchen for fulfillment.
You can set courses at the menu, menu group, subgroup, or menu item level. By default, menu groups inherit their course from their parent menus. Menu items and subgroups inherit their course from their parent menu groups. For more information on inheritance, see Understanding inheritance.
To set the course for a menu, go to the Kitchen prep section of the menu's details page and select the course.
To override the inherited course for a menu group or subgroup, go to the Kitchen prep section of the group's details page, select the link icon next to Course to unlink the configuration, and then select the course from the list.
To configure a menu group or subgroup so that it inherits its course, select the link icon next to Course so that the course setting is grayed out.
To override the inherited course for a menu item, go to the Kitchen section on its details page, set its Inherit course? setting to No, and then select its course from the dropdown list. When you configure settings directly on a menu item, those settings apply any time the menu item is ordered, from any menu path.
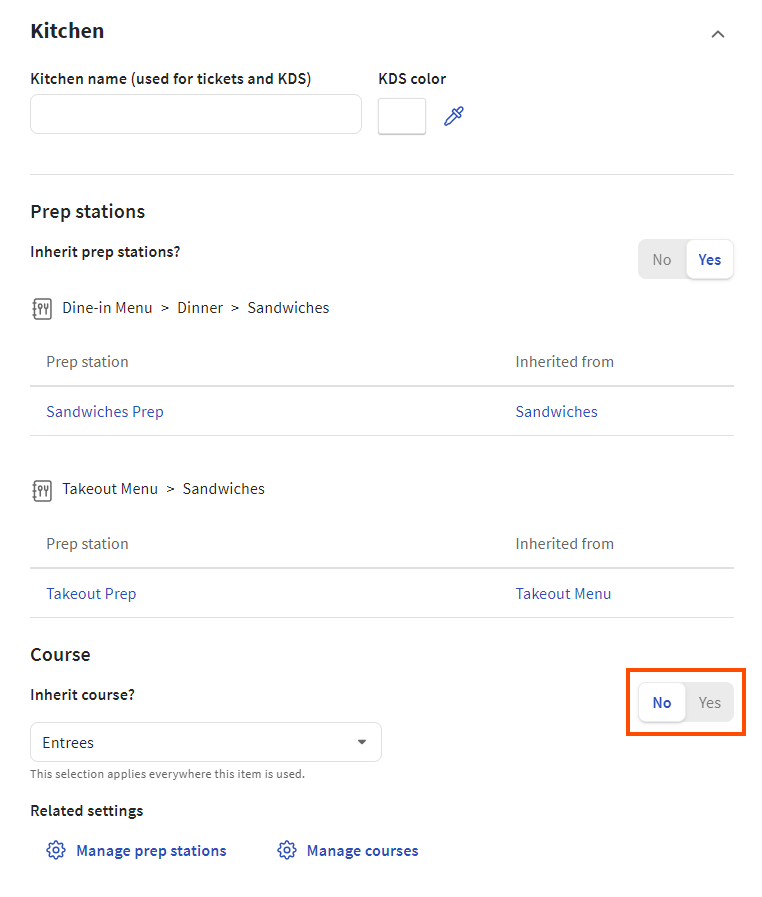
To configure a menu item so that it inherits its course, set the Inherit course? setting to Yes.
If you do not have any courses configured yet, use the Manage courses link to go to the Courses page where you can create them. For more information on creating courses, see Creating courses. For more information on using courses, see this Toast Central article.
While you can assign courses in the menu builder, you must use the classic Courses page to create the courses themselves.
To create courses
-
Go to the Courses page:
If you are viewing a menu item in the menu builder, select Kitchen. If you are viewing a menu, menu group, or subgroup in the menu builder, select Kitchen prep. In the Related settings section, select .
Alternatively, you can do the following:
-
Switch to the restaurant you want to create courses for.
-
Select Kitchen > Pacing > Courses.
-
Select + Add to add a row to the Courses table.
-
Enter a name for the course.
-
Repeat steps 2 and 3 for any additional courses you want to create.
-
Select .
The Sales Summary and other Toast reports use sales categories to create a breakdown of your sales, organized by sales category, for example, Food, Drinks, Retail, and so on.
Some points to keep in mind when using sales categories:
-
If you change the sales category for a menu entity, those changes are reflected in future sales reports but existing reports remain unchanged.
-
While highly recommended for a better reporting experience, sales categories are optional. If you select from the Sales category menu, no sales category is applied to the menu entity.
For information about the reports that use sales categories, see these Toast Central articles:
You can set sales categories at the menu, menu group, subgroup, or menu item level. By default, menu groups inherit their sales category from their parent menus. Menu items and subgroups inherit their sales category from their parent menu groups. For more information on inheritance, see Understanding inheritance.
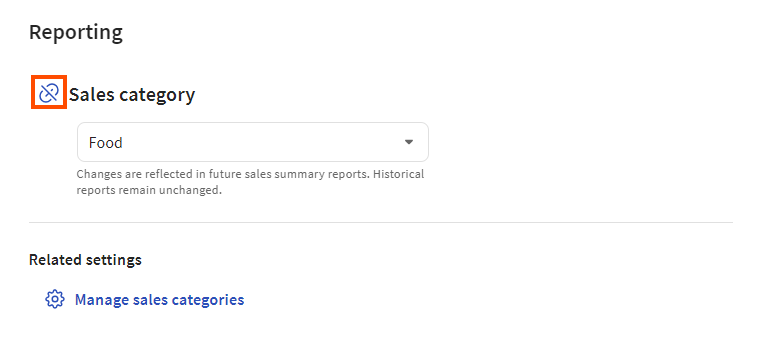
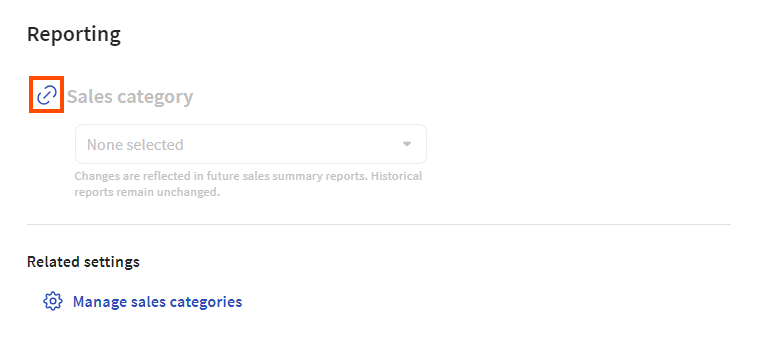
To set the sales category for a menu, go to the Reporting section of the menu's details page and select the category from the Sales category dropdown list.
To override the inherited sales category for a menu group or subgroup, go to the Reporting section of the group's details page, select the link icon next to Sales category to unlink the configuration, and then select the sales category from the list.
To configure a menu group or subgroup so that it inherits its sales category, select the link icon next to Sales category so that the course setting is grayed out.
To override the inherited sales category for a menu item, go to the Reporting section on its details page, set its Inherit sales category? setting to No, and then select its sales category from the dropdown list. When you configure settings directly on a menu item, those settings apply any time the menu item is ordered, from any menu path.
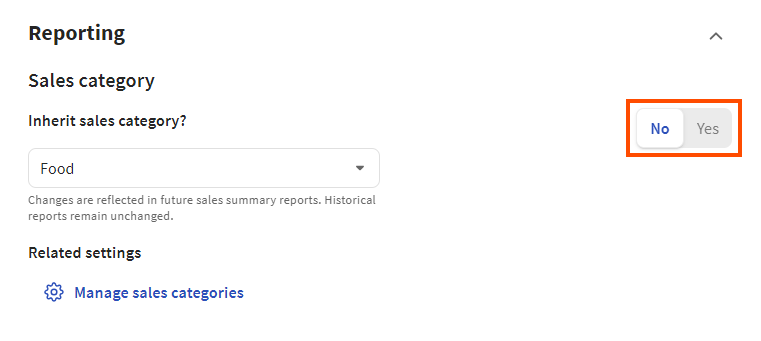
To configure a menu item so that it inherits its sales category, set the Inherit sales category? setting to Yes.
If you do not have any sales categories configured yet, use the Manage sales categories link to go to the Sales categories page where you can create them. For more information on creating sales categories, see Creating sales categories.
While you can assign sales categories in the menu builder, you must use the classic Sales Categories page to create the sales categories themselves.
To create sales categories
-
Do one of the following to navigate to the Sales categories page:
On the details page for a menu, menu group, or menu item, select Reporting. In the Related settings section, select .
Alternatively, you can:
-
Switch to the restaurant you want to create courses for.
-
Select Menus > Settings > Sales categories.
-
Select + Add to add a row to the Sales Categories table.
-
Enter a name and a description for the sales category.
-
Repeat steps 2 and 3 for any additional sales categories you want to create.
-
Select .
During the on-boarding process, you specify the tax rates that apply to your restaurant location. By default, these tax rates are inherited by any menus you create for the restaurant. According to the rules of menu inheritance, the tax rates also flow down to your menu groups, subgroups, and menu items in the following ways:
-
Menu groups inherit their tax rates from their parent menus.
-
Menu items and subgroups inherit their tax rates from their parent menu groups.
You can override tax rates on individual menus, menu groups, subgroups, or menu items as needed.
In addition to tax rates, Toast Web includes two tax behavior settings that allow you to specify that taxes are included in a menu item's price and takeout orders are exempt from taxes. You can set the tax behavior settings at the menu, menu group, subgroup, or menu item level and they follow the same rules of inheritance as tax rates. You can override these settings as needed on individual menu entities.
For more information on menu inheritance, see Understanding inheritance.
The following sections provide instructions for setting tax rates and behavior. They also provide more information about the tax behavior settings.
To override the inherited tax rates for a menu, menu group, or subgroup, go to the Taxes section of the entity's details page, select the link icon next to Tax rates to unlink the configuration, and then select the tax rates from the list. To override the Calculate prices with tax included or Takeout exception setting, select its link icon to unlink the configuration and then configure the setting as needed.
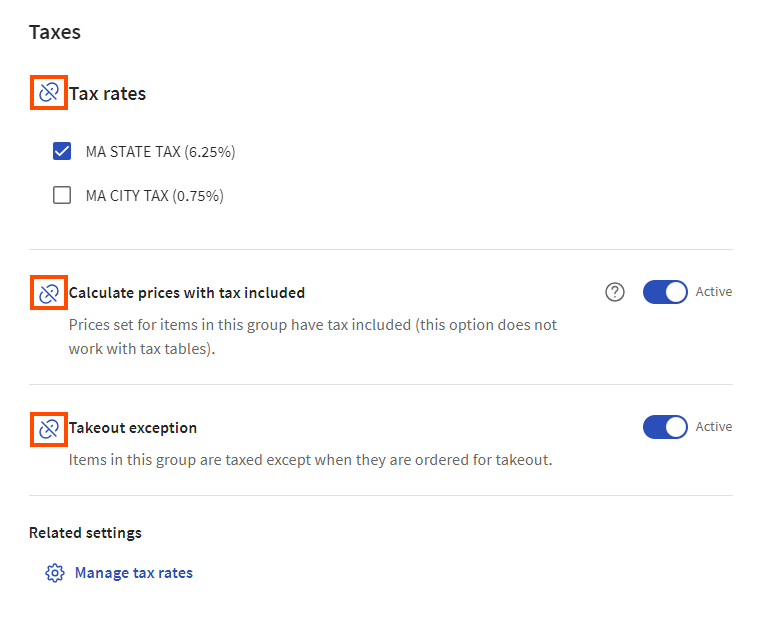
To configure a menu, menu group, or subgroup so it inherits its tax rates, select the link icon next to Tax rates so the tax rates setting is grayed out. To inherit the Calculate prices with tax included or Takeout exception setting, select its link icon so that the setting is grayed out.

To override the inherited tax rates for a menu item, go to the Tax settings section on its details page, set its Inherit tax rates? setting to No, and then select the tax rates from the list. To override the Tax inclusion or Takeout tax exception setting, set Inherit tax inclusion? or Inherit takeout tax? to No and then configure the setting as needed. When you configure settings directly on a menu item, those settings apply any time the menu item is ordered, from any menu path.
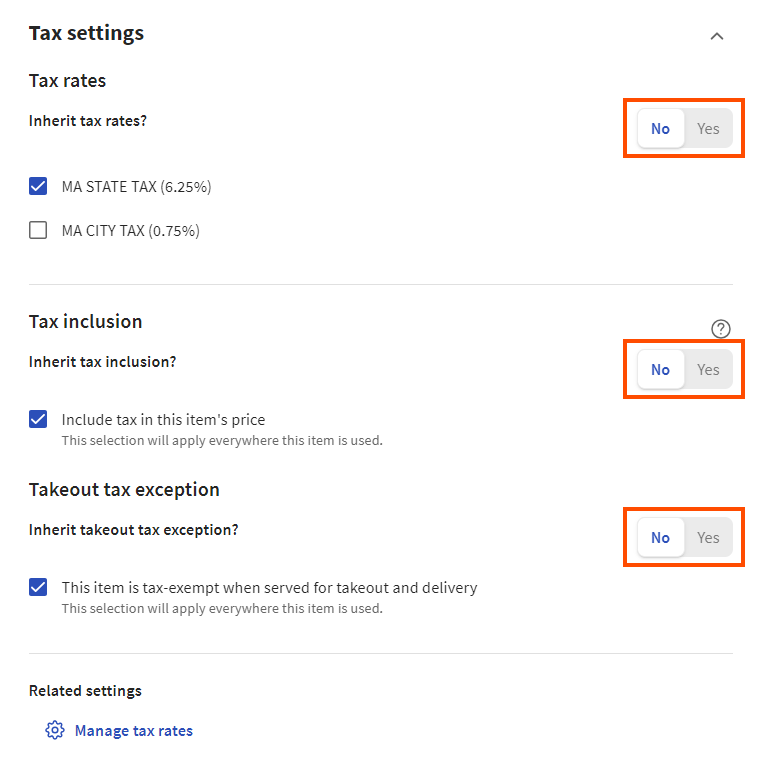
To configure a menu item so that it inherits its tax rates, set the Inherit tax rates? setting to Yes. To inherit the Tax inclusion or Takeout tax exception setting, set the Inherit tax inclusion? or Inherit takeout tax? setting to Yes.
If you do not have any tax rates configured yet, you see a Manage tax rates link that you can select to go to the Tax rates page where you can create them. For more information on creating tax rates, see Taxes overview.
When tax is included in a menu item's price, the guest pays the price you have set and any applicable taxes are taken out of that price, instead of being added to it. Use this option when you want a guest's check total to be a round number. This eliminates the need for employees to deal with coins and makes tipping simpler to calculate. It can, however, decrease net revenue if the price you set does not account for applicable taxes.
To better understand the effect of tax inclusion on your revenue, consider an item that has a price of $10 and a tax rate of 7%. When tax is included, the Toast platform calculates a price and tax combination that equals the price you have set but also covers any applicable taxes. In this case, the guest pays $10 ($9.35 for the item and $0.65 for the tax) and your revenue is $9.35:
-
$9.35 item price x .07 tax rate = $0.65 tax
-
$9.35 item price + $0.65 tax = $10 price with tax included
-
Your revenue is $9.35
When tax is not included, the guest pays $10.70 ($10 for the item and $0.70 for the tax) and your revenue is $10:
-
$10.00 item price x .07 tax rate = $0.70 in tax
-
$10.00 item price + $0.70 tax = $10 price without tax included
-
Your revenue is $10
Your sales reports display the item price and tax amount that the Toast platform has calculated for any tax included items, so you can see the breakdown of revenue versus tax when tax is included.
For information on enabling tax inclusion, see Setting tax rates and tax behavior.
For states that do not tax takeout orders, you can specify that menu items are tax-exempt when ordered for takeout. To determine if an order is a takeout order, the Toast platform looks at the dining option associated with the order and then it looks at that dining option's behavior. Dining options that use the Take Out behavior are considered takeout orders and are not be taxed.
For more information on setting takeout tax exemption behavior, see Setting tax rates and tax behavior.
For more information on dining options, see Dining options.
|
Note |
|
If you have a multi-location restaurant, you cannot set menu group channel visibility in Full menu view. You must use the classic page for the menu group instead. |
The side panel for each menu group has a Channel visibility section that shows the channels where the menu group is visible. If a menu group is visible on a channel, it is available for ordering on that channel. Options include:
-
POS: The menu group is visible in the Toast POS app.
-
Kiosk, Toast Order and Pay: The menu group is visible on Toast Kiosks and on the Toast order and pay web page. In order to enable this setting, you must first enable the POS setting.
-
Toast Online Ordering, Toast Takeout (Local by Toast) App: The menu group is visible on your restaurant's Toast Online Ordering website and in the Toast Takeout (Local by Toast) app.
-
Customer invoices, Catering & Events, Catering Online Ordering: The menu entity is visible when:
-
Creating customer invoices for orders using the Payments > Payment methods > Customer invoices page. For information, see this Toast Central article.
-
Creating catering orders using Toast Catering & Events. For information, see this Toast Central article.
-
Configuring the menu entities that guests can see when placing online catering orders. For information, see this Toast Central article.
Note that this setting is always enabled for all menu entities and cannot be changed.
-
-
Online ordering partners: The menu group is visible on the online ordering sites of all ordering partners you have allowed to integrate with your Toast restaurant (for example, DoorDash, UberEats, or Grubhub).
Unlike other settings such as tax rates and prep stations, the Channel visibility settings cannot be inherited from a parent. That said, if a parent menu entity is hidden from view for any of the Toast channels, then its child menu entities are also hidden from those channels. For example, consider a Dinner menu that contains an Appetizers group with a Chicken Satay menu item. If you hide the Dinner menu from Toast Online Ordering and the Toast Takeout (Local by Toast) app, then the Appetizers group and the Chicken Satay menu item will also be hidden from Toast Online Ordering and the Toast Takeout (Local by Toast) app, even if the Toast Online Ordering, Toast Takeout (Local by Toast) app setting is enabled for Appetizers and Chicken Satay.
The Menu groups section of a menu's details page shows the menu groups that the menu contains. If a menu group has more than one version, you see the View versions link on its card.
|
Note |
|
To view a menu's details page, go to the Full menu view, select the menu to see its side panel, then select the full screen icon to open the details page. |
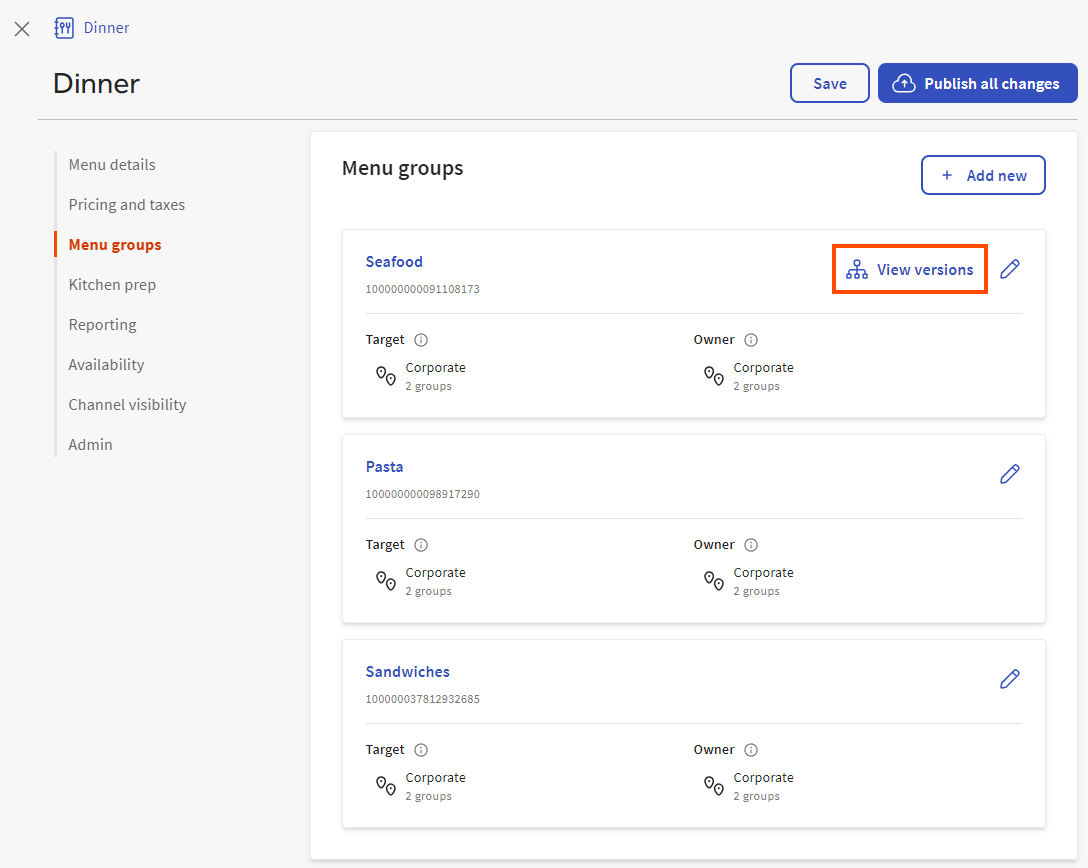
Select the View versions link to open the Versions dialog where you can see all the menu group's versions.
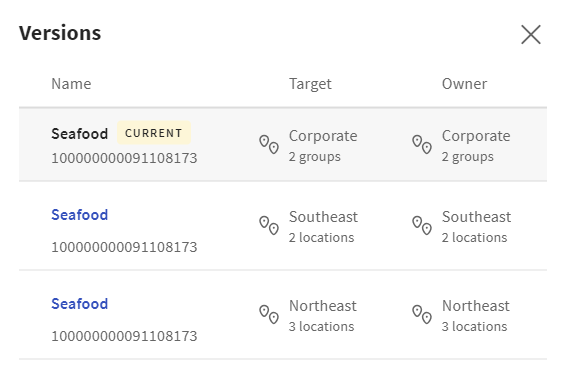
The version shown on the menu group card is marked as CURRENT in the Versions dialog. To navigate to the details page for a menu group version, select its name in the Versions dialog. Because menu groups are not yet fully supported in the menu manager for multi-location restaurants, the classic details page for the menu group opens.
When displaying a menu group that has been versioned in the Menu groups section, the Toast platform picks one representative version from the menu group's set of versions. The platform displays that representative version’s name, target, and owner. To see the name, target, and owner for the other versions, you use the View versions link to open the Versions dialog where you can see the information for the other versions.
The section below describes how the Toast platform chooses the representative version.
First, the Toast platform looks at the target of the entity you are editing (that is, the entity whose details page you are currently viewing) and determines which branch of the location group hierarchy it belongs to. For example, consider the following location group hierarchy:
-
Corporate
-
Northeast
-
Boston
-
New York City
-
-
Southeast
-
Atlanta
-
-
A menu that is targeted at Northeast (let's call this Menu - Northeast) belongs to the branch of the location group hierarchy shown in bold below:
-
Corporate
-
Northeast *** Menu - Northeast is targeted here ***
-
Boston
-
New York City
-
-
Southeast
-
Atlanta
-
-
Next, the Toast platform looks at the configuration entity that it needs to choose a representative version for. The Toast platform picks the version whose target:
-
Falls into the same branch as the entity being edited.
-
Is closest to the top of the location group hierarchy.
Consider a scenario where you want to add a Seafood menu group to the Menu - Northeast menu. In this example, the Seafood menu group has the following versions:
-
Seafood - Northeast version includes trout, lobster, and shrimp
-
Seafood - Boston version includes trout and lobster
-
Seafood - Atlanta version includes trout and shrimp
Seafood - Northeast and Seafood - Boston both fall into the same branch as Menu - Northeast, as shown below:
-
Corporate
-
Northeast *** Menu - Northeast and Seafood - Northeast are targeted here ***
-
Boston *** Seafood - Boston is targeted here ***
-
New York City
-
-
Southeast
-
Atlanta
-
-
The Toast platform picks Seafood - Northeast as the representative version because it is higher in the location group hierarchy than the Seafood - Boston version.
The Toast platform ignores Seafood - Atlanta because that version is in a different branch of the location group hierarchy from Menu - Northeast.
The Toast platform can encounter multiple versions that satisfy the core criteria of falling into the same branch as the entity being edited and being closest to the top of the hierarchy when it picks the representative version. When ties like this occur, the Toast platform chooses the version that was first created.