The menu builder makes it easy to create and add modifier groups to your Toast menu. A modifier group contains modifiers that allow guests to customize their meals. For example, a salad menu item might have a salad dressing modifier group that contains modifiers such as balsamic vinaigrette.
Here are some important points to keep in mind when working with modifier groups and modifiers:
-
You can add modifier groups to menu groups, subgroups, or menu items.
-
When you add a modifier group to a menu item, it only applies to that menu item.
-
When you add a modifier group to a menu group or subgroup, by default, it is inherited by all menu items in the group.
You can disable inherited modifier groups for an individual item within a menu group or subgroup, by setting the item's Inherit modifier groups? setting to No. If you set a menu item's Inherit modifier groups? setting to No, it will not inherit any of the modifier groups assigned to any of its parent menu groups. For more information, see Inheriting modifier groups from a parent menu group.
Note
The remainder of this section uses the term menu group to refer to both menu groups and subgroups. Menu groups and subgroups have the same configuration settings and are effectively the same except for their location in the menu hierarchy. When there is a need to differentiate, the documentation does so. For more information, see Comparing menu groups and subgroups.
-
-
To reduce the number of modifier groups you have to manage, add existing modifier groups to menu groups or items whenever possible instead of creating new ones. For example, add the same Salad Dressing modifier group to both the Dinner Salad and Side Salad menu items.
-
If you remove a modifier group from a menu group, it is removed for all of the menu items in that menu group. For more information, see Removing a modifier group.
-
If a modifier group is used by more than one menu group or item:
-
When you edit the modifier group, it is edited for all the menu groups and items that use it.
-
When you remove the modifier group from one of the menu groups or items, the other menu groups or items continue to use it.
-
-
You must add at least one modifier to a modifier group before you can save the group.
To create a new modifier group, you start by viewing the details page for a menu group or item that will use the modifier group, then you create the modifier group for that menu group or item, and add individual modifiers to it. Once you have created a modifier group for one menu group or item, you can quickly add it to others.
Here are some important points to keep in mind when creating new modifier groups:
-
You can add modifier groups to menu groups or menu items.
-
When you add a modifier group to a menu item, it only applies to that menu item.
-
When you add a modifier group to a menu group, by default, it is inherited by all menu items in the menu group.
You can disable inherited modifier groups for an individual item within a menu group or subgroup, by setting the item's Inherit modifier groups? setting to No. If you set a menu item's Inherit modifier groups? option to No, it will not inherit any of the modifier groups assigned to any of its parent menu groups. For more information, see Inheriting modifier groups from a parent menu group.
-
-
To reduce the number of modifier groups you have to manage, add existing modifier groups to menu groups or items whenever possible instead of creating new ones. For example, add the same Salad Dressing modifier group to both the Dinner Salad and Side Salad menu items.
-
You must add at least one modifier to a group before you can save the group.
To create a new modifier group
-
On the details page for the menu group, subgroup, or item that you want to add a modifier group to, select Modifier groups.
-
In the Modifier groups section, do one of the following:
-
If you are on a menu group details page, select either the Add new button (if this menu group does not have any modifier groups yet) or select the arrow next to the + Add button and choose Add new (if the menu group already has some modifier groups).
-
If you are on a menu item details page, select Add modifier group.
The Create modifier group page opens.
Note
If you have made any changes to the menu group, subgroup, or item that have not been saved yet, you must save them before you can create the modifier group. Select Save and create to save the menu group and move to the Create modifier group page.
-
-
On the Create modifier group page, in the Modifier group details section, enter a name for the modifier group in the Modifier group name field.
-
In the Modifier group details section, if you use Toast POS devices, you can customize the POS button name and color.
-
In the Pricing section, specify how the modifiers in this group are priced.
-
In the Modifiers section, add modifiers to your modifier group.
-
In the Modifier group settings section, choose whether selecting a modifier from this group is required or optional, and, if it's optional, whether to prompt the server.
-
In the Modifier group settings section, specify whether you want guests to be able to order more than one modifier from this group, the minimum and maximum number of modifiers to choose from, and whether a modifier can be chosen more than once.
-
In the Channel visibility section, select the ordering channels where this modifier group is visible. A modifier group is available for ordering on the channels where it is visible.
-
Select Save. You see the details page for the menu entity again and the modifier group you created has been added to the Modifier groups section.
-
Select Save to save the new modifier group to the menu entity.
-
Select the X icon in the upper-left corner to return to the menu builder home page.
-
If you are ready for guests and employees to see these menu changes, select Publish all changes, then select Publish again in the Confirm Publish dialog. For more information, see Understanding when to publish your menu.
To reduce the number of modifier groups you have to manage, add existing modifier groups whenever possible instead of creating new ones.
Here are some important points to keep in mind when adding existing modifier groups:
-
You can add existing modifier groups to menu groups or menu items.
-
When you add a modifier group to a menu item, it only applies to that menu item.
-
When you add a modifier group to a menu group, by default, it is inherited by all menu items in the menu group.
You can disable inherited modifier groups for an individual item within a menu group or subgroup, by setting the item's Inherit modifier groups? setting to No. If you set a menu item's Inherit modifier groups? option to No, it will not inherit any of the modifier groups assigned to any of its parent menu groups. For more information, see Inheriting modifier groups from a parent menu group.
-
-
If a modifier group is used by more than one menu group or item:
-
When you edit the modifier group, it is edited for all the menu groups and items that use it.
-
When you remove the modifier group from one of the menu groups or items, the other menu groups or items continue to use it.
-
To add existing modifier groups to a menu group or item
-
On the details page for the menu group, subgroup, or item that you want to add an existing modifier group to, select Modifier groups.
-
In the Modifier groups section, do one of the following:
-
If you are on a menu group details page, select either the Add existing button (if this menu group does not have any modifier groups yet) or select the arrow next to the + Add button and choose Add existing (if the menu group already has some modifier groups).
-
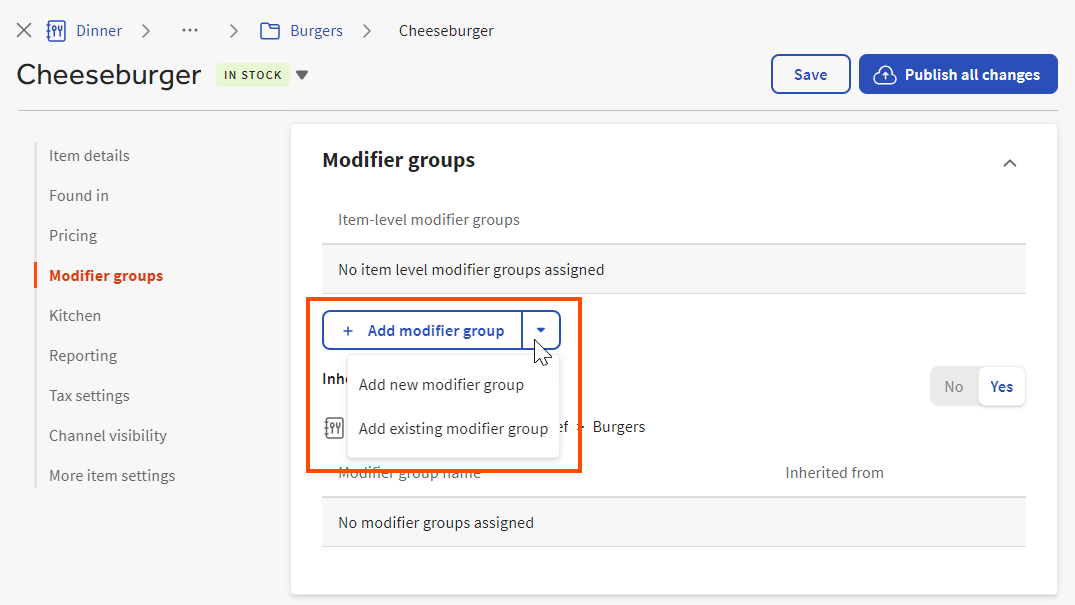
If you are on a menu item details page, select the arrow next to the + Add modifier group button and choose Add existing modifier group.
You see the What would you like to add page.
Note
If you have made any changes to the menu group, subgroup, or item that have not been saved yet, you must save them before you can create the modifier group. Select Save and create to save the menu group and move to the Create modifier group page.
-
-
Enter the name of the first modifier group you want to add in the search box. Matching modifier group results appear as you type.
Modifier groups that are eligible for adding appear in black text. Modifier groups in gray text have already been added to the menu group or item and cannot be added again. If a modifier group's check box is selected, it means you've already chosen to add it during this Add existing session.
If there are more than 25 search results, scroll to the end of the list and select Load more to view the next 25 results.
-
Optionally, select a modifier group's name to preview it and see additional details, such as the modifiers that the group contains, the way the modifier group is priced, and the other menu groups or items that use it.
-
Select the check box for a modifier group you want to add.
-
Repeat steps 6 to 8 to include additional modifier groups.
-
Optionally, select the Selected modifier groups tab to review a list of the modifier groups you've chosen to add during this Add existing session. On the Selected modifier groups tab, you can:
-
Select a modifier group's name to preview it and see additional details.
-
Select the remove icon next to an individual modifier group to remove it from the list.

-
Select Remove all to remove all modifier groups from the list.
-
-
When you are done specifying the modifier groups you want to add, select the Add modifier group button. You are returned to the menu group or menu item page with the modifier group(s) added.
-
Select Save.
-
Select the X icon in the upper-left corner to return to the menu builder home page.
-
If you are ready for guests and employees to see these menu changes, select Publish all changes, then select Publish again in the Confirm Publish dialog. For more information, see Understanding when to publish your menu.
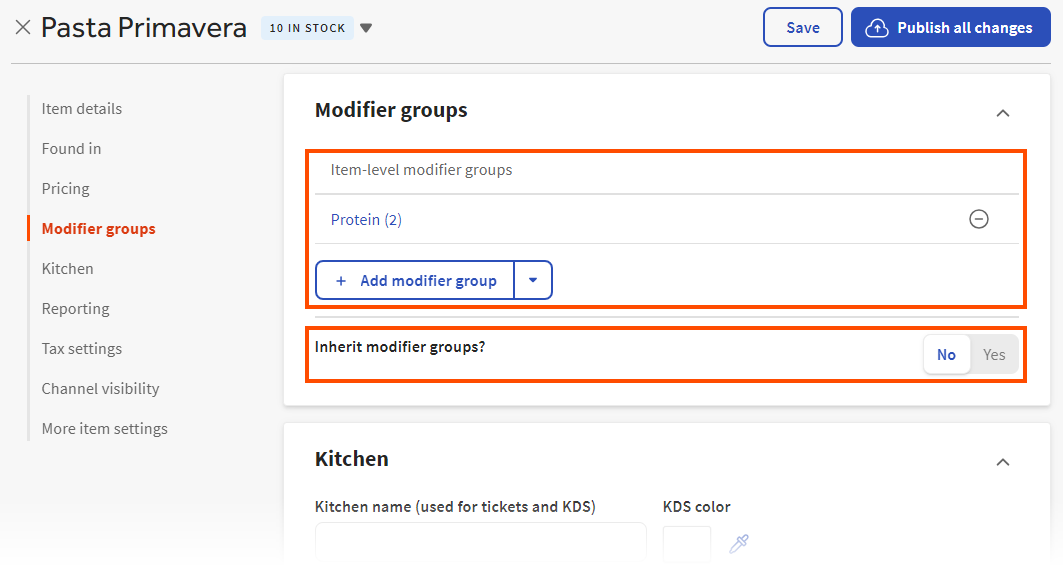
The Modifier groups section of the menu item details page has an Inherit modifier groups? setting. By default, this setting is set to Yes, so that the menu item inherits modifier groups from its parent menu groups.
If you do not want a menu item to inherit modifier groups, set its Inherit modifier groups? setting to No and then add modifier groups to it directly using the Item-level modifier groups settings.
Menu items can belong to more than one menu path. When a menu item belongs to more than one menu path, it can inherit different modifier groups from each path. For example, the Grilled Cheese menu item in the illustration below belongs to two menu paths: Dinner > Dinner Sandwiches and Lunch > Lunch Sandwiches. When a Grilled Cheese is ordered from the Dinner > Dinner Sandwiches path, it uses the Dinner Sides modifier group. When a Grilled Cheese is ordered from the Lunch > Lunch Sandwiches path, the menu item uses the Lunch Sides modifier group.
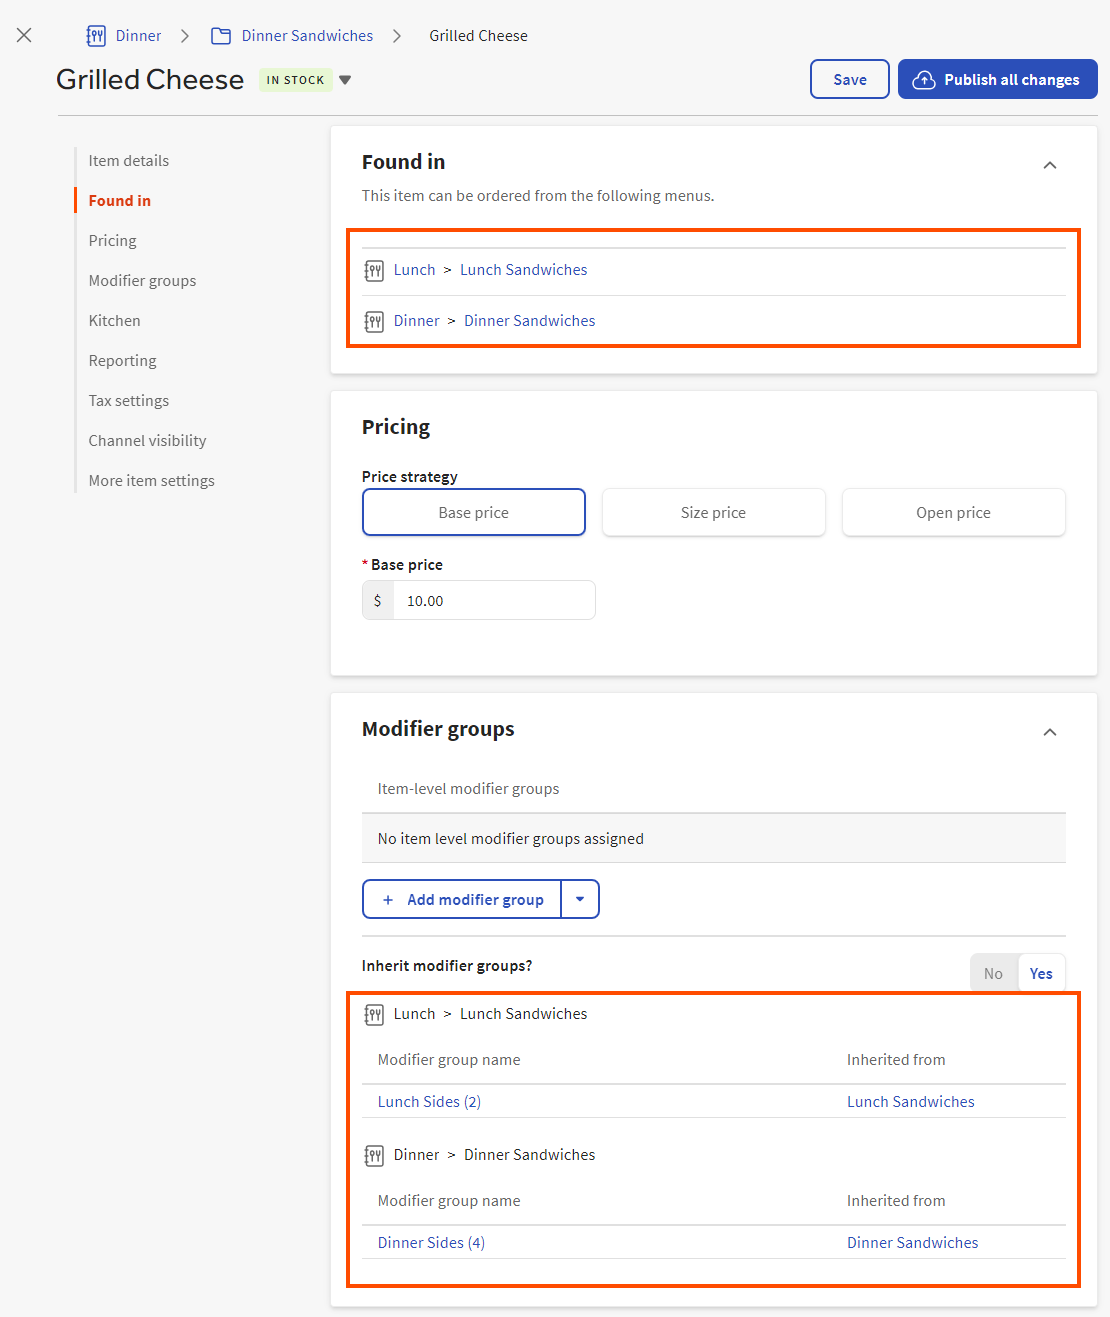
When you set a menu item's Inherit modifier groups? option to Yes, you see a set of tables that show the different menu paths the menu item belongs to. The table for each path shows the modifier groups that the menu item inherits for each path, and the specific parent menu groups within those paths that provide the inherited modifier groups.
For more information on inheritance, see Understanding inheritance.
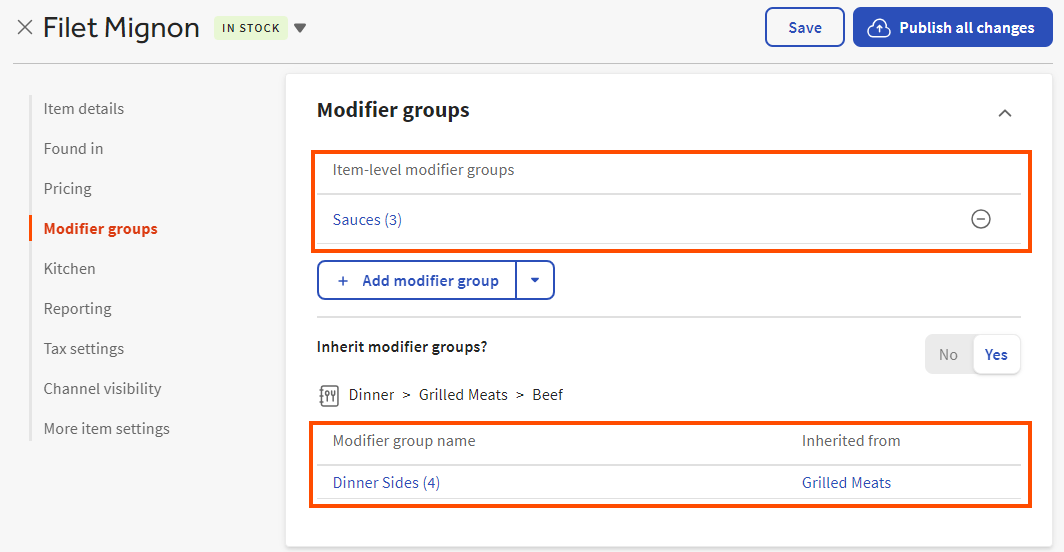
A menu item can have both inherited modifier groups and item-level modifier groups that are added directly to the menu item itself, using the Item-level modifier groups settings. In the example below, the Filet Mignon menu item inherits the Dinner Sides modifier group from its parent menu group while the Sauces modifier group is added directly to the Filet Mignon menu item.
By default, the Inherit modifier groups? setting is set to Yes for all menu items within a menu group. However, you can choose to override that setting on individual menu items within the group. For example, consider a Sandwiches menu group that has an assortment of sandwiches, one of which is vegan. You could add a Cheese Selection modifier group to the Sandwiches menu group and allow the non-vegan sandwiches to inherit it but toggle the Inherit modifier groups? setting to No for the vegan sandwich.
|
Important |
|
You cannot set a menu item to inherit some of the modifier groups from its parent menu groups. It either inherits all of them or none of them. |
To edit a modifier group's configuration, you use its details page.
To edit a modifier group
-
On the details page for the menu group, subgroup, or item that contains the modifier group that you want to edit, select Modifier groups.
-
In the Modifier groups section, do one of the following:
-
If you are on a menu group details page, select the edit icon (pencil) for the modifier group you want to edit.
-
If you are on a menu item details page, select the name of the modifier group you want to edit.
The modifier group's details page opens.
-
-
Make your changes.
-
Select Save.
-
Select the X icon in the upper-left corner to return to the menu builder home page.
-
If you are ready for guests and employees to see these menu changes, select Publish all changes, then select Publish again in the Confirm Publish dialog. For more information, see Understanding when to publish your menu.
You use the Pricing section of a modifier group's details page to specify how the modifiers in a group are priced:
-
No charge: There is no charge for the modifiers in the group.
-
Individual: Each modifier in the group has its own price. When you choose this option, the table in the Modifiers section displays a Price column that you use to specify the prices of the modifiers.
-
Group: All modifiers in the group share the same price. When you choose this option, a Price field appears in the Pricing section where you can enter the price for the modifiers.
Modifier groups contain individual modifiers that allow guests to customize their orders. For example, a Dinner Salad menu item might have a Salad Dressing modifier group that contains modifiers such as Balsamic Vinaigrette and Ranch.
To add and customize the modifiers in a modifier group, you use the Modifiers section of a modifier group's details page. The Modifiers section contains a Modifiers table that lists the modifiers in the modifier group you are creating or editing:

Here are some important points to keep in mind when working with modifiers:
-
To reduce the number of modifiers you have to manage, add existing modifiers to modifier groups whenever possible instead of creating new ones. For example, a Breakfast Sides modifier group and a Burger Toppings modifier group could share a Bacon modifier.
-
If a modifier is used by more than one modifier group:
-
When you edit the modifier, it is edited for all the modifier groups that use it.
-
When you remove the modifier from one of the modifier groups, the other modifier groups continue to use it.
-
-
You must add at least one modifier to a modifier group before you can save the group.
Follow the instructions below to create new modifiers for a modifier group.
To create new modifiers for a modifier group
-
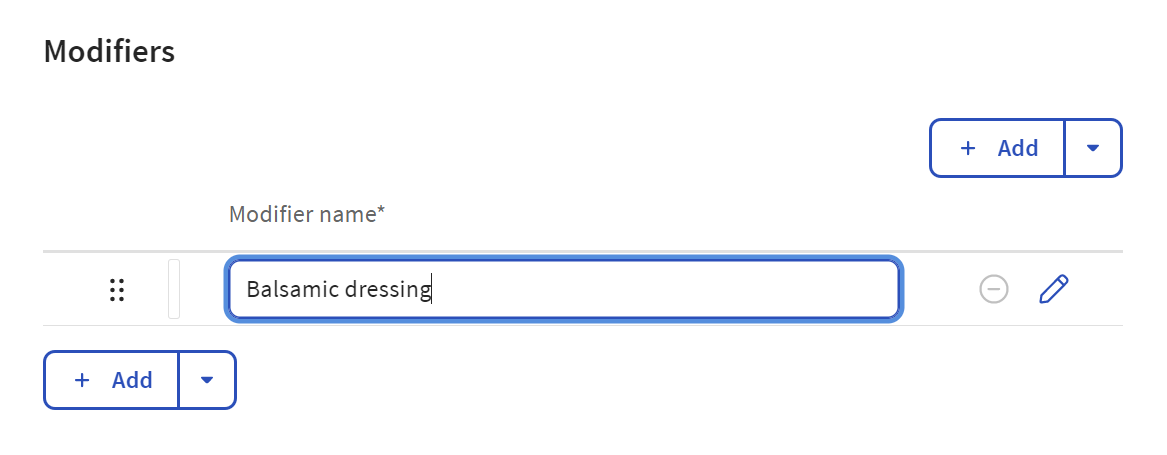
In the Modifiers section of a modifier group's details page, enter the name of the first modifier in the first row.
-
To add another modifier to the modifier group, select + Add. A new row is added to the table where you can specify the details of the next modifier.
-
If your modifiers are priced individually, the Modifiers table has a Price column where you can enter a price for each modifier you create.
Note
If you enter a minus sign before a modifier's price, the value you enter is deducted from the menu item's price. Consider using this method if a guest wants to remove a costly ingredient such as meat from a pizza or salad.
-
Select Save.
-
Select the X icon in the upper-left corner to return to the menu builder home page.
-
If you are ready for guests and employees to see these menu changes, select Publish all changes, then select Publish again in the Confirm Publish dialog. For more information, see Understanding when to publish your menu.
To reduce the number of modifiers you have to manage, add existing modifiers whenever possible instead of creating new ones. For example, a Breakfast Sides modifier group and a Burger Toppings modifier group could share a Bacon modifier.
If a modifier group is used by more than one menu group or item, keep in mind that:
-
When you edit the modifier group, it is edited for all the menu groups and items that use it.
-
When you remove the modifier group from one of the menu groups or items, the other menu groups or items continue to use it.
To add existing modifiers to a modifier group
-
In the Modifiers section of a modifier group's details page, select the arrow next to the + Add button and then choose Add existing from the menu.
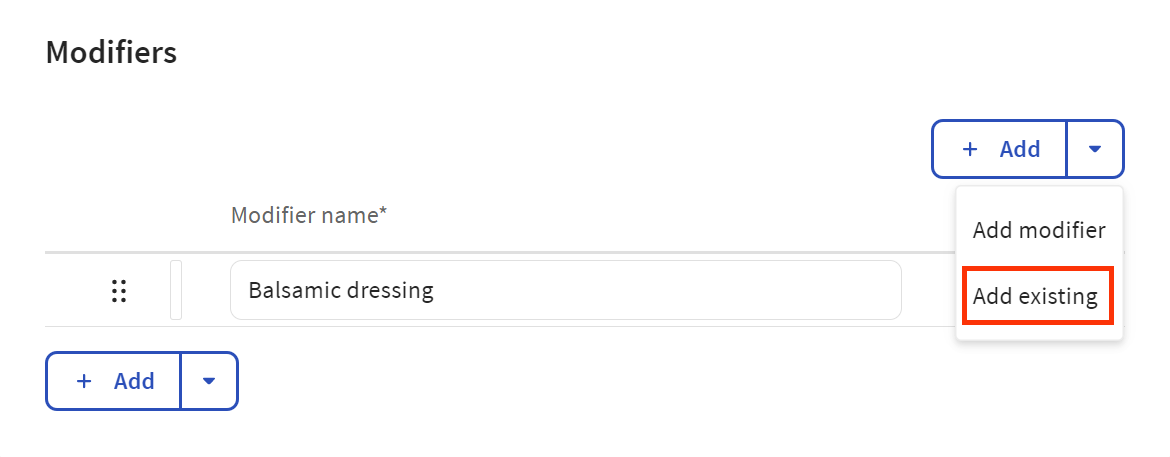
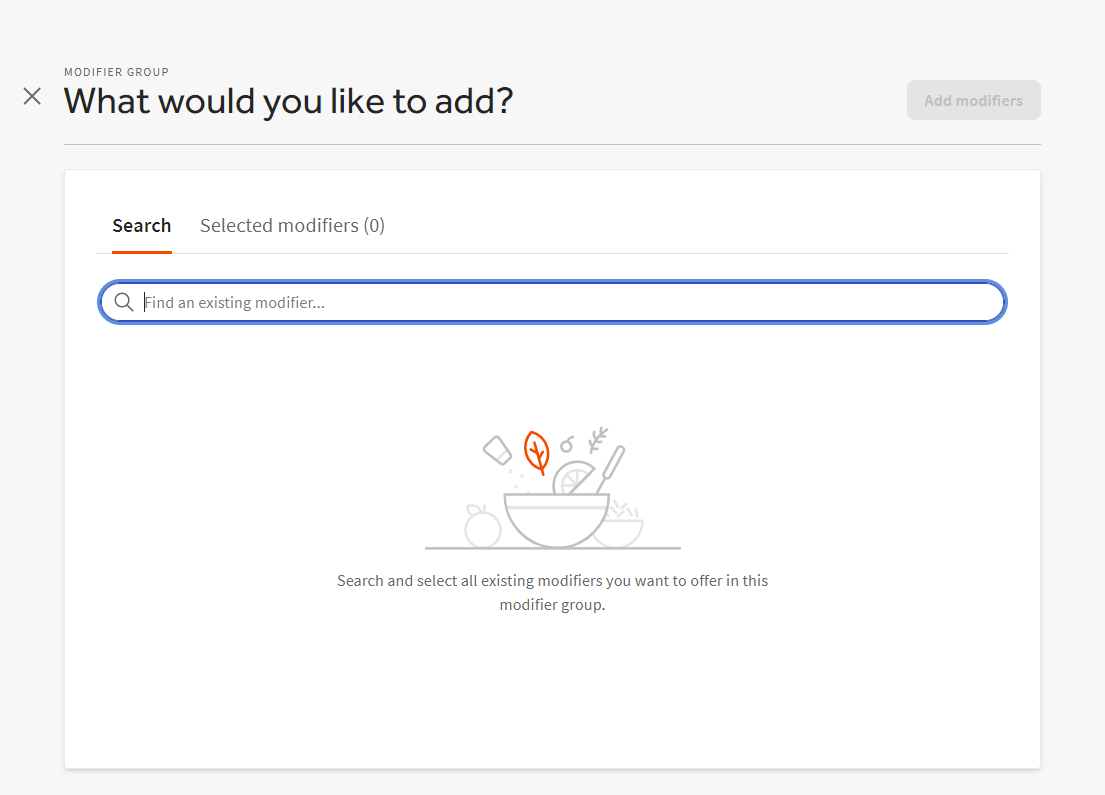
You see the What would you like to add page.
-
For each modifier that you want to add:
-
Enter the name of the modifier you want to add in the search box. Matching modifier results appear as you type.
Modifiers that are eligible for adding appear in black text. Modifiers in gray text have already been added to the modifier group and cannot be added again. If a modifier's check box is selected, it means you've already chosen to add it during this Add existing session.
If there are more than 25 search results, scroll to the end of the list and select Load more to view the next 25 results.
-
Optionally, select a modifier's name to preview it and see additional details, such as the modifier's price and the modifier groups that use it.
-
Select the check box for the modifier you want to add.
You can repeat these steps to add more than one existing modifier during a single Add existing session.
-
-
Optionally, select the Selected modifiers tab to review a list of the modifiers you've chosen to add during this Add existing session. On the Selected modifiers tab, you can:
-
Select a modifier's name to preview it and see additional details.
-
Select the remove icon next to a modifier to remove it from the list.
-
Select Remove all to remove all modifiers from the list.
-
-
When you are done specifying the modifiers you want to add, select the Add modifiers button. You are returned to the modifier group page with the modifier(s) added.
-
Select Save.
-
Select the X icon in the upper-left corner to return to the menu builder home page.
-
If you are ready for guests and employees to see these menu changes, select Publish all changes, then select Publish again in the Confirm Publish dialog. For more information, see Understanding when to publish your menu.
Follow the instructions below to change the display sequence of the modifiers in a modifier group.
To change the display sequence of modifiers in a modifier group
-
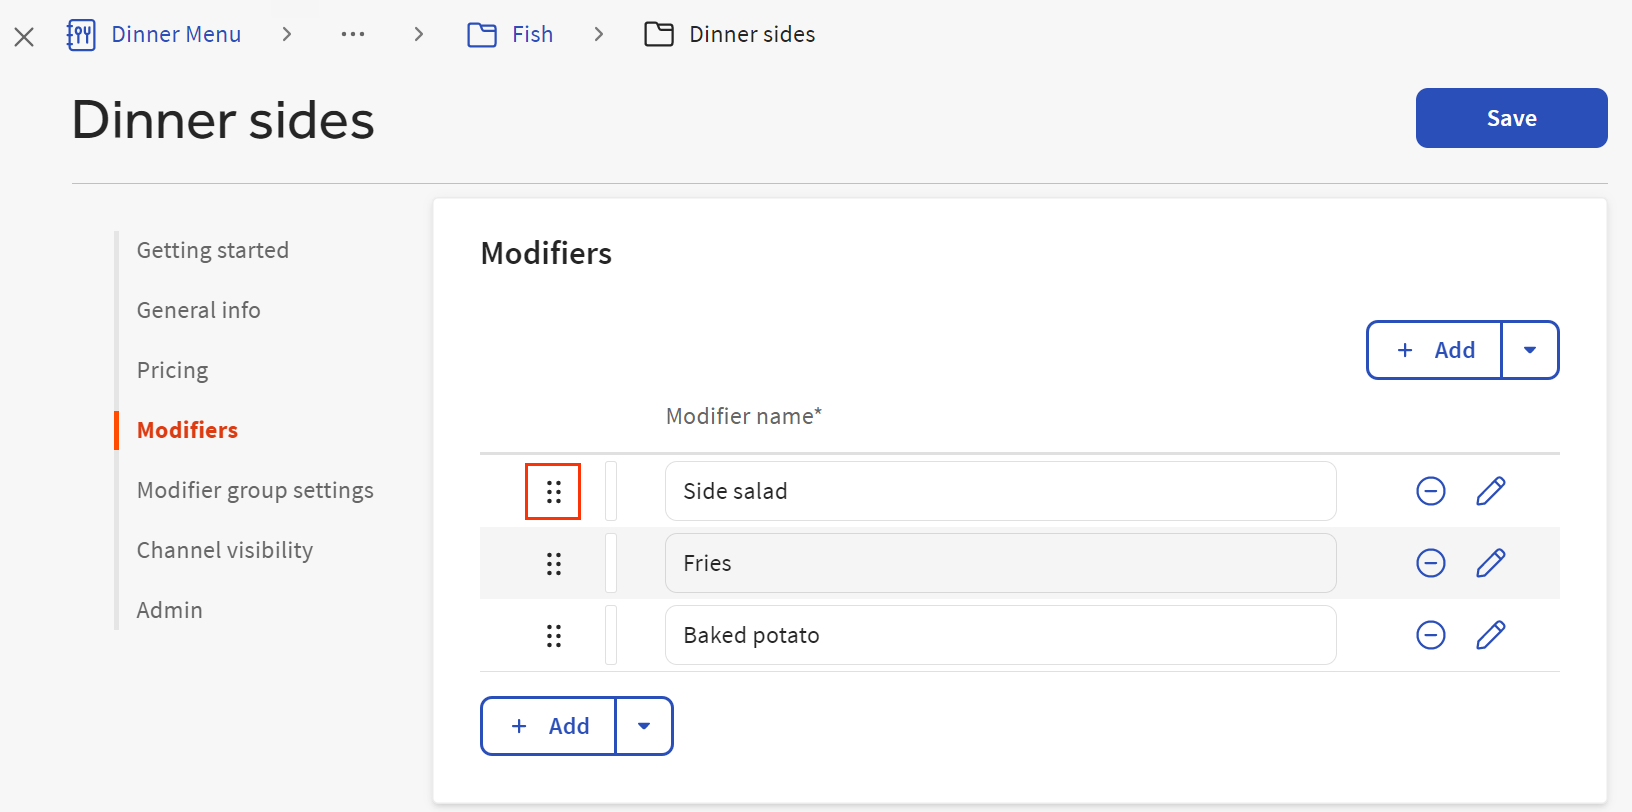
In the Modifiers section of a modifier group's details page, select a modifier's reorder icon and drag the row to its new location.
-
Select Save.
-
Select the X icon in the upper-left corner to return to the menu builder home page.
-
If you are ready for guests and employees to see these menu changes, select Publish all changes, then select Publish again in the Confirm Publish dialog. For more information, see Understanding when to publish your menu.
The Modifiers table displays a modifier's name and price (the Price column only appears if the modifiers in the group are priced individually). To set other details for a modifier, such as button color and calories, you open its Edit modifier dialog.
To set other details for a modifier
-
In the Modifiers section of a modifier group's details page, select a modifier's edit icon.
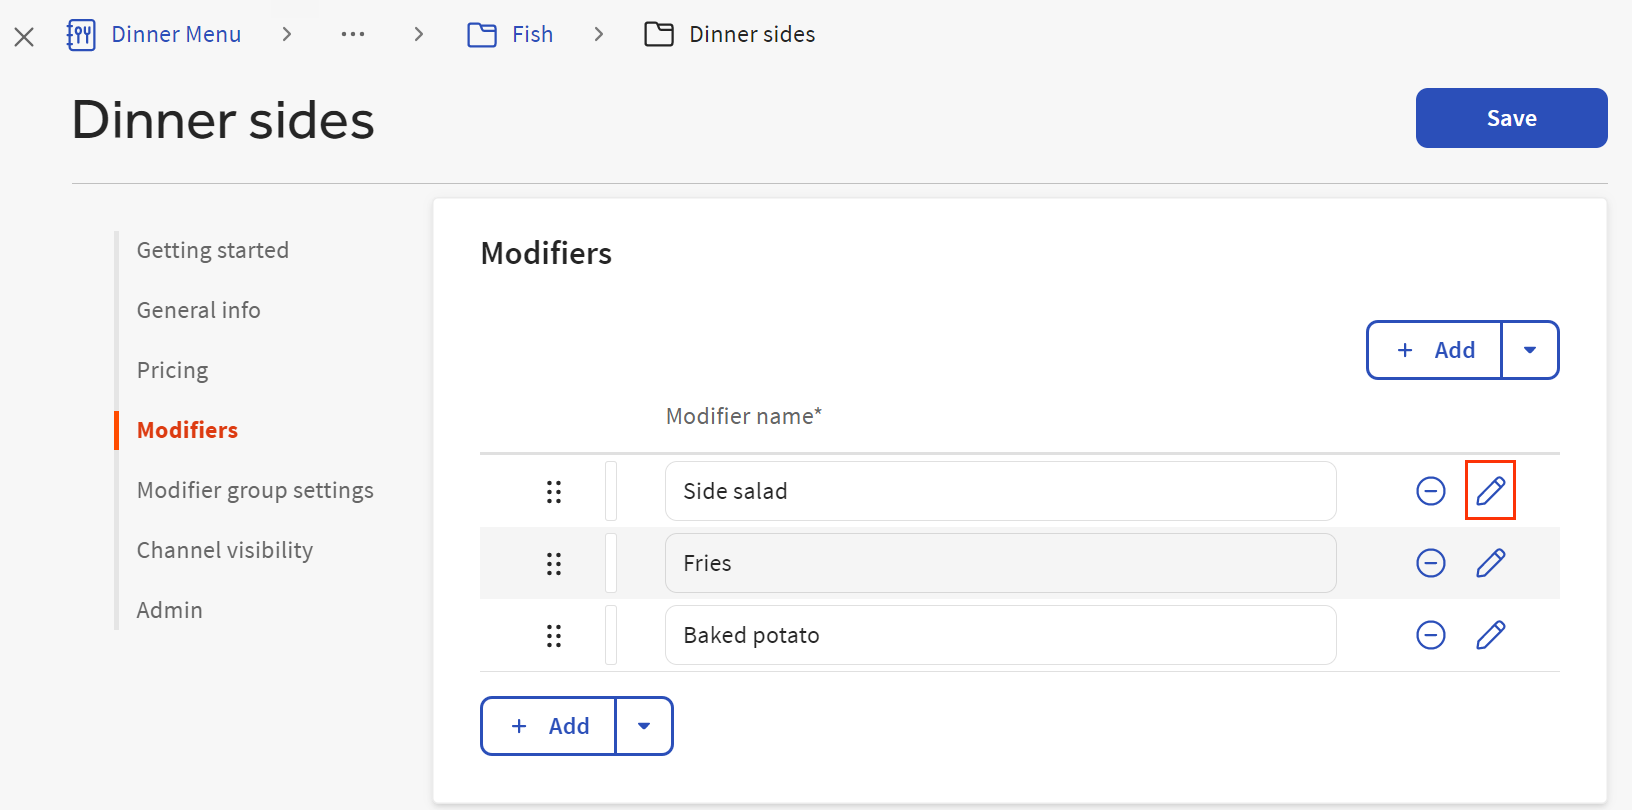
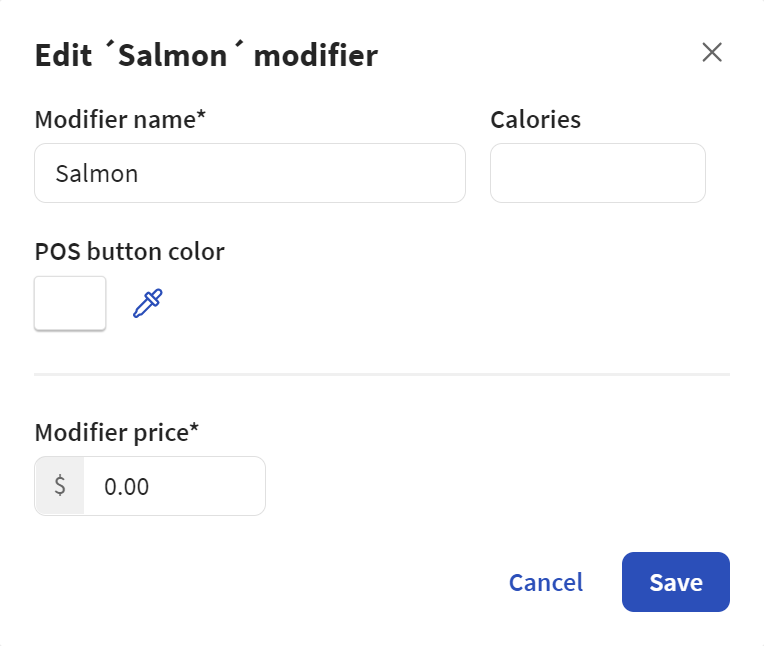
You see the Edit modifier dialog:
-
In the Edit modifier dialog, you can:
-
Edit the modifier's name.
-
Enter the number of calories for the modifier. If you enter a minus sign before a modifier's calorie value, the amount you enter is deducted from the menu item's calorie value. For example, for a No Cheese modifier, you could use the minus sign to deduct the cheese calories from the menu item.
-
Specify a POS button color by selecting the POS button color option and then selecting a color from the color palette.
-
If the modifier is priced individually, you can edit its price in the Modifier price field. If the modifier is not priced individually, the Modifier price field is disabled.
-
-
Select Save.
-
Select the X icon in the upper-left corner to return to the menu builder home page.
-
If you are ready for guests and employees to see these menu changes, select Publish all changes, then select Publish again in the Confirm Publish dialog. For more information, see Understanding when to publish your menu.
Follow the instructions below to remove modifiers from a modifier group.
To remove modifiers from a modifier group
-
In the Modifiers section of a modifier group's details page, select a modifier's remove icon.

If a modifier is used by more than one modifier group, and you remove it from one of those modifier groups, the other modifier groups will continue to use it.
-
Select Save.
-
Select the X icon in the upper-left corner to return to the menu builder home page.
-
If you are ready for guests and employees to see these menu changes, select Publish all changes, then select Publish again in the Confirm Publish dialog. See Understanding when to publish your menu for more information.
In the Modifier group settings section of a modifier group's details page, you can choose whether selecting a modifier from a group is required or optional:
-
A Required modifier group is always shown to a guest or server and they must make a selection before they can proceed with an order (for example, meat temperature on a Steak menu item).
-
An Optional modifier group is available to a guest or server but they don't have to view it or make a selection from it before proceeding with the order (for example, adding a chicken modifier to a Salad menu item).
If you choose Optional and you use POS devices, you can also toggle the Include a POS prompt setting to On to require servers to view the modifier group before they can continue with the order. Servers must either pick a modifier or choose Done to close the modifier group before proceeding. This feature is useful to remind servers about optional upsells they may want to suggest to the guest. This setting has no effect on your online ordering site.
The sequence of modifier groups in Toast ordering channels is affected by the required and optional settings. In general, required modifier groups are shown first, followed by optional groups that use a POS prompt, followed by optional groups that don't use a POS prompt; however there are other factors that affect modifier group display order. See Modifier group display order overview for more information.
When you configure a modifier group as Required, you must also pay careful attention to the group's ordering channel visibility settings. If the group is not visible on a particular channel, guests and servers won't see it on that channel and it will be missing from orders placed on that channel, even if it is marked as Required. Examples of channels include the Toast POS app, a Toast Kiosk, a restaurant's Toast online ordering site, or a third-party ordering website like Grubhub, Doordash, or UberEats.
Consider the following example. A Dinner Salad menu item has a Dressing modifier group that is marked as . The Dinner Salad's visibility settings specify that it is visible and available for ordering on all channels. The Dressing modifier group, however, was accidentally configured so that it is not visible on the Toast Online Ordering site. When a guest places an order for the Dinner Salad on the Toast online ordering site, they are not shown the Dressing modifier group because that modifier group is not visible on the Toast online ordering site. Consequently, when the order is sent to the restaurant, it is missing a selection from the Dressing modifier group.
To sum up, if you mark a modifier group as Required, pay careful attention to its visibility settings to ensure it is displayed on the correct channels and your servers and guests can see it and select it.
In the Modifier group settings section of a modifier group's details page, you can specify whether guests can order more than one modifier from a modifier group.
Set the Allow guests to select more than one modifier toggle to On if you want guests to be able to select more than one modifier from this group. The additional options you see depend on whether the modifier group is required or optional:
-
The What is the maximum number a guest can select option appears for both required and optional modifier groups and allows you to specify the maximum number of modifiers a guest can select from this group. This option defaults to No maximum, meaning a guest can select as many modifiers from the group as they want.
-
The What is the minimum number a guest must select option also appears for required modifier groups and lets you specify the number of modifiers a guest must select from this group. This option defaults to 1, meaning a guest must select one modifier from the group, but you can increase that number if necessary.
The table below provides some examples to help you better understand how to use the minimum and maximum settings:
Modifier group minimum and maximum examples
|
Requirements |
Example |
Settings |
|---|---|---|
|
Guests can make zero or one selection from this modifier group. |
A Protein modifier group that lets a guest optionally add chicken or salmon to a Salad entree. |
Optional Minimum: 0 Maximum: 1 |
|
Guests must make one, and only one, selection from this modifier group. |
A Temperature modifier group that defines the cooking temperature for a Steak entree and has Rare, Medium, or Well Done modifiers. |
Required Minimum: 1 Maximum: 1 |
|
Guests must select a specific number of modifiers from this modifier group. |
A pick-two lunch entree where the guest can pick two offerings from a group of lunch dishes, for example, soup and a sandwich, or soup and a salad, or salad and a sandwich. |
Required Minimum: 2 Maximum: 2 |
|
Guests can select as few or as many modifiers from this modifier group as they want. |
A Pizza Toppings modifier group for a make-your-own pizza where the guest can choose as few or as many toppings as they like. |
Optional No minimum No maximum |
|
Guests must select at least one modifier from this modifier group but they can also pick as many modifiers from this group as they want. |
A Cheese Choice modifier group where the guest must specify at least one type of cheese to add to a sandwich but they can optionally add as many types of cheese as they want. |
Required Minimum: 1 No maximum |
|
Guests do not have to select any modifiers from this group but, if they do, they are limited to a specific number. |
An Extra Sides modifier group where the guest does not have to pick a side dish but they can optionally add up to two side dishes. |
Optional No minimum Maximum: 2 |
If the Allow guests to select more than one modifier option is On, the Can a single modifier be selected more than once option is also displayed. Set this option to On if you want a guest to be able to select a single modifier more than once, for example, to let a guest add double pepperoni to a pizza.
When you configure a modifier group to use the What is the minimum number a guest must select setting, you must also pay careful attention to the ordering channel visibility settings for the modifiers in that group. Specifically, you must ensure that the number of modifiers that are visible in any given ordering channel meet or exceed the minimum number of modifiers a guest or server must select from the modifier group.
For example, consider a Lunch Sides modifier group that sets the What is the minimum number a guest must select option to 2 and has the following modifiers:
-
Fries
-
Salad
-
Soup
The Fries modifier is visible on both the Toast POS app and the Toast Online Ordering site but the Soup and Salad modifiers were mistakenly configured so that they are only visible on the Toast POS app. When a guest on the Toast Online Ordering site places an order, they will only see the Fries modifier in the Lunch Sides modifier group, making it impossible for them to pick two sides. The guest will still be allowed to place this order and the order will not fail when it is sent to the Toast platform, but it will not have all the information the kitchen needs to fulfill it.
Here are some important points to keep in mind when removing modifier groups:
-
If a modifier group is applied to a menu group and you remove it, that modifier group is removed from all menu items that inherit it from the menu group. The same is true if you remove a modifier group from a subgroup.
-
If a modifier group is used by more than one menu item, and you remove it from one of those menu items, the other menu items will continue to use it.
To remove a modifier group
-
On the details page for the menu group, subgroup, or item that contains the modifier group that you want to remove, select Modifier groups.
-
Select the Remove icon (-) for the modifier group you want to remove.
-
Select Save.
-
Select the X icon in the upper-left corner to return to the menu builder home page.
-
If you are ready for guests and employees to see these menu changes, select Publish all changes, then select Publish again in the Confirm Publish dialog. For more information, see Understanding when to publish your menu.