This section provides procedures and information about creating your menu hierarchy.
The sections below describe how to:
-
Set the order in which your menus appear in your ordering channels.
-
Remove a menu. Removing a menu removes any menu groups and menu items that the menu contains.
To create a menu
-
Select + Create Menu. You see the Create menu page.
-
In the Menu details section, enter a name for the menu in the Menu name field.
-
If you use Toast POS devices, you can customize the button restaurant employees see in the Toast POS app by entering a POS nickname and setting the button color. To specify a button color, select the POS button color option, and then select a color from the color palette.
-
In the Pricing and taxes section, set the tax rates and other tax behavior for this menu.
-
In the Kitchen prep section, use the Prep stations settings to assign the prep stations for this menu.
-
In the Kitchen prep section, use the Course setting to specify the course for this menu.
-
In the Reporting section, select a sales category for this menu from the Sales category menu.
-
In the Availability section, specify the days and times that this menu is available for ordering. By default, Always is selected, meaning the menu is available during all hours that the restaurant is open. Use the Specific days and time setting to set a custom schedule for when the menu is available.
For multi-location restaurants, the time period you specify is in each location's local time.
-
In the Channel visibility section, select the ordering channels where this menu is visible. A menu is available for ordering on the channels where it is visible.
-
Select Save.
-
Select the X icon in the upper-left corner to return to the menu builder home page.
To set menu display order
-
Select Set menu display order. You see the Set menu display order dialog.
-
Select and drag a menu to reposition it in the order of menus. Repeat this step as needed to put your menus in the order you want your guests and servers to see them.
-
Select Save.
-
If you are ready for guests and employees to see these menu changes, select Publish all changes, then select Publish again in the Confirm Publish dialog. See Understanding when to publish your menu for more information.
To edit a menu
-
Select the menu you want to edit.
-
Select the overflow menu (the ⋮ icon) to the right of the menu's name and choose Edit to access the menu details page.
-
Change your menu's settings, then select Save.
-
Select the X icon in the upper-left corner to return to the menu builder home page.
-
If you are ready for guests and employees to see these menu changes, select Publish all changes, then select Publish again in the Confirm Publish dialog. See Understanding when to publish your menu for more information.
To remove a menu
-
Select the menu you want to remove.
-
Select the overflow menu (the ⋮ icon) to the right of the menu's name and choose Remove.
-
Select Remove in the confirmation dialog.
-
If you are ready for guests and employees to see these menu changes, select Publish all changes, then select Publish again in the Confirm Publish dialog. See Understanding when to publish your menu for more information.
You use menu groups and subgroups to further organize the offerings in a menu. For example, a Dinner menu could have an Entrees menu group that, in turn, contains From the Grill and Vegetarian subgroups.
Subgroups can be used to make navigating your menu easier. However, each subgroup requires an additional selection by the user who is trying to find a specific menu item in that subgroup. For this reason, the menu builder limits the nesting of subgroups to three subgroups below a parent menu group:
Menu
   Menu group
      Subgroup 1
         Subgroup 2
Subgroup 3 (this is the limit of subgroup nesting)Menu groups and subgroups have the same configuration options on their details pages and are effectively the same except for their location in the menu hierarchy. The primary difference between them is how you access them.
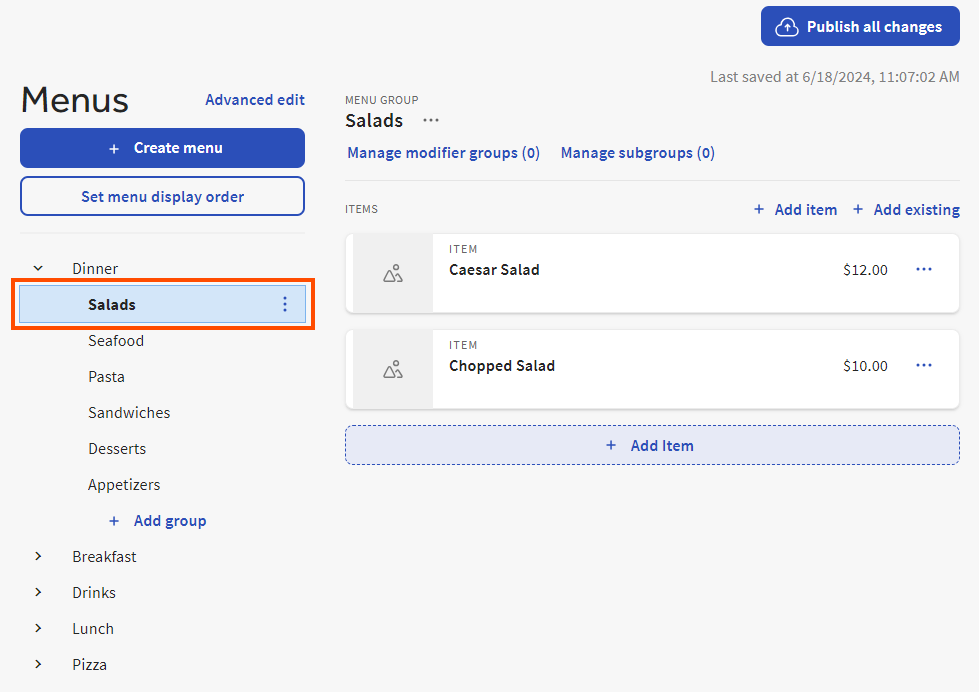
To access a menu group, you use the left-hand navigation pane on the menu builder home page:
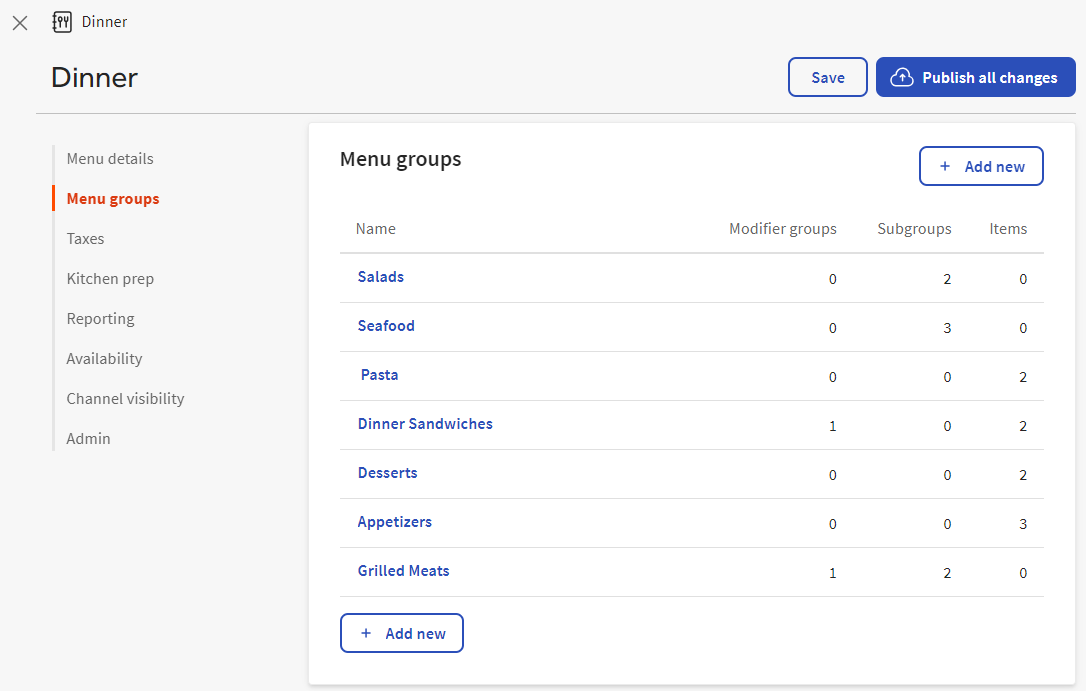
You can also access a menu group from a menu's details page. To do so, navigate to the details page for the menu, select Menu groups from the left-hand pane, and then select the menu group's name.
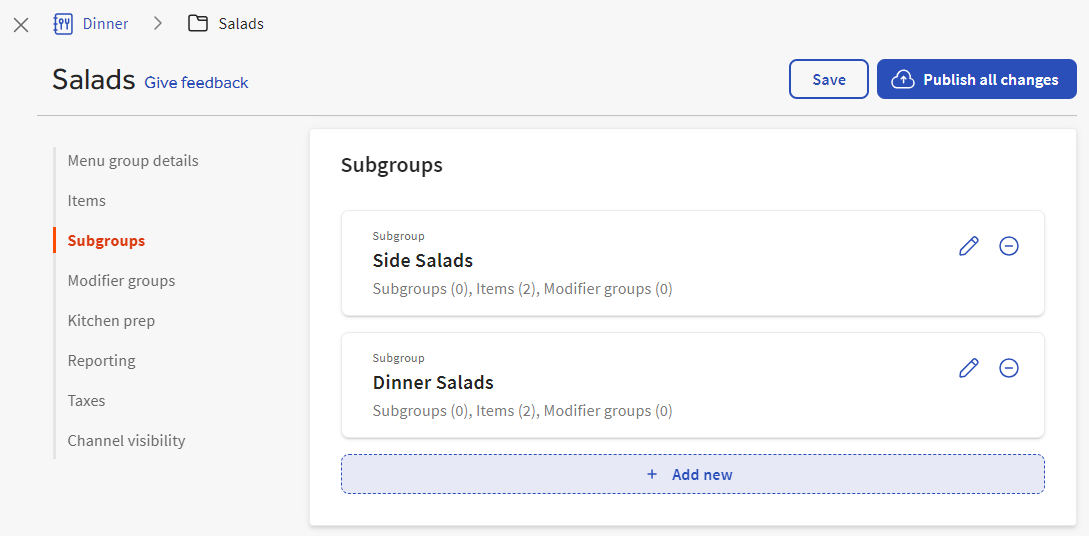
To access a subgroup, you navigate to the details page for the subgroup's parent group and then select Subgroups. For example, the illustration shows the subgroups contained in the Salads menu group.
Menu groups have a set of shortcuts on the menu builder home page for tasks like adding new or existing menu items and managing modifier groups and subgroups. You can also see a list of menu items contained in a menu group when you select it on the menu builder home page.
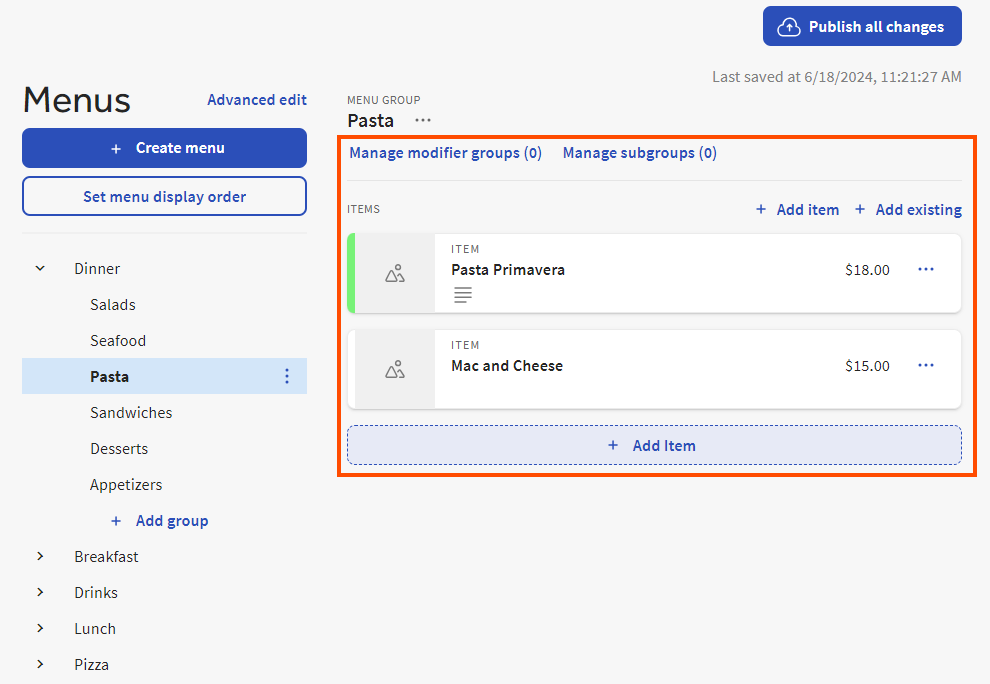
Because subgroups are not visible on the menu builder home page, you cannot manage them from the home page in the same way you can manage menu groups.
The sections below describe how to:
To create a menu group
-
Select the menu you want to add a menu group to.
-
Select + Add Group. You see the Create menu group page.
-
Select Save.
-
Select the X icon in the upper-left corner to return to the menu builder home page.
-
If you are ready for guests and employees to see these menu changes, select Publish all changes. Select Publish again in the Confirm Publish dialog. See Understanding when to publish your menu for more information.
To create a subgroup
-
On the details page for the menu group or subgroup you want to add a subgroup to, select Subgroups.
-
In the Subgroups section, select Add new. You see the Create subgroup page.
-
Select Save.
-
Select the X icon in the upper-left corner to return to the menu builder home page.
-
If you are ready for guests and employees to see these menu changes, select Publish all changes. Select Publish again in the Confirm Publish dialog. For more information, see Understanding when to publish your menu.
To configure a menu group or subgroup
-
On the menu group or subgroup's details page, in the Menu group details section, enter a name for the group in the Group name field.
-
If you use Toast POS devices, you can customize the button restaurant employees see in the Toast POS app by entering a POS name and setting the button color. To specify a button color, select the Button color option and then select a color from the color palette.
-
In the Subgroups section, you can add subgroups to further organize the items in this menu group.
-
In the Items section, use the Add new and Add existing buttons to add new or existing items to this menu group.
-
In the Modifier groups section, use the Add new and Add existing buttons to add new or existing modifier groups to this menu group.
-
In the Kitchen prep section, use the Prep stations settings to assign the prep stations for this menu group.
-
In the Kitchen prep section, use the Course setting to specify the course for this menu group.
-
In the Reporting section, select a sales category for this menu group from the Sales category menu.
-
In the Taxes section, set the tax rates and other tax behavior for this menu group.
-
In the Channel visibility section, select the ordering channels where this menu group is visible. A menu group is available for ordering on the channels where it is visible.
-
Select Save.
-
Select the X icon in the upper-left corner to return to the menu builder home page.
-
If you are ready for guests and employees to see these menu changes, select Publish all changes, then select Publish again in the Confirm Publish dialog. For more information, see Understanding when to publish your menu.
To edit a menu group
-
Select the menu that contains the menu group you want to edit, then select the menu group.
-
Select the overflow menu (the ⋮ icon) to the right of the menu group's name and choose Edit. You see the menu group details page.
Note
Alternatively, if you are viewing the details page for a menu that contains the menu group you want to edit, you can select Menu groups from the left-hand pane, and then select the edit icon (pencil) for the menu group you want to edit.
-
Change your menu group's settings, then select Save.
-
Select the X icon in the upper-left corner to return to the menu builder home page.
-
If you are ready for guests and employees to see these menu changes, select Publish all changes, then select Publish again in the Confirm Publish dialog. For more information, see Understanding when to publish your menu.
To edit a subgroup
-
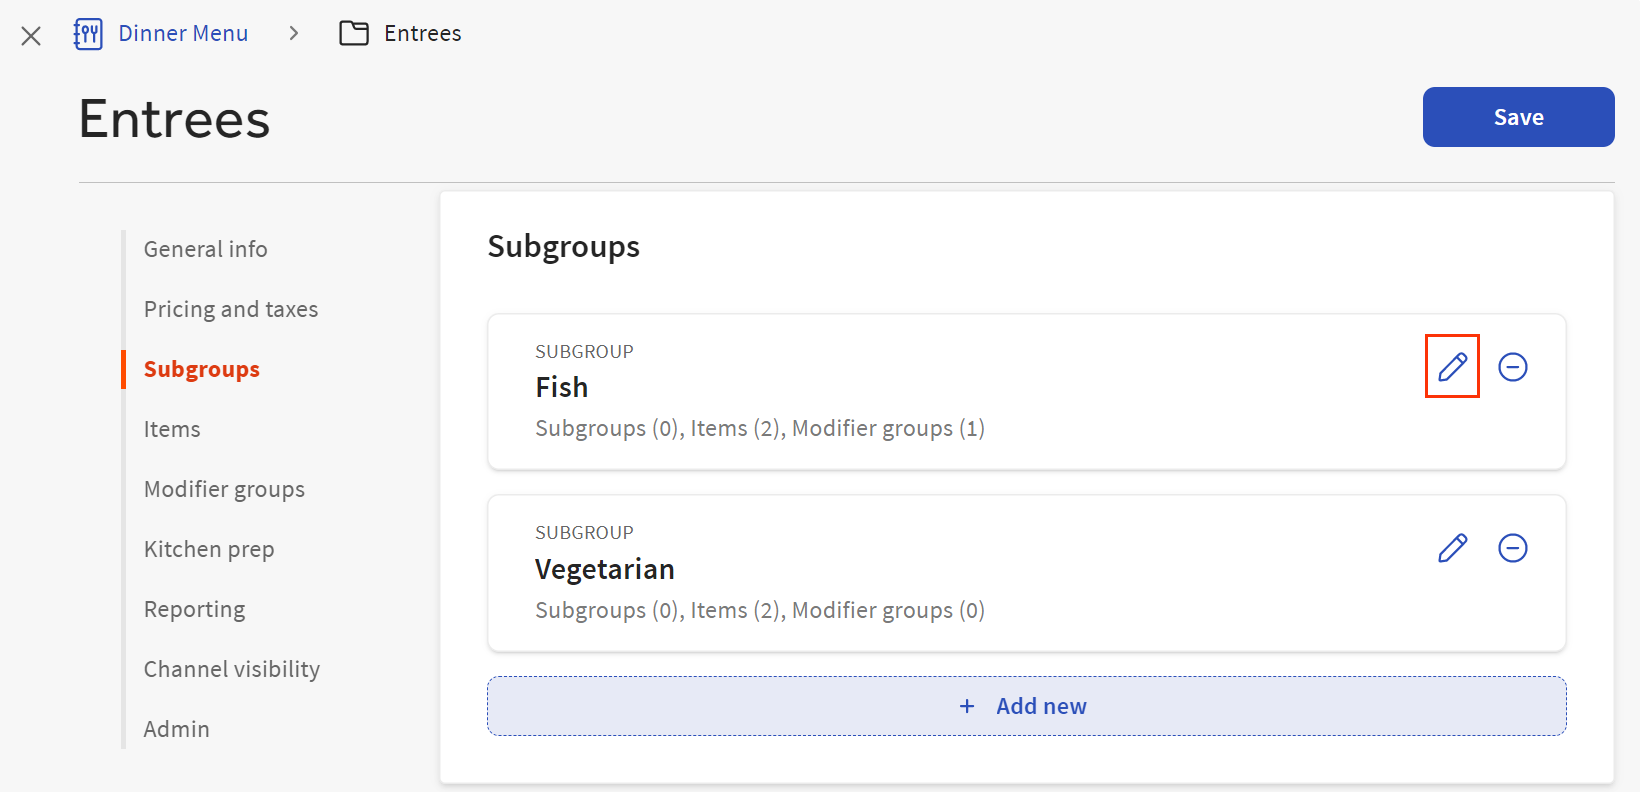
On the details page for the menu group or subgroup that contains the subgroup you want to edit, select Subgroups.
-
In the Subgroups section, select the edit icon (pencil) for the subgroup you want to edit.
-
Change your subgroup's settings, then select Save.
-
Select the X icon in the upper-left corner to return to the menu builder home page.
-
If you are ready for guests and employees to see these menu changes, select Publish all changes, then select Publish again in the Confirm Publish dialog. For more information, see Understanding when to publish your menu.
To remove a menu group
-
Select the menu you want to remove a menu group from and then select the menu group.
-
Select the overflow menu (the ⋮ icon) to the right of the menu group's name and choose Remove.
-
Select Remove in the confirmation dialog.
-
If you are ready for guests and employees to see these menu changes, select Publish all changes, then select Publish again in the Confirm Publish dialog. For more information, see Understanding when to publish your menu.
To remove a subgroup
-
On the details page for the menu group or subgroup that contains the subgroup you want to remove, select Subgroups.
-
In the Subgroups section, select the remove icon for the subgroup you want to remove.

-
Select Confirm to confirm the removal.
-
Select Save.
-
Select the X icon in the upper-left corner to return to the menu builder home page.
-
If you are ready for guests and employees to see these menu changes, select Publish all changes, then select Publish again in the Confirm Publish dialog. For more information, see Understanding when to publish your menu.
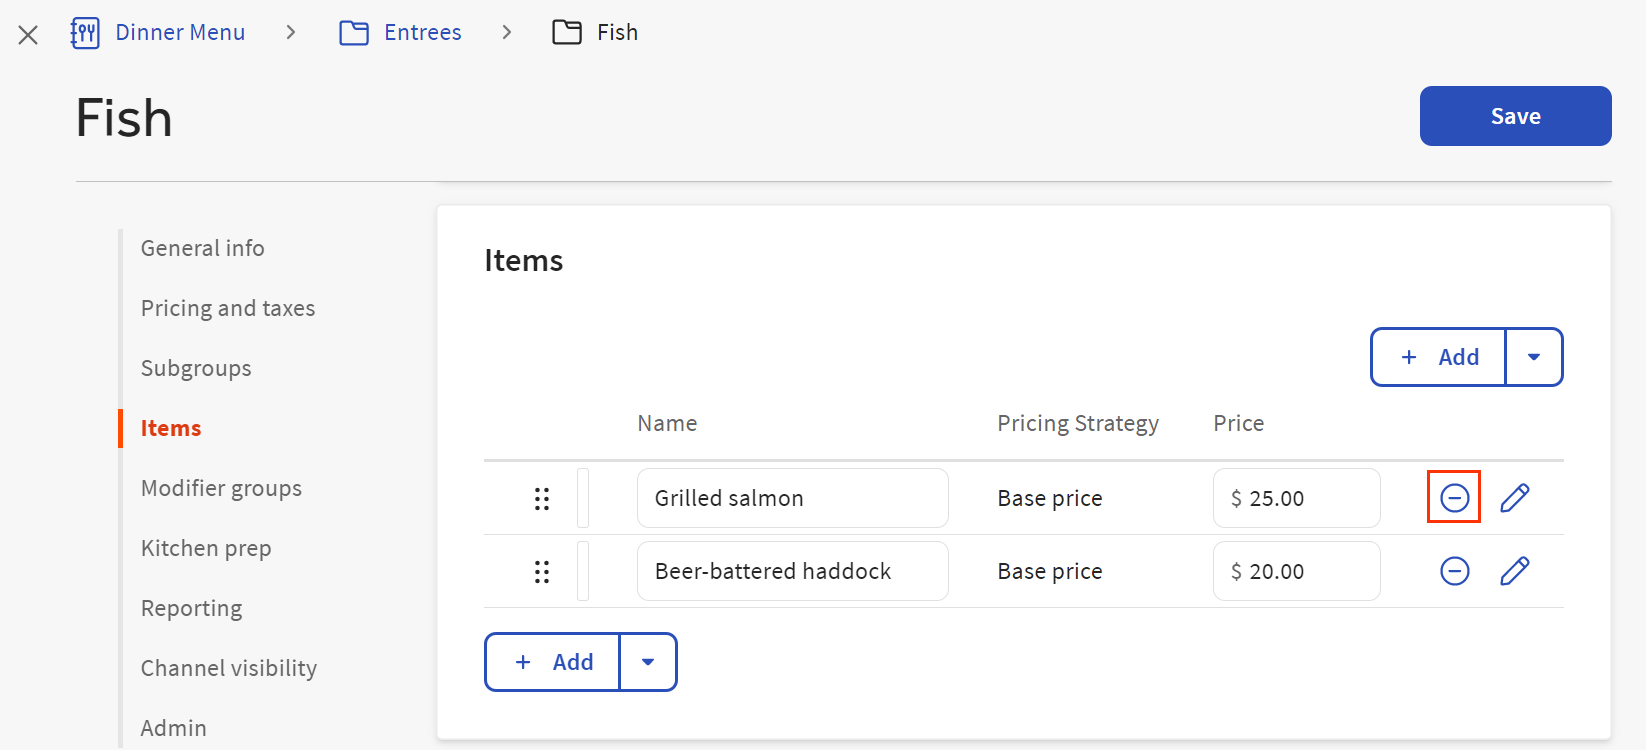
You can quickly create menu items using the Items table on the details page for a menu group or subgroup.
When you create menu items using the Items table, you specify an item name and a base price. Menu items created in this way inherit all their other settings from their parent menu group (for example, tax rate, prep station, and sales category settings).
If a menu item you create in the Items table requires a pricing strategy other than base price, or needs to override the settings it inherits from the parent menu group, you can use a menu item's details page to further edit it. The menu item's details page gives you access to all of the menu item configuration settings, not just the name and price.
Once you have created a menu item, you can reuse that existing menu item in other menu groups.
Use the Alphabetize link to sort the items in the Items table alphabetically to make the items easier for your guests and servers to find.
The sections below describe how to:
-
Access a menu item's details page where you can specify all of a menu item's configuration settings.
-
Remove a menu item. Note that removing a menu item also removes any modifier groups assigned to that menu item.
To create new menu items using the Items table
-
On the details page for the menu group or subgroup you want to add items to, select Items.
-
Do one of the following:
-
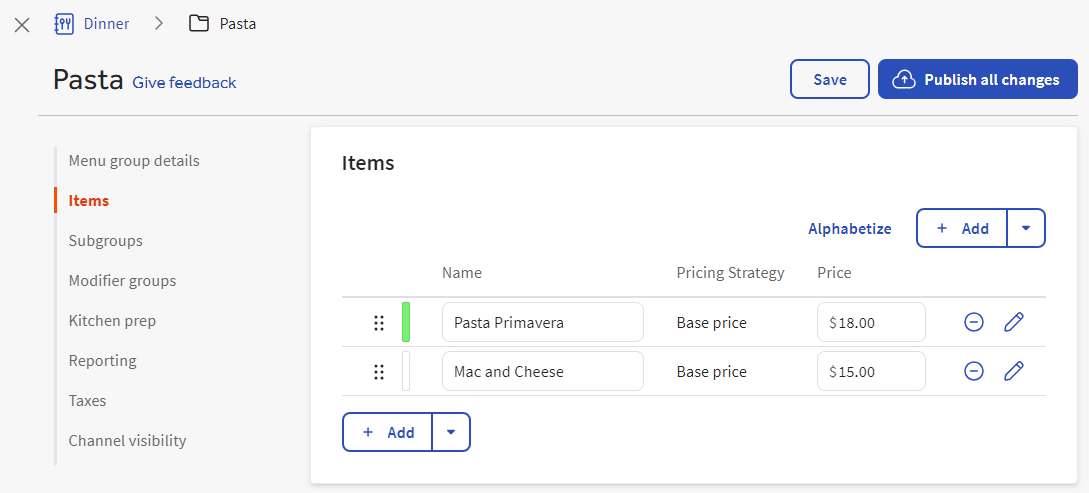
If you haven't added any menu items to this group yet, select the Add new button. The Items table appears with an empty first row.
-
If you have already added items to this group, you see the Items table with + Add buttons above and below it. Select the button to add another row to the table.
-
-
Enter a name and a base price for the menu item.
-
Repeat these steps to add additional menu items to the group as needed.
-
Optionally, use the Alphabetize link to sort the items in the Items table alphabetically to make the items easier for your guests and servers to find.
-
Select Save.
Note
All menu items in the table must have a name and a base price in order to save the table. If you have incomplete rows, delete them before saving. Also, if you want to provide additional configuration for the menu item beyond a name and base price, you must save it before you can access its details page.
-
Select the X icon in the upper-left corner to return to the menu builder home page.
-
If you are ready for guests and employees to see these menu changes, select Publish all changes, then select Publish again in the Confirm Publish dialog. For more information, see Understanding when to publish your menu.
To access a menu item's details page and provide additional menu item configuration
-
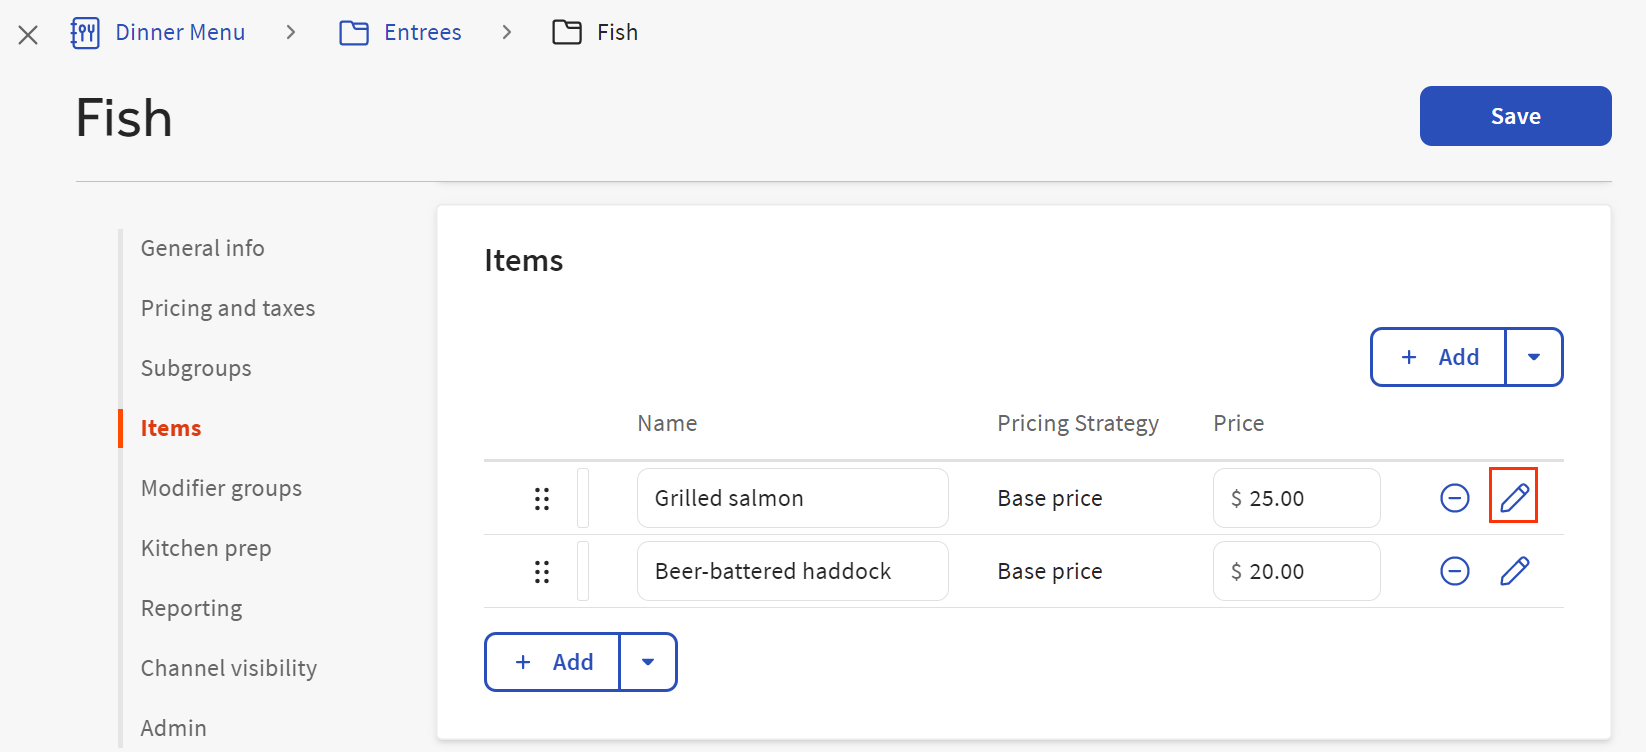
On the details page for the menu group or subgroup that contains the menu items you want to edit, select Items to view the Items table.
-
Select the edit icon (pencil) for the item you want to edit to open the menu item details page.
-
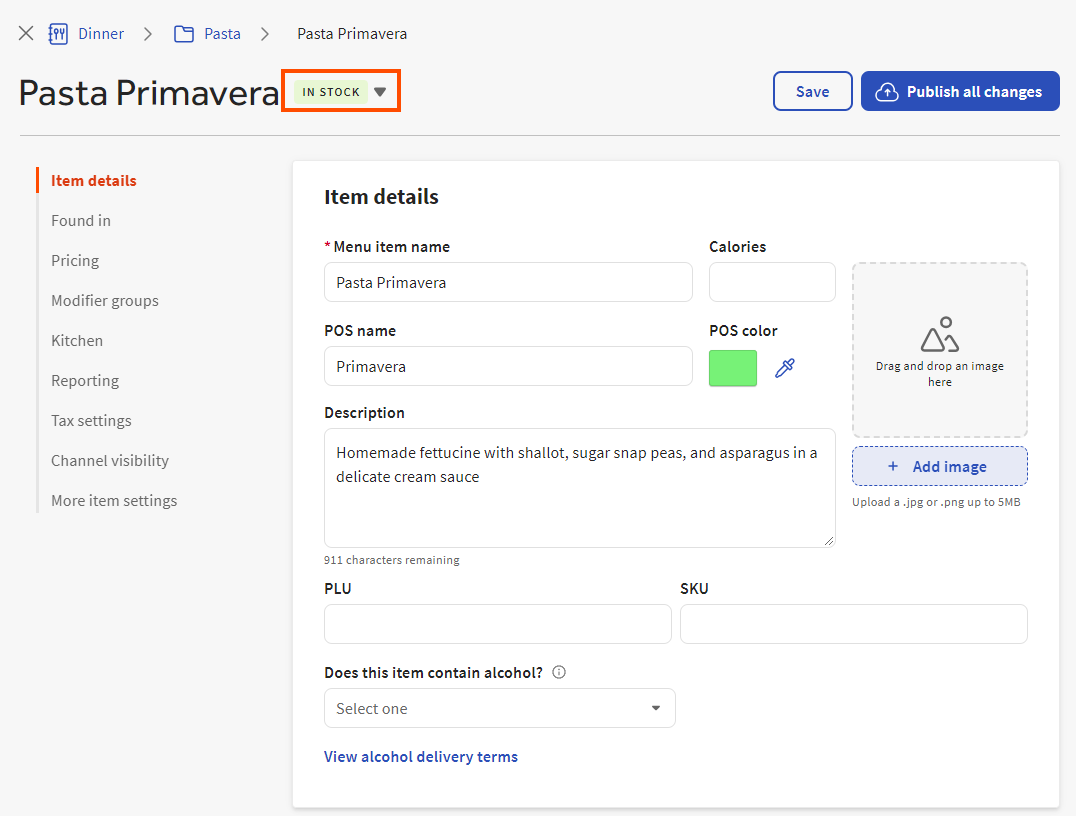
In the Item details section:
-
Enter a name for the menu item in the Menu item name field.
-
Optionally, enter a number of calories for the menu item in the Calories field.
-
If you use Toast POS devices, you can customize the button restaurant employees see in the Toast POS app by entering a POS name and setting the button color. To specify a button color, select the POS color option and then select a color from the color palette.
Note
If you don't use Toast POS devices, you won't see the POS name and POS color options in the Item details section.
-
Add an image to the menu item.
-
Enter a description for the menu item in the Description field.
-
Optionally, enter PLU and SKU codes for the menu item in the PLU and SKU fields.
-
If the menu item contains alcohol and requires additional handling after it is ordered (for example, an ID check or the prevention of loyalty point accruals), select Yes from the Does this item contain alcohol? menu. For more information on alcohol labeling, see Assigning alcohol labeling to menu items.
-
-
Select the stock dropdown list, next to the menu item's name, to open the item's stock settings, where you can specify the item's stock status and count.
Note
A menu item must be saved at least once before you can see and update its stock status.
-
In the Pricing section, enter a price for the menu item:
-
To enter a base price, choose the Base pricing strategy and enter a price in the Price field.
-
To enter size prices, choose the Size pricing strategy and enter a price for each size.
Optionally, you can modify the names of the sizes and the number of sizes the item has.
You cannot save a menu item if it has empty size price rows, so delete any empty rows after you are done entering your prices. For detailed instructions, see Using advanced pricing strategies for menu items.
-
To use an open price, choose the Open pricing strategy. For items that have a daily market price, Toast support recommends configuring the item with an open price and then using Quick Edit mode on a Toast POS device to set a price for the item each day. This ensures that the price is accurate and employees don't have to enter a price every time the item is ordered. Note that open prices are not supported for Toast Online Ordering, so you should not use an open price for a menu item that will appear on your Toast Online Ordering website.
Note
You can use the classic menu item details page to set other advanced pricing strategies for a menu item, for example, time-specific and menu-specific prices. To create a menu item with one of these other advanced prices, you must first create the menu item with a base price, save it, and then edit it to add the advanced price. For more information, see Using advanced pricing strategies for menu items.
-
-
In the Found in section, you can see which menus a menu item is included in and the path within each menu that an employee or guest must follow to get to the menu item. To quickly go to the details page for a menu or menu group in a menu path, select its name.
-
In the Modifier groups section, you can add new or existing modifier groups directly to this menu item.
You can also specify that the menu item inherits modifier groups that are assigned to its parent menu groups.
-
In the Kitchen section:
-
To use a different name for the menu item on kitchen tickets and KDS devices, enter that name in the Kitchen name field.
-
To customize the color your employees see for this item on a KDS device, select the KDS color option and then select a color from the color palette.
-
-
In the Kitchen > Prep stations section, you specify the prep stations this menu item is sent to when it is ordered. By default, a menu item inherits its prep stations from a parent menu entity. A parent menu entity can be a menu, menu group, or subgroup.
You can choose to disable inheritance and specify prep stations specifically for this menu item.
For more information, see Assigning prep stations.
-
In the Kitchen > Courses section, you specify the courses assigned to this menu item. By default, a menu item inherits its course from a parent menu entity. A parent menu entity can be a menu, menu group, or subgroup.
You can choose to disable inheritance and specify courses specifically for this menu item.
For more information, see Assigning courses.
-
In the Reporting > Sales category section, you specify the sales category assigned to this menu item. By default, a menu item inherits its sales category from a parent menu entity. A parent menu entity can be a menu, menu group, or subgroup.
You can choose to disable inheritance and specify a sales category specifically for this menu item.
For more information, see Assigning sales categories.
-
In the Tax settings section, you set the tax rates and other tax behavior for this menu item. By default, a menu item inherits its tax rates and tax behavior from a parent menu entity. A parent menu entity can be a restaurant, menu, menu group, or subgroup.
You can choose to disable inheritance and specify tax rates and tax behavior specifically for this menu item.
For more information, see Assigning tax rates and tax behavior.
-
In the Time-based ordering rules section, you can specify rules for your online orders:
-
Minimum lead time: Allows you to specify the number of hours in advance a guest must order the menu item online.
-
Pre order: Allows you to specify dates during which the menu item is visible for online ordering and also dates during which the menu item may be picked up by a guest or by a delivery driver, if your restaurant offers delivery services. This feature is useful for menu items that your restaurant doesn't carry on a daily basis. For example, a holiday dessert menu item may be available only in the days leading up to the holiday and should be picked up before the holiday.
These rules are only available to restaurants that use Toast Online Ordering Pro and they only apply to online orders.
For more information, see Setting time-based ordering rules for online orders.
-
-
In the Channel visibility section, select where this menu item is visible. A menu item is available for ordering on the channels where it is visible.
-
Select Save.
-
Select the X icon in the upper-left corner to return to the menu builder home page.
-
If you are ready for guests and employees to see these menu changes, select Publish all changes, then select Publish again in the Confirm Publish dialog. For more information, see Understanding when to publish your menu.
To add an existing menu item
-
On the details page for the menu group or subgroup you want to add an existing item to, select Items.
-
Do one of the following:
-
If you haven't added any items to this group yet, select the Add existing button.
-
If you have added items to this group, you see the Items table with + Add buttons above and below it. Select the arrow next to the button and choose Add existing from the menu.
You see the What would you like to add page.
-
-
Enter the name of the menu item you want to add in the search box. Matching menu item results appear as you type.
Menu items that are eligible for adding appear in black text. Menu items in gray text have already been added to the menu group and cannot be added again. If a menu item's check box is selected, it means you've already chosen to add it during this Add existing session.
If there are more than 25 search results, scroll to the end of the list and select Load more to view the next 25 results.
-
Optionally, select the menu item name to preview the item and see additional details. If the menu item uses an advanced pricing strategy, the preview displays the price range.
Note
The Item-Level Modifier Groups section of the preview only includes modifier groups assigned directly to this menu item. It does not include modifier groups inherited from any of the menu item's parent menu groups.
-
Select the check box for the menu item you want to add.
-
Optionally, repeat steps 4 to 6 to include additional menu items.
-
Optionally, select the Selected items tab to review a list of the menu items you've chosen to add during this Add existing session. On the Selected items tab, you can:
-
Select a menu item's name to preview it and see additional details.
-
Select the remove icon next to an individual menu item to remove it from the list.

-
Select Remove all to remove all menu items from the list.
-
-
Select the Add items button. You return to the details page for the menu group or subgroup.
-
Select Save.
-
Select the X icon in the upper-left corner to return to the menu builder home page.
-
If you are ready for guests and employees to see these menu changes, select Publish all changes, then select Publish again in the Confirm Publish dialog. For more information, see Understanding when to publish your menu.
To edit a menu item
-
On the details page for the menu group or subgroup that contains the menu item you want to edit, select Items.
-
Select the edit icon (pencil) for the menu item you want to edit.
-
Edit the details as needed, then select Save.
-
Select the X icon in the upper-left corner to return to the menu builder home page.
-
If you are ready for guests and employees to see these menu changes, select Publish all changes, then select Publish again in the Confirm Publish dialog. For more information, see Understanding when to publish your menu.
To move a menu item to a different menu group
|
Note |
|
Currently, you can only move menu items between menu groups. You cannot move menu items between subgroups, or between a menu group and a subgroup. |
-
Expand the menu that contains the menu item you want to move, then select the menu group that contains the item. You see the menu group's items in the right pane.
-
Select the overflow menu (the ... icon) to the right of the menu item's name and choose Move. You see the Move dialog.
-
Select the Move to menu and choose the menu group you want to move this item to.
-
Select Move Item.
-
If you are ready for guests and employees to see these menu changes, select Publish all changes, then select Publish again in the Confirm Publish dialog. For more information, see Understanding when to publish your menu.
To remove a menu item
-
On the details page for the menu group or subgroup that contains the menu item you want to remove, select Items.
-
Select the remove icon for the menu item you want to edit.
-
Select Save.
-
Select the X icon in the upper-left corner to return to the menu builder home page.
-
If you are ready for guests and employees to see these menu changes, select Publish all changes, then select Publish again in the Confirm Publish dialog. For more information, see Understanding when to publish your menu.
At the top of the details page for each menu group, subgroup, menu item, or modifier group, you see a set of breadcrumbs that you can use to quickly step your way back up the menu hierarchy. For example, the illustration below shows the Dinner Salads subgroup. The Dinner Salads subgroup is a child of the Salads menu group, which is in turn a child of the Dinner menu. Selecting the Salads breadcrumb returns you to the Salads details page while selecting the Dinner breadcrumb returns you to the Dinner details page.
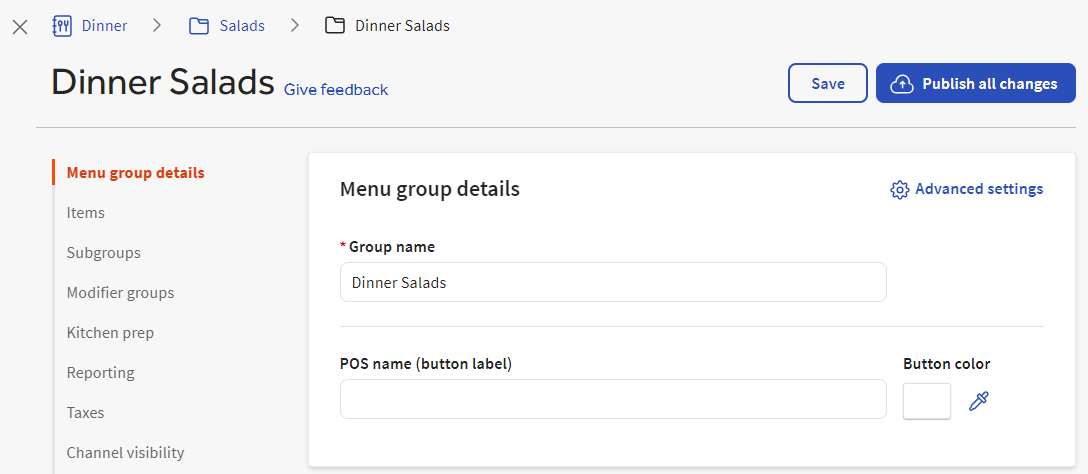
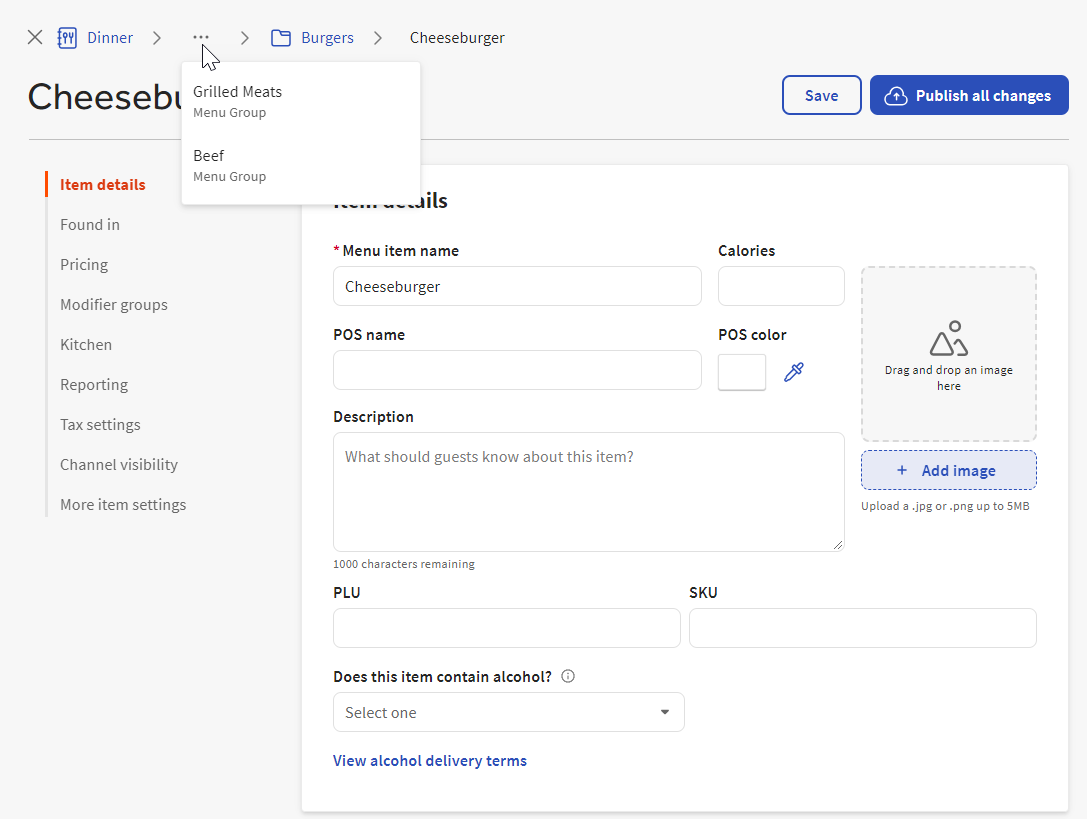
Longer breadcrumb trails are shortened using an ellipsis (...) that represents additional menu hierarchy levels above the one you are currently viewing. Select the ellipsis to see a list of the menu entities you can navigate back to. In the example below, the full breadcrumb trail is Dinner > Grilled Meats > Beef > Burgers > Cheeseburger and the Grilled Meats and Beef menu groups are collapsed into the ellipsis menu.