This section provides information about working with menu items in the menu manager.
Use the procedure below to add a new menu item.
|
Note |
|
To reduce the number of menu items you have to manage, add existing menu items whenever possible instead of creating new ones. |
For multi-location restaurants:
-
Newly created menu items inherit the target and owner of their parent menu group by default. For more information, see Defaults for targets and owners.
-
You must have the Edit Full Menu permission to the owner of a menu group in order to add a new menu item to it.
To add a new menu item
-
Choose Menus > Menu management > Menu manager to open the Menu manager page.
-
From the Show section, choose Full menu.
-
(Multi-location only) Select the locations whose menu data you want to edit from the locations control.
-
Use the expand icons to locate and expand the menu group you want to add an item to.
-
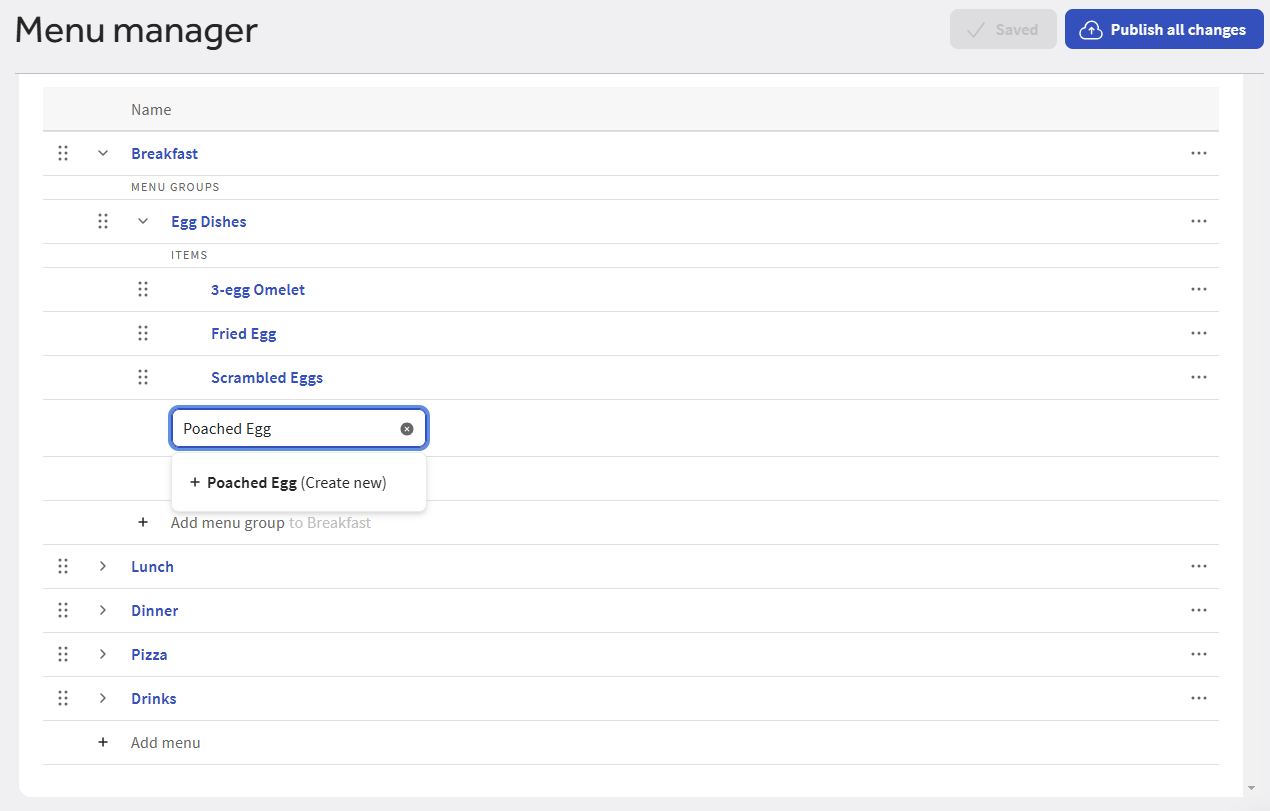
Select + Add item and enter a name for the menu item. A dropdown list appears that has a Create new option followed by a list of any existing menu items that match the text you entered.
-
After you are done entering the item name, select the Create new option (alternatively, you can press the Enter key). A side pane opens for the menu item and you are automatically scrolled to the Pricing section for the new menu item where you can quickly enter a price for the new item.
If you need to specify any other menu item configurations, scroll to the appropriate section of the side pane and make your changes. See the other sections in Working with menu items for more details on additional configurations.
-
Select Save.
-
Manually publish your changes when you are ready for guests and employees to see them.
To reduce the number of menu items you have to manage, add existing menu items whenever possible instead of creating new ones.
|
Note |
|
If you have a multi-location restaurant, you cannot add existing menu items in Full menu view. You must use the classic page for the parent menu group instead. |
When reusing a menu item in multiple menu groups, keep in mind that:
-
When you edit the menu item, it is edited for all the menu groups that use it.
-
When you remove the menu item from one of the menu groups, the other menu groups continue to use it.
-
When you archive a menu item, it is removed from all menu groups that use it.
To add an existing menu item
-
Choose Menus > Menu management > Menu manager to open the Menu manager page.
-
From the Show section, choose Full menu.
-
Use the expand icons to locate and expand the menu group you want to add an existing item to.
-
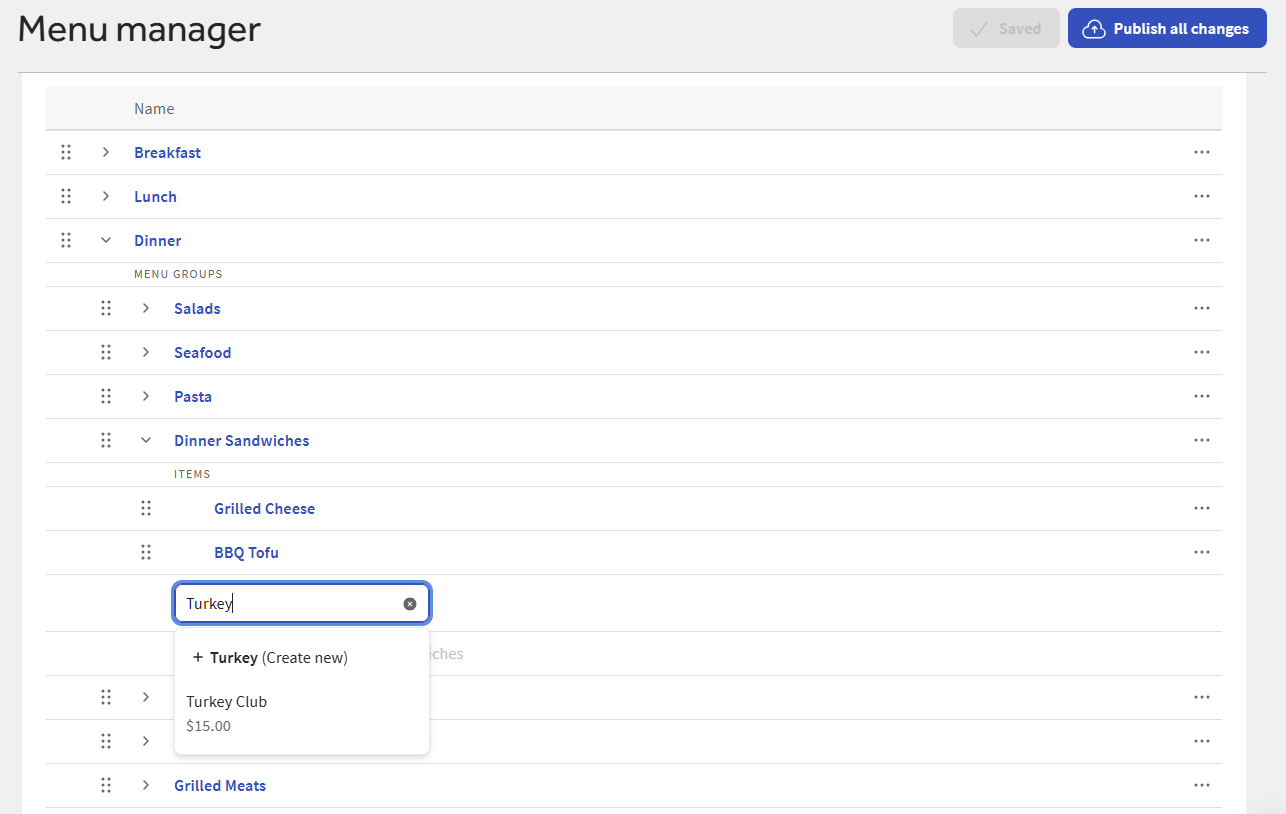
Select + Add item and enter a name for the menu item. A dropdown list appears that has a Create new option followed by a list of any existing menu items that match the text you entered.
-
Select the existing item you want to add. Alternatively, use the down arrow to highlight the existing item and then press the Enter key. Your changes are automatically saved.
-
Manually publish your changes when you are ready for guests and employees to see them.
Follow the procedure below to rename a menu item.
To rename a menu item
-
Choose Menus > Menu management > Menu manager to open the Menu manager page.
-
From the Show section, choose Full menu.
-
(Multi-location only) Select the locations whose menu data you want to edit from the locations control.
-
Use the expand icons to locate the item you want to edit.
-
Select the menu item's name to open its side pane.
-
In the Item details section, enter the new name in the Menu item name field.
-
Select Save.
-
Manually publish your changes when you are ready for guests and employees to see them.
Your Toast ordering channels display your menu items in the order you see them in the Full menu view. You can reorder your menu items so they appear in the order you want them to.
You can reorder menu items within a single menu group. You cannot move a menu item from one menu group to another.
|
Note |
|
If you have a multi-location restaurant, you cannot reorder menu items in Full menu view. You must use the classic page for their parent menu group instead. |
To reorder a menu item
-
Choose Menus > Menu management > Menu manager to open the Menu manager page.
-
From the Show section, choose Full menu.
-
Use the expand icons to locate the item you want to reorder.
-
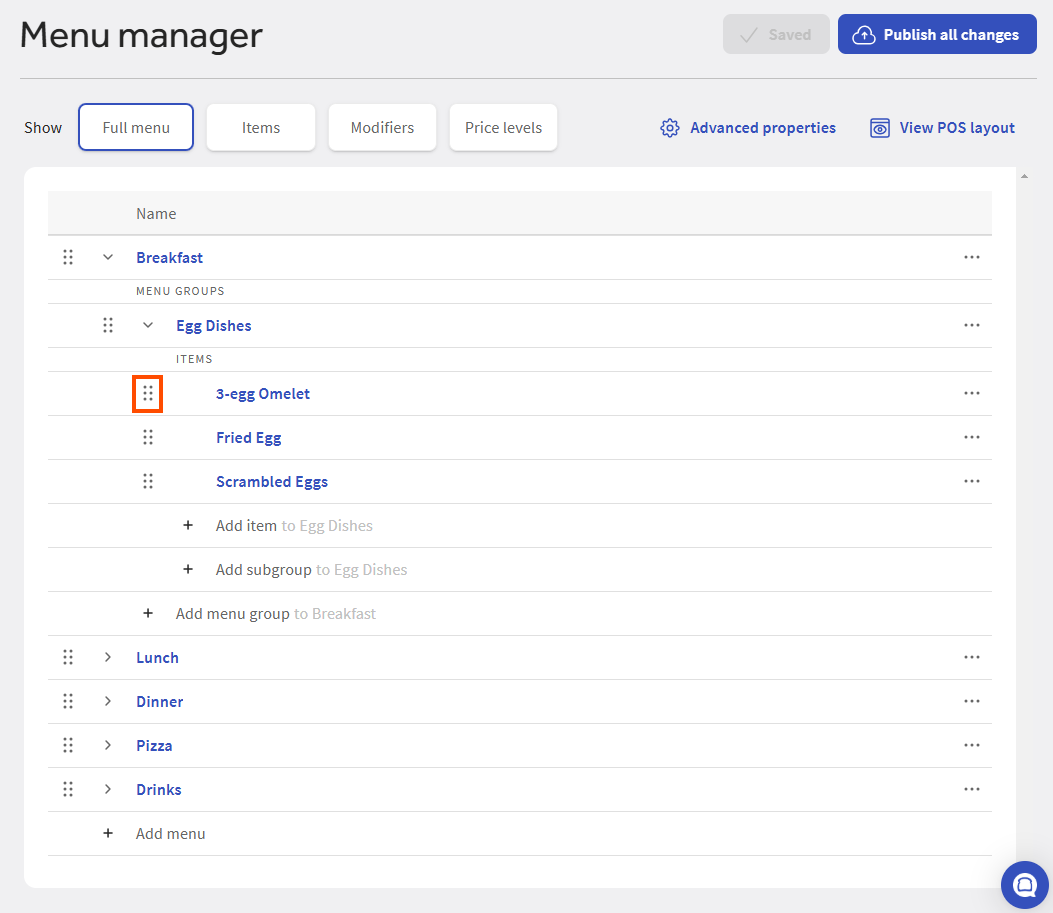
Select the menu item's reorder icon and drag it to its new location. Your changes are automatically saved.
-
Manually publish your changes when you are ready for guests and employees to see them.
You can remove a menu item from a menu group using the Remove menu item option from the overflow menu. When you remove a menu item from a menu group, the item no longer appears in that menu group, but the item remains in your Toast Web database and can still be added to or used by other menu groups.
If the menu item belongs to multiple menu groups, removing the item from one group has no effect on the others. They continue to use the menu item.
For multi-location restaurants:
-
You must have the Edit Full Menu permission to the owner of a menu item's parent in order to remove the menu item. For example, consider a Sandwiches menu group that contains a Turkey Club menu item. You must have Edit Full Menu permission to the owner of the Sandwiches menu group to remove the Turkey Club menu item from it.
-
If the parent menu group of the menu item you want to remove is versioned, you must pick the version you want to remove the menu item from. The menu item is removed from that version only. The other versions continue to use the menu group.
-
If the menu item you want to remove is versioned, removing the menu item from its parent removes all versions of the menu item from the parent.
|
Note |
|
To remove a menu item from all menu groups that use it, you must archive it. For more information, see Archiving a menu item. |
To remove a menu item from a menu group
-
Choose Menus > Menu management > Menu manager to open the Menu manager page.
-
From the Show section, choose Full menu.
-
(Multi-location only) Select the locations whose menu data you want to edit from the locations control.
-
Use the expand icons to locate the item you want to remove.
-
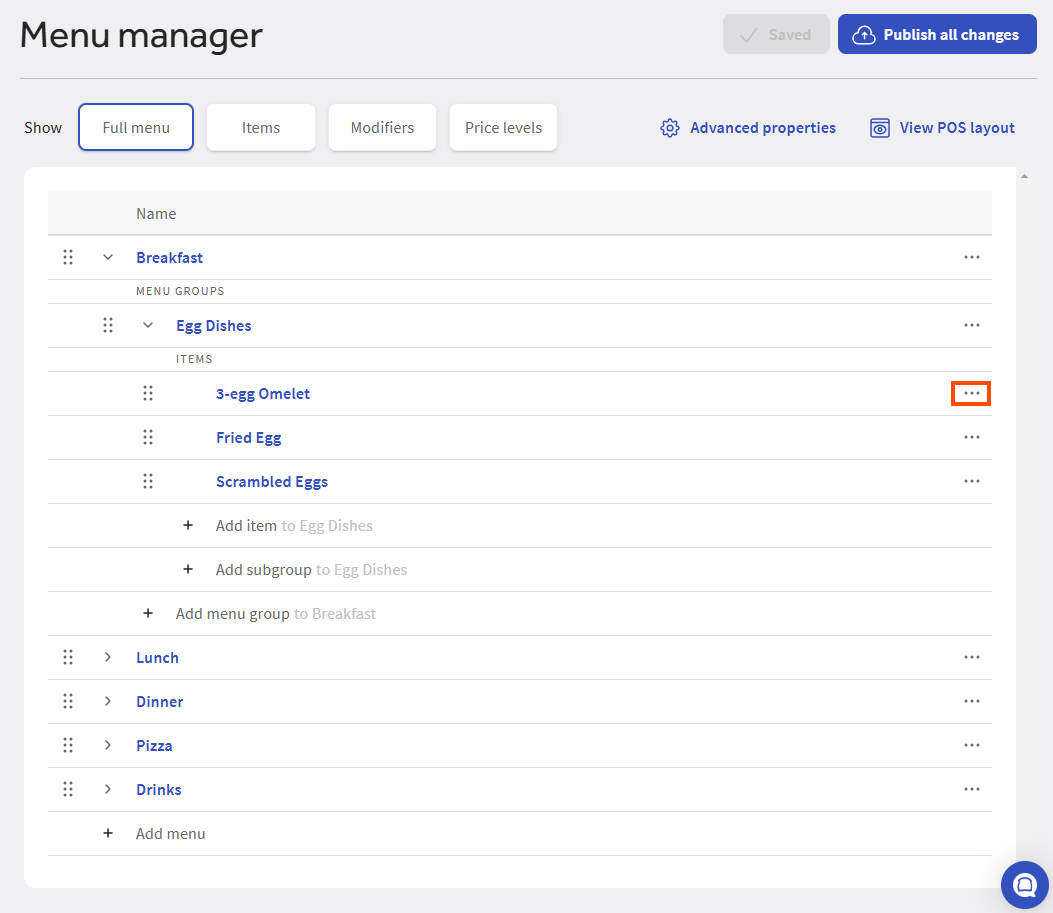
Select the menu item's overflow menu (...) and choose Remove menu item. Your changes are automatically saved.
-
Manually publish your changes when you are ready for guests and employees to see them.
You can archive a menu item to hide it from your Toast ordering channels. When archiving a menu item, keep in mind that:
-
An archived menu item is removed from all the menu groups that use it.
-
If the menu item is reused as a modifier, those modifiers are also archived.
For multi-location restaurants:
-
You must have the Edit Full Menu permission to the owner of a menu item version to archive that version.
-
If you archive a version of a menu item, only that version is archived. The other versions continue to be available.
|
Note |
|
To undo a menu item archive, go to the Menus > Bulk management > Items database page in Toast Web. Select the Items tab and then choose Show Archived. Select the checkbox for the menu item you want to restore and choose Restore. |
To archive a menu item
-
Choose Menus > Menu management > Menu manager to open the Menu manager page.
-
From the Show section, choose Full menu.
-
(Multi-location only) Select the locations whose menu data you want to edit from the locations control.
-
Use the expand icons to locate the item you want to archive.
-
Select the menu item's overflow menu (...) and choose Archive menu item.
-
To confirm, select Archive in the Archive the item dialog. Your changes are automatically saved.
-
Manually publish your changes when you are ready for guests and employees to see them.
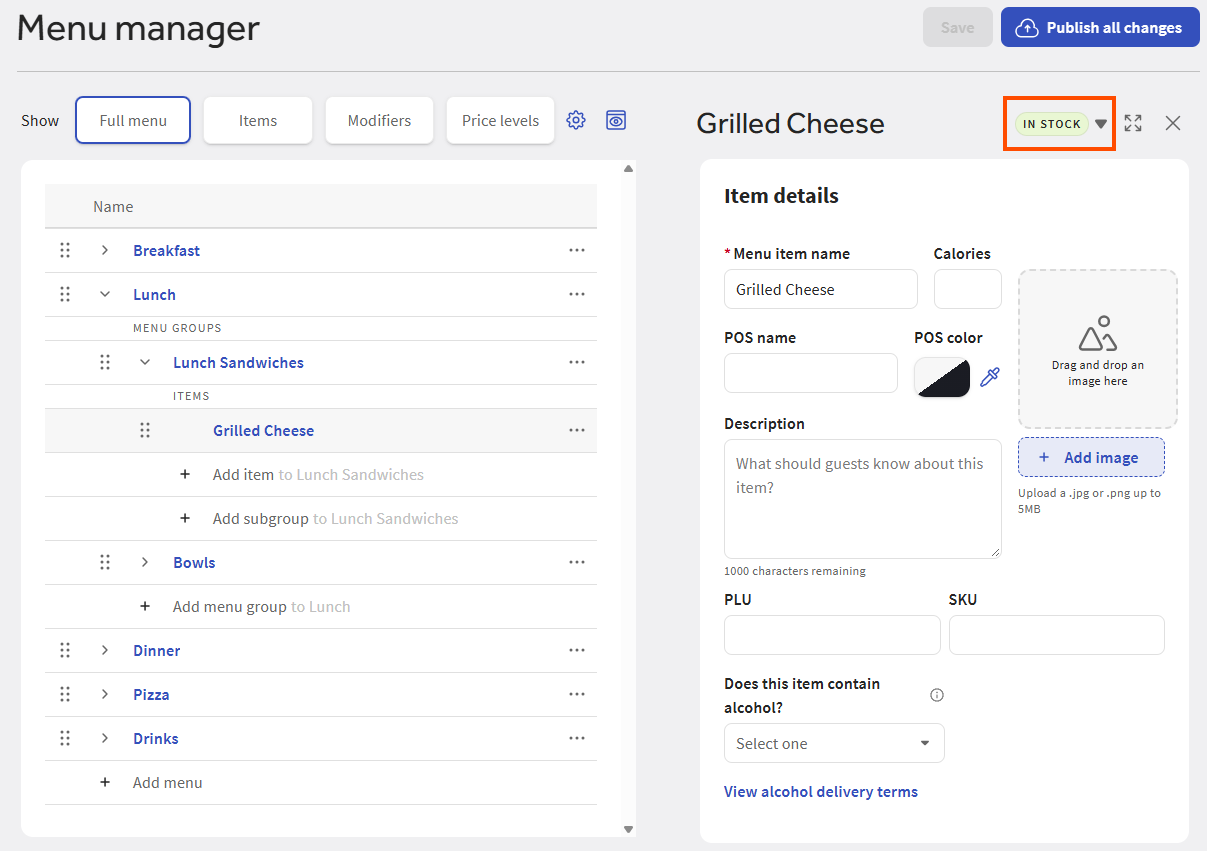
You can set the stock status for menu items to indicate whether a menu item is in stock, out of stock, or in limited supply. Out of stock items are displayed to your guests, however, they are marked as "out of stock" and cannot be ordered.
A menu item must be saved at least once before you can update its stock status.
To set stock status for a menu item
-
Choose Menus > Menu management > Menu manager to open the Menu manager page.
-
From the Show section, choose Full menu.
-
(Multi-location only) Select the locations whose menu data you want to edit from the locations control.
-
Use the expand icons to locate the item you want to edit.
-
Select the item to see its details in the side pane, then select the stock dropdown list.
-
Set the stock status:
-
In stock: The menu item is in stock and can be ordered.
-
Out of stock: The menu item is out of stock. Your guests can see the menu item, marked as "out of stock", but they cannot order it.
-
If the menu item is in limited supply, you can set a specific quantity for the item by typing a number into the Enter quantity field and pressing Enter. The Toast platform automatically marks the item as "out of stock" when the last unit is sold.
The stock amount you set appears next to the menu item's name, as shown below:

The Toast platform updates the stock amount when you initially open the menu item's details page to reflect any units that have been sold since the stock amount was set. However, the stock amount is not updated after the menu item details page is initially loaded. This means that, if units of the menu item are sold while you are viewing the menu item's details page, you won't see those changes to the stock amount until you refresh the menu item's details page.
Stock changes that you make are immediately applied and there is no need to save or publish them.
-
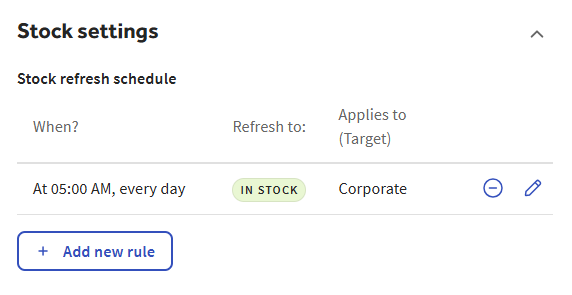
You can create stock refresh schedules that automatically refresh a menu item or modifier's stock status and count on a defined schedule.
You can set the menu item or modifier so that its stock status refreshes to In stock or to a specific stock quantity. For multi-location restaurants, all stock refresh updates are made in each location's local time.
You can have multiple stock schedules for the same menu item or modifier. For example, you could set the item's quantity to refresh to 20 on Monday to Friday and to 30 on Saturday and Sunday.
The Toast platform does not prevent you from defining multiple conflicting stock refresh schedules and it does not guarantee which stock refresh schedule will win out in the case of conflicts. Stock refresh schedules conflict when:
-
They are set to trigger on the same day at the same time.
-
For multi-location restaurants, they apply to the same location and are set to trigger on the same day at the same time. For example, you define a schedule that applies to the Corporate location group and triggers at 6 AM on Mondays at all locations contained within the group. Then, you define another schedule that applies to a single location within the Corporate location group and also triggers at 6 AM on Mondays. These two schedules would conflict.
For single-location restaurants, you must have the following permissions at the restaurant you are logged into:
-
To create and edit stock refresh schedules, you need the 4. Restaurant Admin > 4.5 Edit Full Menu or the 4. Restaurant Admin > 4.14 Local Menu Edit permission.
-
To publish stock refresh schedules, you need the 6. Web Setup > 6.4 Publishing permission. If you do not have the Publishing permission, you can still create and edit stock refresh schedules but an employee with the Publishing permission has to publish the schedules for you.
For multi-location restaurants:
-
You must have the 4. Restaurant Admin > 4.5 Edit Full Menu or the 4. Restaurant Admin > 4.14 Local Menu Edit permission to the owner of a menu item or modifier to add a stock refresh schedule to it.
-
If you have the Edit Full Menu or Local Menu Edit permission to the location group or location defined in the stock refresh schedule's Applies to (target) setting, or an ancestor of that location group/location, you can view, edit, or delete that schedule.
-
If you have the Edit Full Menu or Local Menu Edit permission to a descendant of the location group or location defined in the stock refresh schedule's Applies to (target) setting, you can view the schedule because it applies to your location, but you cannot edit it.
-
If a stock refresh schedule's Applies to (target) setting is set to a location group or location that belongs to a branch of the location group hierarchy where you have neither Edit Full Menu nor Local Menu Edit permission, then you cannot see or edit that schedule. For example, consider the following location group hierarchy:
-
Corporate
-
Northeast Franchises
-
Boston
-
NYC
-
-
Southeast Franchises
-
Atlanta
-
Charlotte
-
-
If you have the Edit Full Menu or Local Menu Edit permission to the Northeast Franchises location group and a stock refresh schedule's Applies to (target) is set to Atlanta, you will not see that schedule in the Stock settings section.
-
-
You must have the 6. Web Setup > 6.4 Publishing permission to the location group or location defined in the stock refresh schedule's Applies to (target) setting, or an ancestor of that location group/location, to publish that schedule. If you do not have the Publishing permission, you can still create and edit stock refresh schedules but an employee with the Publishing permission has to publish the schedules for you.
The stock refresh schedule settings are are only available in the menu manager. Users with Local Menu Edit permission do not currently have full access to the menu manager. Also, modifiers are not fully supported in the menu manager. For these two reasons, the way you access the stock refresh schedule settings varies slightly, depending on whether you have the Edit Full Menu permission or the Local Menu Edit permission and whether you are creating a refresh schedule for a menu item or a modifier. Use the procedure below to access the stock refresh schedule settings, then use the To create a stock refresh schedule procedure to create the stock refresh schedule.
To access the stock refresh schedule settings
-
Do one of the following:
(Edit Full Menu users) To access the stock refresh schedule settings for a menu item:
-
Choose Menus > Menu management > Menu manager to open the Menu manager page.
-
From the Show section, choose Full menu.
-
(Multi-location only) Select the locations whose menu data you want to edit from the locations control.
-
Use the expand icons to locate the item you want to edit.
-
Select the item to see its details in the side pane, then scroll to the Stock settings section.
(Edit Full Menu users) To access the stock refresh schedule settings for a modifier:
-
Choose Menus > Bulk management > Advanced properties to open the Advanced properties page.
-
(Multi-location only) From the Show/Hide menu, choose the locations whose menu data you want to edit.
-
Use the expand icons to locate the modifier you want to edit.
-
Select the modifier to see its classic details page.
-
Select Edit item to see the modifier's item reference page.
-
In the blue banner at the top of the page, select the item page link to open the menu manager page for the item reference.
-
Scroll to the Stock settings section.
(Local Menu Edit users) To access the stock refresh schedule settings for a menu item:
-
Choose Menus > Bulk management > Advanced properties to open the Advanced properties page.
-
Use the expand icons to locate the menu item you want to edit.
-
Select the menu item to see its classic details page.
-
In the blue banner at the top of the page, select the item page link to open the menu manager details page for the menu item.
-
Scroll to the Stock settings section.
(Local Menu Edit users) To access the stock refresh schedule settings for a modifier:
-
Choose Menus > Bulk management > Advanced properties to open the Advanced properties page.
-
Use the expand icons to locate the modifier you want to edit.
-
Select the modifier to see its classic details page.
-
Select Edit item to see the modifier's item reference page.
-
In the blue banner at the top of the page, select the item page link to open the menu manager page for the item reference.
-
Scroll to the Stock settings section.
-
-
Continue with the To create a stock refresh schedule procedure to create the stock refresh schedule.
To create a stock refresh schedule
-
In the Stock settings section, select Add new rule to open the Stock refresh schedule dialog.
-
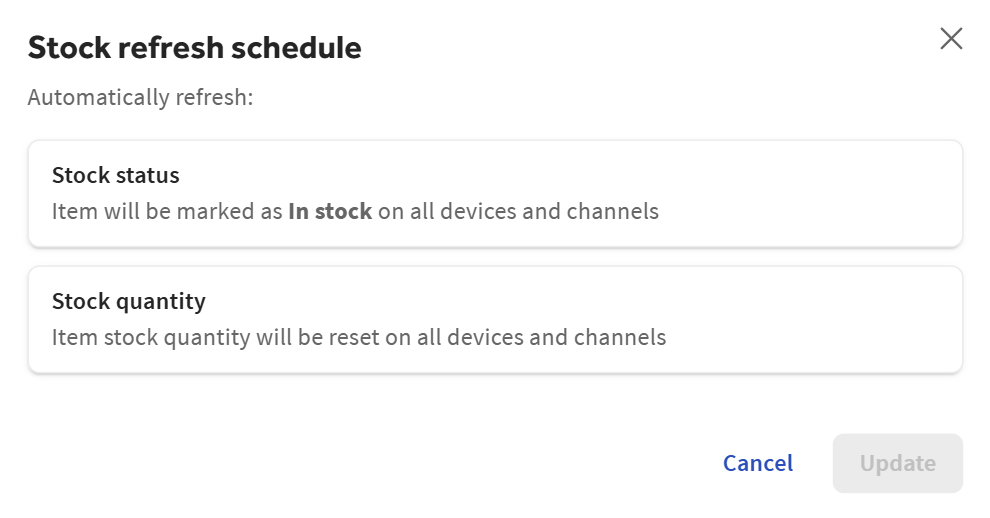
Do one of the following:
-
Select Stock status if you want the item to be marked as In stock on all devices and channels.
-
Select Stock quantity if you want to specify the quantity of the item to refresh.
Additional settings appear that let you specify the days and times the refresh schedule takes effect.
-
-
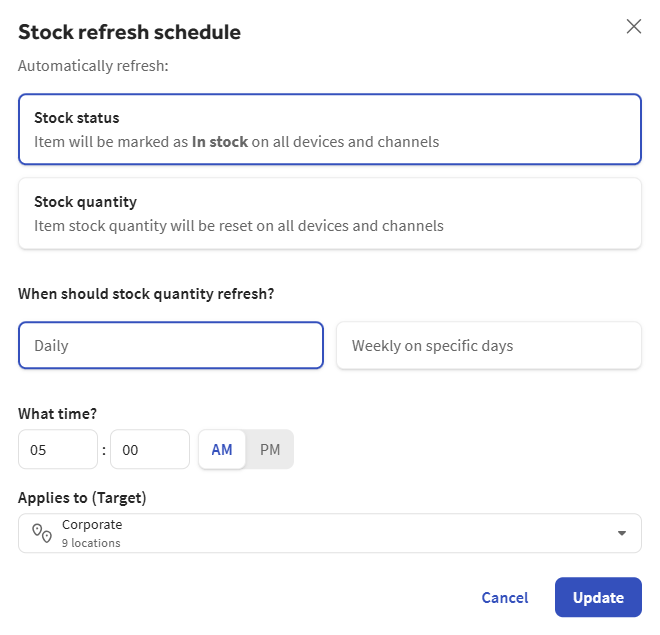
For the When should stock quantity refresh? setting, choose one of the following:
-
Daily: The stock quantity refreshes every day.
-
Weekly on specific days: The stock quantity refreshes on the days you select. If you use this option, select the days from the Select day(s) list that appears.
-
-
For the What time? setting, select the time of day and AM or PM.
-
If you selected Stock quantity in step 2, enter a number in the What quantity? field.
-
(Multi-location only) Select the Applies to (Target) control to open the Select locations dialog where you can set the location groups or locations you want this stock refresh schedule to apply to. All stock refresh updates are completed in each location's local time.
The Applies to (Target) setting defaults to the parent menu item or modifier's target and must be either the same as the parent's target or a descendant of the parent's target.
-
Select Update to close the Stock refresh schedule dialog and add the new rule to the Stock settings.
-
Select Save.
-
When you are ready for guests and employees to see your changes, you must publish them.
Single-location restaurants: Select Publish all changes.
Multi-location restaurants should use the Toast account > Publishing > Publish Config page to publish changes to one or more affected locations:
-
If the page you are currently on does not have the Open publishing page icon at the top, select X in the upper-left corner to return to a page that does.

-
Select the Open publishing page icon at the top of the page to go to the Toast account > Publishing > Publish Config page and follow the instructions in Publishing changes for multiple locations to publish changes to all or some of your locations.
-
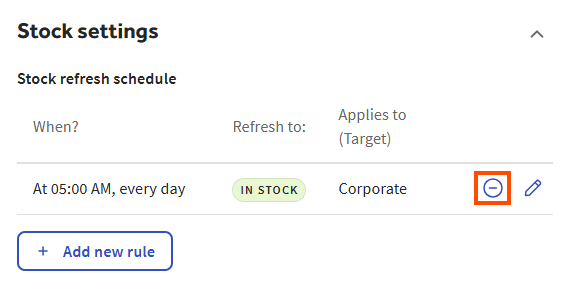
To delete a stock refresh schedule
-
In the Stock settings section, select the delete icon for the stock refresh schedule you want to delete.
-
Select Yes, delete to confirm.
-
Select Save.
-
When you are ready for guests and employees to see your changes, you must publish them.
Single-location restaurants: Select Publish all changes.
Multi-location restaurants should use the Toast account > Publishing > Publish Config page to publish changes to one or more affected locations:
-
If the page you are currently on does not have the Open publishing page icon at the top, select X in the upper-left corner to return to a page that does.
-
Select the Open publishing page icon at the top of the page to go to the Toast account > Publishing > Publish Config page and follow the instructions in Publishing changes for multiple locations to publish changes to all or some of your locations.
-
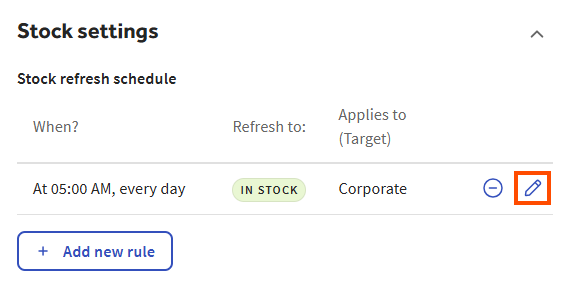
To edit a stock refresh schedule
-
In the Stock settings section, select the edit (pencil) icon for the stock refresh rule you want to edit.
-
Make your changes to the stock refresh schedule and select Update.
-
Select Save.
-
When you are ready for guests and employees to see your changes, you must publish them.
Single-location restaurants: Select Publish all changes.
Multi-location restaurants should use the Toast account > Publishing > Publish Config page to publish changes to one or more affected locations:
-
If the page you are currently on does not have the Open publishing page icon at the top, select X in the upper-left corner to return to a page that does.
-
Select the Open publishing page icon at the top of the page to go to the Toast account > Publishing > Publish Config page and follow the instructions in Publishing changes for multiple locations to publish changes to all or some of your locations.
-
You can edit menu items that are priced individually from either Full menu view or Items view.
|
Note |
|
Items that inherit their prices from a parent menu group are not editable in the menu manager. You must edit these items in their classic menu item details pages instead. |
Full menu view and Items view have different pricing capabilities:
-
In Full menu view, you can edit items that use the Base, Size, or Open pricing strategy. You must manually publish pricing changes you make in Full menu view. Full menu view does not support scheduled publishing.
-
In Items view, you can edit items that use the Base, Size, Menu-specific or Location-specific pricing strategy. You can manually publish pricing changes you make in Items view or schedule them for future publishing.
The menu editing permissions you have determine which view you can use to edit a menu item's price:
-
Single-location restaurants: If you have the 4. Restaurant Admin > 4.5 Edit Full Menu permission, you can use either Full menu view or Items view to edit a menu item's price. If you have the 4. Restaurant Admin > 4.14 Local Menu Edit permission, you must use Items view to edit the menu item's price. Employees with the Local Menu Edit permission cannot see Full menu view.
-
Multi-location restaurants: If you have the 4. Restaurant Admin > 4.5 Edit Full Menu permission to the menu item's owner, or an ancestor of the owner, you can use either Full menu view or Items view to edit a menu item's price. If you have the 4. Restaurant Admin > 4.14 Local Menu Edit permission to the menu item's owner, or an ancestor of that owner, you must use Items view to edit the menu item's price. Employees with the Local Menu Edit permission cannot see Full menu view.
|
Note |
|
For more information about the Edit Full Menu and Local Menu Edit permissions, see Permissions for editing menus. |
Follow the procedure below for the view you want to use, Full menu view or Items view.
To edit a menu item's price in Full menu view
-
Choose Menus > Menu management > Menu manager to open the Menu manager page.
-
From the Show section, choose Full menu.
-
(Multi-location only) Select the locations whose menu data you want to edit from the locations control.
-
Use the expand icons to locate the item you want to edit.
-
Select the item to see its details in the side pane, then scroll to the Pricing section.
-
In the Pricing section, enter a price for the menu item:
-
To enter a base price, choose the Base pricing strategy and enter a price in the Price field.
-
To enter size prices, choose the Size pricing strategy and enter a price for each size.
Optionally, you can modify the names of the sizes and the number of sizes the item has.
You cannot save a menu item if it has empty size price rows, so delete any empty rows after you are done entering your prices.
-
To use an open price, choose the Open pricing strategy. For items that have a daily market price, Toast support recommends configuring the item with an open price and then using Quick Edit mode on a Toast POS device to set a price for the item each day. This ensures that the price is accurate and employees don't have to enter a price every time the item is ordered.
Note that open prices are not supported for Toast Online Ordering, so you should not use an open price for a menu item that will appear on your Toast Online Ordering website.
Note
You can use the classic menu item details page to set other advanced pricing strategies for a menu item, for example, time-specific prices. To create a menu item with one of these other advanced prices, you must first create the menu item with a base price, save it, and then edit it to add the advanced price. For more information, see Using advanced pricing strategies for menu items.
-
-
Select Save.
-
Manually publish your changes when you are ready for guests and employees to see them.
To edit a menu item's price in Items view
-
Choose Menus > Menu management > Menu manager to open the Menu manager page.
-
From the Show section, choose Items.
-
Use the search field or the filtering controls to refine the list of menu items.
-
Make your price edits:
-
To edit a menu item with a base price, enter the new price in the Price column.
-
To edit a menu item with a size, menu-specific, or location-specific price, expand its row and enter the new price in the Price column.
Note
Items view only allows you to edit size prices that are already defined on a menu item's details page. If you need to add a price for another size, you must add the size's price on the details page first, before it is visible and available for editing in Items view. The same is true for menu-specific and location-specific prices. If you need to add a price for another menu or location, you must add the price on the details page first. For more information on adding size prices, see Configuring size pricing on menu groups and menu items. For more information on adding menu-specific prices, see Menu-specific price. For more information on adding location-specific prices, see Enabling and setting location-specific prices.
Note
If a menu item is versioned, all of its versions that use location-specific pricing use the same location-specific prices. In this situation, the versioned menu item appears on multiple rows on the Items view, one row per version, and the location-specific prices associated with the versions are identical. If you edit the location-specific prices for one version, they are edited for all versions. For more information, see Location-specific prices and versions.
-
-
Continue reading the Publishing menu manager changes section to understand how to make your menu changes available to employees and guests.
Important
Items view offers additional workflows for saving and publishing your pricing edits that are different from other configuration pages in Toast Web, including the ability to create a change set that publishes your changes at a later date and time. In Items view, you either select Schedule to create a change set or Save to save your changes immediately. If you select Save, your changes are saved immediately and you will not be able to create a change set. Do not select Save in Items view until you fully understand the publishing workflows described in Publishing menu manager changes.
Toast support recommends adding images to your menu items to make them more appealing on your Toast Online Ordering website. Images must be in .jpg and .png format and no larger than 5MB.
To specify an image for a menu item
-
Choose Menus > Menu management > Menu manager to open the Menu manager page.
-
From the Show section, choose Full menu.
-
(Multi-location only) Select the locations whose menu data you want to edit from the locations control.
-
Use the expand icons to locate the item you want to edit.
-
Select the item to see its details in the side pane.
-
In the Item details section, select Add image, locate the image you want to use, and select Open. Alternatively, you can drag an image file to the gray box.
-
To remove the image you specified and replace it with a different one, select the Remove image button and then repeat the preceding step.
-
Select Save.
-
Manually publish your changes when you are ready for guests and employees to see them.
Use the procedure below to add a description to a menu item.
To add a menu item description
-
Choose Menus > Menu management > Menu manager to open the Menu manager page.
-
From the Show section, choose Full menu.
-
(Multi-location only) Select the locations whose menu data you want to edit from the locations control.
-
Use the expand icons to locate the item you want to edit.
-
Select the item to see its details in the side pane.
-
In the Item details section, enter a description in the Description field.
-
Select Save.
-
Manually publish your changes when you are ready for guests and employees to see them.
You can customize the names and colors of the buttons employees see in the Toast POS app for the various menu entities:
-
For menus, menu groups, subgroups, menu items, and modifier groups, go to the details section of the menu entity's details page. For example, for a menu, go to Menu details.
Enter a name in the POS name field. To specify a button color, select the Button color option and then select a color from the color palette.
-
For modifiers, go to the Edit modifier dialog for the modifier, select the POS button color option and then select a color from the color palette. Modifiers do not have a POS name. The Toast POS app displays the Modifier name.
By default, the POS name field is empty and the button color is set to white.
Use the procedure below to specify the calorie count for a menu item.
To specify calories for a menu item
-
Choose Menus > Menu management > Menu manager to open the Menu manager page.
-
From the Show section, choose Full menu.
-
(Multi-location only) Select the locations whose menu data you want to edit from the locations control.
-
Use the expand icons to locate the item you want to edit.
-
Select the item to see its details in the side pane.
-
In the Item details section, enter the calories in the Calories field.
-
Select Save.
-
Manually publish your changes when you are ready for guests and employees to see them.
Use the procedure below to specify a PLU or SKU for a menu item.
To add a PLU or SKU for a menu item
-
Choose Menus > Menu management > Menu manager to open the Menu manager page.
-
From the Show section, choose Full menu.
-
(Multi-location only) Select the locations whose menu data you want to edit from the locations control.
-
Use the expand icons to locate the item you want to edit.
-
Select the item to see its details in the side pane.
-
In the Item details section, enter a PLU or SKU in the PLU or SKU field.
-
Select Save.
-
Manually publish your changes when you are ready for guests and employees to see them.
Each menu item has a Does this item contain alcohol? setting, under the Item details section in the side pane. This setting identifies whether the menu item contains alcohol in cases where orders containing alcohol require additional handling. For example, local laws might require an ID check or prevent accrual of loyalty points.
|
Important |
|
Once an option is initially selected, you can only choose from the Yes or No options. |
Identifying alcoholic items makes it easier for online ordering partners to comply with alcohol delivery laws and enables restaurants to include alcohol with takeout and delivery orders.
To assign alcohol labeling to a menu item
-
Choose Menus > Menu management > Menu manager to open the Menu manager page.
-
From the Show section, choose Full menu.
-
(Multi-location only) Select the locations whose menu data you want to edit from the locations control.
-
Use the expand icons to locate the item you want to edit.
-
Select the item to see its details in the side pane.
-
In the Item details section, set the Does this item contain alcohol? setting. Select Yes to indicate that the item contains alcohol and requires additional handling. Select No to indicate that the item does not require additional handling. For example, choose Yes for items such as Red Wine and Beer, but No for items such as Bananas Foster or Rum Cake.
-
Select Save.
-
Manually publish your changes when you are ready for guests and employees to see them.
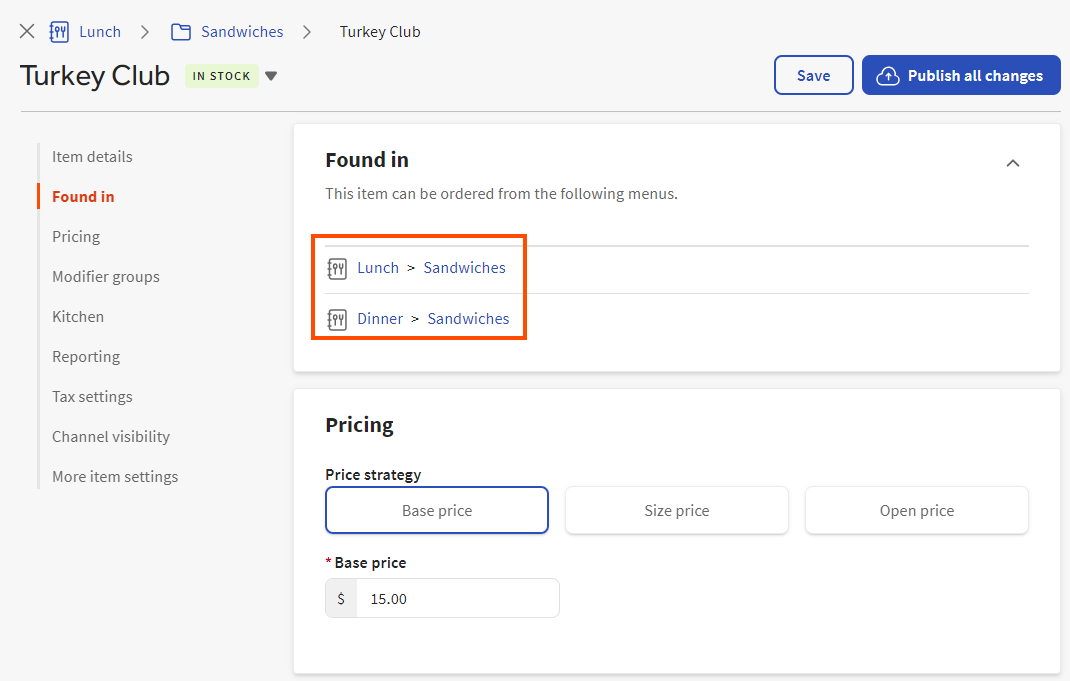
You can use the Found in section of a menu item's details page to see which menus a menu item is included in and the path within each menu that an employee or guest must follow to get to the menu item. To quickly go to a menu or menu group in a menu path, select its name.
For example, the menu item in the illustration below belongs to two menu paths: Lunch > Sandwiches and .
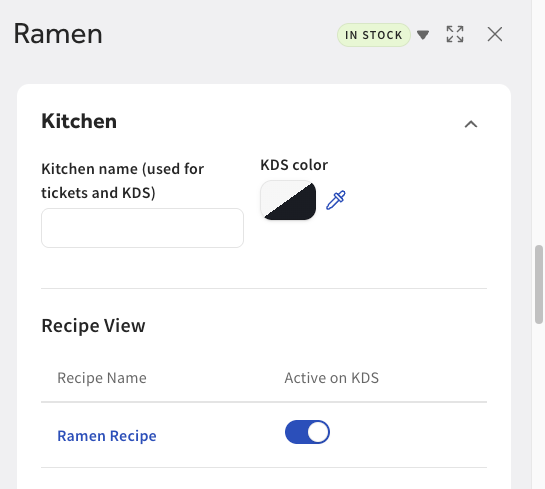
You can specify a kitchen name for a menu item. The kitchen name is used instead of the POS name on KDS devices and printed kitchen tickets. You can also specify a KDS color for a menu item. The KDS color is used instead of the POS color on KDS devices.
To specify a different name and color for KDS devices and kitchen tickets
-
Choose Menus > Menu management > Menu manager to open the Menu manager page.
-
From the Show section, choose Full menu.
-
(Multi-location only) Select the locations whose menu data you want to edit from the locations control.
-
Use the expand icons to locate the item you want to edit.
-
Select the item to see its details in the side pane, then scroll to the Kitchen section.
-
Enter a name in the Kitchen name field. To specify a button color, select the KDS color option and then select a color from the color palette.
-
Select Save.
-
Manually publish your changes when you are ready for guests and employees to see them.
|
Note |
|
This feature is in limited release. |
You can add a recipe to a menu item that can then be viewed on KDS devices. Recipe files must:
-
Use either .jpg or .png format.
-
Be between 100 kilobytes and 1.5 megabytes.
Toast support also recommends using a resolution that allows text to be readable on a standard screen and the image orientation be in portrait mode. For information about how to access the recipe on KDS devices, see Viewing recipes.
To add a recipe to a menu item for viewing on KDS devices
-
Choose Menus > Menu management > Menu manager to open the Menu manager page.
-
From the Show section, choose Full menu.
-
Use the expand icons to locate the item you want to edit.
-
Select the item to see its details in the side pane, then scroll to the Kitchen section.
-
Go to the Recipe View section and select Upload Recipe. The Upload Recipe dialog opens.
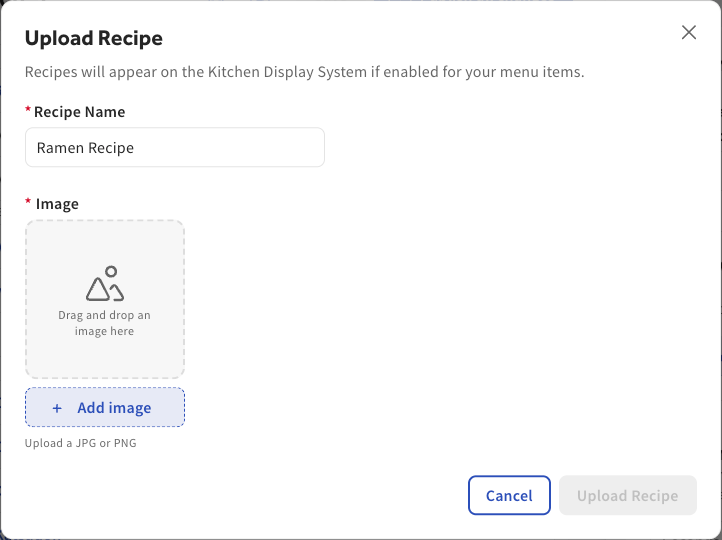
-
Optionally, edit the Recipe Name. The Toast platform automatically names the recipe with the menu item name, followed by "Recipe."
-
Select Add image, locate the image you want to use, and select Open. Alternatively, you can drag an image file to the gray box.
Note
You can have only one recipe for each menu item.
-
To remove the image you specified and replace it with a different one, select the Remove image button and then repeat the preceding step.
-
Select Upload recipe. The Upload Recipe dialog closes.
-
Select Save.
-
Optionally, if you do not want the recipe available on KDS devices, return to the Recipe View section, turn off the Active on KDS toggle next to the recipe name, and select Save.
-
Manually publish your changes when you are ready for guests and employees to see them.
You use prep stations to route menu items to the appropriate stations in the kitchen for fulfillment. A prep station represents the location of a kitchen printer or KDS device that receives orders for fulfillment.
|
Important |
|
If a menu item does not have any prep stations assigned to it, the Toast platform automatically routes that menu item to all prep stations. |
You can set prep stations at the menu, menu group, subgroup, or menu item level. By default, menu groups inherit prep stations from their parent menus. Menu items and subgroups inherit prep stations from their parent menu groups. For more information on inheritance, see Understanding inheritance.
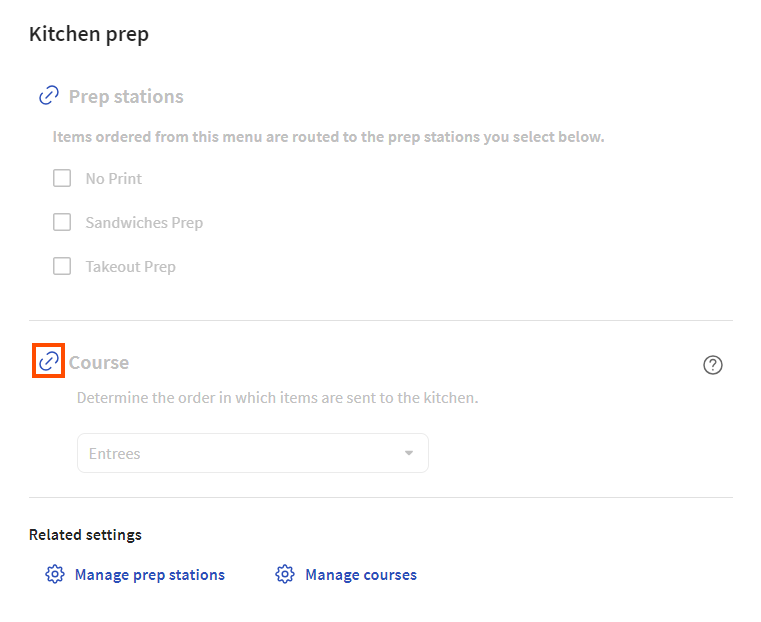
To set prep stations for a menu, go to the Kitchen prep section of the menu's details page and select the prep stations to which items ordered from the menu should be routed.
To override the inherited prep stations for a menu group or subgroup, go to the Kitchen prep section of the group's details page, select the link icon next to Prep stations to unlink the configuration, and then select the prep stations from the list.
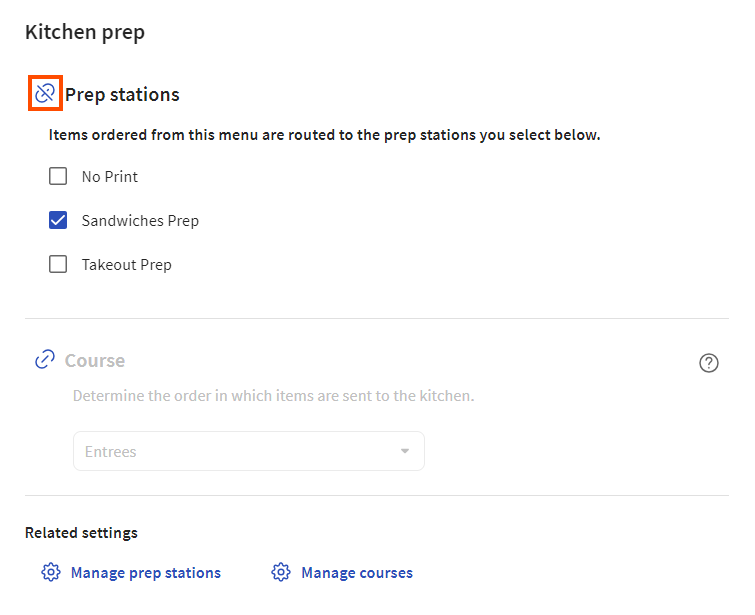
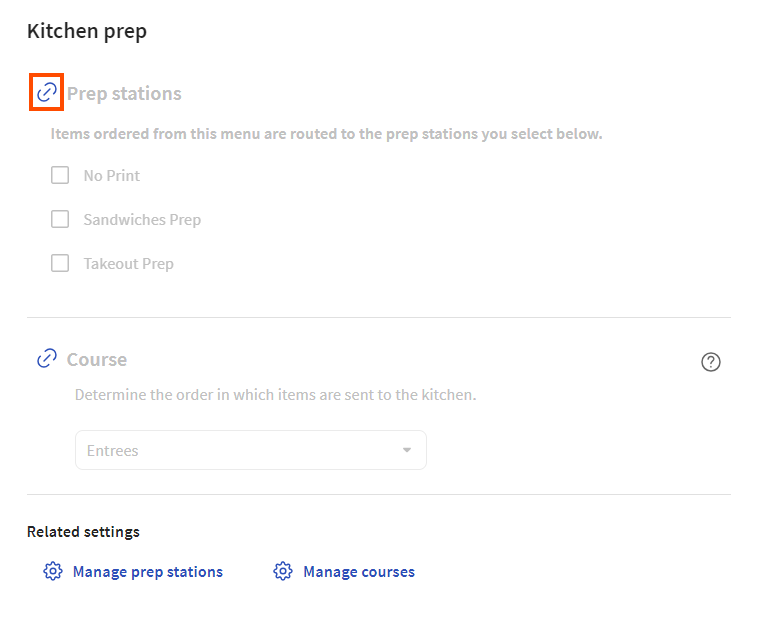
To configure a menu group or subgroup so it inherits its prep stations, select the link icon next to Prep stations so that the prep station settings are grayed out.
To override the inherited prep stations for a menu item, go to the Kitchen section on its details page, set its Inherit prep stations? setting to No, and then select its prep stations from the dropdown list. When you configure settings directly on a menu item, those settings apply any time the menu item is ordered from any menu path.

To configure a menu item to inherit its prep stations, set the Inherit prep stations? setting to Yes.
If you do not have any prep stations configured yet, use the Manage prep stations link to go to the Prep Stations page where you can create them. For more information on creating and using prep stations, see Adding a prep station and Routing with prep stations.
You use courses to manage the firing of tickets to the kitchen for fulfillment.
You can set courses at the menu, menu group, subgroup, or menu item level. By default, menu groups inherit their course from their parent menus. Menu items and subgroups inherit their course from their parent menu groups. For more information on inheritance, see Understanding inheritance.
To set the course for a menu, go to the Kitchen prep section of the menu's details page and select the course.
To override the inherited course for a menu group or subgroup, go to the Kitchen prep section of the group's details page, select the link icon next to Course to unlink the configuration, and then select the course from the list.
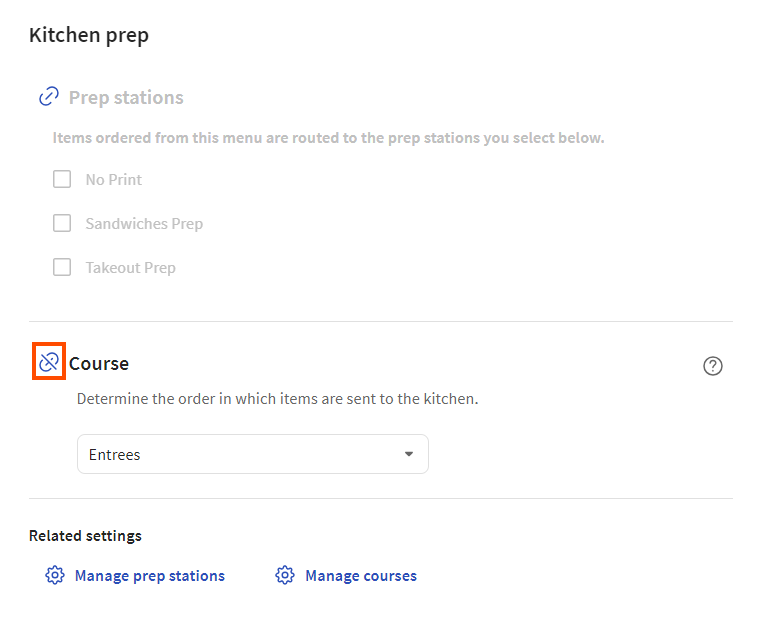
To configure a menu group or subgroup so that it inherits its course, select the link icon next to Course so that the course setting is grayed out.
To override the inherited course for a menu item, go to the Kitchen section on its details page, set its Inherit course? setting to No, and then select its course from the dropdown list. When you configure settings directly on a menu item, those settings apply any time the menu item is ordered, from any menu path.
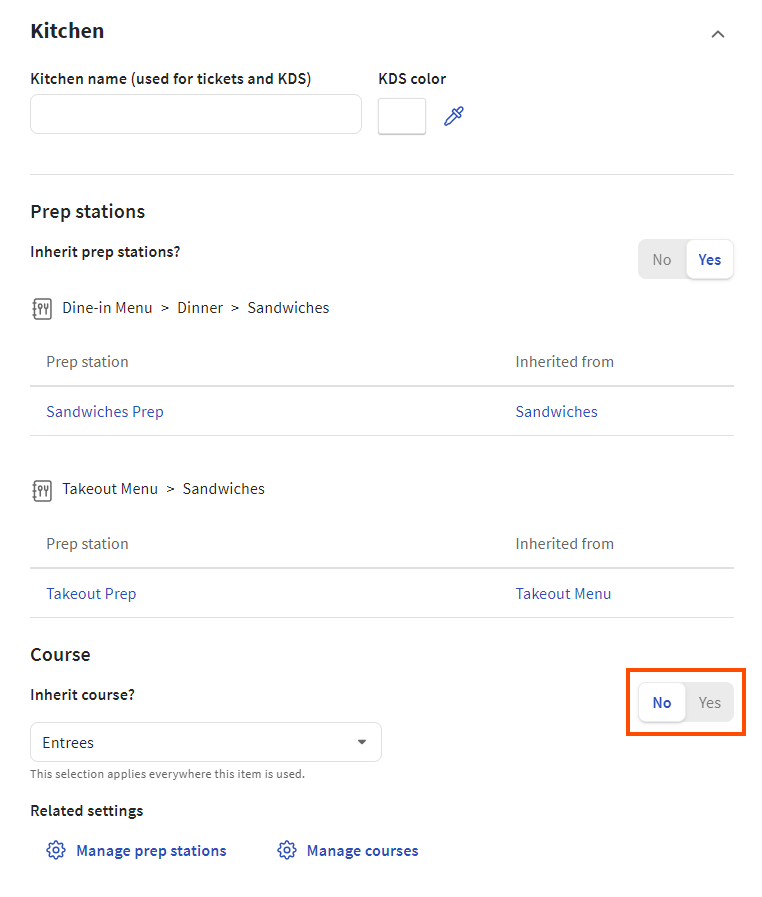
To configure a menu item so that it inherits its course, set the Inherit course? setting to Yes.
If you do not have any courses configured yet, use the Manage courses link to go to the Courses page where you can create them. For more information on creating courses, see Creating courses. For more information on using courses, see this Toast Support article.
While you can assign courses in the menu builder, you must use the classic Courses page to create the courses themselves.
To create courses
-
Go to the Courses page:
If you are viewing a menu item in the menu builder, select Kitchen. If you are viewing a menu, menu group, or subgroup in the menu builder, select Kitchen prep. In the Related settings section, select .
Alternatively, you can do the following:
-
Switch to the restaurant you want to create courses for.
-
Select Kitchen > Pacing > Courses.
-
Select + Add to add a row to the Courses table.
-
Enter a name for the course.
-
Repeat steps 2 and 3 for any additional courses you want to create.
-
Select .
The Sales Summary and other Toast reports use sales categories to create a breakdown of your sales, organized by sales category, for example, Food, Drinks, Retail, and so on.
Some points to keep in mind when using sales categories:
-
If you change the sales category for a menu entity, those changes are reflected in future sales reports but existing reports remain unchanged.
-
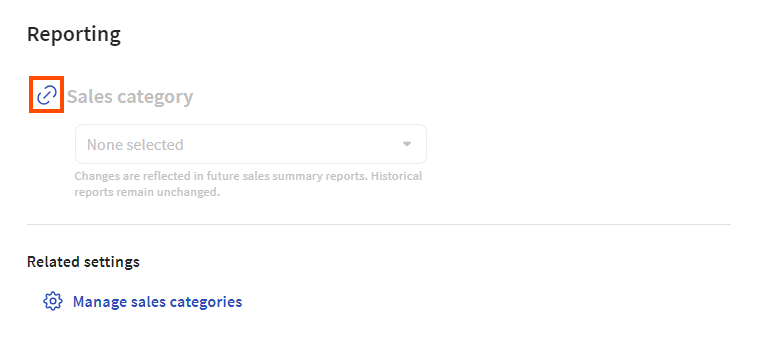
While highly recommended for a better reporting experience, sales categories are optional. If you select from the Sales category menu, no sales category is applied to the menu entity.
For information about the reports that use sales categories, see these Toast Support articles:
You can set sales categories at the menu, menu group, subgroup, or menu item level. By default, menu groups inherit their sales category from their parent menus. Menu items and subgroups inherit their sales category from their parent menu groups. For more information on inheritance, see Understanding inheritance.
To set the sales category for a menu, go to the Reporting section of the menu's details page and select the category from the Sales category dropdown list.
To override the inherited sales category for a menu group or subgroup, go to the Reporting section of the group's details page, select the link icon next to Sales category to unlink the configuration, and then select the sales category from the list.
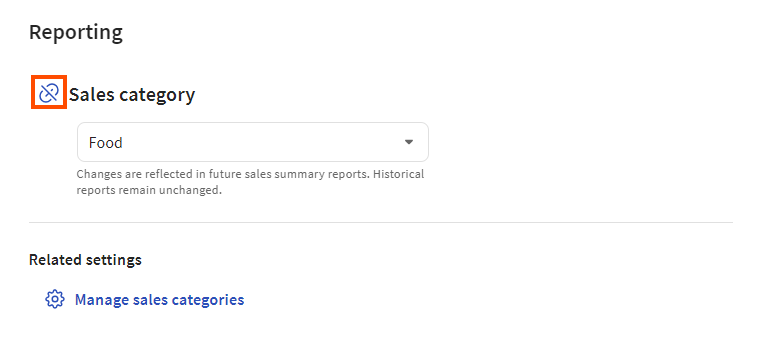
To configure a menu group or subgroup so that it inherits its sales category, select the link icon next to Sales category so that the course setting is grayed out.
To override the inherited sales category for a menu item, go to the Reporting section on its details page, set its Inherit sales category? setting to No, and then select its sales category from the dropdown list. When you configure settings directly on a menu item, those settings apply any time the menu item is ordered, from any menu path.
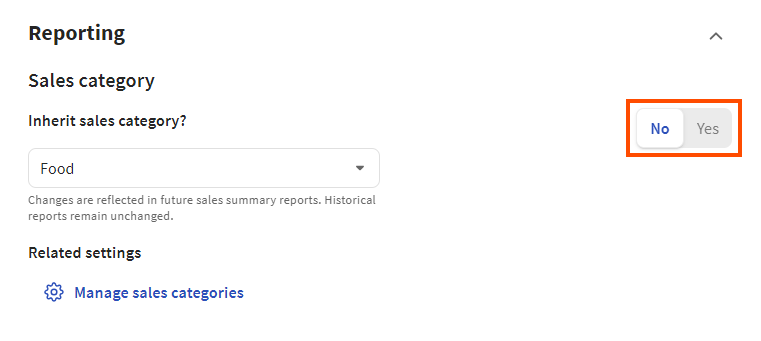
To configure a menu item so that it inherits its sales category, set the Inherit sales category? setting to Yes.
If you do not have any sales categories configured yet, use the Manage sales categories link to go to the Sales categories page where you can create them. For more information on creating sales categories, see Creating sales categories.
While you can assign sales categories in the menu builder, you must use the classic Sales Categories page to create the sales categories themselves.
To create sales categories
-
Do one of the following to navigate to the Sales categories page:
On the details page for a menu, menu group, or menu item, select Reporting. In the Related settings section, select .
Alternatively, you can:
-
Switch to the restaurant you want to create courses for.
-
Select Menus > Settings > Sales categories.
-
Select + Add to add a row to the Sales Categories table.
-
Enter a name and a description for the sales category.
-
Repeat steps 2 and 3 for any additional sales categories you want to create.
-
Select .
During the on-boarding process, you specify the tax rates that apply to your restaurant location. By default, these tax rates are inherited by any menus you create for the restaurant. According to the rules of menu inheritance, the tax rates also flow down to your menu groups, subgroups, and menu items in the following ways:
-
Menu groups inherit their tax rates from their parent menus.
-
Menu items and subgroups inherit their tax rates from their parent menu groups.
You can override tax rates on individual menus, menu groups, subgroups, or menu items as needed.
In addition to tax rates, Toast Web includes two tax behavior settings that allow you to specify that taxes are included in a menu item's price and takeout orders are exempt from taxes. You can set the tax behavior settings at the menu, menu group, subgroup, or menu item level and they follow the same rules of inheritance as tax rates. You can override these settings as needed on individual menu entities.
For more information on menu inheritance, see Understanding inheritance.
The following sections provide instructions for setting tax rates and behavior. They also provide more information about the tax behavior settings.
To override the inherited tax rates for a menu, menu group, or subgroup, go to the Taxes section of the entity's details page, select the link icon next to Tax rates to unlink the configuration, and then select the tax rates from the list. To override the Calculate prices with tax included or Takeout exception setting, select its link icon to unlink the configuration and then configure the setting as needed.
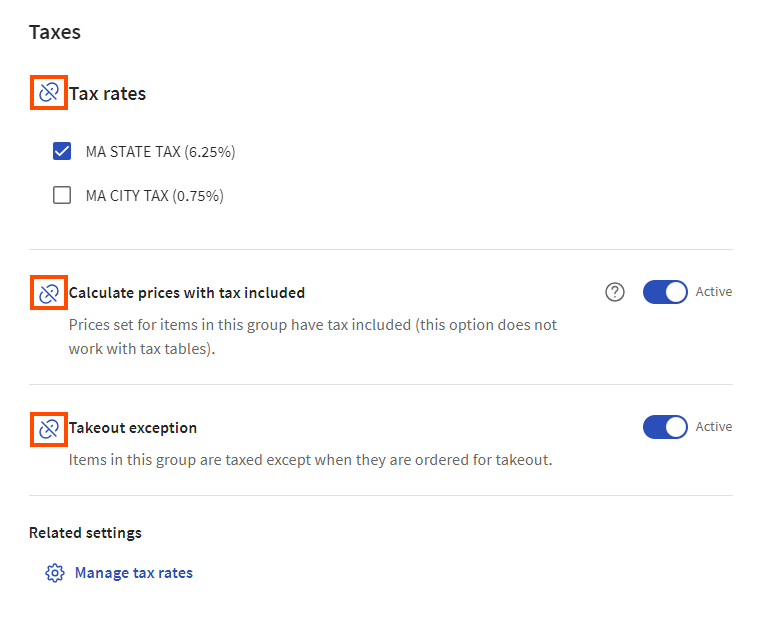
To configure a menu, menu group, or subgroup so it inherits its tax rates, select the link icon next to Tax rates so the tax rates setting is grayed out. To inherit the Calculate prices with tax included or Takeout exception setting, select its link icon so that the setting is grayed out.

To override the inherited tax rates for a menu item, go to the Tax settings section on its details page, set its Inherit tax rates? setting to No, and then select the tax rates from the list. To override the Tax inclusion or Takeout tax exception setting, set Inherit tax inclusion? or Inherit takeout tax? to No and then configure the setting as needed. When you configure settings directly on a menu item, those settings apply any time the menu item is ordered, from any menu path.
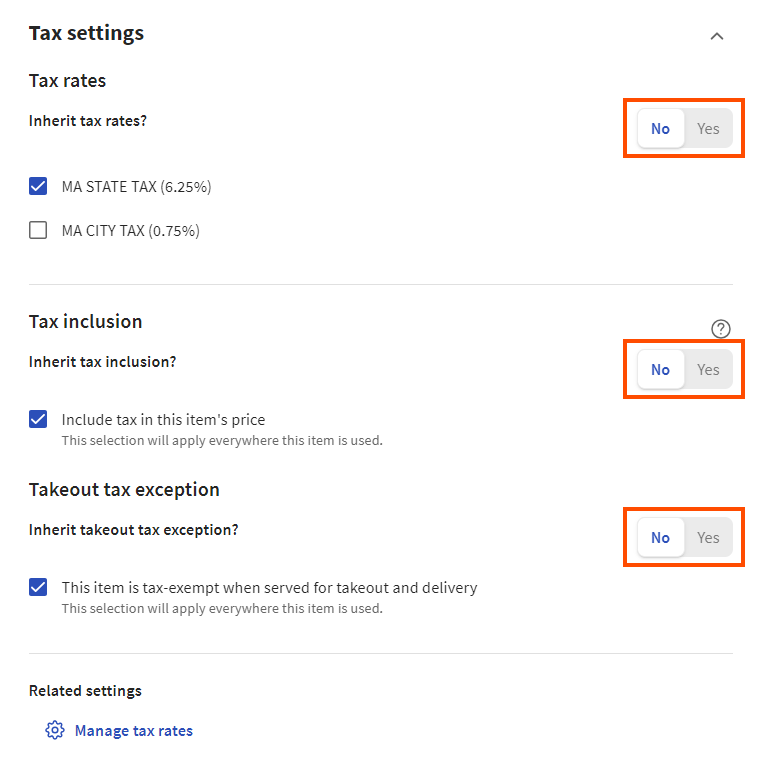
To configure a menu item so that it inherits its tax rates, set the Inherit tax rates? setting to Yes. To inherit the Tax inclusion or Takeout tax exception setting, set the Inherit tax inclusion? or Inherit takeout tax? setting to Yes.
If you do not have any tax rates configured yet, you see a Manage tax rates link that you can select to go to the Tax rates page where you can create them. For more information on creating tax rates, see Taxes overview.
When tax is included in a menu item's price, the guest pays the price you have set and any applicable taxes are taken out of that price, instead of being added to it. Use this option when you want a guest's check total to be a round number. This eliminates the need for employees to deal with coins and makes tipping simpler to calculate. It can, however, decrease net revenue if the price you set does not account for applicable taxes.
To better understand the effect of tax inclusion on your revenue, consider an item that has a price of $10 and a tax rate of 7%. When tax is included, the Toast platform calculates a price and tax combination that equals the price you have set but also covers any applicable taxes. In this case, the guest pays $10 ($9.35 for the item and $0.65 for the tax) and your revenue is $9.35:
-
$9.35 item price x .07 tax rate = $0.65 tax
-
$9.35 item price + $0.65 tax = $10 price with tax included
-
Your revenue is $9.35
When tax is not included, the guest pays $10.70 ($10 for the item and $0.70 for the tax) and your revenue is $10:
-
$10.00 item price x .07 tax rate = $0.70 in tax
-
$10.00 item price + $0.70 tax = $10 price without tax included
-
Your revenue is $10
Your sales reports display the item price and tax amount that the Toast platform has calculated for any tax included items, so you can see the breakdown of revenue versus tax when tax is included.
For information on enabling tax inclusion, see Setting tax rates and tax behavior.
For states that do not tax takeout orders, you can specify that menu items are tax-exempt when ordered for takeout. To determine if an order is a takeout order, the Toast platform looks at the dining option associated with the order and then it looks at that dining option's behavior. Dining options that use the Take Out behavior are considered takeout orders and are not be taxed.
For more information on setting takeout tax exemption behavior, see Setting tax rates and tax behavior.
For more information on dining options, see Dining options.
In the Time-based ordering rules section of a menu item's details page, you can specify rules for your online orders:
-
Minimum lead time: Allows you to specify the number of hours in advance a guest must order the menu item online.
-
Pre order: Allows you to specify dates during which the menu item is visible for online ordering, and also dates during which the menu item may be picked up by a guest or a delivery driver, if your restaurant offers delivery services. This feature is useful for menu items that your restaurant doesn't carry on a daily basis. For example, a holiday dessert menu item may be available only in the days leading up to the holiday and should be picked up before the holiday.
|
Important |
|
These rules are only available to restaurants that use Toast Online Ordering Pro or the Branded Mobile App and they only apply to orders placed through these channels. |
To specify a minimum lead time for online orders
-
On the details page for the menu item that you want to edit, go to the Time-based ordering rules section.
-
Select + Add rule. The Add Rule dialog opens.
-
Select Minimum lead time.
-
Enter the lead time, in hours, in the How many hours in advance? box.
-
Select Save. Your changes are applied immediately after you select Save and you do not have to publish this change. It can take up to an hour for the rule to display on your online ordering page.
To specify dates for pre-ordering and pick up
-
On the details page for the menu item that you want to edit, MENU-3285-itemsgo to the Time-based ordering rules section.
-
Select + Add rule. The Add Rule dialog opens.
-
Select Pre order.
-
In the Order range section, specify the date range during which the menu item can be ordered from your online ordering site. Select Select dates to view a calendar. Select the first day in the date range and then select the last day in the date range. Click or tap outside the calendar to close it.
-
In the Pickup range section, specify the date range during which the guest or delivery driver can pick up the menu item. Select Select dates to view a calendar. Select the first day in the date range and then select the last day in the date range. Click or tap outside the calendar to close it.
-
Select Save. Your changes are applied immediately after you select Save and you do not have to publish this change. It can take up to an hour for the rule to display on your online ordering page.
The side pane for each menu item has a Channel visibility section that shows the ordering channels where the menu item is visible. If a menu item is visible on a channel, it is available for ordering on that channel. Options include:
-
POS: The menu item is visible in the Toast POS app.
-
Kiosk, Toast Order and Pay: The menu item is visible on Toast Kiosks and on the Toast Order and Pay web page. In order to enable this setting, you must first enable the POS setting.
-
Toast Online Ordering, Toast Takeout (Local by Toast) app: The menu item is visible on your restaurant's Toast Online Ordering website and in the Toast Takeout (Local by Toast) app.
-
Customer invoices, Catering & Events, Catering Online Ordering: The menu item is visible when:
-
Creating customer invoices for orders using the Finance > Payments > Customer invoices page. For information, see this Toast Support article.
-
Creating catering orders using Toast Catering & Events. For information, see this Toast Support article.
-
Configuring the menu entities that guests can see when placing online catering orders. For information, see this Toast Support article.
Note that this setting is always enabled for all menu entities and cannot be changed.
-
-
Online ordering partners: The menu item is visible on the online ordering sites of all ordering partners you have allowed to integrate with your Toast restaurant (for example, DoorDash, Uber Eats, or Grubhub).
Unlike other settings such as tax rates and prep stations, the Channel visibility settings cannot be inherited from a parent. That said, if a parent menu entity is hidden from view for any of the Toast channels, then its child menu entities are also hidden from those channels. For example, consider a Dinner menu that contains an Appetizers group with a Chicken Satay menu item. If you hide the Dinner menu from Toast Online Ordering and the Toast Takeout (Local by Toast) app, then the Appetizers group and the Chicken Satay menu item will also be hidden from Toast Online Ordering and the Toast Takeout (Local by Toast) app, even if the Toast Online Ordering, Toast Takeout (Local by Toast) app setting is enabled for Appetizers and Chicken Satay.
You can edit a menu item's visibility from Full menu view or from Items view. You can set the same visibility options in the two views but the way you publish those changes is different:
-
You must manually publish visibility changes you make in Full menu view. Full menu view does not support scheduled publishing.
-
You can manually publish visibility changes you make in Items view or schedule them for future publishing.
Follow the procedure below for the view you want to use, Full menu view or Items view.
|
Note |
|
Multi-location restaurants must use Items view to edit item visibility. They cannot edit visibility in Full menu view yet. Also, the following procedures let you make visibility updates to individual menu items. Use the bulk editing feature to make the same visibility edits to multiple menu items at one time. For more information, see Making bulk edits. |
To edit a menu item's visibility in Full menu view
-
Choose Menus > Menu management > Menu manager to open the Menu manager page.
-
From the Show section, choose Full menu.
-
Use the expand icons to locate the item you want to edit.
-
Select the item to see its details in the side pane, then scroll to the Channel visibility section.
-
Enable or disable the visibility settings as needed.
-
Select Save.
-
Manually publish your changes when you are ready for guests and employees to see them.
To edit a menu item's visibility in Items view
-
Choose Menus > Menu management > Menu manager to open the Menu manager page.
-
From the Show section, choose Items.
-
Use the search field or the filtering controls to refine the list of menu items.
-
Select a menu item's Visibility column and enable or disable the visibility settings as needed. Repeat this step with any other menu items that require visibility updates.
-
Continue reading the Publishing menu manager changes section to understand how to make your menu changes available to employees and guests.
Important
Items view offers additional workflows for saving and publishing your pricing edits that are different from other configuration pages in Toast Web, including the ability to create a change set that publishes your changes at a later date and time. In Items view, you either select Schedule to create a change set or Save to save your changes immediately. If you select Save, your changes will be saved immediately and you will not be able to create a change set. Do not select Save in Items view until you fully understand the publishing workflows described in Publishing menu manager changes.
Menu manager supports setting base prices, size prices, and open prices in Full menu view and editing existing base, size, location-specific, and menu-specific prices in Items view.
You can use the classic menu item detail pages to configure other advanced pricing strategies for your menu items, beyond those supported in the menu manager, for example, time prices and price levels. You can also use the classic pages to specify that a menu item inherits its price from a menu group.
If you set an advanced pricing strategy for a menu item, Items view displays the pricing strategy's name and the price range for the price (for example, $8.00 - $10.00). If the pricing strategy is one that is editable in Items view (base, size, location-specific, or menu-specific), you can edit the prices. If not, the prices are read-only.
If you configure a menu item to inherit its price from a menu group, the Price on column in Items view contains Menu group to indicate the menu item inherits its price from a parent menu group. Currently, the menu item side pane in Full menu view doesn't show whether a menu item is priced at the group level or not. It only shows individual prices for the menu item, which are ignored if the menu item belongs to a menu group that is priced at the group level.
It is important to note that not all pricing strategies are supported on all Toast ordering channels. For example, Toast Online Ordering does not support time or open prices so you should not use those pricing strategies for menu items that will be displayed on your Toast Online Ordering website. Before using an advanced pricing strategy, check the table below to ensure that the strategy you want to use is supported by the Toast ordering channels where those menu items will be visible. This table also includes a description of each pricing strategy and the location where you configure it (in the menu manager or in the classic menu item details page). The sections that follow the table describe how to configure each of these pricing strategies.
| Pricing strategy | Description | Can be used with... | Configure in... | ||
|---|---|---|---|---|---|
|
Size price |
With size pricing, the price of a menu item changes based on the size chosen for the menu item. For example, a small pizza costs $12 and a large pizza costs $14. |
|
Menu manager |
||
|
Open price |
With open pricing, you manually specify a price for a menu item when that menu item is ordered on the Toast POS app. For example, you may want to set the price of a menu item differently depending on the market price of that menu item on the day that it is ordered.
|
|
Menu manager |
||
|
Menu-specific price |
With menu-specific pricing, the price of a menu item changes based on the menu it was ordered from, for example, a menu item that costs $5 when it is ordered from the Lunch menu and $7 when it is ordered from the Dinner menu. Menu-specific prices require that the same menu item has been added to multiple menus. Currently, that type of configuration can only be created in the classic menu details pages in Toast Web. For instructions on how to add the same menu item to multiple menus, see this Toast Support article. |
|
Classic menu item details page You can update existing menu-specific prices in the menu manager Items view after you have defined them on the classic menu item details page. |
||
|
Location-specific price |
With location-specific pricing, the price of a menu item changes based on the location it was ordered from, for example, a menu item that costs $15 when it is ordered from the Boston location and $17 when it is ordered from the New York location. |
|
Classic menu item details page You can update existing location-specific prices in the menu manager Items view after you have defined them on the classic menu item details page. |
||
|
Time price |
With time pricing, you define the price of a menu group or item during specific times of the day. For example, a menu item that costs $10 between noon and 2pm and $12 during the rest of the day. With time pricing, you also specify a base price that functions as a default price for times of day when a time price has not been defined. |
|
Classic menu item details page |
||
|
Price levels |
Price levels allow you to quickly price menu items that all share the same price. You create a price level, and then assign it to the menu items that will use it. For example, all bottled beers are $5 and all draft beers are $6. To change the price of the menu items that use a price level, you only need to change the price level itself. This eliminates the need to edit the price for each individual menu group or item. |
|
Classic menu item details page |
For detailed information about setting base, size, and open prices in the Full menu view of the menu manager, see Editing a menu item's price. This same topic provides information about editing existing size, location-specific, and menu-specific prices in Items view.
Follow the instructions below to access the classic details page for a menu item, where you can configure all advanced pricing strategies.
To set an advanced price using the classic menu item details page
-
Choose Menus > Menu management > Menu manager to open the Menu manager page.
-
From the Show section, choose Full menu.
-
(Multi-location only) Select the locations whose menu data you want to edit from the locations control.
-
Use the expand icons to locate the item you want to edit.
-
If you are a single-location restaurant, select the item to see its side pane, then select More settings to open its classic details page.
If you are a multi-location restaurant, select the item's name to open its classic details page.
-
If you want to use the Menu Specific Price, Time Specific Price, or Location Specific Price pricing strategy, do the following:
-
Leave the Pricing Provider section set to Specify pricing on this item.
-
In the Pricing Strategy section, choose the advanced pricing strategy and fill out its configuration details. Click a link below for specific instructions for each strategy type:
-
-
If you want to use price levels, set the Pricing Provider section to Price level and then choose a price level from the Price Level dropdown list.
Note
Price levels must be created before you can assign them to your menu items. Currently, price level creation must be done in the classic menu details pages in Toast Web. For instructions on how to create price levels, see Using price levels.
-
At the top of the page, select Save.
-
When you are ready to make your changes visible to employees and guests, you must publish them. Follow the instructions below for your scenario:
-
If you have a single location, select Publish now.
-
If you have multiple locations, select the Unpublished changes link at the top of the page to go to the Toast account > Publishing > Publish Config page. Follow the instructions in Publishing changes for multiple locations to publish changes to all or some of your locations.
Note
The Publish now prompt that appears when you edit configuration pages in Toast Web publishes changes to the session restaurant only. To publish to multiple locations, you must use the Publish Config page.
-
The Items view of the menu manager provides additional read-only information about menu items. For example, the Found in column displays information about where a menu item appears in the menu hierarchy. For more information, see Items and modifiers view.