The menu manager offers several workflows for saving and publishing your menu changes. With the menu manager, you can:
-
Create a new change set from the Menu manager page that is saved and published at a later date and time.
-
Add the menu manager changes to an existing change set that is published at a later date and time.
-
Save your changes and manually publish them when you are ready to make them visible.
The sections below describe how to use these workflows.
|
Note |
|
You cannot add changes made on the Full menu view to a change set. They must be saved and manually published. |
A change set stores the configuration edits you make but it does not save and publish them until a date and time that you specify. When that date and time occurs, the Toast platform saves the changes in the change set and then immediately publishes them to all affected locations, making them available to employees and guests.
When you create a new change set, you specify metadata for it that includes an identifying name and a publishing date and time (alternatively, you can just give the change set a name and defer setting a date and time until later). You also specify who can view the change set and edit its metadata. This workflow is called scheduled publishing. For more information, see Understanding scheduled publishing and change sets.
To create a new change set, you need the 6. Web Setup > 6.4 Publishing and 6. Web Setup > 6.7 Change sets permissions to the location you are logged into.
|
Note |
|
You cannot add changes made on the Full menu view to a change set. They must be saved and manually published. |
To create a new change set for menu manager changes
-
After making your menu changes in the Items, Modifiers, or Price levels views, select the Schedule button. You see the Which scheduled change set would you like to add this to dialog with a list of existing change sets at the top.
-
Select Create change set.
-
Enter a name for the change set.
-
Select a date and time for the change set to be saved and published.
The time zone is the current time zone from your browser. Be sure to take that into account when you select the publication time. For example, if you are in the Pacific time zone, but are scheduling a change set for locations in the Eastern time zone, then to publish the change set at 4:00 AM Eastern, set the scheduled publication for 1:00 AM Pacific.
Alternatively, you can select and then edit the change set later to set its date and time.
-
For the Editable by setting, specify one or more location groups or locations. Employees who have the 6. Web Setup > 6.7 Change sets permission to the location or location group you specify (or an ancestor of the location or location group) can view this change set; edit its metadata, which includes its name, date, time, and Editable by setting; and add changes to it.
For the Editable by setting, you are limited to selecting locations and locations groups that you have the Change sets permission to.
For more information about scheduled publishing permissions, see Scheduled publishing permissions.
-
Select Create and add [X] changes.
A calendar icon is added next to each menu entity that has been updated. The calendar icon also includes a number that indicates the number of change sets the updated entity is included in. For example, the Fried Egg menu item below is included in one change set:
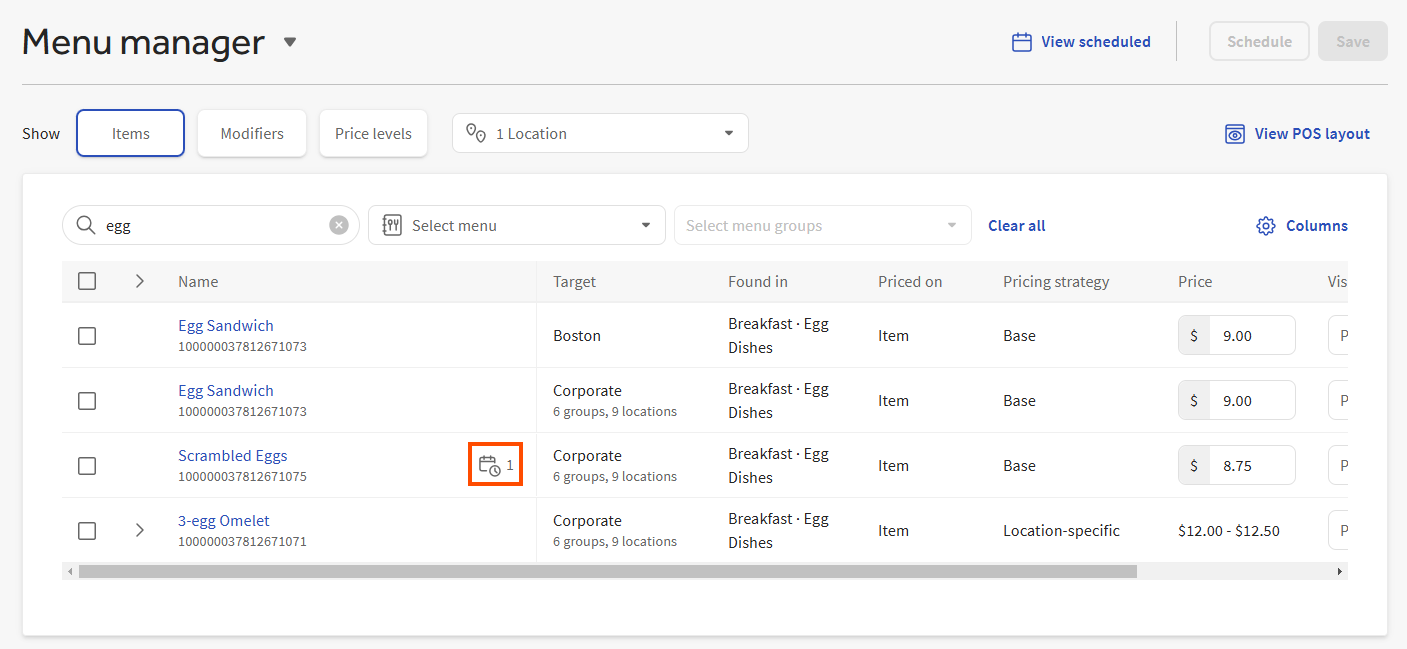
You can select the calendar icon to open a list of the change sets that the updated menu entity is included in. Select a change set from that list to view and edit it. The change sets you see in this list are limited to those you have the Change sets permission to. For more information, see Permissions for scheduled publishing.
You can add edits made on the Menu manager page to an existing change set that has not been published yet. As described in Creating a new change set, you can create a change set from the Menu manager page, but they can also be created from the publishing center page. See Publishing center overview for more information about the publishing center.
To add changes to an existing change set, you need the 6. Web Setup > 6.7 Change sets and 6. Web Setup > 6.4 Publishing permissions to the location or location group (or an ancestor of the location or location group) specified in the change set's Editable by setting.
|
Note |
|
You cannot add changes made on the Full menu view to a change set. They must be manually published. |
To add menu manager changes to an existing change set
-
After making your menu changes in the Items, Modifiers, or Price levels views, select the Schedule button. You see the Which scheduled change set would you like to add this to dialog with a list of existing change sets at the top.
The list of change sets in the Which scheduled change set would you like to add this to dialog is limited to change sets where you have the 6. Web Setup > 6.7 Change sets permission to the location or location group (or an ancestor of the location group) specified in the change set's Editable by setting.
-
Select the change set you want to add your changes to and then select Add changes.
A calendar icon is added next to each menu entity that has been updated. The calendar icon also includes a number that indicates the number of change sets the updated entity is included in. For example, the Fried Egg menu item below is included in one change set:
You can select the calendar icon to open a list of the change sets that the updated menu entity is included in. Select a change set from that list to view and edit it. The change sets you see in this list are limited to those you have the Change sets permission to. For more information, see Permissions for scheduled publishing.
With the manual workflow, your changes must be:
-
Saved immediately after making them.
-
Manually published when you are ready for them to be visible to employees and guests.
Saving works differently depending on the view you are using:
-
Full menu view consists of a table that shows your menu hierarchy and an optional side pane that you can choose to display or hide for a particular menu entity. The Toast platform automatically saves changes you make in the menu hierarchy table as you work. For example, if you add a new menu or re-order your menu groups, those changes are automatically saved. The side pane does not have the auto-save feature. To save changes you make in the side pane, use the Save button that appears at the bottom of the pane.
-
The , Modifiers, and views also do not have the auto-save feature. To save changes you make in these views, use the Save [X] changes button.
To manually save and publish your changes, follow the procedure below for the view you are using.
|
Note |
|
For more information about the difference between saving and publishing, see Understanding saving and publishing. |
To manually publish menu manager changes from Full menu view
-
If you've only made changes to the menu hierarchy table, those changes are automatically saved and you can proceed to step 2. If you made changes in the side pane, select Save in the side pane and then proceed to step 2.
-
When you are ready to make your changes visible to employees and guests, do one of the following:
For single-location restaurants: Select Publish all changes.
For multi-location restaurants: Select the Unpublished changes link at the top of the page to go to the Toast account > Publishing > Publish Config page and follow the instructions in Publishing changes for multiple locations to publish changes to all or some of your locations.
To manually publish menu manager changes from Items, Modifiers, or Price levels view
-
Select the Save [X] changes button.
-
In the Save changes now dialog, select Yes, save now.
-
When you are ready to make your changes visible to employees and guests, select the Unpublished changes link at the top of the page to go to the Toast account > Publishing > Publish Config page.
-
Follow the instructions below for your scenario:
-
Single-location restaurants: Select Publish Changes.
-
Multi-location restaurants: Follow the instructions in Publishing changes for multiple locations to publish changes to all or some of your locations.
Note
The Publish now prompt that appears when you edit other configuration pages in Toast Web (outside of the menu manager page) publishes changes to the session restaurant only. To publish to multiple locations, you must use the Publish Config page.
-
Modifiers and price levels must have already been published at least once before you can use the menu manager's Schedule button to schedule updates for them. For example, you create Price Level A. You must publish Price Level A before you can edit Price Level A in the menu manager and schedule those edits to be published at a future date and time.
Menu items are handled differently. You can schedule a change for a menu item if it has not been previously published. However, to ensure that the menu item is available for ordering, the Toast platform may have to also publish other menu entities that the item is dependent on. When determining if other menu entities need publishing, the Toast platform follows these rules:
-
Any menu groups that contain the unpublished menu item are published along with the menu item. Publishing the parent menu groups ensures they will include the menu item. If those menu groups have other saved changes that have not been published yet, those changes are also published with one exception: any other menu items that have been added to the menu group are not included in the publish. Only the menu item that has a scheduled change is added to the menu group.
-
If the menu item has dependencies on entities like modifier groups, tax rates, or prep stations, those entities are published along with the menu item.
This only applies to entities that the menu item requires to function properly. These entities include:
-
Tax rates
-
Price levels
-
Modifier groups
-
Modifiers
If a modifier contains another nested modifier group, that nested modifier group is also published.
A nested modifier group allows a guest or employee to further customize a modifier. For example, a dinner entree could have a Side Salad modifier. The Side Salad modifier can contain a nested modifier group called Salad Dressing with Balsamic and Ranch modifiers.
-