In the menu manager details pages, when you enable the Online ordering partners setting for a menu, an additional list of the online ordering partners you integrate with appears. You can use these settings to make the menu visible to specific online ordering partners. For example, you can configure a menu to be visible to Uber Eats and Grubhub but not DoorDash.
The Online ordering partners settings are slightly different depending on whether your restaurant uses the multi-location module or not. The illustration below shows the simpler version of the Online ordering partners settings for a restaurant that does not use the multi-location module.
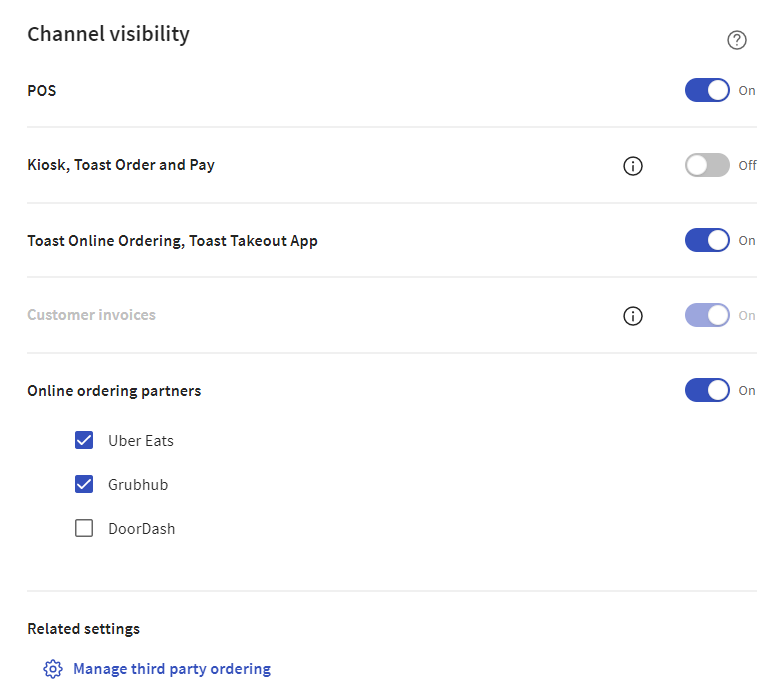
If your restaurant does not use the multi-location module, see Ordering partner-specific settings for a single location for information on using the ordering partner-specific settings. If your restaurant uses the multi-location module, see Ordering partner-specific settings for multi-location restaurants.
|
Note |
|
This section applies to restaurants that do not use the multi-location module. If your restaurant uses the multi-location module, see Ordering partner-specific settings for multi-location restaurants instead. |
Use the instructions below to configure a menu so that it is only visible to specific online ordering partners.
These settings apply to the restaurant you are currently logged into. For example, you are logged into Restaurant A and viewing the Dinner menu. You can use the ordering partner-specific settings to configure the Dinner menu for Restaurant A so that it is visible to Uber Eats and Grubhub but not DoorDash.
To configure ordering partner-specific visibility for a menu
-
In Toast Web, select Menus > Menu management > Menu manager.
-
Select the menu you want to edit to see its side panel.
-
Scroll to the Channel visibility section in the side panel.
-
Toggle Online ordering partners to On. A list of the online ordering partners you integrate with appears. By default, they are all selected.
Note
When the setting is Off, the partner-specific settings disappear and the menu is hidden from all online ordering partners.
-
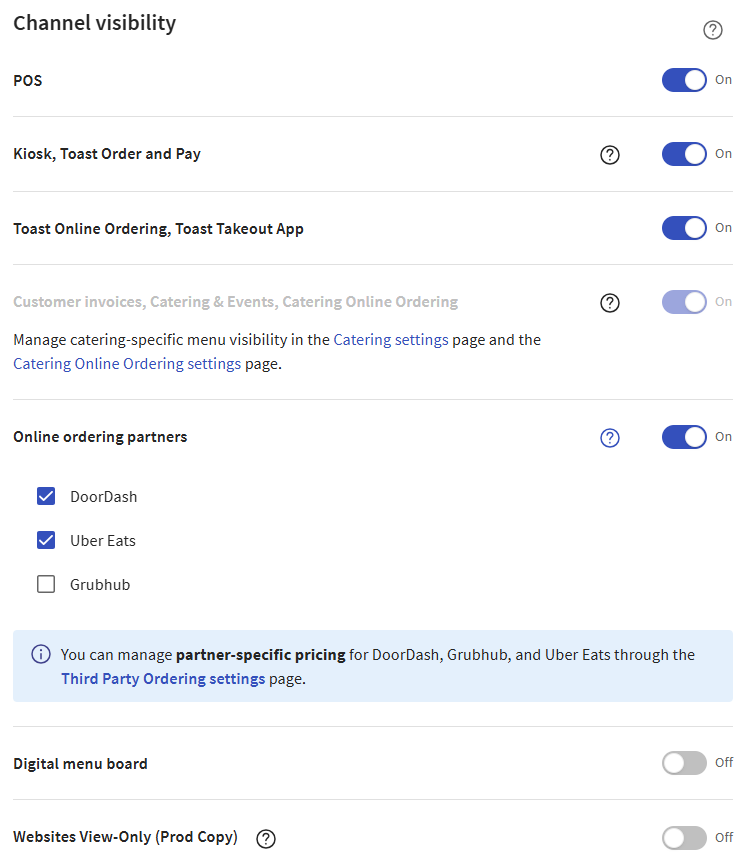
Uncheck an online ordering partner to hide the menu on that online ordering partner's site. In the illustration below, the menu is visible on the DoorDash and Uber Eats sites but not on the Grubhub site.
-
Select Save in the side panel.
-
If you are ready for guests and employees to see these menu changes, select Publish all changes, then select Publish again in the Confirm Publish dialog box. For more information, see Understanding when to publish your menu.
|
Note |
|
This section applies to restaurants that use the multi-location module. If your restaurant does not use the multi-location module, see Ordering partner-specific settings for a single location instead. |
This section covers how to configure a menu so it is visible to specific online ordering partners for specific locations. For example, you can configure a menu so that it is visible to Uber Eats for the Atlanta and Boston locations but hidden from DoorDash for these locations.
|
Important |
|
If a menu is versioned, the ordering partner-specific visibility settings you set for one version apply to all versions. For more information, see Ordering partner visibility settings and versioned menus. |
To configure ordering partner-specific visibility for a menu (multi-location)
-
Log in to Toast Web.
-
From the navigation pane on the left, select Menus > Bulk management > Advanced Properties.
-
From the You are viewing menu, pick a location group that uses the menu you want to edit and select Update.
-
Select the name of the menu you want to edit. The menu's classic details page opens.
-
In the blue banner at the top of the page, select the link for the new menu page to open the menu manager details page for the menu.
-
Select Channel visibility to scroll to the Channel visibility settings.
-
Toggle Online ordering partners to On. A list of the online ordering partners you integrate with appears. Next to each ordering partner's name you see a dropdown list with a list of locations.
Note
When the setting is Off, the partner-specific settings disappear and the menu is hidden from all online ordering partners.
-
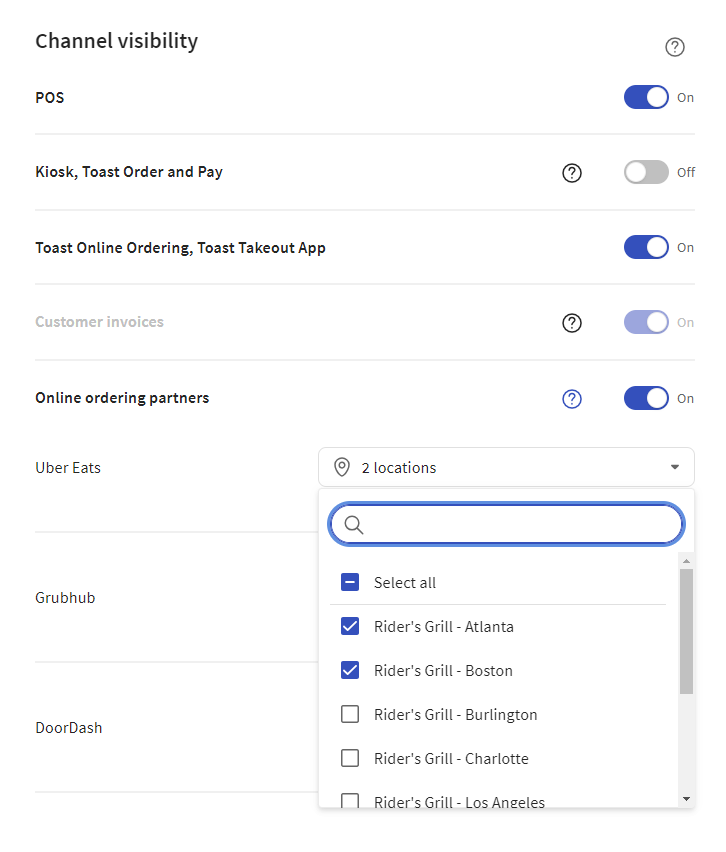
Use the dropdown lists to choose the locations the menu should be visible to for each ordering partner. For example, in the illustration below, the menu is visible to DoorDash for the Atlanta and Boston locations.
The dropdown lists only show locations that are included in the menu's target and that you have the Restaurant Admin > Edit Full Menu permission to. For example, consider the following location group hierarchy:
-
Corporate
-
Northeast
-
Boston
-
Cambridge
-
NYC
-
-
Southeast
-
Atlanta
-
Charlotte
-
-
If a menu's target is Northeast and you have Edit Full Menu permissions to the Boston and Cambridge locations, the dropdown lists show Boston and Cambridge. They do not show Atlanta and Charlotte because those locations are not part of the menu's Northeast target and they don't show NYC, because you do not have permissions to edit the menu for NYC.
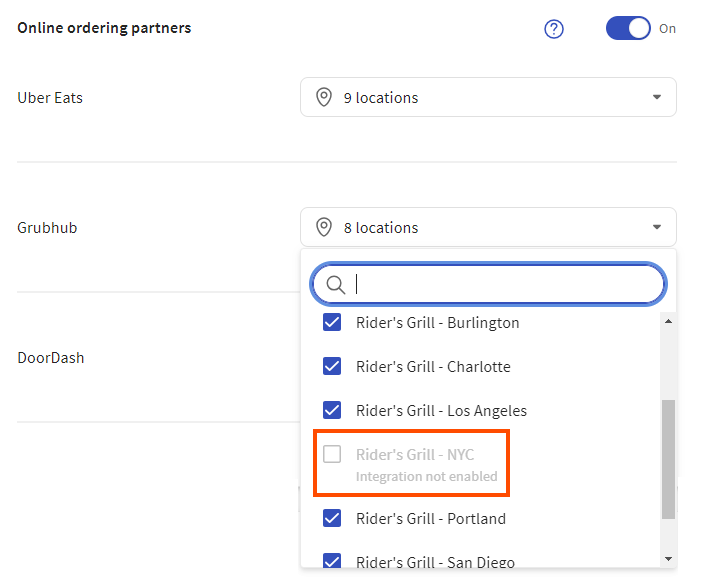
If a location does not have an integration enabled for an ordering partner, it still appears in the dropdown lists but it is disabled and a note indicates it does not have the integration enabled. For example, in the illustration below, the NYC location does not have the Grubhub integration enabled.
-
-
Select Save.
-
Select the X icon in the upper-left corner to return to the menu's classic details page.
For each menu group, menu item, modifier group, and modifier within this same menu, you must also toggle the Online ordering partners setting to On. Also, if the menu has multiple versions, you must make sure Online ordering partners is set to On for all of the versions. The most efficient way to do this is by using the Advanced Properties page.
|
Note |
|
If any of the menu versions has Online ordering partners set to Off, a warning appears. Setting them all so that Online ordering partners is On resolves the warning. For more information, see Ordering partner visibility settings and versioned menus. |
To toggle Online ordering partners to On using the Advanced Properties page (multi-location)
-
Log in to Toast Web.
-
From the navigation pane on the left, select Menus.
-
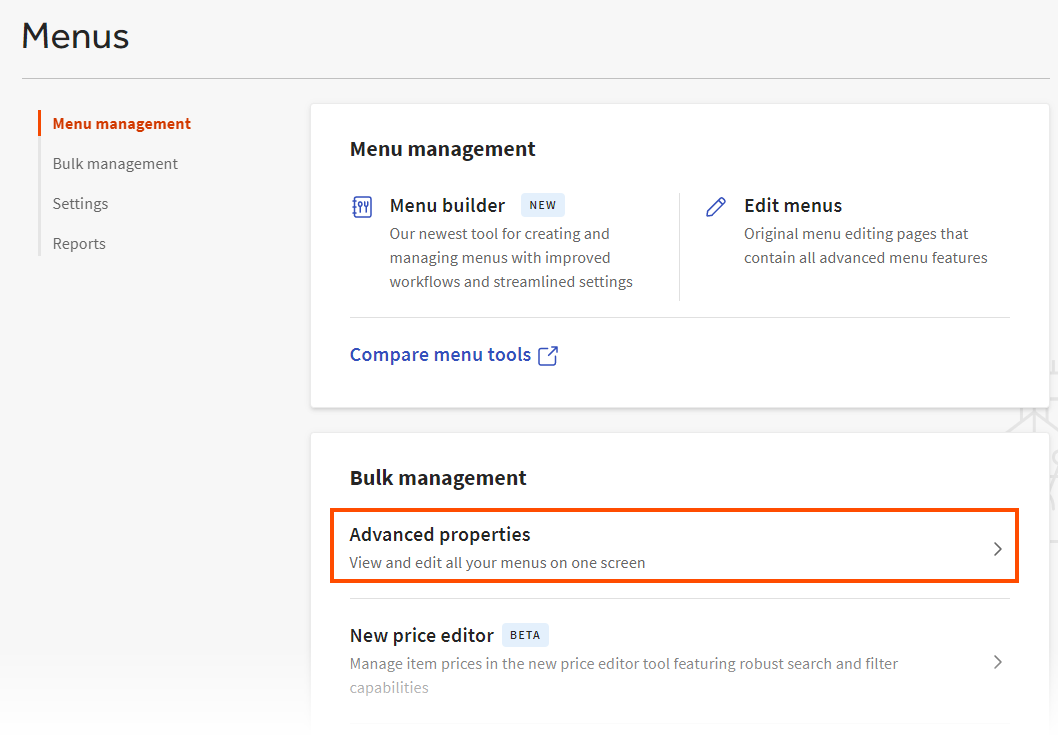
Select Bulk management > Advanced properties.
-
From the You are viewing menu, pick a location group that uses the menu you want to edit and select Update. If your menu has multiple versions, pick a location group that ensures you see all of the versions in the Advanced Properties page. This may be your top-level location group.
-
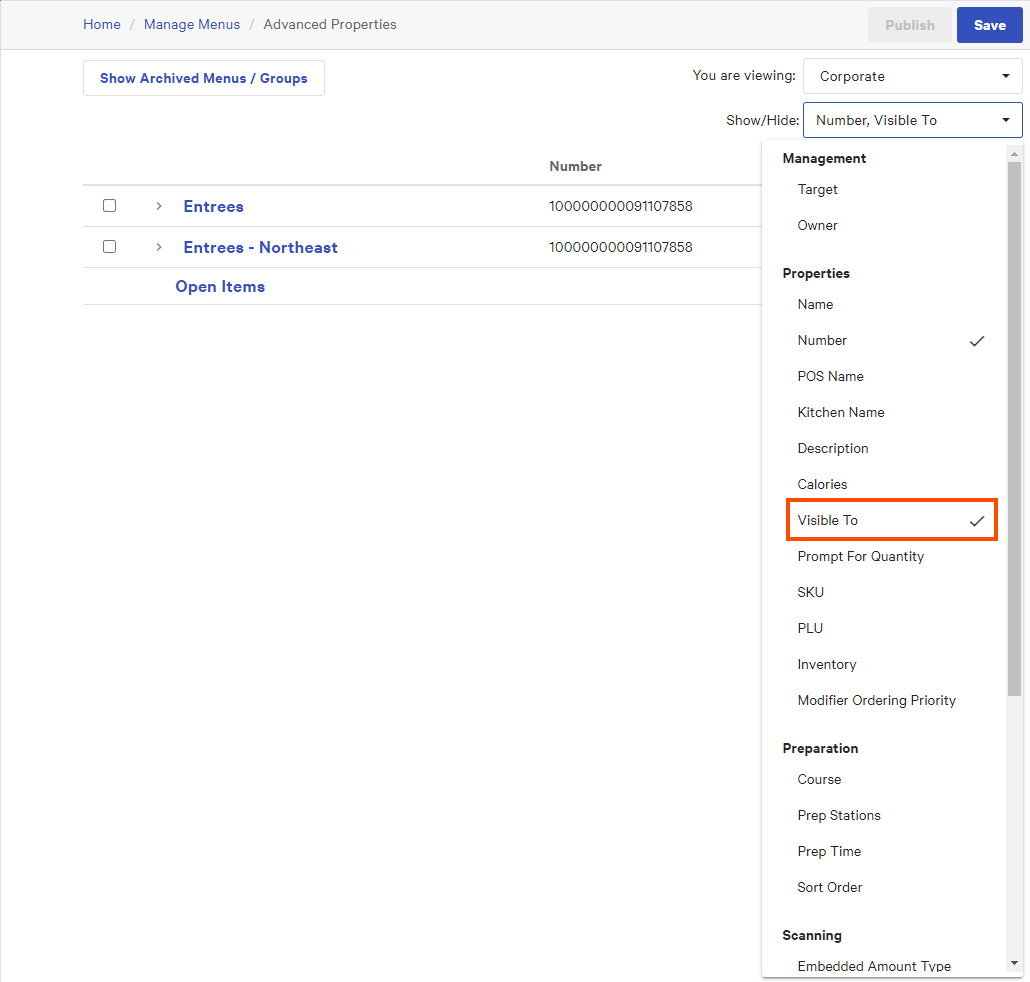
If the Visible to column is not already displayed, from the Show/Hide menu, choose Properties > Visible to.
-
Expand the menu to see all its menu groups, menu items, modifier groups, and modifiers. If the menu has multiple versions, expand the first version.
-
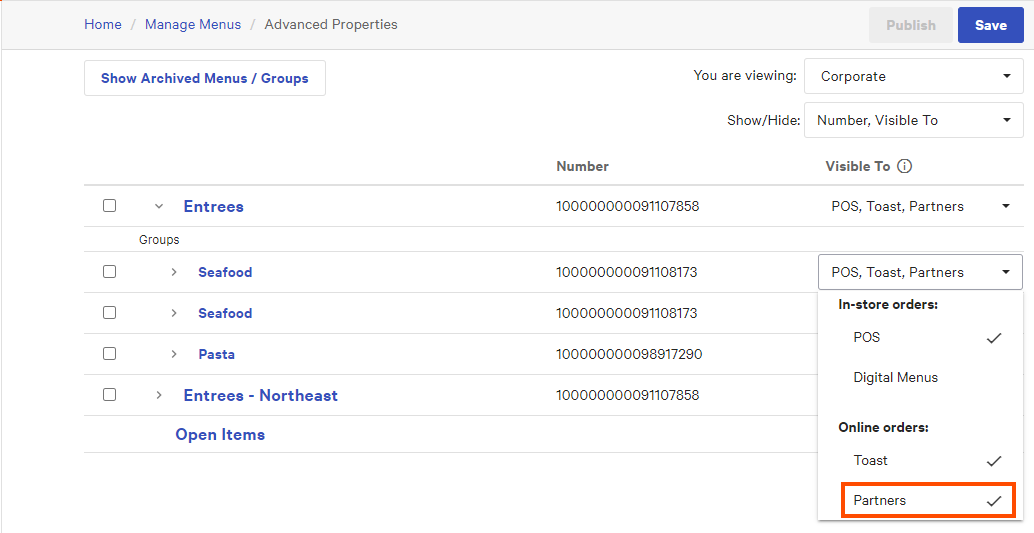
Select Online orders: Partners from the Visible to column for each menu group, menu item, modifier group, and modifier.
-
If the menu has multiple versions, select Online orders: Partners from the Visible to column for each version. For more information, see Ordering partner visibility settings and versioned menus.
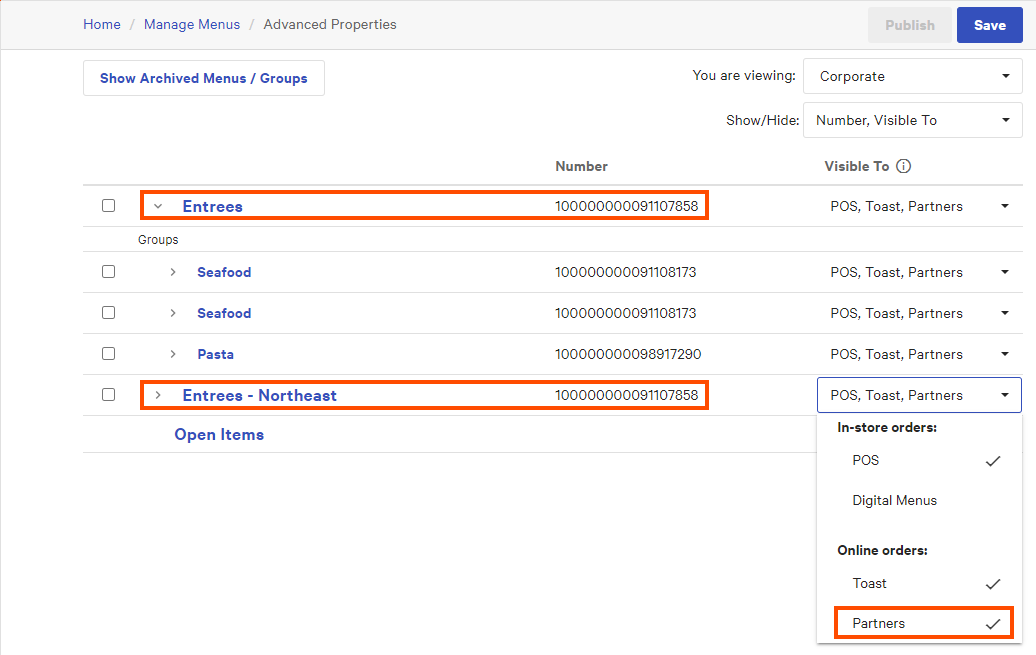
Also for each additional version, expand the version and ensure that the Online orders: Partners setting is enabled for each menu group, menu item, modifier group, and modifier.
-
Select Save.
-
Choose Toast account > Publishing > Publish config to view the Publish config page.
-
From the You are viewing menu, select the locations you want to view. For more information, see Filtering pages.
The locations you have selected to view are shown in the table at the top. If a location has outstanding changes that need publishing, a Publish button appears in the location's row. If the location is up to date, it is marked as “Published”.
-
Do one of the following:
-
To publish changes for a single location, click the location's Publish button.
-
To publish changes for multiple locations, select each location's check box and click Publish Selected Restaurants.
-
The multi-location module allows you to create multiple versions of a menu and target those versions at specific locations. If you have a menu with multiple versions:
-
The ordering partner-specific visibility settings (DoorDash, Grubhub, and Uber Eats) you set apply to all versions of the menu. If you edit the ordering partner-specific visibility settings for one version, it is updated for all versions.
-
Unlike the partner-specific visibility settings, which apply to all versions of a menu, the Online ordering partners setting can be set differently across versions, making it possible to enable the Online ordering partners setting for some of the menu's versions and disable it for other versions.
If the Online ordering partners setting is disabled for a version of a menu, that version is not visible to any online ordering partners at any locations. The other menu versions that have Online ordering partners enabled are visible to ordering partners at the locations you specified for each partner.
If this situation occurs, Toast Web displays a warning. To keep the menu versions in sync with each other and remove the warning, view each version of the menu and enable its Online ordering partners setting.
For more information on versions, see Versions.
Complementary visibility settings exist on the Third party ordering page that let you specify the menus that are visible to a specific third-party online ordering partner. These settings only apply for the restaurant you are currently logged into.
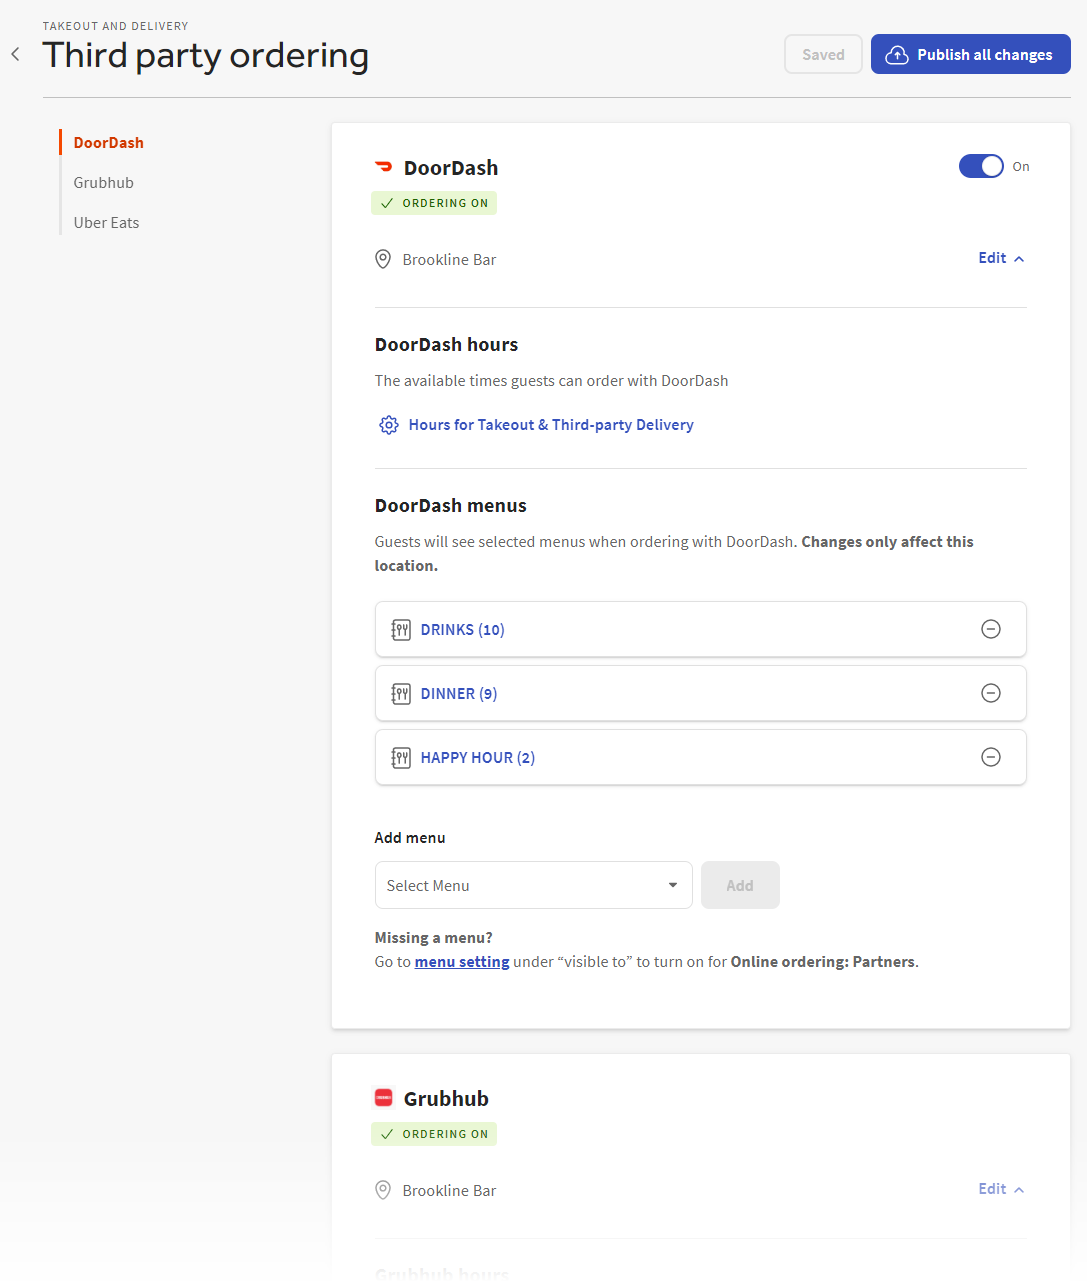
Before you can add a menu on the Third party ordering page, you must first enable its online ordering partner visibility, using one of the three procedures below. Single location restaurants can use any of the three procedures. Multi-location restaurants can use either the second or third procedures.
To enable online ordering partner visibility in the menu manager
-
In Toast Web, select Menus > Menu manager.
-
Select the menu you want to edit to open its side panel.
-
Scroll to the Channel visibility section in the side panel.
-
Select Online ordering partners.
-
Select Save.
Note
After you select Save, the menu is available for use on the Third party ordering page. That said, the menu visibility settings you have selected do not take effect until after you publish. Be sure to publish when you are ready for online ordering partners to see the menu.
To enable online ordering partner visibility in the classic menu details page
-
In Toast Web, select Menus > Menu manager.
-
Select Full menu view, then select the menu you want to edit to see its side panel.
-
In the Menu details section of the side panel, select Advanced settings to open the menu's classic details page.
-
Scroll down to the Properties section.
-
In the Visible To settings, check the Online ordering partners setting.
-
Change your menu's settings, then select Save.
Note
After you select Save, the menu is available for use on the Third party ordering page. That said, the menu visibility settings you have selected do not take effect until after you publish. Be sure to publish when you are ready for online ordering partners to see the menu.
To enable online ordering partner visibility on the Advanced Properties page
-
In Toast Web, select Menus > Bulk management > Advanced properties. The Advanced Properties page opens.
-
If the Visible To column is not showing on the page, do the following:
-
Select the Show/Hide menu.
-
In the Properties section, select Visible To. The Visible To column is added to the page.
-
-
Locate the row for the menu you want to enable online ordering visibility for, then select its Visible To setting and choose Online orders > Partners.
-
Select Save.
Note
After you select Save, the menu is available for use on the Third party ordering page. That said, the menu visibility settings you have selected do not take effect until after you publish. Be sure to publish when you are ready for online ordering partners to see the menu.
If you enable or disable a menu's visibility on either the menu details page or on Third party ordering page, the other page is updated accordingly.
For more information on the Third party ordering page, see Adjusting menu visibility for a third-party online ordering channel.
Toast support recommends that you turn off the overall setting for a menu if that menu is not visible to any ordering partners at any locations.
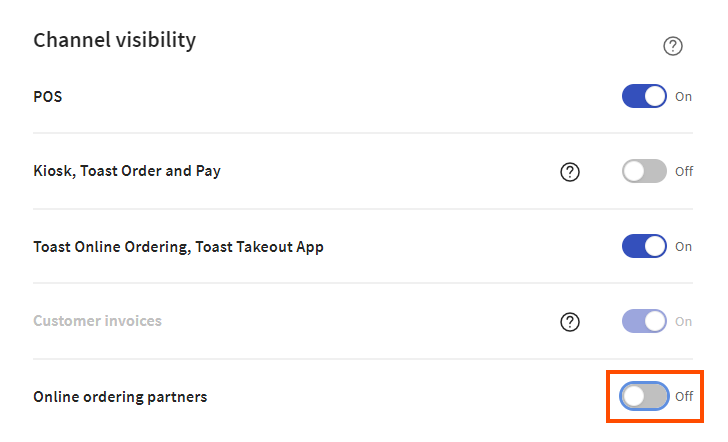
Toast support makes this recommendation because the classic menu details page and the Advanced Properties page, which are older, cannot display the visibility settings for individual online ordering partners. They can only show whether the overall Online ordering partners setting is on or off. If all the individual ordering partners are disabled but the overall Online ordering partners setting is enabled, it creates the appearance in the classic menu details page and on the Advanced Properties page that online ordering partner visibility is enabled when, in actuality, it is not.
Currently, the ordering partner-specific visibility settings are:
-
Limited to menus. They are not available for menu groups, menu items, modifier groups, or modifier item references.
-
Only available in the menu manager. They are not available in the classic menu details pages or from the Advanced Properties page.
Note
See Menu builder and the classic menu details pages for a comparison of the classic menu details pages and the menu manager.
