|
Note |
|
This feature is only available for Toast Flex devices. This feature is not available for Toast handhelds. |
To access your cash drawers on the Toast POS device, select the Toast logo until the Toast POS home screen appears. Choose Cash Management > Cash Drawers to open the Cash Drawers screen.
POS cash drawers actions are organized into the following categories:
-
During a shift: Making and completing cash entries, such as adding or removing cash, or opening a drawer to make change.
-
After a shift: Completing cash drawer actions when completing shift review.
Cash drawer actions completed during a shift include making cash entries and adjusting the starting cash drawer balance. These actions are only available for open or paused cash drawers.
Cash drawer actions that can be completed during a shift are organized into three categories:
-
Adding cash
-
Cash in
-
Cash collected
-
-
Removing cash
-
Cash out
-
Payout
-
Tip out
-
Cash drop
-
-
No sale
The Cash In action adds cash to an open or paused cash drawer. Employees can enter an optional comment for the cash entry.
To make a cash in entry
-
On the Cash Drawers screen, select the cash drawer. This opens the Cash drawer activity screen.
-
On the Cash drawer activity screen, select the Add cash button. This opens the Add cash screen.
-
On the Add cash screen, use the numerical keypad to enter the cash amount. To add a comment, select the + Add comment button. This opens a dialog where you can enter a comment.

-
Select the Done button to save your Cash In entry. The Cash In entry is recorded on the cash drawer activity pane with the optional comment. The Cash In entry is also recorded in the Reports > Cash and loss management > Cash activity audit report.
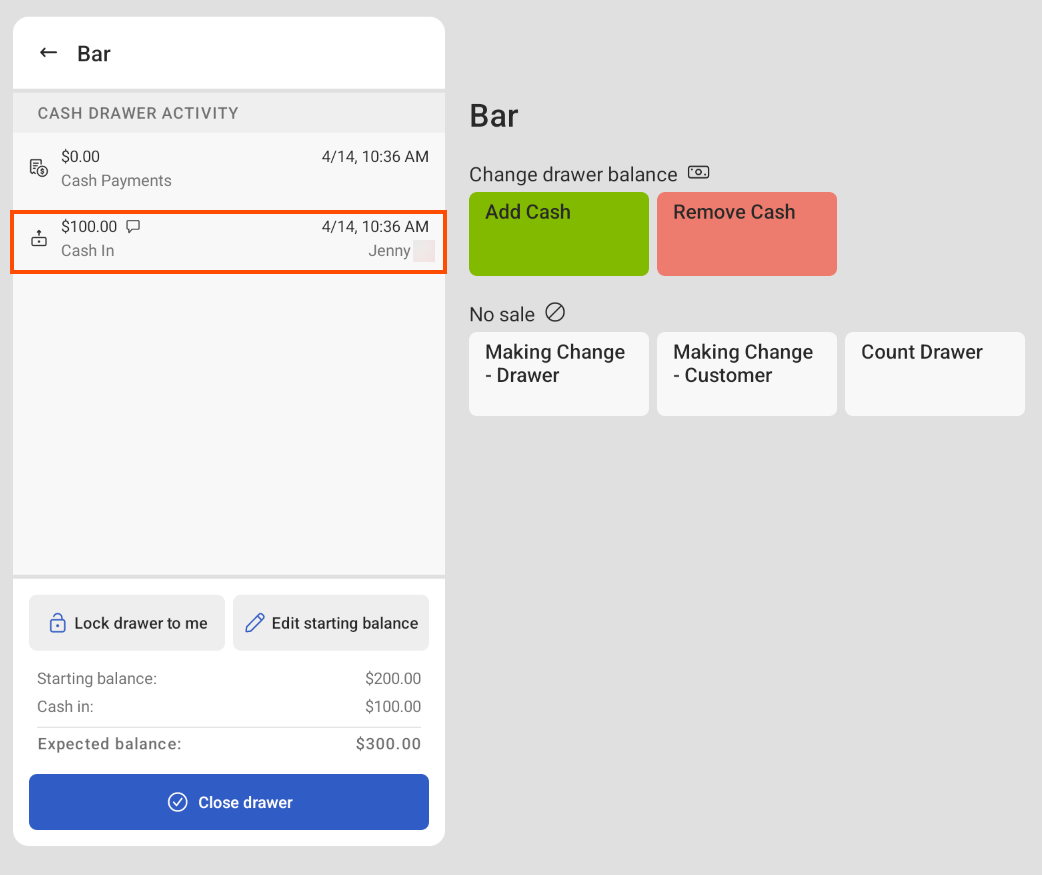
To review details of the Cash In entry, select the cash entry on the cash drawer activity pane. A dialog appears with details about the Cash In entry.
The Cash Collected action adds cash collected from an employee to an open or paused drawer. Employees can enter an optional comment for the cash entry.
To make a cash collected entry
-
On the Cash Drawers screen, select the cash drawer. This opens the Cash drawer activity screen.
-
On the Cash drawer activity screen, select the Add cash button. This opens the Add cash screen.
-
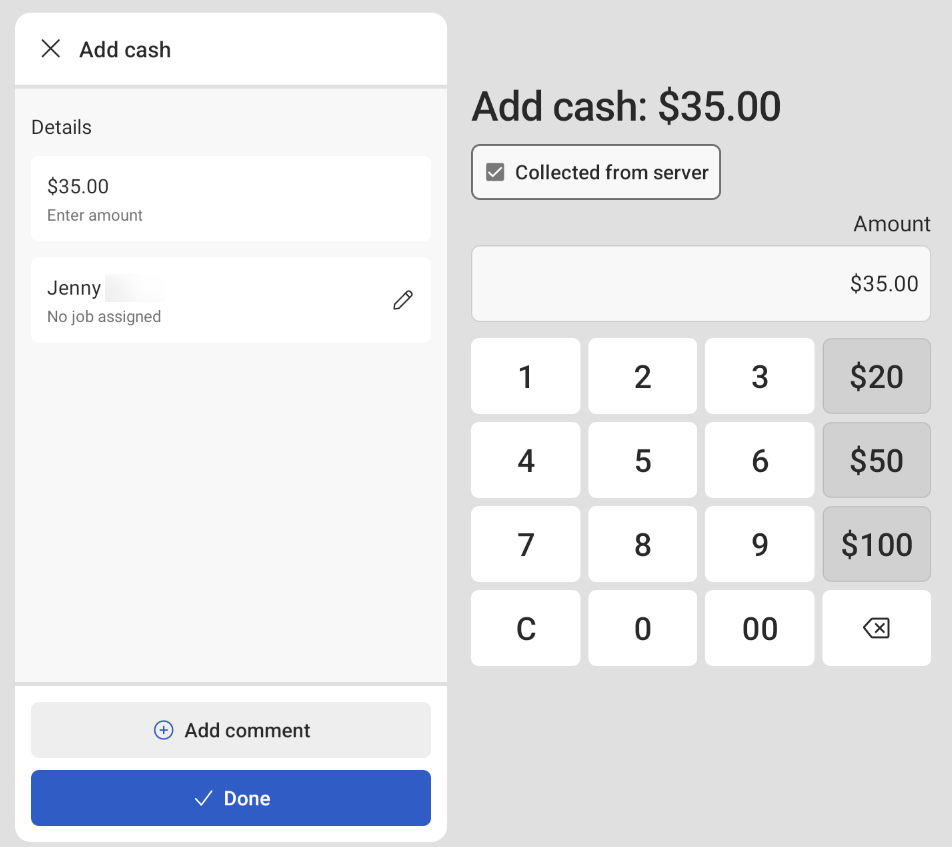
On the Add cash screen, select the Collected from server checkbox to open the Employees screen.
-
On the Employees screen, select the employee that you are collecting cash from. You can use the search field to search and find an employee.
-
Select the employee. This navigates you back to the Add cash screen.
-
On the Add cash screen, the employee name is listed below the Details heading on the cash drawer activity pane. Use the numerical keypad to enter the cash amount. To add a comment, select the + Add comment button. This opens a dialog where you can enter a comment.
-
Select the Done button to save your Cash Collected entry. The Cash Collected entry is recorded on the cash drawer activity pane with the optional comment. The Cash Collected entry is also recorded in the Reports > Cash and loss management > Cash activity audit report.
To review details of the Cash Collected entry, select the cash entry on the cash drawer activity pane. A dialog appears with details about the Cash Collected entry.
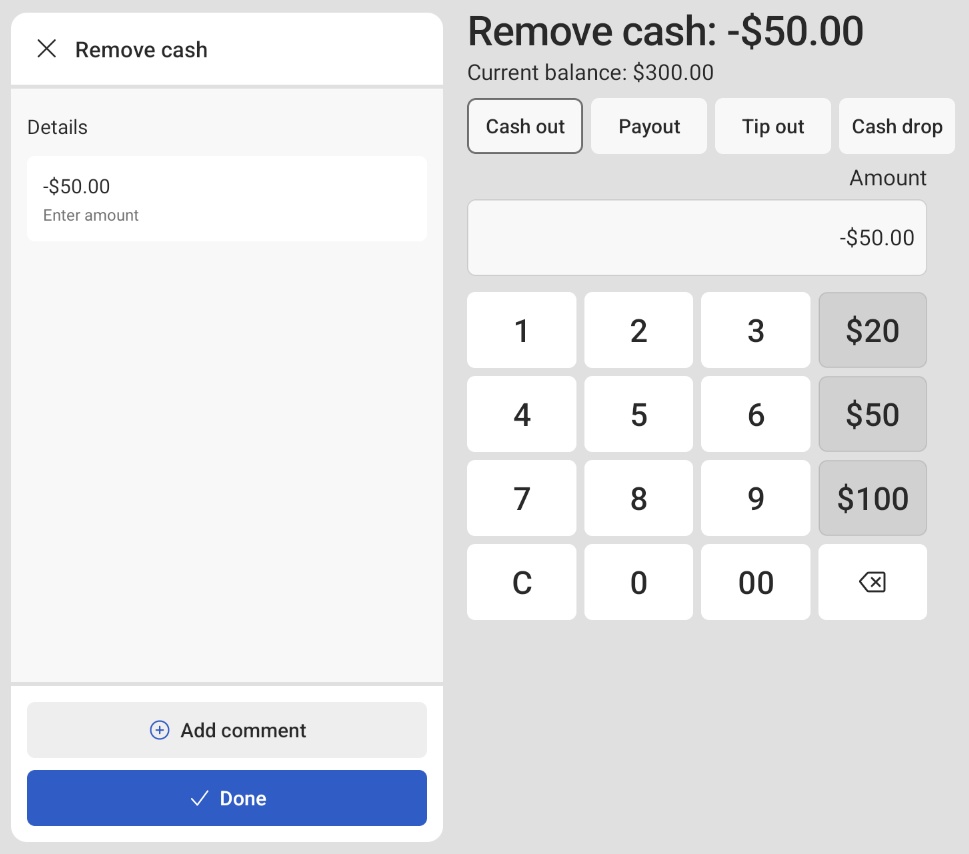
The Cash Out action removes cash from an open or paused cash drawer. The Cash Out amount cannot exceed the cash drawer's current balance. Employees can enter an optional comment for the cash entry.
To make a cash out entry
-
On the Cash Drawers screen, select the cash drawer. This opens the Cash drawer activity screen.
-
On the Cash drawer activity screen, select the Remove cash button. This opens the Remove cash screen.
-
The Remove cash screen displays the cash drawer’s current balance. Select the Cash out button.
-
Use the numerical keypad to enter the cash amount. To add a comment, select the + Add comment button. This opens a dialog where you can enter a comment.
-
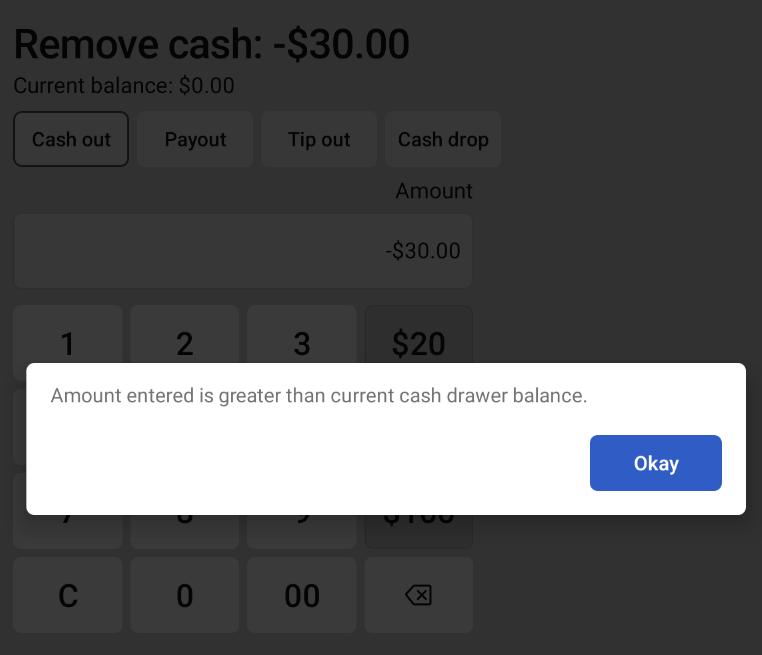
Select the Done button. If the Cash out amount is greater than the cash balance, a dialog appears noting that the amount entered is greater than the cash drawer balance.
-
Select the Okay button to close out of the dialog.
-
Select the Done button to save your Cash Out entry. The Cash Out entry is recorded on the cash drawer activity pane with the optional comment. The Cash Out entry is also recorded in the Reports > Cash and loss management > Cash activity audit report.
To review details of the Cash Out entry, select the cash entry on the cash drawer activity pane. A dialog appears with details about the Cash Out entry.
The Payout action removes cash from an open or paused cash drawer to pay for goods or services. The payout amount cannot exceed the cash drawer's current balance. Employees can enter an optional comment for the cash entry. There are two options to complete a payout:
-
Cash drawer: You can complete a payout from an open or paused cash drawer.
-
Toast POS: You can complete a payout from the Pay out screen on a Toast POS device. On the Toast POS home screen, choose Cash Management, and then select Pay out. Paying out from the Pay out screen allows you to make payouts from any cash drawer that you have permissions for.
To make a payout entry from a cash drawer
-
On the Cash Drawers screen, select the cash drawer. This opens the Cash drawer activity screen.
-
On the Cash drawer activity screen, select the Remove cash button. This opens the Remove cash screen.
-
The Remove cash screen displays the cash drawer’s current balance. Select the Payout button. This opens the Payout screen.
-
On the Payout screen, select a payout reason. For information on how to configure payout reasons, see this Toast Support article.
-
This navigates you back to the Remove cash screen. On the Remove cash screen, the payout reason is listed below the Details heading on the cash drawer activity pane. Use the numerical keypad to enter the cash amount. To add a comment, select the + Add comment button. This opens a dialog where you can enter a comment.

-
Select the Done button to save your Payout entry. The Payout entry is recorded on the cash drawer activity pane with the optional comment. The Payout entry is also recorded in the Reports > Cash and loss management > Cash activity audit report.
To review details of the Payout entry, select the cash entry on the cash drawer activity pane. A dialog appears with details about the Payout entry.
To make a payout entry from the Pay out screen
-
On the Toast POS device, select the Toast logo in the top corner until the Toast POS home screen appears.
-
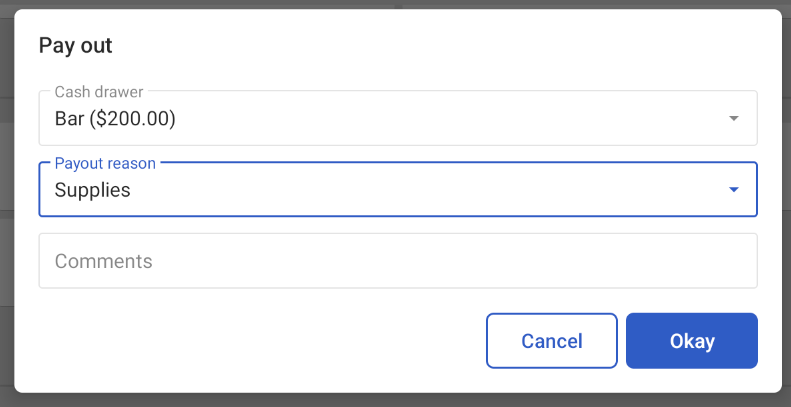
Choose Cash Management > Pay Out to open the Pay out dialog.
-
In the Pay out dialog, complete the following:
-
Select a cash drawer from the Cash drawer dropdown menu.
-
Select a payout reason from the Payout reason dropdown menu.
-
Enter an optional comment for the payout.
-
-
Select the Okay button. This opens the New cash entry dialog.
-
Use the numerical keypad to enter the cash amount.
-
Select the Done button to complete the payout. The Payout entry is recorded on the cash drawer activity pane with the optional comment.
The Payout entry is also recorded in the Reports > Cash and loss management > Cash activity audit report.
A Pay Out slip is also printed with the name of the employee who made the payout with the following information:
-
Comment (optional): The comment entered by the employee.
-
Cash Drawer: The name of the cash drawer the cash was removed from.
-
Current Cash Balance: The cash drawer balance before the payout was completed.
-
Paid Out: The amount of cash removed from the cash drawer.
-
New Cash Balance: The new balance of the cash drawer after the payout. This dollar amount should be the same as the Expected balance in the cash drawer activity pane.
-
|
Note |
|
Avoid using the Tip Out action on the Cash Drawers screen if employees must complete shift review. Tip outs made on the Cash Drawers screen can lead to incorrect tip out amounts in shift review. |
The Tip Out action removes cash from an open or paused cash drawer to distribute tips or gratuities to employees. The tip out amount cannot exceed the cash drawer's current balance. Employees can enter an optional comment for the cash entry.
To make a tip out entry
-
On the Cash Drawers screen, select the cash drawer. This opens the Cash drawer activity screen.
-
On the Cash drawer activity screen, select the Remove cash button. This opens the Remove cash screen.
-
The Remove cash screen displays the cash drawer’s current balance. Select the Tip out button. This opens the Employees screen.
-
On the Employees screen, search for an employee or select an employee from the list.
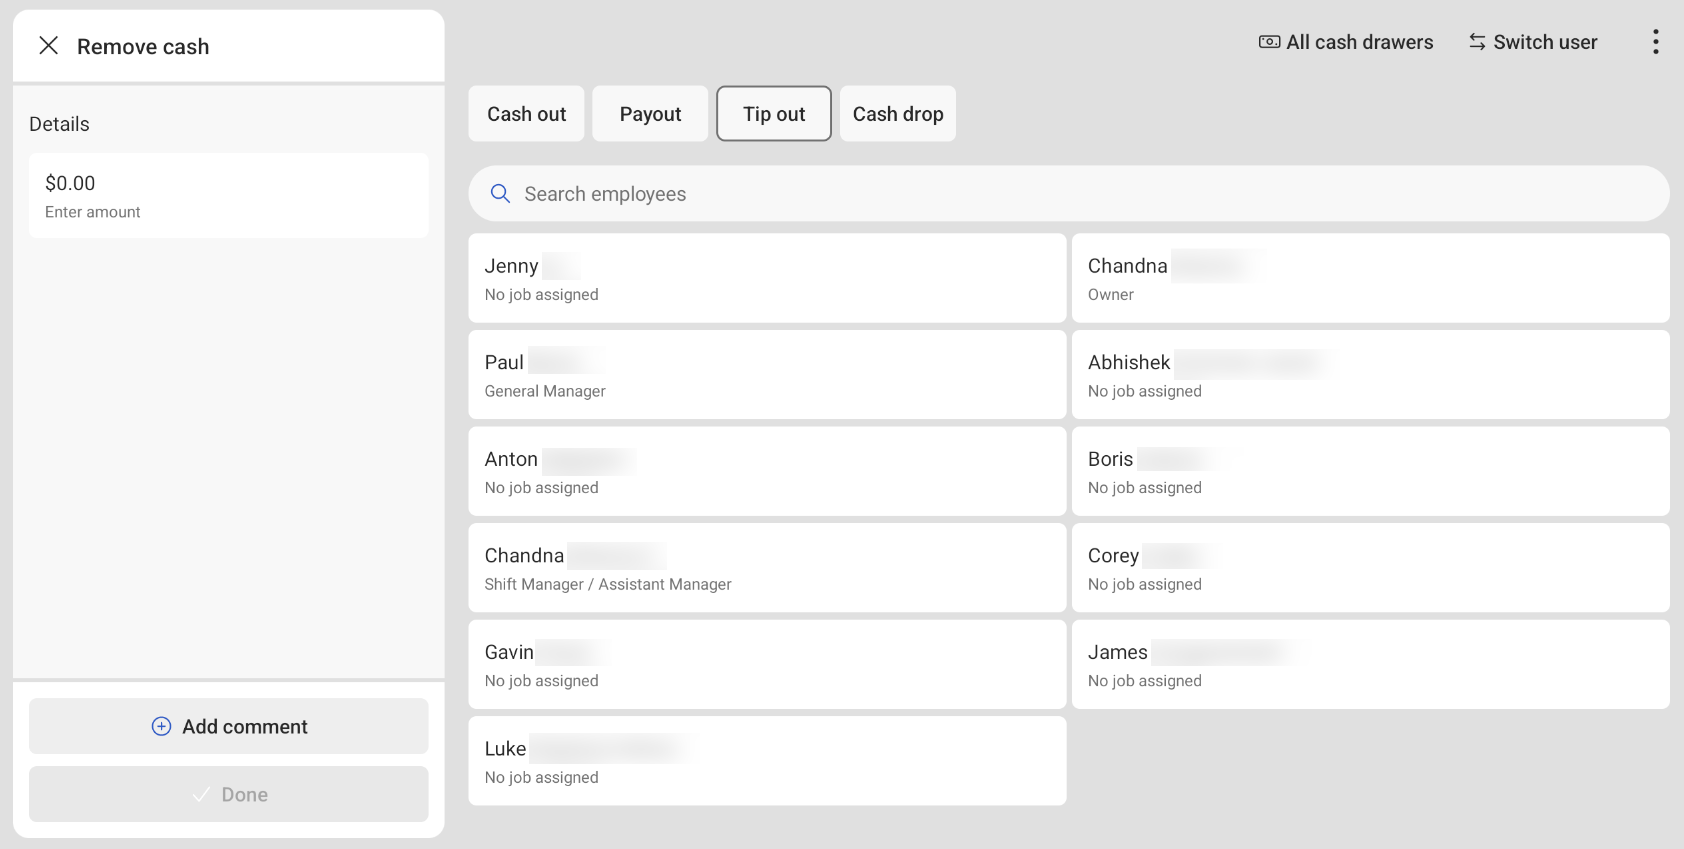
This navigates you back to the Remove cash screen. On the Remove cash screen, the employee name is listed below the Details heading on the cash drawer activity pane.
To change the employee, select the pencil icon to open the Employees screen.
-
Use the numerical keypad to enter the cash amount. To add a comment, select the + Add comment button. This opens a dialog where you can enter a comment.
-
Select the Done button to save your Tip out entry. The Tip out entry is recorded on the cash drawer activity pane with the optional comment. The Tip Out entry is also recorded in the Reports > Cash and loss management > Cash activity audit report.
To review details of the Tip Out entry, select the cash entry on the cash drawer activity pane. A dialog appears with details about the Tip Out entry.
The Cash drop action removes cash from an open or paused cash drawer to transfer money from one location to another for safekeeping, or if you want to reduce the amount of cash in a cash drawer. For example, you can use the Cash drop action if you need to move money from one safe to another in the store. The cash drop amount cannot exceed the cash drawer's current balance. Employees can enter an optional comment for the cash entry.
To make a cash drop entry
-
On the Cash Drawers screen, select the cash drawer. This opens the Cash drawer activity screen.
-
On the Cash drawer activity screen, select the Remove cash button. This opens the Remove cash screen.
-
The Remove cash screen displays the cash drawer’s current balance. Select the Cash drop button.
-
Use the numerical keypad to enter the cash amount. To add a comment, select the + Add comment button. This opens a dialog where you can enter a comment.
-
Select the Done button to save your Cash drop entry. The Cash drop entry is recorded on the cash drawer activity pane with the optional comment. The Cash drop entry is also recorded in the Reports > Cash and loss management > Cash activity audit report.
To review details of the Cash drop entry, select the cash entry on the cash drawer activity pane. A dialog appears with details about the Cash drop entry.
A Cash drop slip is also printed with the name of the employee who made the Cash drop with the following information:
-
From: The name of the cash drawer the money was removed from.
-
To: The location that the money was transferred to.
-
By: The name of the employee who made the cash drop.
-
Current Cash Balance: The cash drawer balance before the cash drop was completed.
-
Cash Amount Dropped: The amount of cash removed from the cash drawer.
-
New Cash Balance: The new balance of the cash drawer after the cash drop. This dollar amount should be the same as the Expected balance in the cash drawer activity pane.
-
Employee Signature: A signature line for the employee who made the cash drop.
-
Manager Signature: A signature line for the manager.
-
The No sale action opens an open or paused cash drawer without changing the cash balance. For example, an employee can make a No Sale entry to make change for a guest, or to count the cash in the cash drawer. You can select from previously configured no sale reasons or choose to configure a new no sale reason.
To make a no sale entry
-
On the Cash Drawers screen, select the cash drawer. This opens the Cash drawer activity screen.
-
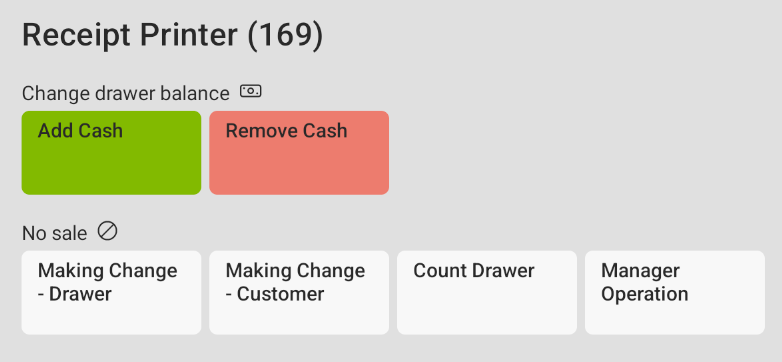
On the Cash drawer activity screen, select your No Sale reason button. This opens the Remove cash screen.
-
A No sale entry is recorded on the cash drawer activity pane. The No sale entry is also recorded in the Reports > Cash and loss management > Cash activity audit report.
To review details of the No Sale entry, select the cash entry on the cash drawer activity pane. A dialog appears with details about the No Sale entry.
You can configure no sale reasons in Toast Web.
To configure a no sale reason
-
Choose Finance > Related > Settings > No sale reasons to open the No sale reasons page. You can also configure no sale reasons from Finance > Related > Settings > Cash overview > Cash drawers > Payout and no sale reasons page.
-
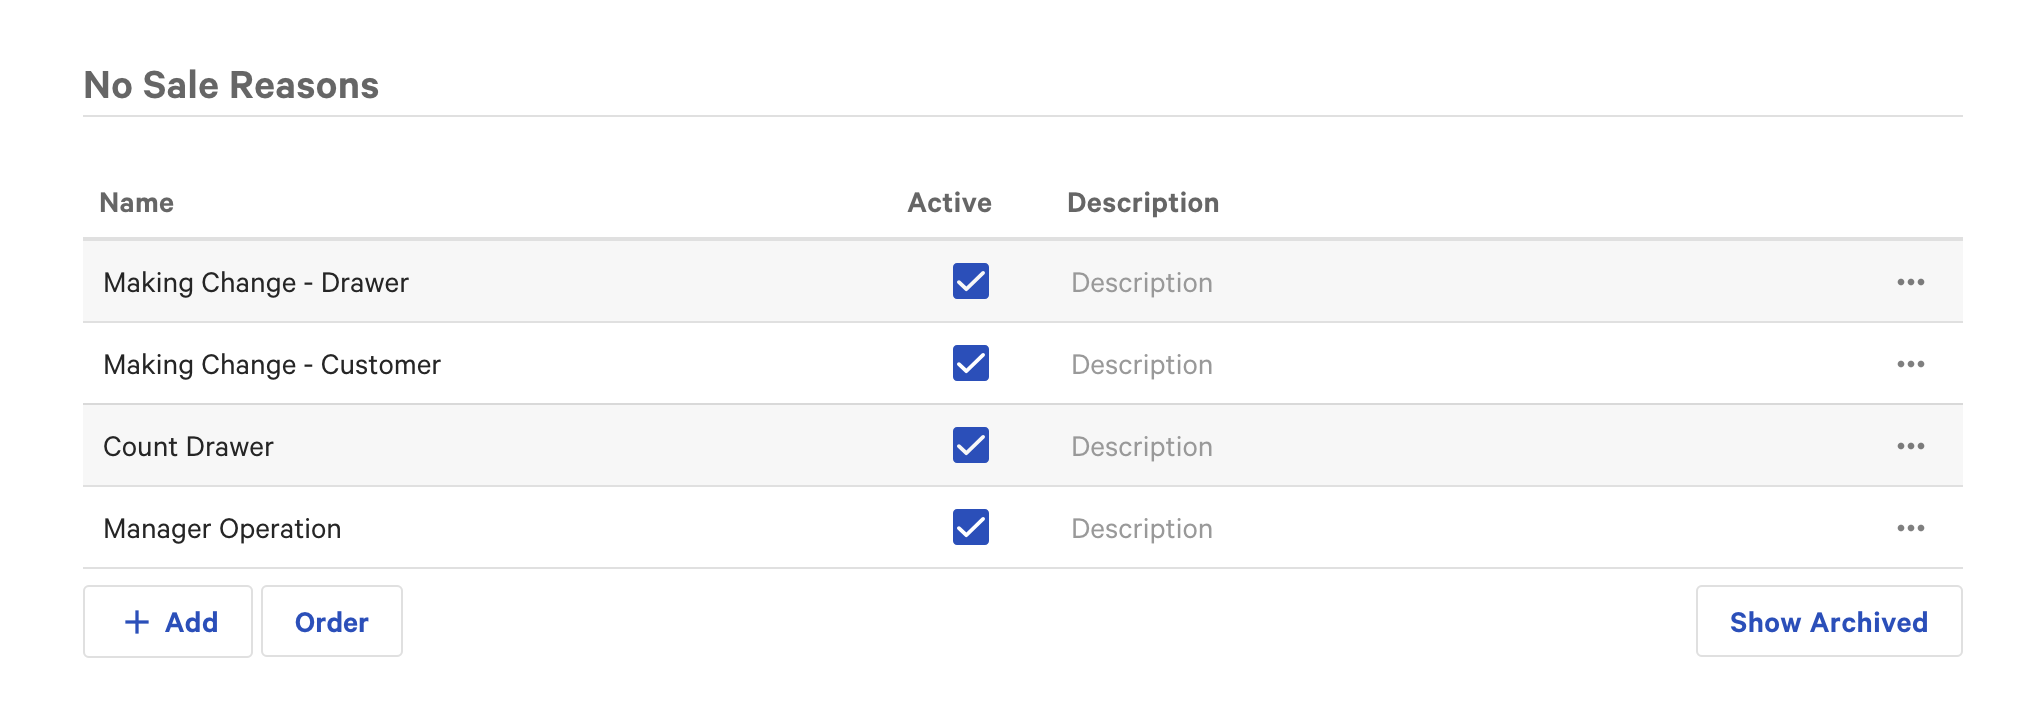
Select the + Add button to add another row to the No Sale Reasons table. Complete the following:
-
Name: Enter a name that is descriptive of the purpose of the No Sale entry, such as Make Change or Count Cash. The name is included in the Reports > Cash and loss management > Cash activity audit report and also in the Reports > Cash and loss management > No sale report.
-
Active: Select this checkbox if the no sale reason should be active. Only active reasons are listed on the Cash drawer activity screen.
-
Description (optional): Enter a description for the no sale reason. The description is not entered in the Reports > Cash and loss management > Cash activity audit report or in the Reports > Cash and loss management > No sale report. The description is intended to provide more information for anyone making changes on this page.
-
-
Select the Save button. The new no sale reason appears on the No Sale Reasons table on the Cash drawer activity screen.
Certain cash drawer actions can be completed during shift review, such as closing a cash drawer, opening a new drawer, reopening a closed drawer, or adjusting a cash drawer’s starting balance.
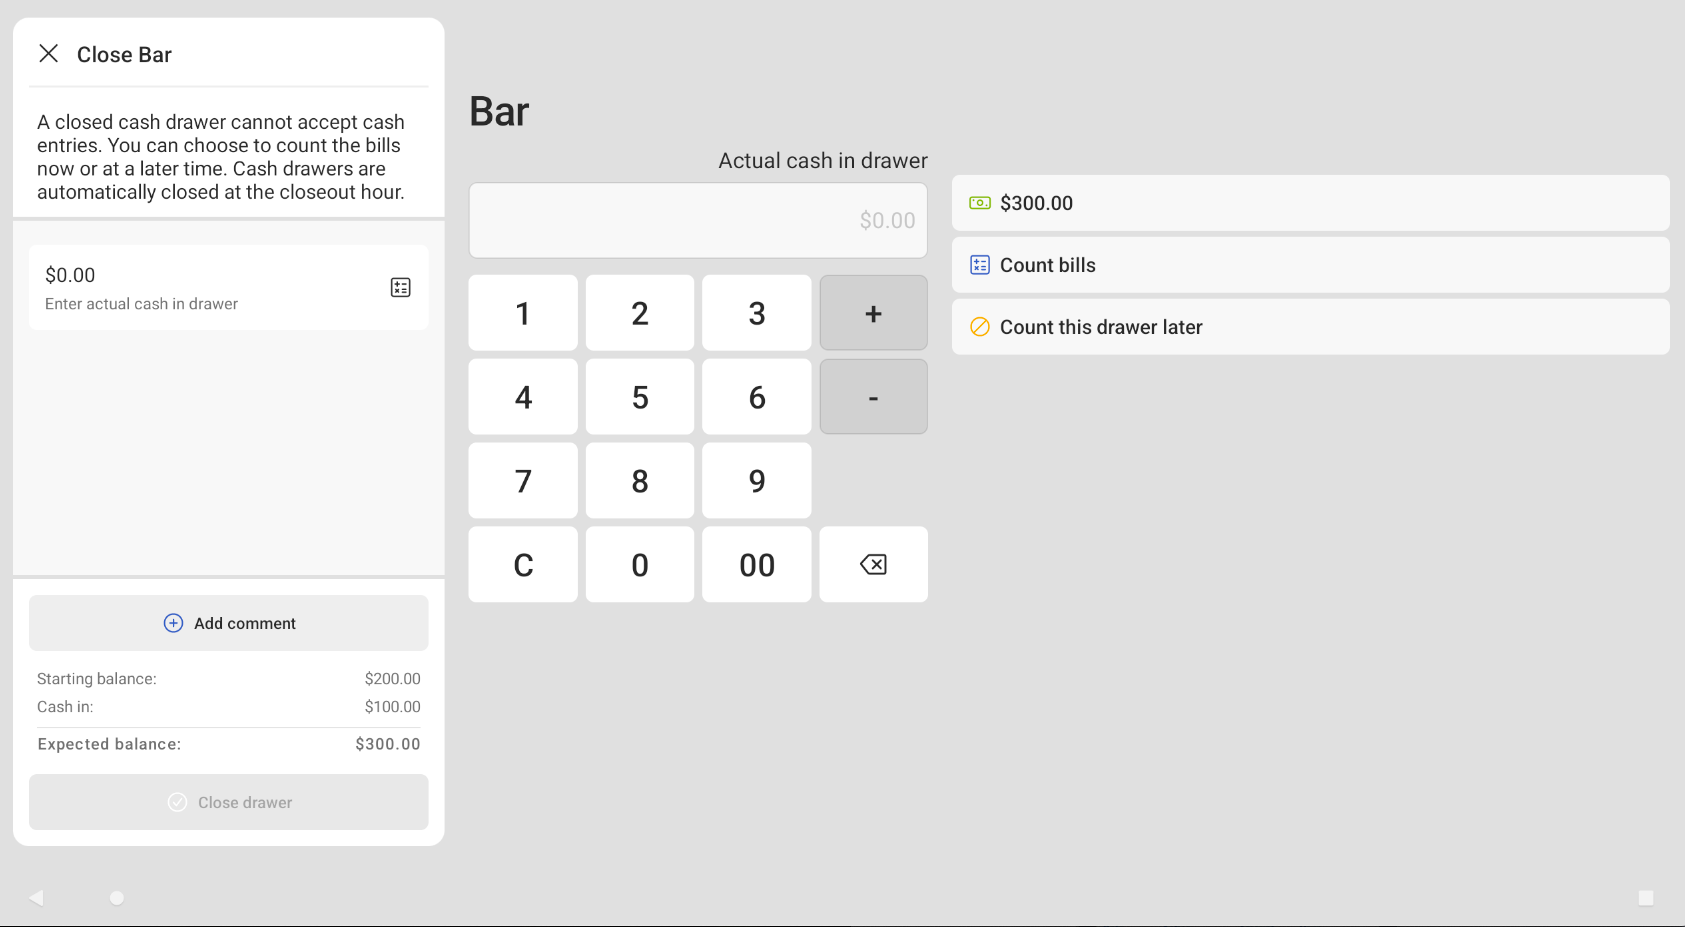
The Close action closes an open or paused cash drawer. To close a cash drawer, you must count the bills and coins in the drawer and enter the amount into the Toast platform. If you choose to count the cash later, this pauses the open cash drawer and opens a new cash drawer. A paused drawer cannot accept cash payments, but you can complete cash entries, such as adding or removing cash.
To close an open cash drawer
-
On the Cash Drawers screen, go to the Open tab and select the cash drawer. This opens the Cash drawer activity screen.
-
On the Cash drawer activity screen, select the Close drawer button. This opens the Close [cash drawer name] screen. The Close [cash drawer name] screen displays the following information:
-
The starting balance of the cash drawer
-
Cash entries (if applicable)
-
The expected balance of the cash drawer
-
-
Choose from the following actions to close an open cash drawer:
-
Select the pre-calculated cash balance amount to enter into the Toast platform.
-
This populates the pre-calculated amount into the Actual cash in drawer field in the cash drawer activity pane.
-
(Optional) Select the + Add comment button to add a comment.
-
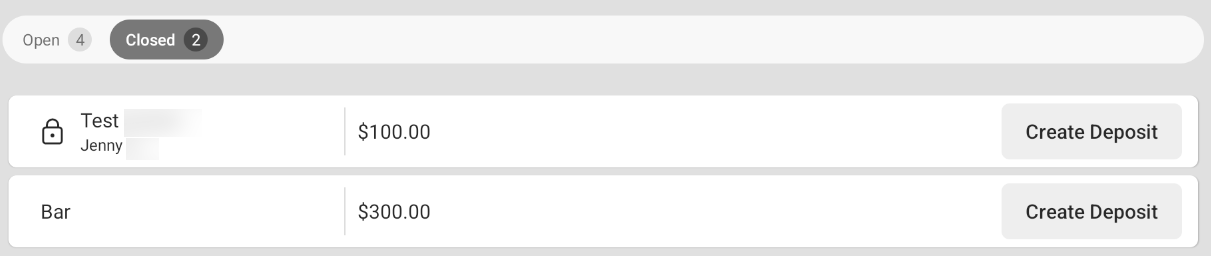
Select the Close drawer button to close the drawer. A CLOSED [TIME] label appears at the top of the screen. The closed drawer now appears under the Closed tab on the Cash drawers screen.
You can now choose to create a deposit for the cash in the cash drawer. For more information, see Cash deposits.
-
-
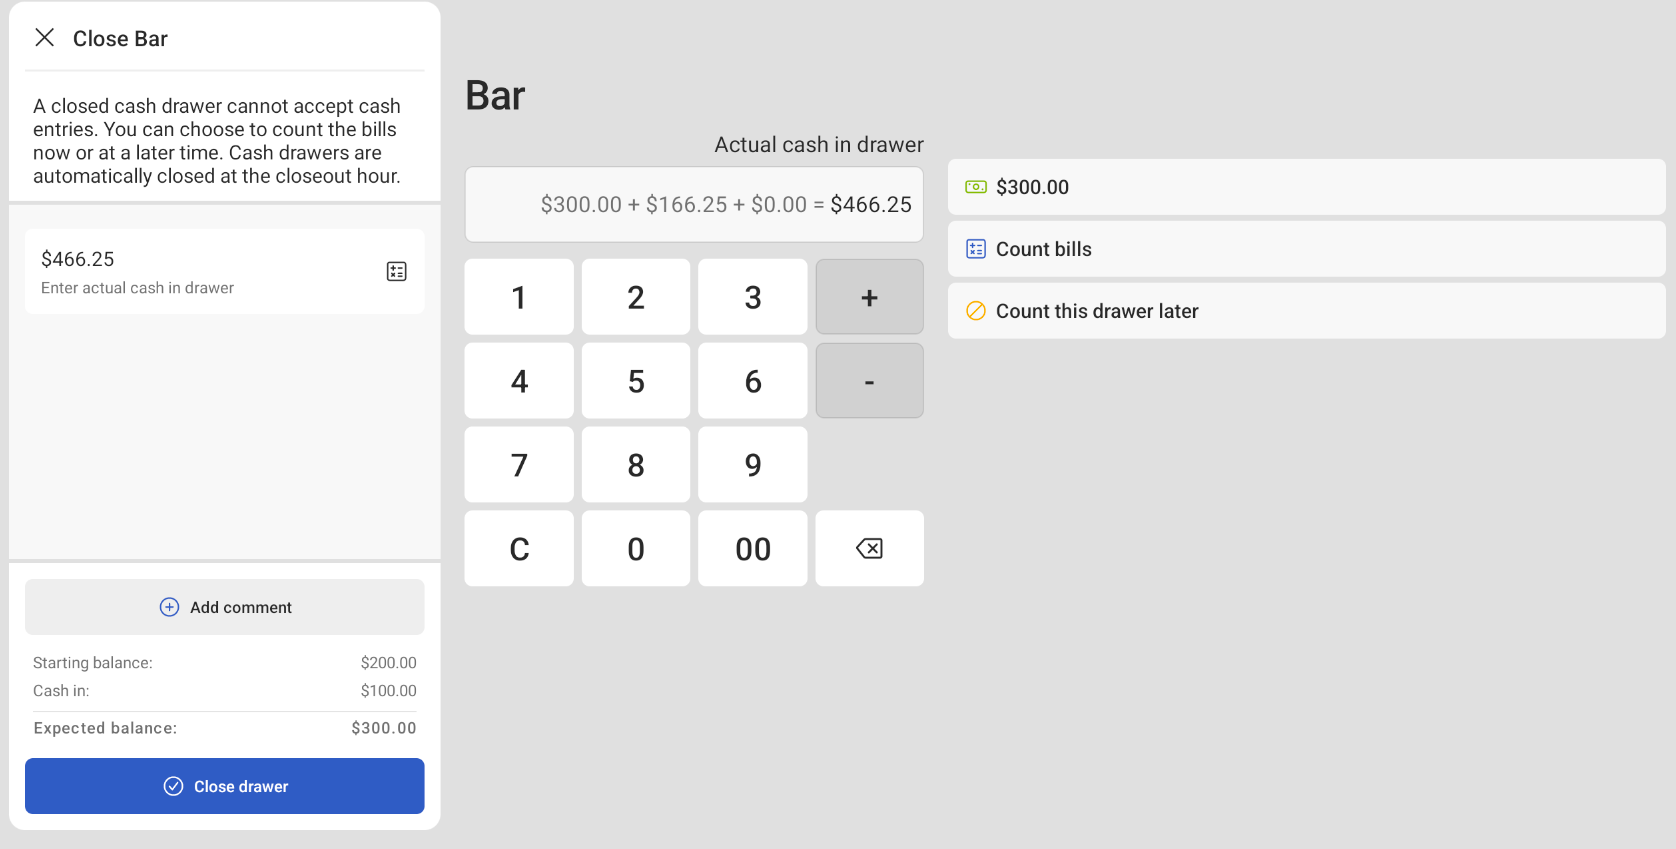
Select the Count bills button to manually count the bills and coins in the cash drawer and enter it into the Toast platform.
-
This opens the Count bills screen. On the Count bills screen, use the bill and coin calculator to count the amount of cash collected.
-
Select the Done counting button to finish counting. This navigates you back to the Close [cash drawer name] screen. The bill and coin count is shown in the Actual cash in drawer field in the cash drawer activity pane.
-
(Optional) Select the + Add comment button to add a comment.
-
Select the Close drawer button to close the drawer. A CLOSED [TIME] label appears at the top of the screen. The closed drawer now appears under the Closed tab on the Cash drawers screen.
-
-
To close a paused cash drawer
-
On the Cash Drawers screen, go to the Paused heading under the Open tab and select the cash drawer. This opens the Cash drawer activity screen.
-
On the Cash drawer activity screen, select the Close drawer button.
-
Complete the close drawer workflow. For more information, see the section on how to close an open cash drawer.
You can add an optional comment when closing a cash drawer. You can choose to enter a custom comment or a comment will be entered on the cash drawer activity pane depending if there was a variance with the closeout amount and the expected amount. For more information, see Managing cash drawer variance.
If no comment is provided, the following default comments are entered depending on if there was a cash drawer variance:
-
Closeout Overages: "Close out balance is over"
-
Closeout Shortages: "Close out balance is short"
-
Closeout Exact: "Close out balance matches expected balance"
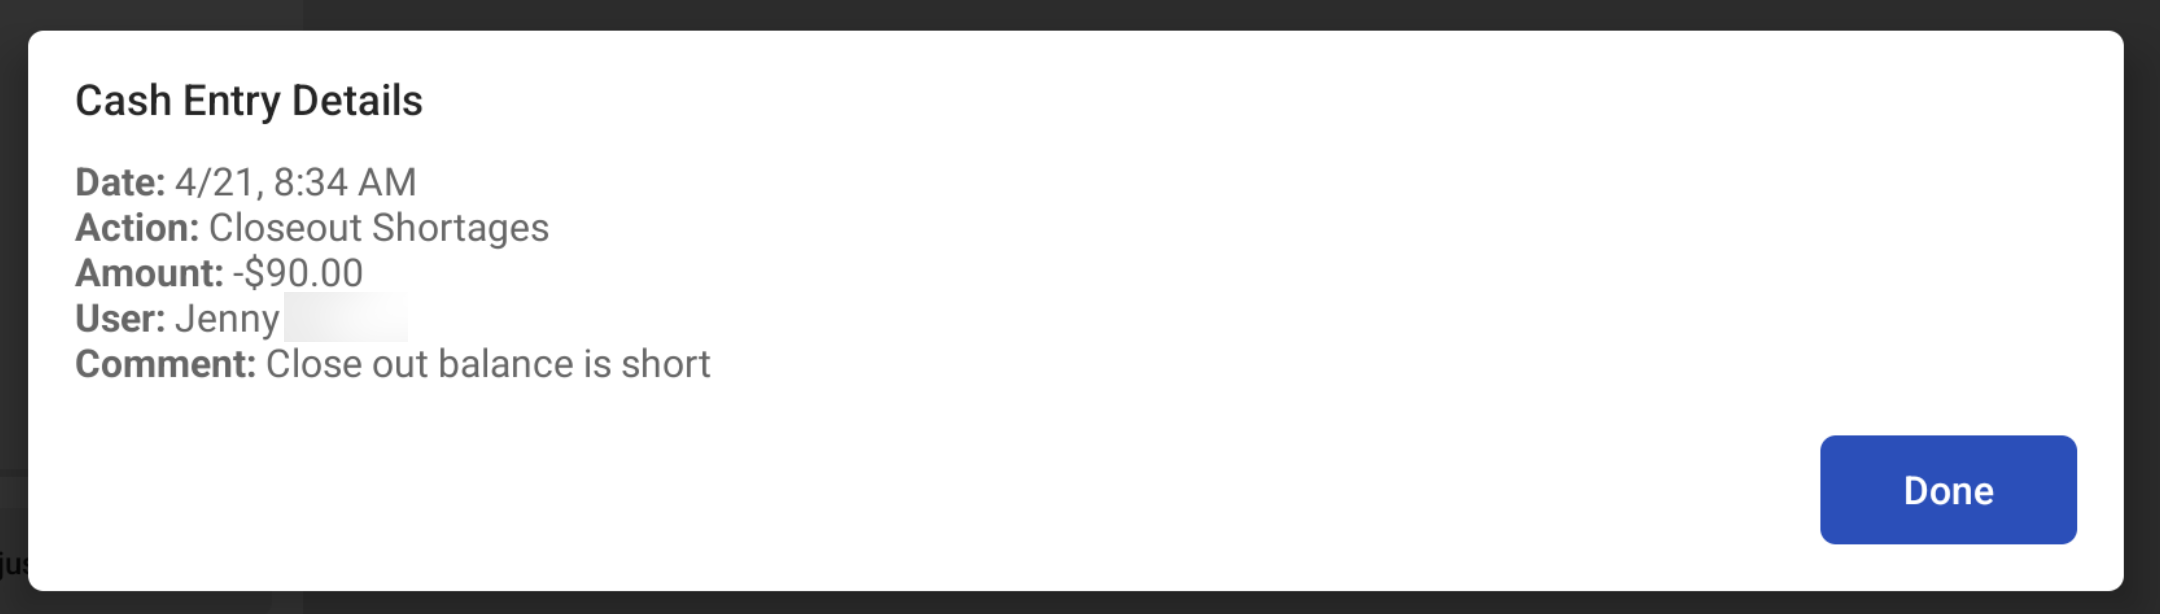
Closeout comments are recorded in the Reports > Cash loss and management > Cash activity audit report.

Opening a new cash drawer replaces a current open cash drawer with a new active drawer. This action is typically done at the end of a shift to start a new drawer for the next shift. The new open drawer keeps the name of the previous open drawer and its starting cash balance. The name of the new drawer follows this naming convention: Drawer (2). The number after the drawer name increases with each drawer replacement.
A new cash drawer is opened if you choose to count the cash drawer’s cash later. The new cash drawer appears under the Open tab on the Cash Drawers screen.
When the new active drawer is created, it must have a starting balance. There are two options to set the starting balance:
-
Manual: You manually enter the starting balance for each new open drawer.
-
Automatic: Toast automatically uses the amount in the Starting Cash Drawer Balance field when a new drawer is created.
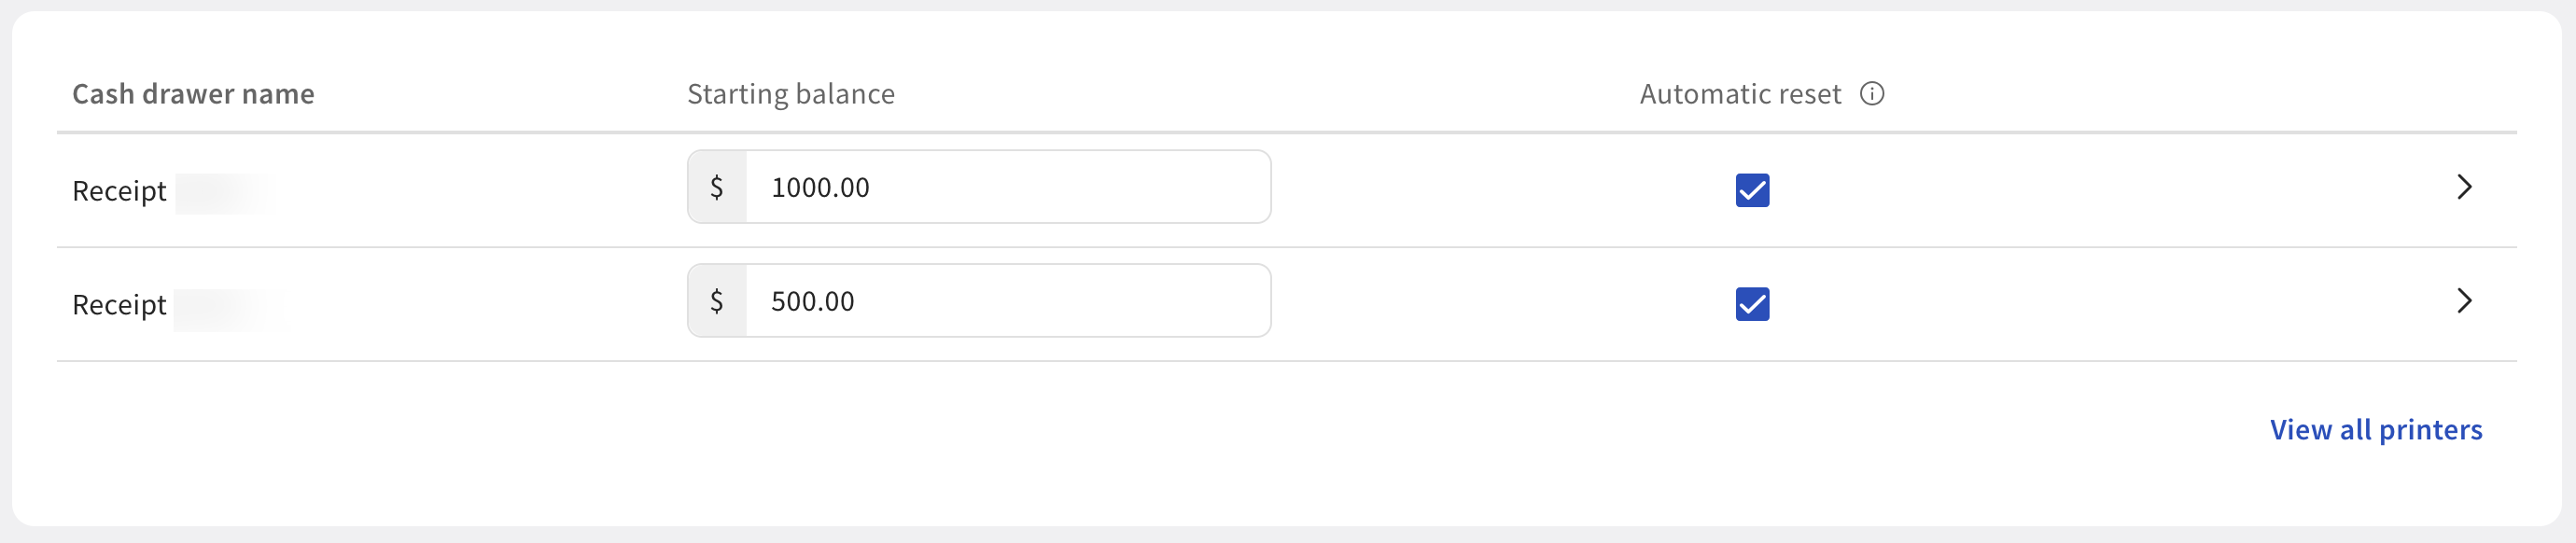
To view and set the starting balance or reset balance type for individual cash drawers, choose Finance > Related > Settings > Cash overview > Cash drawers > View cash drawers to open the Cash drawers page. Select the arrow next to the cash drawer and go to the Primary cash drawer section to configure your cash balance settings.
To configure a new starting balance for all cash drawers
-
Choose Finance > Related > Settings > Cash overview > Cash drawers > View cash drawers to open the Cash drawers page.
-
On the Cash drawers page, you can choose to change the starting balance and choose to either automatically start all new open drawers with the same starting balance. Select the checkbox under the Automatic reset column to automatically set the starting balance for each new open drawer. Clear the checkbox to manually set the starting balance for each new open drawer.
-
Automatic: All new drawers are set with the starting balance. Drawers are automatically closed at the closeout hour (4 AM). Toast support recommends you choose this setting.
-
Manual: You are prompted to enter a starting balance for all new drawers. Drawers are not automatically closed at the closeout hour.
-
-
Select the Publish all changes button to publish your changes.
The Reopen action reopens a closed cash drawer. When you adjust the closing balance of a closed drawer, this reopens the cash drawer and moves it from under the Closed tab to under the Paused heading on the Cash Drawers screen.
To reopen a closed drawer
-
On the Cash Drawers screen, go to the Closed tab and select the closed cash drawer to open the Cash drawer activity screen.
-
On the Cash drawer activity screen, select the Adjust closing entries button. This refreshes the screen and reopens the cash drawer and moves it under the Paused heading on the Cash drawers screen.
|
Note |
|
You must have the Manager > 3.21 Adjust Cash Drawer Start Balance permission to adjust the starting balance for a cash drawer. |
The starting balance is the initial amount of cash placed into a cash drawer at the beginning of a shift or day. You can adjust the starting balance for an open or paused cash drawer. For example, you need to adjust the starting balance because you accidentally put in a different amount of cash in the physical cash drawer than what is configured in Toast Web.
|
Note |
|
You can only adjust the starting balance for today's cash drawers. You cannot adjust the starting balance for cash drawers in the past. |
To adjust the starting balance of a cash drawer
-
On the Cash Drawers screen, select an open or paused cash drawer to open the Cash drawer activity screen.
-
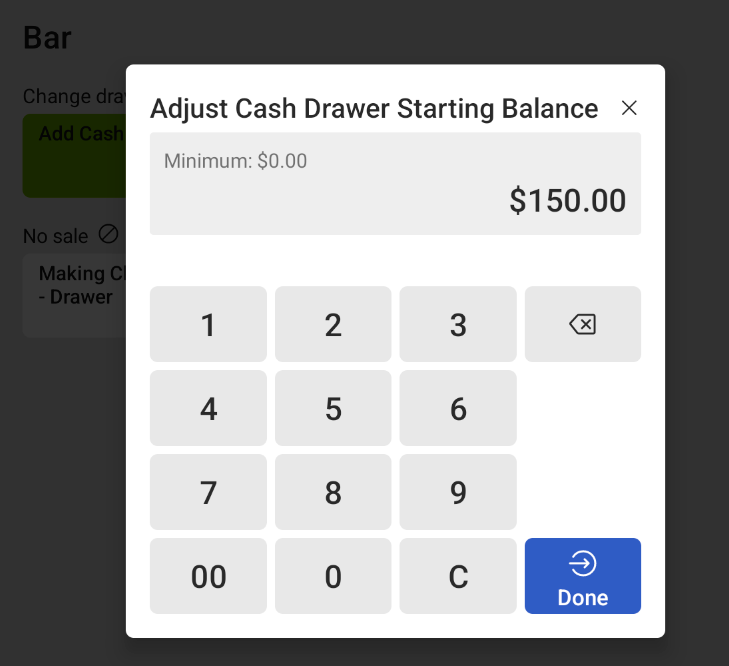
Select the Edit starting balance button to open the Adjust cash drawer starting balance dialog.
-
In the Adjust cash drawer starting balance dialog, use the numerical keypad to enter a positive amount. The minimum amount is $0.00.
-
Select the Done button to save your changes. The new starting balance is displayed on the cash drawer activity pane. The new starting balance entry is recorded in the Reports > Cash and loss management > Cash drawer history report.
