|
Important |
|
This content will be deprecated. For the latest information about cash drawers, see Cash drawers. |
Cash management is an umbrella term that describes the many workflows and features that you can use to manage your cash transactions, report cash tips, and close out your day.
Cash drawers are physically attached to printers. When restaurant employees perform actions that require cash transactions, the Toast platform opens the cash drawer.
You can optionally configure names for cash drawers, so that the printer and the cash drawer will each have a distinct name. If you do not configure a cash drawer name, the printer name is used as the name of the cash drawer.
Note these two scenarios:
-
If the printer has two cash drawers, you configure one cash drawer name (such as Bar Drawer) and the Primary and Secondary suffixes are automatically added to the names of each cash drawer (such as Bar Drawer - Primary for the primary cash drawer and Bar Drawer - Secondary for the secondary cash drawer).
-
If there are multiple instances of the same cash drawer (such as by using the New Drawer option on the Toast POS device), an ordinal suffix is added to the name. For example, a new drawer created from the Patio Drawer will be named Patio Drawer (2).
The cash drawer name appears in Toast Web in areas of the Cash Activity Audit and the Cash Drawer History reports. In addition, all areas on the Toast POS device that reference cash drawers will display the cash drawer name, not the associated printer name.
You can assign a cash drawer name when you create or update a cash drawer with the Finance > Related > Settings > Printers & cash drawers page in Toast Web.
This procedure assumes that you have a physical cash drawer connected to a printer and the printer has been connected to your Toast network.
You need the Web Setup > 6.10 Printer and Cash Drawer Setup permission to configure a printer and its cash drawer.
To configure a new cash drawer
-
Choose Finance > Related > Settings > Cash overview > Cash drawers > View cash drawers to open the Cash drawers page.
-
Select the View all printers link. This opens the Printers and cash drawers page.
-
Select the + Add button.
-
In the Printer configuration page, enter the basic configuration information for the printer. The more important fields are:
-
Name: Enter the name of the printer.
-
Model: Select the printer model that you are using.
-
IP Address: Enter the IP address of the printer that has been configured to the device.
-
-
Configure the fields in the Cash Drawers Configuration section:
-
Cash Drawer: Select One Cash Drawer (if there is only one cash drawer connected to the terminal) or Two Cash Drawers (if dual cash drawers are connected to the terminal).
-
Cash Drawer Name: Enter the name of the cash drawer (maximum of 30 characters). Use a descriptive name that helps your employees differentiate among multiple cash drawers when viewing them from the Toast POS device.
-
Cash Drawer Delay: This field is intended for internal use, and should be set only by Toast support. The field specifies the amount of time (between 0 and 5000 milliseconds, inclusive) to wait before the open-drawer command is issued. Blank assumes the default command delay of 0 milliseconds.
-
-
Configure the Primary Cash Drawer fields:
-
Starting Cash Drawer Balance: Enter the default starting balance of the cash drawer.
-
Reset Balance Type: Specify how the starting balance of a new cash drawer is set when the current instance of the drawer is closed: Automatic means the new cash drawer automatically uses the Starting Cash Drawer Balance amount, while Manual means the employee must manually enter the starting balance for the new cash drawer.
-
-
If you have configured dual cash drawers, configure the Secondary Cash Drawer fields. Their settings can be identical to or different from the Primary Cash Drawer fields.
-
When you have finished, save and publish your changes.
Restaurants typically use one of two modes for how employees (such as servers or bartenders) handle cash payments:
-
Cash in drawer: Employees use a cash drawer for all cash payments. The employees do not carry cash, which means they must use the cash drawer to make change. At the end of their shift, employees should not owe the restaurant for any cash payments. Note that the Tip Out configuration may require employees to declare cash tips.
-
Cash in hand: Employees use a personal cash bank for cash payments and do not interact with a cash drawer during their shift. At the end of their shift, employees are expected to pay the restaurant the cash payments they have received. Your Cash Drawer History report will have a Cash in Hand entry for these payments.
Based on the needs of the restaurant (such as for job roles or revenue centers), a restaurant can use both modes. For example, bartenders could use the cash in drawer mode, while servers could use cash in hand.
An employee handling cash payments (either cash in drawer or cash in hand) must have the 1.6 Apply Cash Payments permission. In addition, the employee's Toast POS device must have the Allow Cash Payments device setting enabled, as described in the following procedure.
To configure a Toast POS device for a cash drawer mode
-
On the Toast POS device, select the Toast logo in the top corner until the Toast POS home screen appears.
-
In the Setup section, select Device Setup. This opens the Device Setup screen.
-
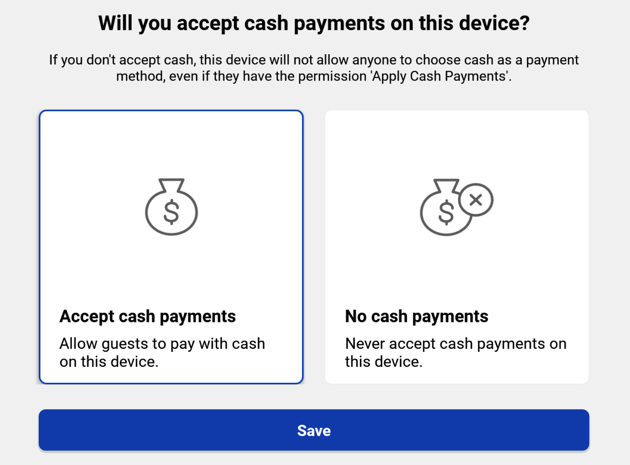
Select the Allow Cash Payments setting, then select Accept cash payments to allow an employee to accept cash payments on the device. Employees must also have the POS Access > 1.6 Apply Cash Payments permission to accept cash payments.
Select No cash payments if you want to prevent employees from accepting cash payments on the device, regardless of whether or not they have the Apply Cash Payment permission. For example, you can set this to No cash payments on a kitchen display system (KDS) device.
-
Select Save to return to the Device Setup screen.
-
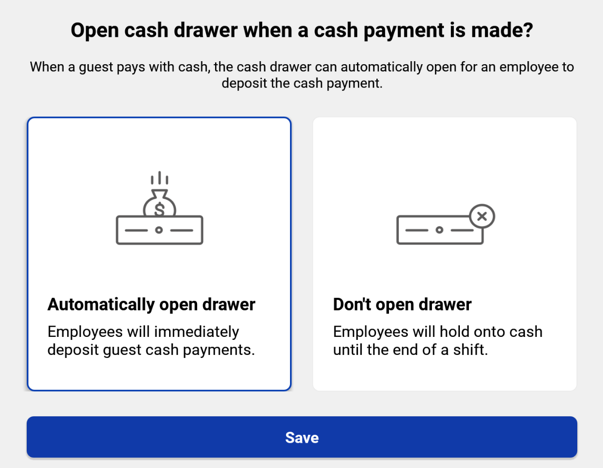
On the Device Setup screen, select Open Cash Drawer.
-
On the Open Cash Drawer dialog, select the appropriate mode:
-
Select Automatically open drawer to enable cash in drawer mode. Select this mode if the cash drawer needs to open for each cash payment. This option will also assign all cash payments to the drawer selected.
-
Select Don't open drawer to enable cash-in-hand mode.
-
-
Select Save.
If a specific Toast POS device is configured for cash in drawer mode, it must be assigned to printer that has a cash drawer. Typically, this cash drawer assignment remains throughout the employee's shift, but you can change the cash drawer assignment (for example, if the drawer does not operate properly because of a mechanical or electronic problem).
You also make this re-assignment if the Toast POS device was previously using a printer without a cash drawer (for example, it was in cash in hand mode) and you now want it to use cash in drawer mode. Note that if the Toast POS device is configured to use cash in drawer mode but is using a printer without a cash drawer, it displays this warning when you make a cash payment:
You don't have the Cash Drawer Access permission.
If you see this message, re-assign the receipt printer to one with a cash drawer.
To re-assign a cash drawer to a Toast POS device
-
Log in to the Toast POS device.
-
Select the Toast logo or left arrow (in the upper left of the screen) until the Toast POS home screen displays.
-
Swipe to the Setup section and select Device Setup.
-
On the Device Setup screen, select Receipt Printer.
-
Choose a printer that has a cash drawer and select Save. You are returned to the Device Setup screen.
-
Select Digital Receipts.
-
Choose Yes, use digital receipts or No, don't use digital receipts and tap Save. You are returned to the Device Setup screen.
-
Select Always Print Receipt.
-
Choose Yes to always print receipts, even if the printed receipt option was not chosen by the guest, or No to only use the receipt option chosen by the guest, and tap Continue. You are returned to the Device Setup screen.
-
Select Open Cash Drawer.
-
Choose Automatically open drawer to have employees deposit guest cash payments immediately or Don't open drawer to have employees to hold onto cash until the end of their shift, and select Save. You are returned to the Device Setup screen.
-
Select the Toast logo, or left arrow, to return to the Toast POS home screen.
A cash drawer can be in one of the following cash drawer states:
-
Active: The cash drawer is in use. That is, it is taking cash entries of any type, including cash transactions for orders (Cash Payments).
-
Open: The cash drawer is not in use. It is not taking Cash Payments for orders, but can accept other types of cash entries (such as Cash In or Pay Out entries). The drawer has not yet been closed, which means that the drawer's expected cash balance has not been verified and entered into the Toast POS device.
-
Closed: The cash drawer is not taking cash entries of any type and has been closed (the bills have been counted and the actual closing balance has been entered into the Toast POS system).
Cash drawers begin as active drawers and typically have one of these state workflows:
-
An active drawer is replaced with the New Drawer button and becomes an open drawer. Later, the open drawer is closed (using the Close Drawer button) and becomes a closed drawer.
-
An active drawer is closed with the Close Drawer button and becomes a closed drawer.
You can change the state of cash drawers as needed during restaurant business hours. For example, you can re-open a closed drawer so that it becomes an open drawer, adjust the cash balance to resolve a cash discrepancy, and then close the drawer again.
|
Note |
|
At the 4 AM closeout hour, cash drawers are automatically closed. If a restaurant is offline during that time, employees will be unable to create a new cash drawer. |
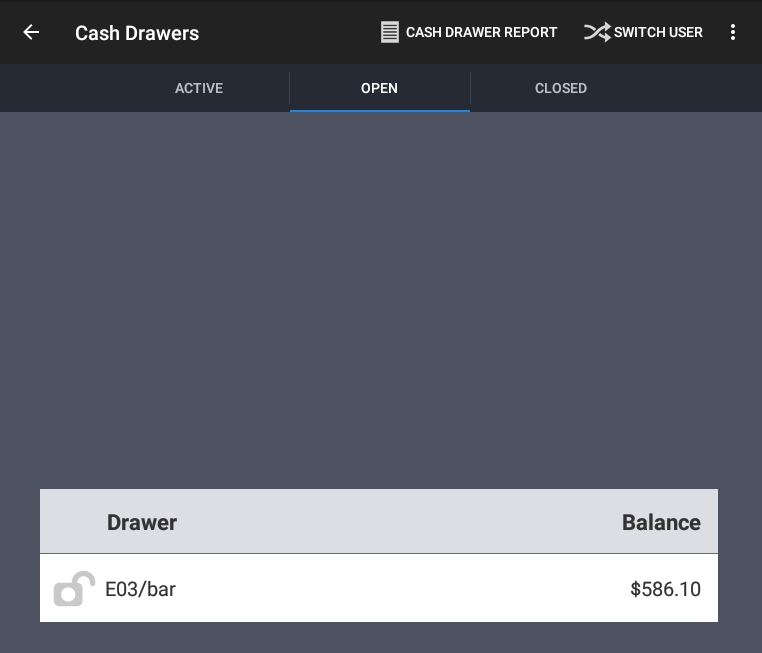
Cash drawers for the restaurant are listed in the Cash Drawers screen on the Toast POS device. You can access this screen by tapping the Toast logo (until the Toast POS home screen displays) and selecting Cash Management > Cash Drawers. The screen has three tabs: ACTIVE, OPEN, and CLOSED, as shown in this abbreviated example:

An active cash drawer is one that restaurant employees are using to make cash entries. A cash entry (called an Action in the cash drawer) is one of the following:
-
Cash Payments: Cash transactions for orders. A customer pays for an order with cash, which the employee puts into the cash drawer and makes change if needed.
-
Cash Collected: Cash added to a cash drawer, usually at the end of an employee shift. Note that a Cash Collected entry is created if you undo a previous Tip Out entry.
-
Pay Out: Cash removed from a cash drawer to pay for goods or services.
-
Undo Pay Out: Cash added to a cash drawer to undo a previous Pay Out entry.
-
Tip Out: Cash removed from a cash drawer to distribute tips or gratuities to restaurant employees. For example, a Tip Out entry might pay tips that were entered in credit card payments.
-
Cash In: Cash added to a cash drawer which does not correspond to a sale.
-
Cash Out: Cash removed from a cash drawer. Note that a Cash Out entry is created if you undo a previous Cash In entry.
-
Cash Drop: Cash removed from a cash drawer and usually transferred to a different restaurant location, such as a safe in a back office.
-
Undo Cash Drop: Cash added to a cash drawer to undo a previous Cash Drop entry.
-
No Sale: Cash drawer is opened without a change to the cash balance. For example, a restaurant employee can perform a No Sale transaction to make change for a customer.
-
Driver Reimbursement: Cash removed from a cash drawer to re-pay drivers for delivery expenses.
When a cash entry is made, the Toast platform opens the physical drawer so that the employee can add or remove cash. After the cash entry is complete, the employee closes the physical drawer.
Active drawers for the restaurant are listed in the ACTIVE tab of the Cash Drawers screen. A sample ACTIVE tab might look like this abbreviated example with three active cash drawers:
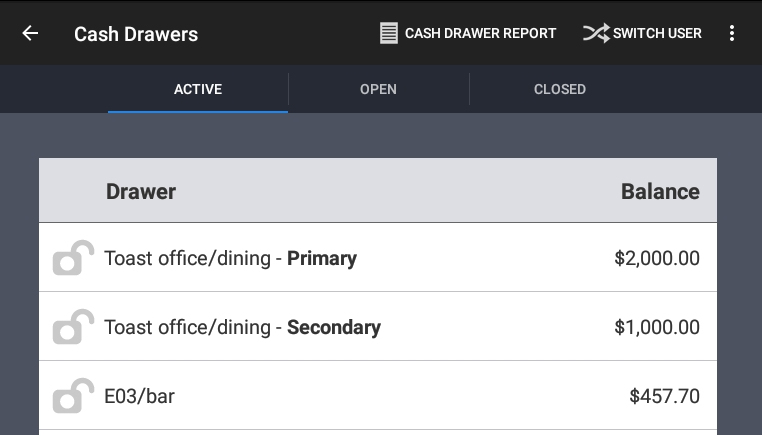
The ACTIVE tab has the following information:
-
The name of each active drawer.
Note that if a terminal has dual drawers connected, two cash drawers are listed with Primary or Secondary appended to the drawer name.
-
If a cash drawer is locked down to an employee, a locked icon displays before the cash drawer name and the employee's name appears after the cash drawer name. If the cash drawer is not locked down, an unlocked icon displays before the cash drawer name.
-
If the employee has the Manager > 3.18 Cash Drawers (Full) permission, the expected amounts for each drawer display in the Balance column. If the employee has the Manager > 3.17 Cash Drawers (Blind) permission, the expected amounts for each drawer do not display.
Tap the name of an active drawer to view its transaction history, as shown in this example:
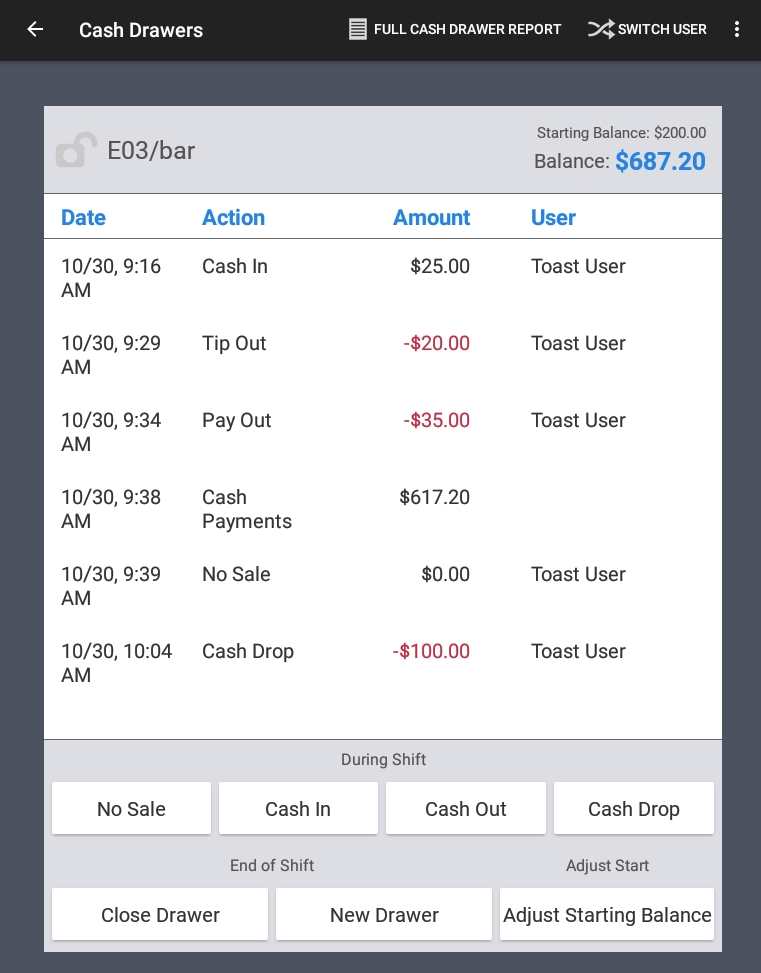
The active drawer screen contains the following information:
-
The name of the drawer is at the top. If a cash drawer is locked down to an employee, a locked icon displays before the cash drawer name and the employee's name appears. If the cash drawer is not locked down, an unlocked icon displays. If the drawer had been replaced (using the New Drawer button), the drawer name has Drawer x appended (where x begins at 2 and increases with each replacement of the cash drawer).
-
Starting Balance is the amount of cash assigned to the drawer when it was created.
-
Balance is the current balance of the cash drawer (starting balance plus the total of all cash entries).
-
Date is the timestamp of the cash entry. Note that the date for the Cash Payments action is the most recent cash payment.
-
Action is the type of cash entry, such as a Cash In or a Pay Out. Cash payments are cumulative, so only one Cash Payments action appears.
-
Amount is the total currency amount of the Cash Payments or the amount of a specific cash entry.
-
User is the name of the employee who made the cash entry. Note that user names are not listed for Cash Payments.
At the bottom of the screen are buttons for cash drawer operations, such as making a Cash Drop entry and closing the cash drawer. These operations are described in Cash drawer operations.
You create an open drawer when you use the New Drawer button to replace an existing active drawer. Typically, you create the open drawer to verify its transactions and cash balance before you close the drawer.
The newly-created open drawer retains the name of the original active drawer and the name of the new active drawer has Drawer 2 (or Drawer 3 and so on) appended to its name. However, the open drawer's balance has not yet been closed out, which is why it is still open.
For example, if the current active drawer is named "Dining Room" and has a balance of $500, selecting the New Drawer button creates an open drawer named "Dining Room" with a balance of $500 and a new active drawer named "Dining Room (Drawer 2)" with a starting balance set in its configuration. The "Dining Room (Drawer 2)" active drawer will now take cash payments for orders while the original "Dining Room" drawer cannot accept cash payments for orders.
Open drawers cannot accept Cash Payments for orders. However, they accept all other types of cash entries (such as Cash In or Tip Out entries), so that you can adjust the cash drawer balance before closing it.
Open drawers are listed in the OPEN tab of the Cash Drawers screen, as in this example:
Tapping the name of the open drawer displays the open drawer screen, which is functionally similar to the active drawer screen. The buttons at the bottom of the screen provide the same cash drawer operations as with active drawers. For example, the During Shift buttons let you adjust the drawer's balance before closing it. These operations are described in Cash drawer operations.
A closed drawer is a previously active or open drawer that you closed with the Close Drawer button. You then confirmed the balance in the closed drawer by counting the bills and filling out the Close Out Balance dialog for the drawer. Closing the drawer enters the actual closing balance into the Toast POS.
A closed drawer cannot accept cash entries of any type. However, a closed drawer can be re-opened (for example, to adjust the actual closing balance for the drawer) or replaced.
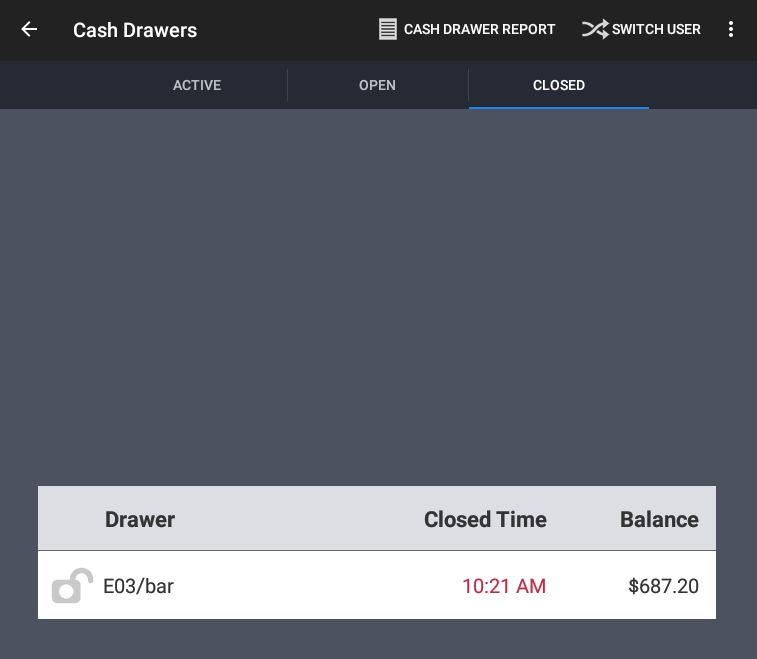
A closed drawer retains the name of the active or open drawer from which it was closed. Closed drawers are listed in the CLOSED tab of the Cash Drawers screen, as in this example:
Tap the drawer name to display the closed drawer screen, as in this example:
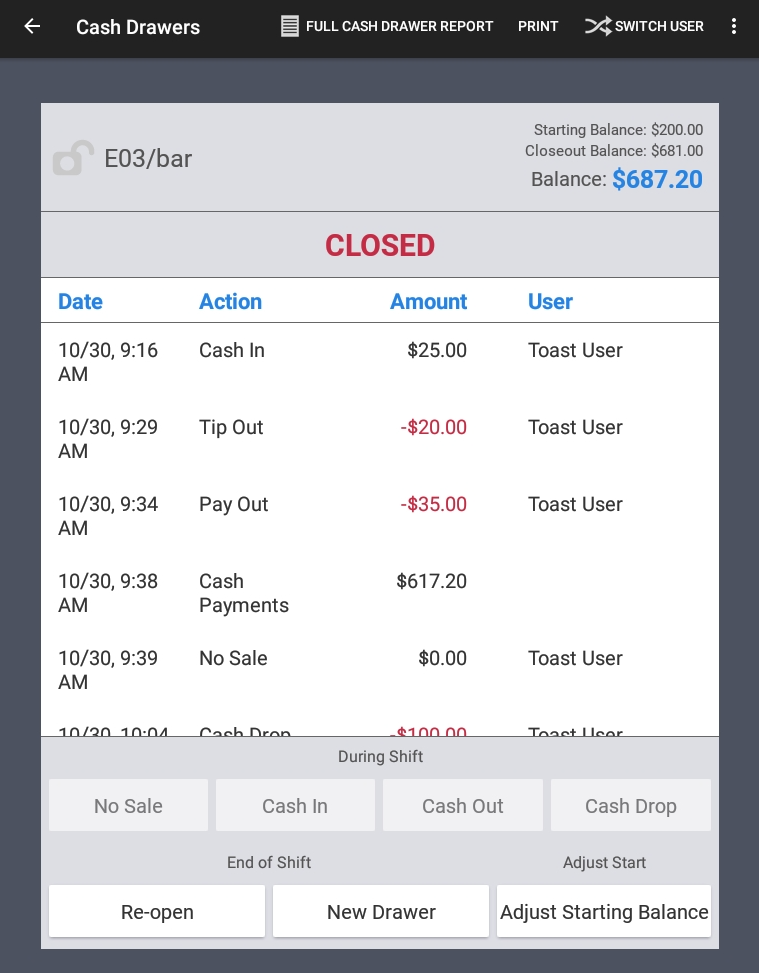
The top pane shows three balance amounts for the closed drawer:
-
Starting Balance is the amount of cash assigned to the drawer when it was created. This amount should be the same as the starting balance when the drawer was an active drawer.
-
Closeout Balance is the amount that you specified in the Close Out Balance dialog when you closed the drawer. This is the actual closing balance which was entered into the Toast POS.
-
Balance is the total amount of cash in the drawer (starting balance plus the total of all cash entries).
As the example shows, the During Shift buttons are disabled. The End of Shift buttons are described in End of Shift operations and the Adjust Start button is described in Adjust Starting Balance operation.
Cash drawers have three sets of operations that allow employees to perform these cash drawer activities:
-
Make cash entries (such as adding or removing cash) with the During Shift operations.
-
Change the state of cash drawers (such as closing an active or open drawer) with the End of Shift operations.
-
Adjust the starting balance of a cash drawer with the Adjust Starting Balance operation.
The During Shift operations allow employees to perform cash entries during their open shifts. These operations can also be used to make cash adjustments in open drawers before they are closed.
The During Shift operations, which are available only for active and open drawers, are described in the following sections.
Cash In entries add cash to active and open drawers. The employee can enter a custom reason for the entry as a comment.
To make a Cash In entry
-
In the cash drawer, tap the Cash In button.
-
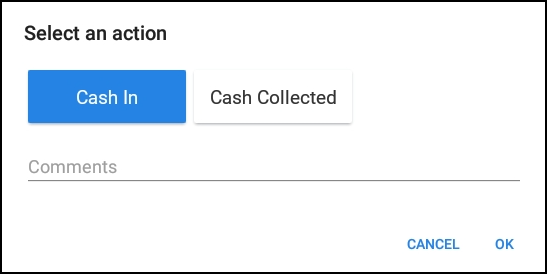
In the Select an action dialog, do the following:
-
Select the Cash In action.
-
Enter a reason for the entry in the Comments field (optional, but recommended).
-
Tap OK.
-
-
In the New cash entry numeric keypad, enter the cash amount and tap Done.
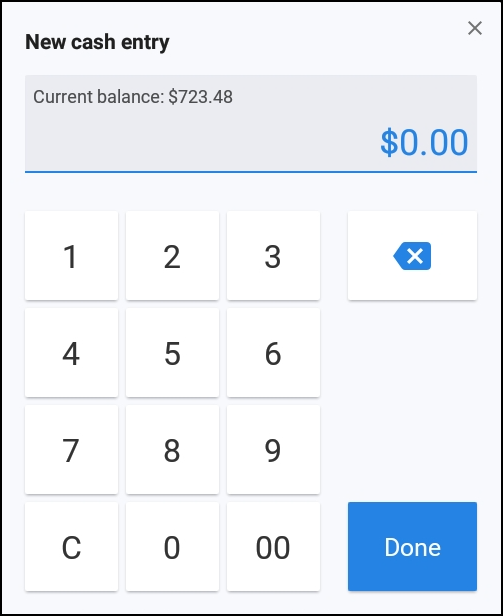
As a result, a Cash In action for the amount is added to the cash drawer, together with the name of the employee who made the entry. This information (including the reason for the entry) will also be listed in the Reports > Cash and loss management > Cash activity audit report.
Cash Collected entries add cash to active and open drawers. The employee can enter a custom reason for the entry as a comment. The intent of a Cash Collected entry is to collect cash in hand from a server and add it to the cash drawer.
Note that a Cash Collected entry executed from a cash drawer is similar to the Collect Cash step during a shift review. Both procedures add a Cash Collection action to the cash drawer and to the Reports > Cash and loss management > Cash activity audit report.
To make a Cash Collected entry
-
In the cash drawer, tap the Cash In button.
-
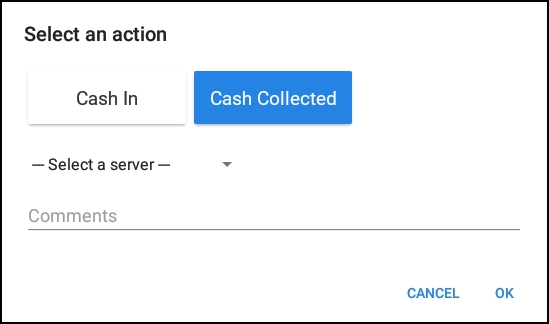
In the Select an action dialog, do the following:
-
Select the Cash Collected action.
-
From the Select a server drop-down, choose the server from whom cash will be collected.
-
Enter a reason for the entry in the Comments field (optional, but recommended).
-
Tap OK.
-
-
In the New cash entry numeric keypad, enter the cash collected amount and tap Done.
As a result, a Cash Collected entry for the amount is made in the cash drawer, with the name of the employee from whom the cash was collected. This information (including the reason) will also be listed in the Reports > Cash and loss management > Cash activity audit report.
Cash Out entries remove cash from active and open drawers. The Cash Out amount cannot exceed the cash drawer's current balance.
Optionally, the employee can enter a custom reason for the entry as a comment. Comments are useful as they appear on sales-related reports and provide managers with information about the reason for the entry.
To make a Cash Out entry
-
In the cash drawer, tap the Cash Out button.
-
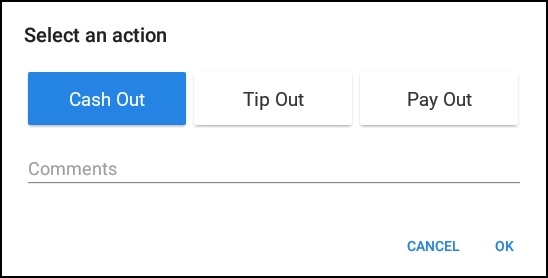
In the Select an action dialog, do the following:
-
Select the Cash Out action.
-
Enter a reason for the entry in the Comments field (optional, but recommended).
-
Tap OK.
-
-
In the New cash entry numeric keypad, enter the cash out amount and tap Done.
As a result, a Cash Out action for the removed amount is entered in the cash drawer, together with the name of the employee who made the entry. This information (including a comment for the entry) will also be listed in the Reports > Cash and loss management > Cash activity audit report.
Tip Out entries remove cash from active and open drawers to distribute tips or gratuities to restaurant employees. The Tip Out amount cannot exceed the cash drawer's current balance.
The employee can provide information for the entry as a comment.
To make a Tip Out entry
-
In the cash drawer, tap the Cash Out button.
-
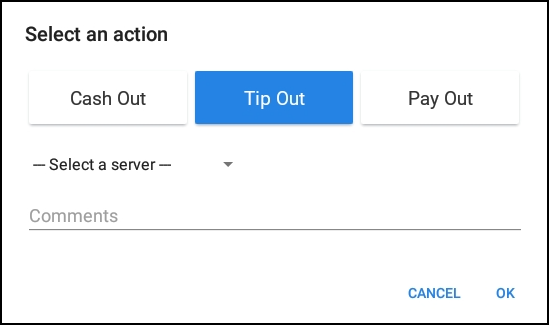
In the Select an action dialog, do the following:
-
Select the Tip Out action.
-
From the Select a server drop-down, choose the server to whom the cash tips will be distributed.
-
Enter a reason for the entry in the Comments field (optional, but recommended).
-
Tap OK.
-
-
In the New cash entry numeric keypad, enter the amount of cash removed and tap Done.
As a result, a Tip Out entry for the amount removed is made in the cash drawer, together with the name of the employee to whom the cash tips were distributed. This information (including the reason) will also be listed in the Reports > Cash and loss management > Cash activity audit report.
Pay Out entries remove cash from active and open drawers to pay for goods or services. The Pay Out amount cannot exceed the cash drawer's current balance.
There are two versions of the Pay Out operation:
-
Cash drawer version: You perform this Pay Out entry from within a specific cash drawer, which means that you can pay out only from that cash drawer.
-
Toast POS home version: You perform this Pay Out entry from the Cash Management section on the Toast POS home screen. This version allows you to make pay outs from any cash drawer to which you have permissions.
To make a Pay Out entry from a specific cash drawer
-
In a specific cash drawer, tap the Cash Out button.
-
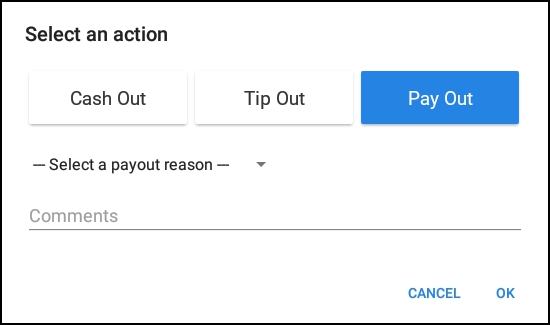
In the Select an action dialog, do the following:
-
Select the Pay Out action.
-
From the Select a payout reason drop-down, select a pre-configured reason.
-
In the Comments field, enter any other information about the cash entry (optional).
-
Tap OK.
-
-
In the New cash entry numeric keypad, enter the pay out amount and tap Done.
To make a Pay Out entry from the Cash Management section
-
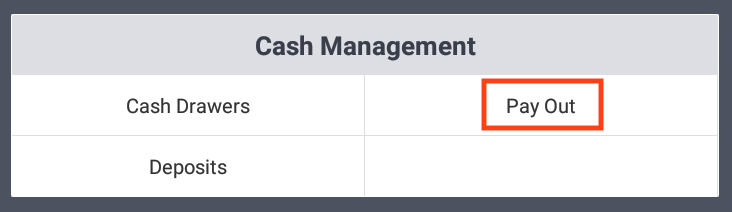
On the device, tap the Toast logo in the top corner until the Toast POS home screen appears.
-
Go to the Cash Management section and select Pay Out.
-
On the Pay Out dialog, do the following:

-
From the Select a cash drawer drop-down, select a cash drawer in which to make the pay out entry.
-
From the Select a payout reason drop-down, select a pre-configured reason.
-
In the Comments field, enter any other information about the cash entry (optional).
-
Tap OK.
-
-
In the New cash entry numeric keypad, enter the pay out amount and tap Done.
As a result, a Pay Out action for the amount is entered in the cash drawer, along with the name of the employee who made the pay out. This information (including the reason for the entry) will also be listed in the Reports > Cash and loss management > Cash activity audit report.
A Pay Out slip is also printed, with the name of the employee who made the Pay Out listed at the top of the slip. The slip also prints the following information:
-
Comment: the comment (if any) entered by the employee during the Pay Out entry.
-
Cash Drawer: the name of the cash drawer from which the money was removed.
-
Current Cash Balance: the cash drawer balance before the Pay Out was made.
-
Paid Out: the amount of cash removed from the cash drawer with this Pay Out transaction.
-
New Cash Balance: the new balance of the cash drawer after the removal of the Pay Out amount. This dollar amount should be the same as the Balance field in the cash drawer.
Cash Drop entries remove cash from an active or open drawer. The cash is usually transferred to a different restaurant location (such as a safe) for safekeeping. The Cash Drop amount cannot exceed the cash drawer's current balance.
Cash Drop entries are made if the cash drawer has more money than the restaurant prefers. For example, a Cash Drop can be used to limit the amount of money lost in case of a robbery or employee theft. A Cash Drop is also made if the cash drawer is so full that it cannot accept further cash transactions.
To make a Cash Drop entry
-
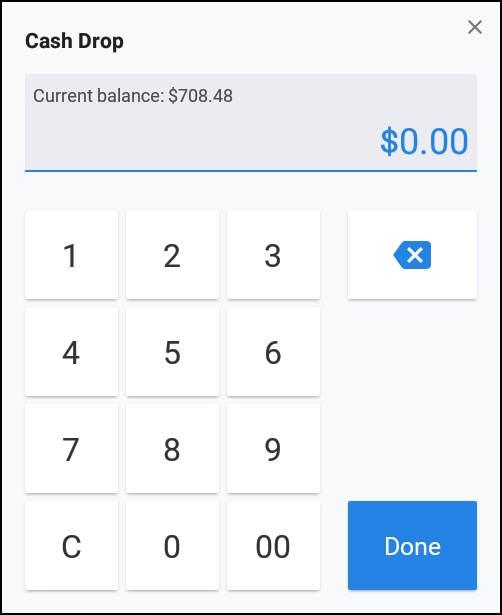
In the cash drawer, tap the Cash Drop button.
-
In the Cash Drop numeric keypad, enter the cash drop amount and tap Done.
As a result, a Cash Drop action for the removed amount (as a negative dollar amount) is made in the cash drawer, along with the name of the employee who made the cash drop. This information will also be listed in the Reports > Cash and loss management > Cash activity audit report.
A Cash Drop slip is also printed, with the restaurant name at the top followed by this information:
-
From: the name of the cash drawer from which the money was removed.
-
To: the location to which the money was transferred. This will be the restaurant account (listed as House).
-
By: the name of the employee who made the Cash Drop.
-
Current Cash Balance: the cash drawer balance before the Cash Drop was made.
-
Cash Amount Dropped: the amount of cash removed from the cash drawer with this Cash Drop transaction.
-
New Cash Balance: the new balance of the cash drawer after the removal of the Cash Drop amount. This dollar amount should be the same as the Balance field in the cash drawer.
-
Employee Signature: a signature line for the employee who made the Cash Drop.
-
Manager Signature: a signature line for the manager.
No Sale entries open the cash drawer without a change to the cash balance. For example, a restaurant employee performs a No Sale entry to make change for a customer. Another common example is that you make a No Sale entry in order to count the cash in the cash drawer.
When an employee makes a No Sale entry, a Please select a no sale reason dialog opens. A previously-configured No Sale reason must be selected.
To configure No Sale reasons
-
Choose Finance > Related > Settings > No sale reasons to open the No sale reasons page.
-
Select the + Add button.
-
Configure the fields for the No Sale reason:
-
Name: Enter a name that is descriptive of the purpose of this No Sale entry, such as Make Change or Count Cash. The name is included in the Reports > Cash and loss management > Cash activity audit report and also in the Reports > Cash and loss management > No sale reports, so a descriptive name is helpful when reading those reports.
-
Active: Specify whether this No Sale reason should be active. Only active reasons are listed in the Please select a no sale reason dialog.
-
Description: Optionally, enter a more detailed description of this reason. The description is not entered in the Reports > Cash and loss management > Cash activity audit report nor in the Reports > Cash and loss management > No sale report, but is intended to provide more information for anyone making changes on this page.
-
-
Save and publish your changes.
To make a No Sale entry
-
In the cash drawer, tap the No Sale button.
-
In the Please select a no sale reason dialog, select a reason, as in this example.
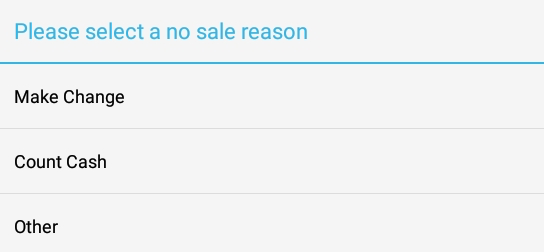
As a result, a No Sale action for $0.00 is entered in the cash drawer, along with the name of the employee who made the No Sale entry. This information (including the name of the No Sale reason) will also be listed in the Reports > Cash and loss management > Cash activity audit report and also in the Reports > Cash and loss management > No sale reports.
You use the End of Shift operations to control the state of a cash drawer (such as closing it) or to reset its starting balance. The close drawer operation, for example, is used as part of the shift review process that collects the money from a cash drawer.
The close drawer operation closes an active or open drawer. As part of the closing operation, you physically count the cash in the drawer and enter the amount in the Cash Actual field of the Close Out Balance dialog. This action enters the actual closing balance into Toast.
When the Close Out Balance dialog is first displayed, it looks like this example:
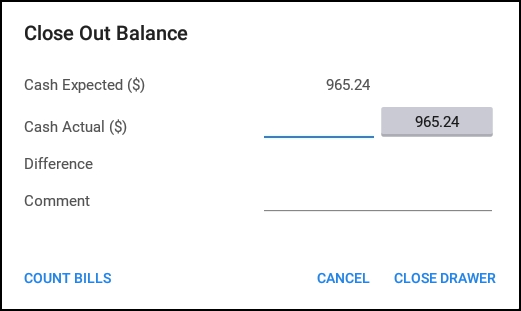
The cash labels provide the following information:
-
Cash Expected is the current balance of the cash drawer (starting balance plus the total of all cash entries). This is the amount of money that should be in the cash drawer.
-
Cash Actual is the field into which you enter the actual cash amount that you counted.
-
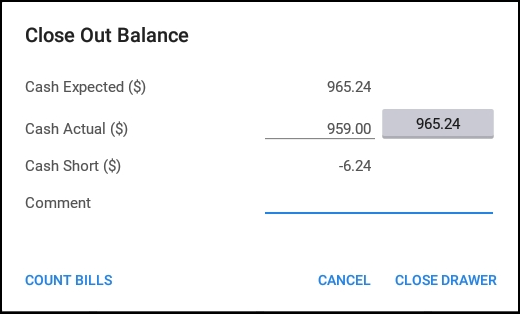
Difference indicates the difference between the Cash Expected and Cash Actual values. Depending on the amount variance, the Difference label will change to Cash Over, Cash Short, or No Difference followed by the amount.
The Comment field allows the employee to enter an optional comment (maximum of 45 characters). Comments are especially useful when there are overage or shortage variances in the closing balance. These closeout comments are listed in the Reports > Cash loss and management > Cash activity audit report. If the Comment field is left blank, the following default text is used:
-
Closeout Overage: "Close out balance is over"
-
Closeout Shortage: "Close out balance is short"
-
Closeout Exact: "Close out balance matches expected balance"
The Count Bills button brings up the Toast bill/coin calculator, which speeds up the cash-counting process by keeping track of the cash amount. When you exit the calculator, it enters the calculated amount into the Cash Actual field. Use of the Toast calculator is optional and does not affect the cash drawer closing procedure if you do not use the calculator.
In Toast Web, you can optionally configure confirmation thresholds that are applied when a cash drawer is closed:
-
Closeout Over/Short Max: A dollar threshold that, if exceeded, requires a manager to approve the closing of the cash drawer.
-
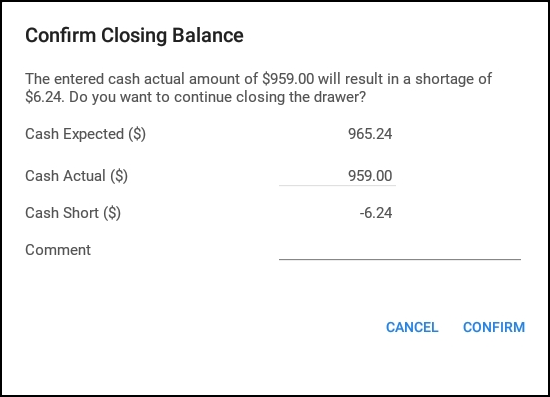
Closeout Over/Short Warning: A confirmation warning that is triggered if the closing balance is over or under a configured amount. For example, if the over/short threshold is $5.00 and the actual closing balance is $5.00 over or under the threshold, then a warning prompt is displayed to the employee about the variance. The employee must confirm the closing balance (note that this warning does not require managerial override). This warning is shown only if the employee has the Manager > 3.18 Cash Drawers (Full) access permission; otherwise the warning is not shown as it contains cash balance information.
The two thresholds work independently of each other, so you can use either or both of them.
After you close the drawer, it appears on the Closed tab of the Cash Drawers screen. For more information on closed drawers, see Closed drawers.
To configure cash drawer closeout thresholds
-
Choose Finance > Related > Settings > Cash overview > Cash drawers > Cash drawer variance to open the Cash drawer variance page.
-
On the Cash drawer variance page, configure one or both of these fields:
-
Closeout Over/Short Max: Enter a positive dollar amount to enable this feature, or enter $0.00 (or leave blank) to disable it. If the feature is enabled and the over/short variance exceeds the configured amount, managerial override is required to close the cash drawer.
-
Closeout Over/Short Warning: Enter a positive dollar amount to enable this feature, or enter $0.00 (or leave blank) to disable it. If the feature is enabled and the over/short variance exceeds the configured amount, a warning is displayed and the employee must confirm the closing balance.
-
-
Save and publish your changes.
To close an active or open drawer
-
If the cash drawer is closed, open it with the No Sale operation so that you can count the cash in the drawer.
-
In the cash drawer, tap the Close Drawer button.
-
In the Close Out Balance dialog, do the following:
-
Count all the cash in the drawer. Optionally, you can use the Toast bill/coin calculator (available from the Count Bills button) to help you with the cash-counting task.
-
In the Cash Actual field, enter the cash amount you counted. Be sure to enter the entire amount that is present in the drawer, including the starting balance amount. Note that if you use the Toast bill/coin calculator, it will enter the amount when you exit the calculator.
-
Use the Comment field to enter any relevant information. The information provides a historical record of this closing instance.
-
Tap Close Drawer.
-
-
If you have enabled the Closeout Over/Short Warning and the variance exceeds the threshold, the Confirm Closing Balance dialog is displayed. Tap Confirm to continue.
-
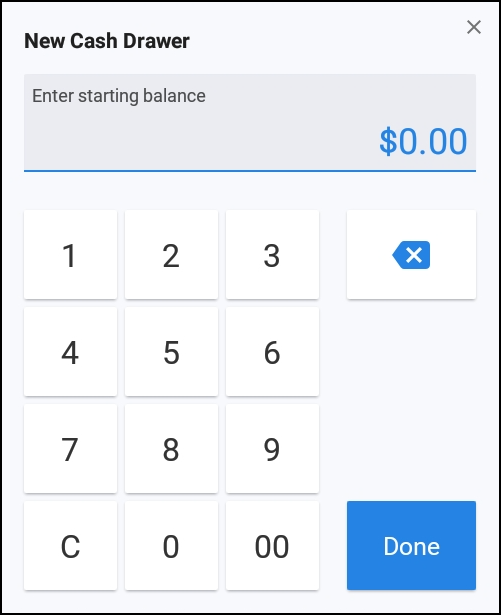
If the cash drawer configuration has the Reset Balance Type field set to Manual, you must manually enter the starting balance of the new cash drawer in the New Cash Drawer numeric keypad and tap Done.
As a result, the current active or open drawer is closed and a new instance of the cash drawer is created. Information from the closed drawer operation is added to the Reports > Cash and loss management > Cash activity audit report.
The new drawer operation replaces the current active drawer (which becomes an open drawer) with a new active drawer. This operation is typically used at the end of a shift to start a new drawer for the next shift.
|
Note |
|
The new drawer operation can be executed from active, open, and closed drawers (that is, all these drawers have the New Drawer button). |
The open drawer retains the name of the previous active drawer (and its cash balance), while the name of the new active drawer will have Drawer x appended (where x begins at 2 and is increased with each replacement of the active drawer).
When the new active drawer is created, it must have a starting balance. This starting balance is set in one of two ways, depending on the value of the cash drawer's Reset Balance Type configuration setting:
-
If the Reset Balance Type field is set to Manual, you must manually enter the starting balance of the new active drawer.
-
If the Reset Balance Type field is set to Automatic, Toast automatically uses the amount in the Starting Cash Drawer Balance field when it creates the new active drawer.
For more information of these configuration settings, see Creating cash drawers.
To replace the active drawer with a new drawer
-
In the cash drawer, tap the New Drawer button.
-
If the cash drawer configuration has the Reset Balance Type field set to Manual, you must manually enter the starting balance of the new cash drawer in the New Cash Drawer numeric keypad and tap Done.
After the active drawer is replaced, it is moved to the Open tab of the Cash Drawers screen, while the new active drawer is added to the Active tab.
The re-open operation re-opens a closed drawer so that it becomes an open drawer. The re-open operation is not available in active or open drawers.
A use case for re-opening a closed drawer is to adjust the actual closing balance for the drawer and then close the drawer again.
To re-open a closed drawer
-
From the Closed tab of the Cash Drawers screen, tap the name of the target closed drawer.
-
In the closed cash drawer, tap the Re-open button.
After the drawer is re-opened, it appears on the Open tab of the Cash Drawers screen.
The Adjust Starting Balance button lets you adjust the starting balance for an existing cash drawer. This operation is useful if you discover that you had put a different amount of cash in the physical drawer than you had configured for the drawer. Another example is if you have manual cash drawers and an employee entered the wrong amount in the New Cash Drawer numeric keypad when closing a cash drawer.
Note that you can only adjust the starting balance for today's cash drawers. That is, you cannot adjust the starting balance for cash drawers in the past.
You must have the Manager > 3.21 Adjust Cash Drawer Start Balance permission to adjust starting balances for cash drawers.
To adjust the starting balance of a cash drawer
-
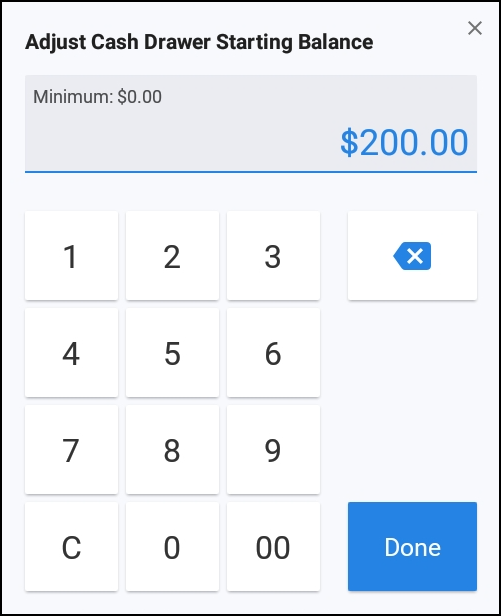
In the cash drawer, tap the Adjust Starting Balance button.
-
In the Adjust Cash Drawer Starting Balance numeric keypad, enter the new starting balance and tap Done.
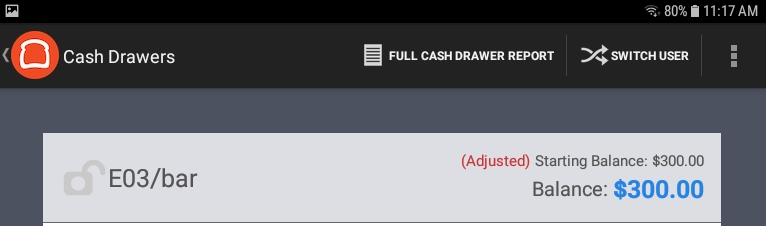
As a result, the cash drawer's starting balance is immediately adjusted. The cash drawer's Starting Balance field will have an "Adjusted" prefix (as shown in the following cropped example) to indicate that the starting balance was changed.
A subset of the cash drawer operations on the Toast POS device are also available on Toast Web. You have the option of using a web browser instead of a Toast POS device to perform these cash drawer operations. Note that you cannot make Cash Payments (that is, cash transactions for guest orders) into a cash drawer from Toast Web.
The cash drawer operations available on Toast Web are the following:
-
All the During Shift operations (except for the No Sale operation).
-
The Close Drawer operation.
-
The Adjust Starting Balance operation.
The results of these Toast Web operations update the cash drawer as seen on the Toast POS device. For example, if you make a Cash Out entry from Toast Web, it has the same effect on the cash drawer as if you had made the entry from the Toast POS device.
If you need to perform any cash drawer operation that is not available on Toast Web (such as re-opening a closed drawer), you must use the Toast POS device.
The cash drawer Toast Web operations are available in the Cash Drawer History report, which is a section of the Sales Report. The Cash Drawer History report lists all the active cash drawers in the restaurant. The same set of cash drawer Toast Web operations is available for each cash drawer.
|
Note |
|
Before issuing a Toast Web cash drawer operation, make sure that you are viewing the appropriate cash drawer. |
The Cash entries section of the Cash Drawer History report contains the Update Entries drop-down menu, as shown in this example:

To access the cash drawer operations in Toast Web
-
Choose Finance > Related > Settings > Cash overview > View related reports > Cash drawer history report to open the Cash Drawer History report. You can also choose Reports > Cash and loss management > Drawer history to open the Cash Drawer History report.
-
Locate the desired cash drawer listed across the top and scroll to the bottom of its column.
-
At the bottom of the column, select View.
-
In the Cash entries section, select the Update Entries drop-down menu to display the available cash management operations:
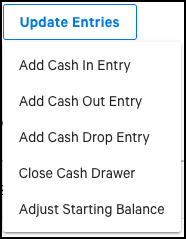
The Update Entries menu lets you make these cash entries:
-
The Add Cash In Entry selection provides Cash In and Cash Collected operations.
-
The Add Cash Out Entry selection provides Cash Out, Tip Out, and Pay Out operations.
-
The Add Cash Drop Entry selection is for Cash Drop operations.
These operations are functionally similar to those on the Toast POS device, which are described in During Shift operations. Note that the user name displayed in the cash drawer for the action is the name of the employee who is logged into Toast Web.
To make a cash entry from Toast Web
-
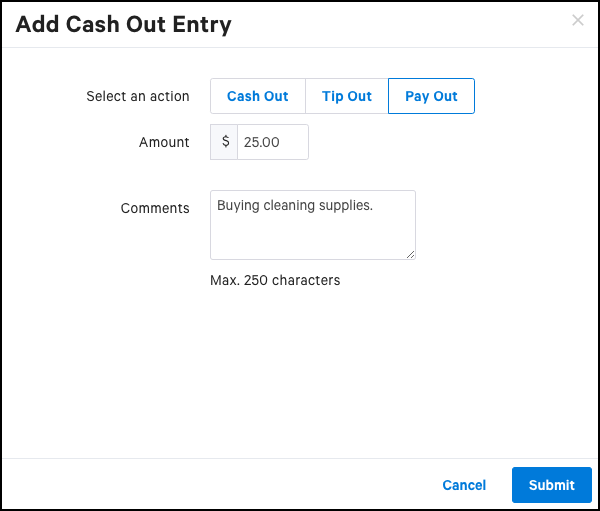
In the Update Entries drop-down menu, select a cash entry, such as Add Cash Out Entry.
-
In the cash entry dialog box, select an action, such as Pay Out.
-
Enter the cash entry amount in the Amount field.
-
Optionally, use the Comment field to enter a descriptive comment about the cash entry.
At this point, the dialog box should look like this example:
-
Select the Submit button.
The cash entry is listed in the Cash entries section of the Cash Drawer History report and also in the cash drawer on the Toast POS device.
You can close an active cash drawer from Toast Web. While similar to the close drawer operation on the Toast POS device, the Toast Web version has the following differences:
-
The Close Cash Drawer dialog box in the Toast Web version is named Close Out Balance in the Toast POS device version.
-
The Close Cash Drawer dialog box in the Toast Web version only has the Expected Cash and Actual Cash fields. It does not have the Difference field (which means you cannot easily see if there is a cash balance discrepancy), the Comment field, or the Count Bill calculator.
-
The Toast Web version ignores the Closeout Over/Short Max and Closeout Over/Short Warning configuration settings.
To close an active drawer from Toast Web
-
If you need to count the money in the cash drawer, issue a No Sale command from the Toast POS device.
-
In the Update Entries drop-down menu, select Close Cash Drawer.
-
In the Close Cash Drawer dialog box, enter the cash amount (including the starting balance) in the Actual Cash field and select Submit.
After you close the drawer, it appears on the Closed tab of the Cash Drawers screen (on the Toast POS device) and its status is changed to Closed on the Cash Drawer History report. For more information on closed drawers, see Closed drawers.
You can adjust the starting balance for a cash drawer from the Toast Web. This operation is functionally the same as the version on the Toast POS device, described in Adjust Starting Balance operation.
To adjust a cash drawer's starting balance from Toast Web
-
In the Update Entries drop-down menu, select Adjust Starting Balance.
-
In the Adjust Starting Balance dialog box, enter the new starting balance in the New Starting Balance field.
-
Select Submit.
After you make the adjustment, it is listed in the Start balance adjustments section of the Cash Drawer History report.
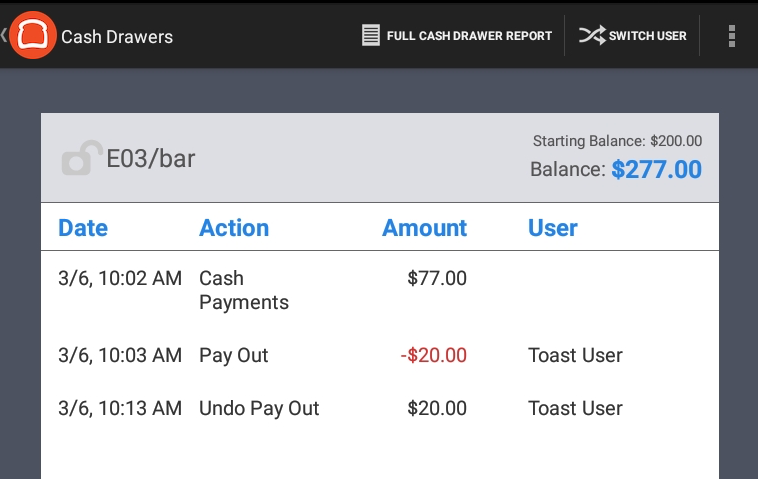
You can undo cash entries in a cash drawer from either the Toast POS device or Toast Web. For example, you made a Pay Out entry to pay for restaurant cleaning supplies and took out money from the cash drawer; however, you never purchased the supplies so you want to undo the Pay Out entry and replace the cash in the drawer.
When you undo a cash entry, the original cash entry remains listed in the cash drawer and a new undo cash entry is added. Also, the cash drawer's current balance is adjusted to account for the undone entry. For example, if you undo a Pay Out entry of $20, the original $20 Pay Out entry remains listed in the cash drawer, a new $20 Undo Pay Out entry is added, and the cash drawer's balance is increased by $20.
You can undo the following cash entries:
-
Cash Collected: When you undo a Cash Collected entry, the Toast platform posts a Tip Out entry for the same amount.
-
Tip Out: When you undo a Tip Out entry, the Toast platform posts a Cash Collected entry for the same amount.
-
Cash In: When you undo a Cash In entry, the Toast platform posts a Cash Out entry for the same amount.
-
Cash Out: When you undo a Cash Out entry, the Toast platform posts a Cash In entry for the same amount.
-
Cash Drop: When you undo a Cash Drop entry, the Toast platform posts an Undo Cash Drop entry for the same amount.
-
Pay Out: When you undo a Pay Out entry, the Toast platform posts an Undo Pay Out entry for the same amount.
When you undo cash entries on the Toast POS device, the operations also open the physical cash drawer, so that you can manually add or remove cash to adjust the cash balance. For this reason, you must have the POS Access > 1.13 No Sale permission to perform any undo cash entry operation.
To undo a cash entry on the Toast POS device
-
From Cash Management mode on the Toast POS device, tap Cash Drawers and then select the cash drawer from the list.
-
In the cash drawer view, tap the cash entry that you want to undo.
The Cash Entry Details dialog box displays, as in this Pay Out example:

-
In the Cash Entry Details dialog box, tap Undo Entry.
-
When the physical cash drawer opens, add or remove cash as required and then close the drawer.
As a result, the cash drawer displays the undone cash entry and the Balance field is adjusted for the undone amount. In this example, a $20 Pay Out entry has been undone:
When you undo cash entries from Toast Web, the operations do not open the physical cash drawer. Therefore, if you want to manually add or remove cash, you must issue a No Sale command from the Toast POS device.
To undo a cash entry from Toast Web
-
Choose Finance > Related > Settings > Cash overview > View related reports > Cash drawer history report to open the Cash Drawer History report. You can also choose Reports > Cash and loss management > Drawer history to open the Cash Drawer History report.
-
Locate the desired cash drawer listed across the top and scroll to the bottom of its column.
-
At the bottom of the column, select View.
-
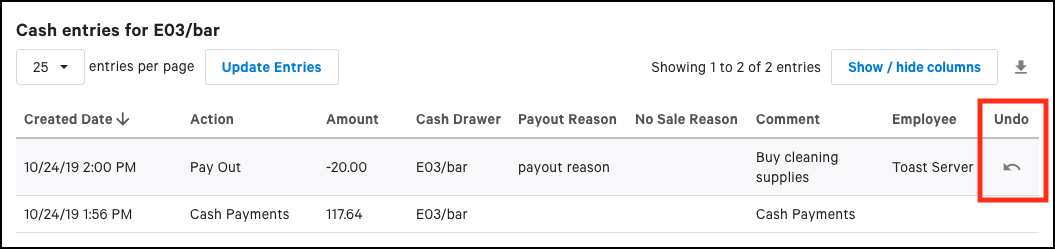
In the Cash entries section, select the Undo icon for the cash entry you want to undo:
-
Select OK when you are prompted to confirm the undo operation.
As a result, the Cash Drawer History report displays the undone cash entry and the cash drawer's balance is adjusted for the undone amount.
You use the cash drawer lockdown feature to allow employees to assign cash drawers to themselves. Once a cash drawer is locked down to a specific employee, only that employee can use that drawer to make transactions during the employee's shift. At the end of the shift, the employee must close the cash drawer before clocking out.
A locked down drawer is more secure because it is not shared with other employees (although managers can override this restriction). Locked down drawers also make it easier for a restaurant manager to track cash flow in a drawer and to resolve cash discrepancies, because the manager knows exactly who is accessing the cash drawer.
Keep the following in mind when using the cash drawer lockdown feature:
-
The cash drawer lockdown feature does not physically lock the drawer. Instead, the feature prevents an employee from using the Toast cash drawer interface to make transactions in a cash drawer that is locked to another employee.
-
Cash drawer lockdown does not have any special permissions of its own. If employees have the permissions to access a cash drawer, they can lock down the drawer themselves. For more information about cash management permissions, see User permissions for cash management.
-
A restaurant employee (typically a manager) who has the Manager > 3.19 Cash Drawer Lockdown (Override) permission can override a locked down setting on a cash drawer. Use cases for managerial overrides include the manager having to make transactions in the cash drawer (such as a payout transaction to buy restaurant goods), adjusting the starting balance of the cash drawer, and closing the cash drawer.
-
A locked cash drawer can be unlocked only by closing the drawer.
-
The employee to whom a cash drawer is locked down must close the cash drawer during the shift review.
-
If a terminal has dual drawers connected, an employee can lock down either drawer. The other drawer can be left unlocked or a different employee can lock it down.
-
For security reasons, cashiers should be required to assign cash drawers to themselves.
To set up the cash drawer lockdown feature for restaurant employees, you should enable the three Shift Review/Closeout configuration options listed below.
To configure cash drawer lockdown
-
Choose Employees > Shift review > Shift review to open the Shift review setup page.
-
Select the Customize shift review button. Continue to the Require shift review screen, go to the Require shift review setting and select the Shift review is required option.
-
Continue to the Close cash drawer screen, go to the Lock employee to cash drawer setting and select the Required - Employees assigned a drawer-lock job are required to lock themselves to a cash drawer option.
-
Save and publish your changes.
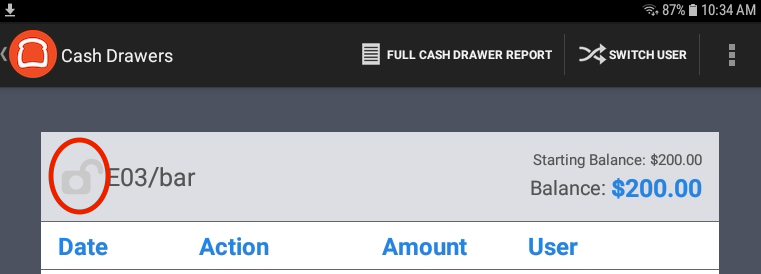
To lock down a cash drawer, you use the open lock icon that displays on the Toast POS device. This icon appears next to the drawer name in the Active tab and at the top of the drawer view.
To lock down a cash drawer to an employee
-
On the Cash drawers screen, tap the open lock icon next to the drawer name.
-
In the Cash Drawer Lockdown dialog, tap Lock.
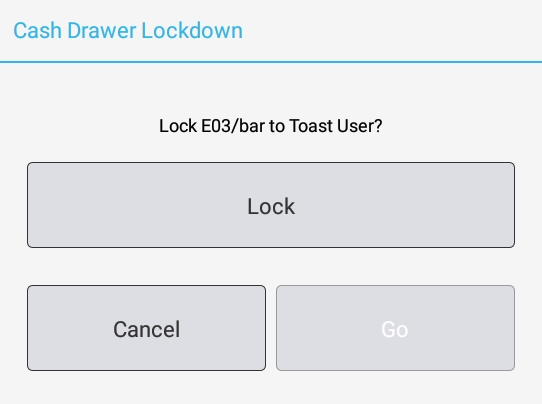
-
In the second Cash Drawer Lockdown dialog, tap Go.
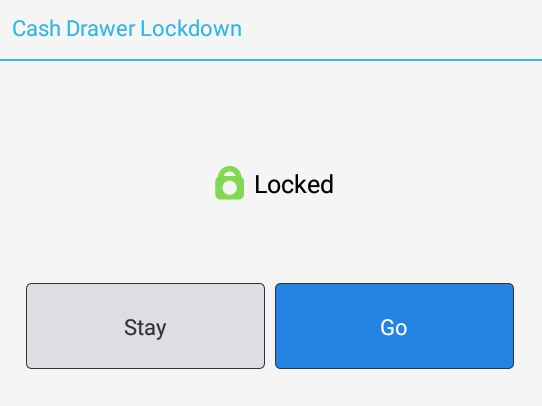
As a result, the cash drawer view shows the closed lock icon and also the name of the employee who has the cash drawer locked down, as in this example: