Cash drawers are physically attached to printers. When employees perform actions that require cash transactions, the Toast platform opens the cash drawer.
You can optionally configure names for cash drawers, so that the printer and the cash drawer will each have a distinct name. If you do not configure a cash drawer name, the printer name is used as the name of the cash drawer.
Note these two scenarios:
-
If the printer has two cash drawers, you configure one cash drawer name (such as Bar Drawer) and the Primary and Secondary suffixes are automatically added to the names of each cash drawer (such as Bar Drawer - Primary for the primary cash drawer and Bar Drawer - Secondary for the secondary cash drawer).
-
If there are multiple instances of the same cash drawer (such as by using the New Drawer option on the Toast POS device), an ordinal suffix is added to the name. For example, a new drawer created from the Patio Drawer will be named Patio Drawer (2).
The cash drawer name appears in Toast Web in areas of the Cash Activity Audit and the Cash Drawer History reports. In addition, all areas on the Toast POS device that reference cash drawers will display the cash drawer name, not the associated printer name.
You can assign a cash drawer name when you create or update a cash drawer with the Finance > Related > Settings > Printers & cash drawers page in Toast Web.
This procedure assumes that you have a physical cash drawer connected to a printer and the printer has been connected to your Toast network.
You need the Web Setup > 6.10 Printer and Cash Drawer Setup permission to configure a printer and its cash drawer.
To configure a new cash drawer
-
Choose Finance > Related > Settings > Cash overview > Cash drawers > View cash drawers to open the Cash drawers page.
-
Select the View all printers link. This opens the Printers and cash drawers page.
-
Select the + Add button.
-
In the Printer configuration page, enter the basic configuration information for the printer. The more important fields are:
-
Name: Enter the name of the printer.
-
Model: Select the printer model that you are using.
-
IP Address: Enter the IP address of the printer that has been configured to the device.
-
-
Configure the fields in the Cash Drawers Configuration section:
-
Cash Drawer: Select One Cash Drawer (if there is only one cash drawer connected to the terminal) or Two Cash Drawers (if dual cash drawers are connected to the terminal).
-
Cash Drawer Name: Enter the name of the cash drawer (maximum of 30 characters). Use a descriptive name that helps your employees differentiate among multiple cash drawers when viewing them from the Toast POS device.
-
Cash Drawer Delay: This field is intended for internal use, and should be set only by Toast support. The field specifies the amount of time (between 0 and 5000 milliseconds, inclusive) to wait before the open-drawer command is issued. Blank assumes the default command delay of 0 milliseconds.
-
-
Configure the Primary Cash Drawer fields:
-
Starting Cash Drawer Balance: Enter the default starting balance of the cash drawer.
-
Reset Balance Type: Specify how the starting balance of a new cash drawer is set when the current instance of the drawer is closed: Automatic means the new cash drawer automatically uses the Starting Cash Drawer Balance amount, while Manual means the employee must manually enter the starting balance for the new cash drawer.
-
-
If you have configured dual cash drawers, configure the Secondary Cash Drawer fields. Their settings can be identical to or different from the Primary Cash Drawer fields.
-
When you have finished, save and publish your changes.
Restaurants typically use one of two modes for how employees (such as servers or bartenders) handle cash payments:
-
Cash in drawer: Employees use a cash drawer for all cash payments. The employees do not carry cash, which means they must use the cash drawer to make change. At the end of their shift, employees should not owe the restaurant for any cash payments. Note that the Tip Out configuration may require employees to declare cash tips.
-
Cash in hand: Employees use a personal cash bank for cash payments and do not interact with a cash drawer during their shift. At the end of their shift, employees are expected to pay the restaurant the cash payments they have received. Your Cash Drawer History report will have a Cash in Hand entry for these payments.
Based on the needs of the restaurant (such as for job roles or revenue centers), a restaurant can use both modes. For example, bartenders could use the cash in drawer mode, while servers could use cash in hand.
An employee handling cash payments (either cash in drawer or cash in hand) must have the 1.6 Apply Cash Payments permission. In addition, the employee's Toast POS device must have the Allow Cash Payments device setting enabled, as described in the following procedure.
To configure a Toast POS device for a cash drawer mode
-
On the Toast POS device, select the Toast logo in the top corner until the Toast POS home screen appears.
-
In the Setup section, select Device Setup. This opens the Device Setup screen.
-
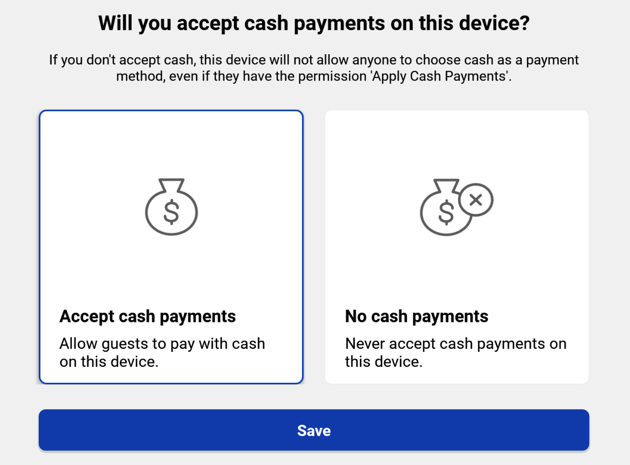
Select the Allow Cash Payments setting, then select Accept cash payments to allow an employee to accept cash payments on the device. Employees must also have the POS Access > 1.6 Apply Cash Payments permission to accept cash payments.
Select No cash payments if you want to prevent employees from accepting cash payments on the device, regardless of whether or not they have the Apply Cash Payment permission. For example, you can set this to No cash payments on a kitchen display system (KDS) device.
-
Select Save to return to the Device Setup screen.
-
On the Device Setup screen, select Open Cash Drawer.
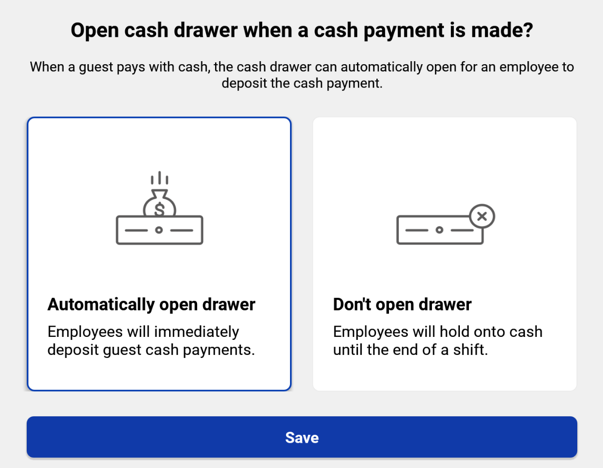
-
On the Open Cash Drawer dialog, select the appropriate mode:
-
Select Automatically open drawer to enable cash in drawer mode. Select this mode if the cash drawer needs to open for each cash payment. This option will also assign all cash payments to the drawer selected.
-
Select Don't open drawer to enable cash-in-hand mode.
-
-
Select Save.
If a specific Toast POS device is configured for cash in drawer mode, it must be assigned to printer that has a cash drawer. Typically, this cash drawer assignment remains throughout the employee's shift, but you can change the cash drawer assignment (for example, if the drawer does not operate properly because of a mechanical or electronic problem).
You also make this re-assignment if the Toast POS device was previously using a printer without a cash drawer (for example, it was in cash in hand mode) and you now want it to use cash in drawer mode. Note that if the Toast POS device is configured to use cash in drawer mode but is using a printer without a cash drawer, it displays this warning when you make a cash payment: You don't have the Cash Drawer Access permission.
If you see this message, re-assign the receipt printer to one with a cash drawer.
To re-assign a cash drawer to a Toast POS device
-
Log in to the Toast POS device.
-
Select the Toast logo or left arrow (in the upper left of the screen) until the Toast POS home screen displays.
-
Swipe to the Setup section and select Device Setup.
-
On the Device Setup screen, select Receipt Printer.
-
Choose a printer that has a cash drawer and select Save. You are returned to the Device Setup screen.
-
Select Digital Receipts.
-
Choose Yes, use digital receipts or No, don't use digital receipts and tap Save. You are returned to the Device Setup screen.
-
Select Always Print Receipt.
-
Choose Yes to always print receipts, even if the printed receipt option was not chosen by the guest, or No to only use the receipt option chosen by the guest, and tap Continue. You are returned to the Device Setup screen.
-
Select Open Cash Drawer.
-
Choose Automatically open drawer to have employees deposit guest cash payments immediately or Don't open drawer to have employees to hold onto cash until the end of their shift, and select Save. You are returned to the Device Setup screen.
-
Select the Toast logo, or left arrow, to return to the Toast POS home screen.