By default, the Toast platform creates a state and local tax rate for each location in your enterprise. For an enterprise restaurant configuration, you should archive these auto-created tax rates and, instead, do the following:
-
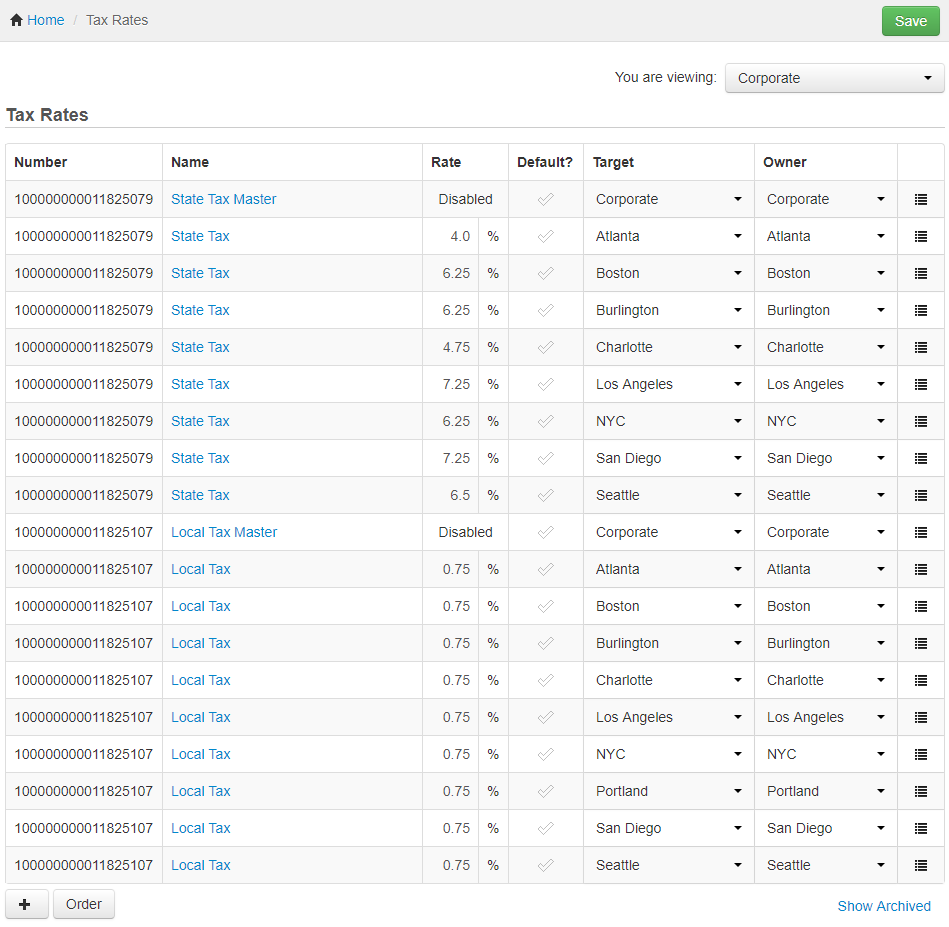
For each type of tax you must collect, create a tax rate that will function as the master version for that tax type. For example, you could create a tax rate named State Tax Master and another named Local Tax Master. Set the target for these master versions to the corporate restaurant group and set them to disabled.
-
Create a version of each master tax rate for each location in your enterprise and set the location's specific tax details in those versions.
This configuration ensures that any changes you make to the tax rates in one location do not inadvertently affect the tax rates in other locations. It also makes it easier to assign tax rates to menus (for more information, see Creating a master version with location-specific versions for every location). When you select a master tax rate for a menu, the Toast platform automatically calculates which version of the tax rate to use at each given location.
|
Note |
|
This section assumes you are assigning tax rates at the menu level and that menu groups and menu items will inherit their taxes from their parents. |
To archive tax rates
-
Choose Menus > Menu management > Tax rates setup to open the Tax rates page.
-
Use the You are viewing menu to show the tax rates for the corporate restaurant group (the corporate restaurant group is your top-level restaurant group and it should show all locations). See Filtering pages for information on the You are viewing menu.
-
Click the actions button for the tax rate you want to archive and choose Archive from the menu.

-
Click Save.
-
Repeat these steps for the other tax rates that were automatically created for each location.
-
Continue with the next procedure to create master tax rates.
To create master tax rates
-
Choose Menus > Menu management > Tax rates setup to open the Tax rates page. Assuming you followed the procedure to archive any auto-created tax rates, the tax rates table will be empty.
-
Use the You are viewing menu to show the tax rates for the corporate restaurant group (this group should show all locations). See Filtering pages for information on the You are viewing menu.
-
Click the plus button to add a new tax rate, enter an identifying name for the tax (for example, "State Tax Master") and click Save. After you click Save, the tax rate you created becomes a link.

-
Click the tax rate's link to see its details.
-
Set the Target and Owner fields to the corporate restaurant group.
-
Set the Type property to Disabled.
-
Click Save.
-
Click Tax Rates in the breadcrumbs at the top of the page to return to the Tax rates page.
-
Repeat these steps to add a master tax rate for any other taxes your enterprise must collect.
-
Continue with the next procedure to create location-specific tax rates.
To create location-specific tax rates
-
Choose Menus > Menu management > Tax rates setup to open the Tax rates page. Assuming you followed the To archive tax rates and To create master tax rates procedures, you only see master tax rates in the table, targeted at the corporate restaurant group.
-
Use the You are viewing menu to show the tax rates for the corporate restaurant group (this group should show all locations). See Filtering pages for information on the You are viewing menu.
-
Click the actions button for a master tax rate and choose New Version.
-
Set the Target field to a location in your enterprise. The Owner field is automatically set to that same location. You can leave the Owner field as is or set it to some other point in the restaurant group hierarchy (the value you choose for this setting should be driven by who in your enterprise should be able to edit the tax rate).
-
Click Submit. The new version is added to the Tax Rates table.
-
Click the name of the new version to view its details.
-
Remove "Master" from the name of the tax rate.
-
Configure the tax type and rate for the new version so that they are appropriate for the location you chose in step 4.
-
Leave the Default property set to No.
-
Click Save.
-
Click Tax Rates in the breadcrumbs at the top of the page to return to the Tax Rates page.
-
Repeat these steps to create a version of each master tax rate for every location in your enterprise. After this process, you will see something similar to the following on the Tax rates page:
-
Publish your changes using the Publish config page. See Publishing changes for multiple locations for information on accessing and using that page.
After creating your tax rates, you must apply them to your menus. There are two techniques:
-
Manually assign applicable taxes to your menus on the Advanced properties page.
-
Set your tax rates as default on the Tax rates page and then configure your menus to inherit those default rates on the Advanced properties page.
The automated nature of defaults and inheritance makes it harder to understand what taxes are being applied. For this reason, Toast support recommends using the first technique where you manually set applicable taxes on your menus. However, for completeness, this documentation covers both in the Manually assigning applicable taxes and Using default tax rates and inheritance to assign applicable taxes sections.