On your KDS devices, you can sort and filter tickets to manage which tickets appear and in what order. To sort and filter, you can use either the Sort and filter pane or the Ticket Display Options setting.
-
The Sort and filter pane allows you to sort KDS tickets using various methods, group KDS tickets by fulfillment status, and filter by the time an order is due, dining option, and course. For more information, see Sort and filter pane overview.
-
The Ticket Display Options setting allows you to filter KDS tickets by dining option or course. For more information, see Filtering tickets from the Device Setup screen.
Using the Sort and filter pane, you can:
-
Sort by fire time or when a ticket is due. You configure this in the Sort by category.
-
Group tickets fulfilled at the prep station level first on expediter KDS devices (also applies to tickets filled at the expediter level if you are showing fulfilled tickets), and choose to sort them by fulfilled time or by fire time. You configure this in the Fulfilled ticket behavior category.
-
Filter by order due time, dining option, and course, and choose whether the filters apply only to KDS tickets and all day view, or also to production item counts. You configure this in the Filters category.

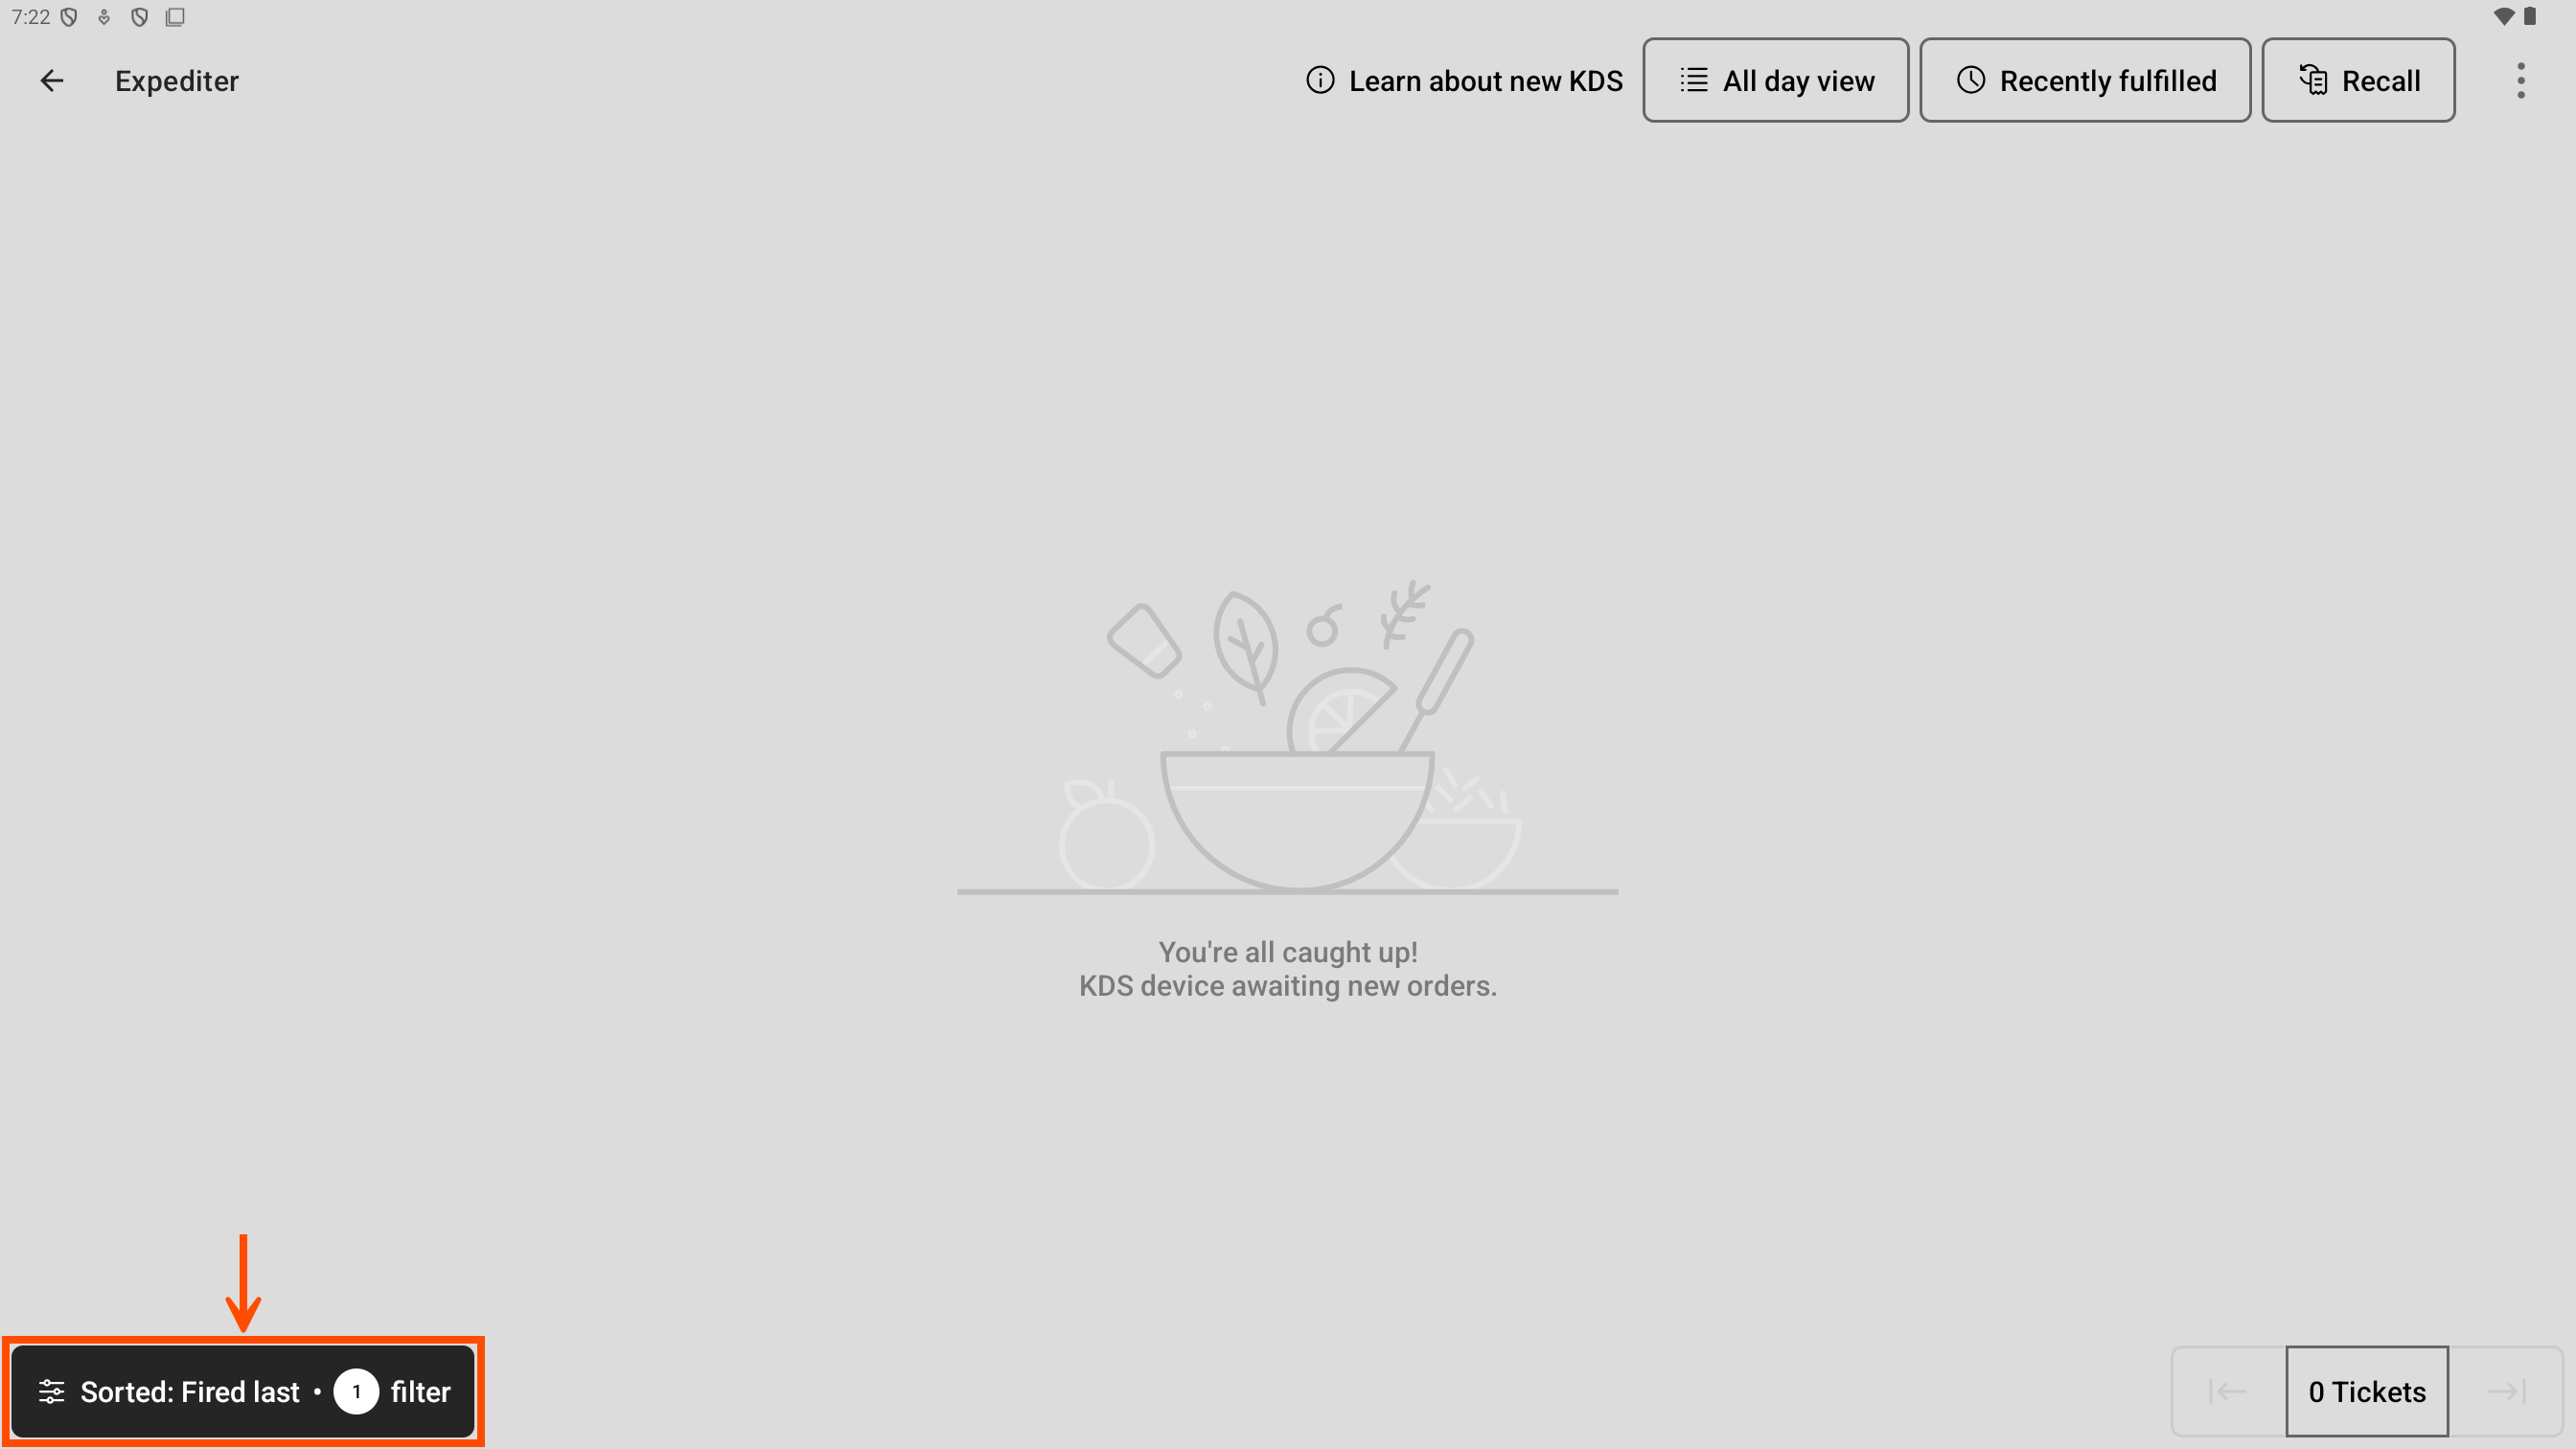
When you open the Sort and filter pane, there are three categories to choose from: Sort by, Fulfilled ticket behavior, and Filters. When you apply a sort or filter option, the Sort and filter button on the bottom left updates to indicate that sorting or filtering is applied.
|
Note |
|
If the only option applied is the Sort by category to Fired first or the Fulfilled ticket behavior category for expediter KDS devices, the Sort and filter button appears as if no sorting or filtering is applied. |
Here is an example of the Sort and filter button showing applied filters.
For the Sort by category, there are two options for sorting tickets:
-
Fired first: This is the default. This option sorts tickets by when they are sent or fired to the kitchen, with the oldest fire times first.
-
Due first: This option sorts tickets by when they are due, with the earliest due times first.
When you use the Due first sorting option, the KDS device assigns every order a due time. How due times are calculated depends on the order source:
-
Toast Online Ordering: Due time uses the takeout and delivery quote time.
-
Third-party orders: DoorDash™ orders use the pickup time sent by DoorDash. Uber Eats™ and Grubhub™ orders use the takeout and delivery quote time.
-
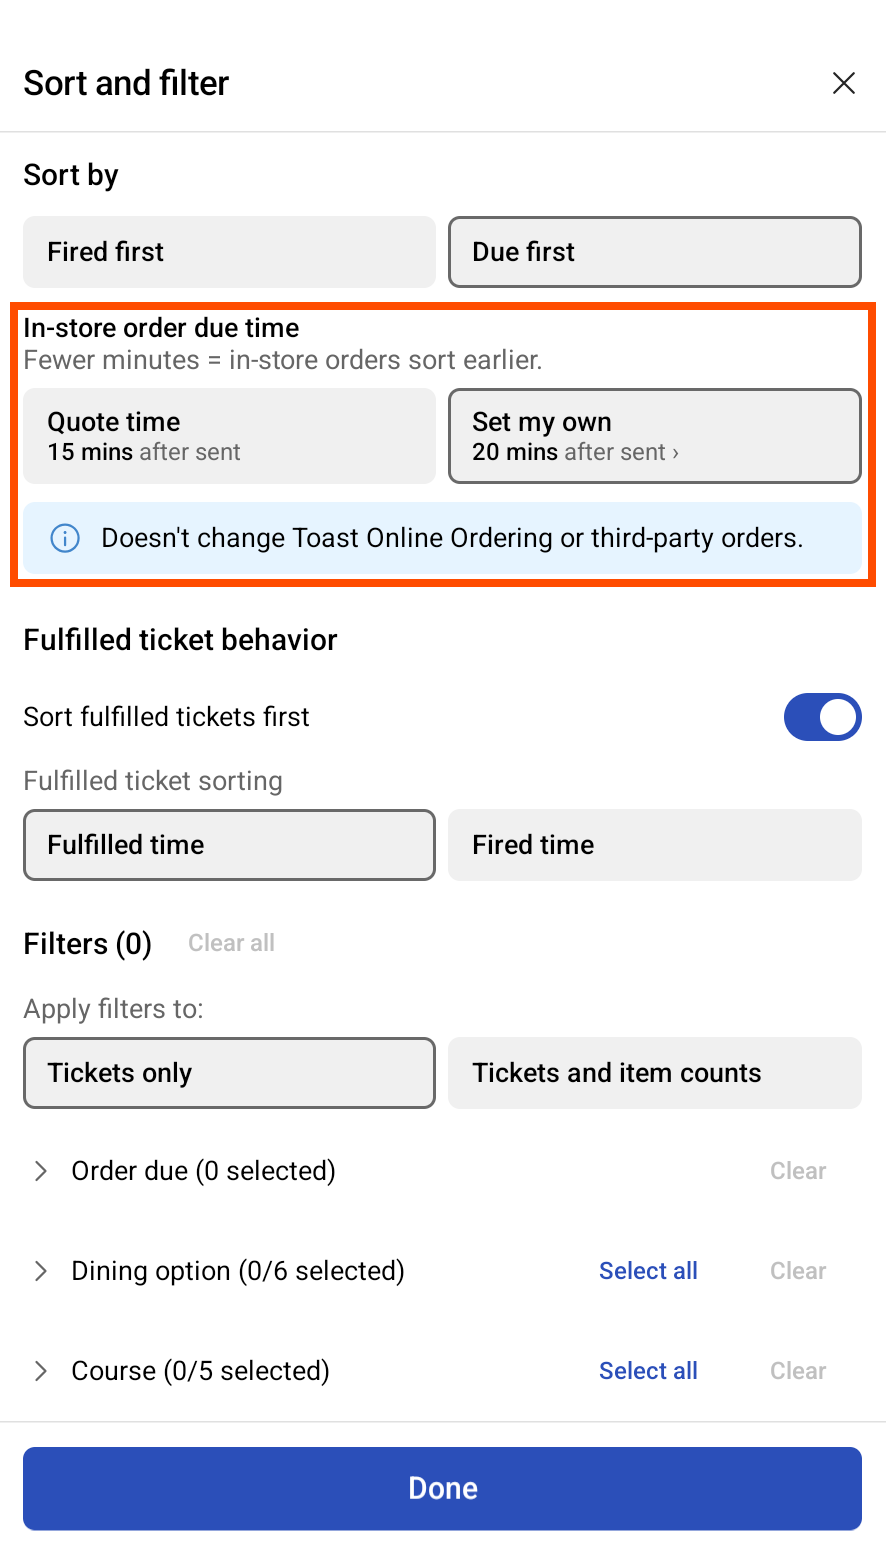
In-store orders: The In-store order due time setting determines whether to use the takeout and delivery quote time, or a custom time that you choose using the Set your own option on the Sort and filter pane.
Note
In-store orders are orders with the order source:
IN_STORE,KIOSK,CALLER_ID,OPT,TABLES,VOICE_AI_DT,MEMBERSHIP, orHOUSE_ACCOUNTS.For example, orders entered using the Toast POS app, from a kiosk, or using Toast Order and Pay are in-store orders.
For more information about takeout and delivery quote times, see Quote time strategy overview.
When you use the Due first sorting option, the In-store order due time setting determines the due time for in-store ASAP orders:
-
Quote time: This option adds the time configured for takeout and delivery orders to when the order was sent to the kitchen. This time is taken from the Takeout & delivery > Quote time strategy > Quote times strategy.
For example, a quote time is set for 15 minutes. An order sent to the kitchen at 2:30 PM is due at 2:45 PM.
-
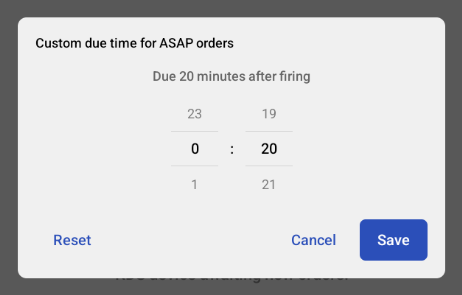
Set your own: This option adds the amount of time you choose to the fire time to calculate the due time. Less time means that in-store ASAP orders are due earlier, and more time means that those orders are due later.
For example, you set the time to 20 minutes. An order sent to the kitchen at 2:30 PM is due at 2:50 PM.
An alternatively example is that you set the time to zero minutes to prioritize in-store ASAP orders. An order sent to the kitchen at 2:30 PM is due at 2:30 PM.
Here is an example of Due first selected, which shows the In-store order due time options.
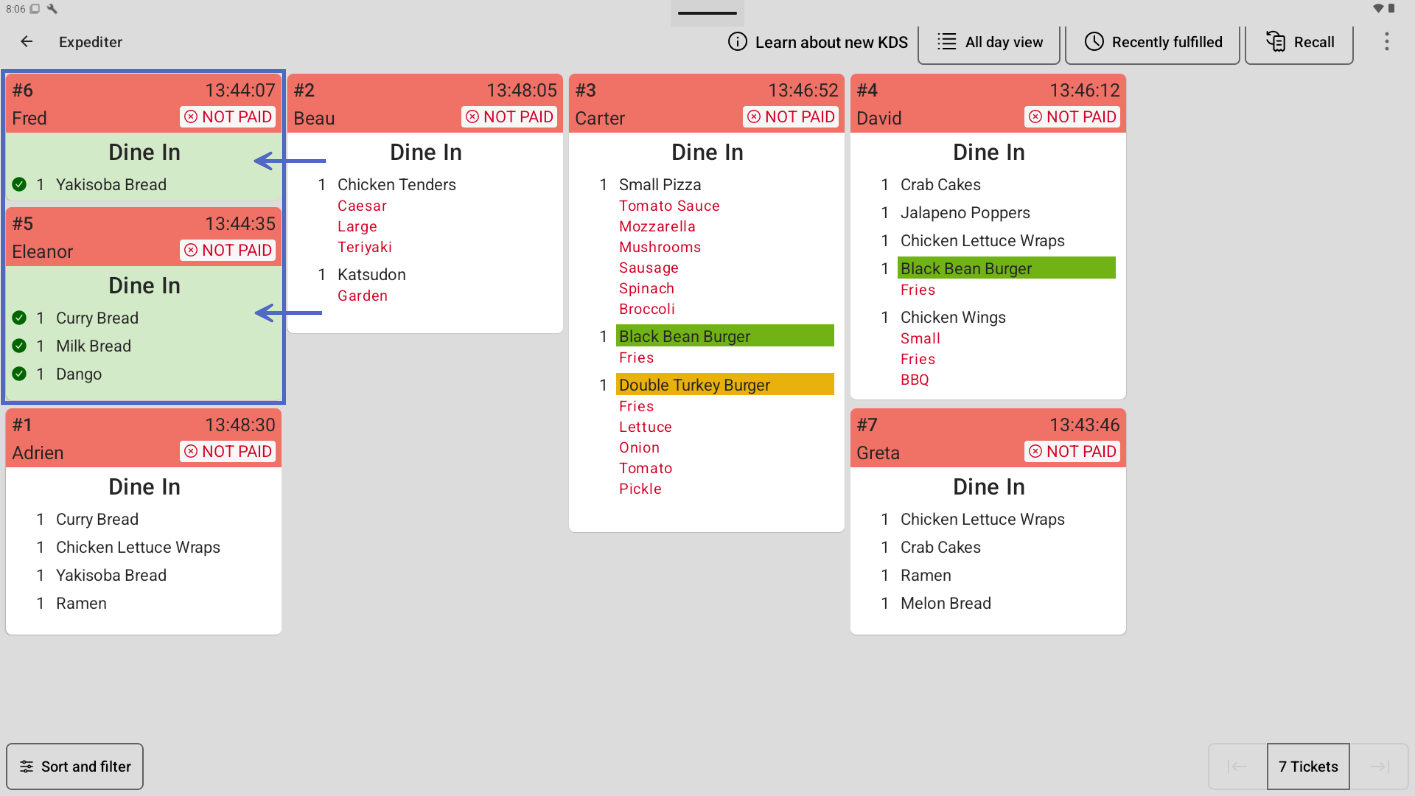
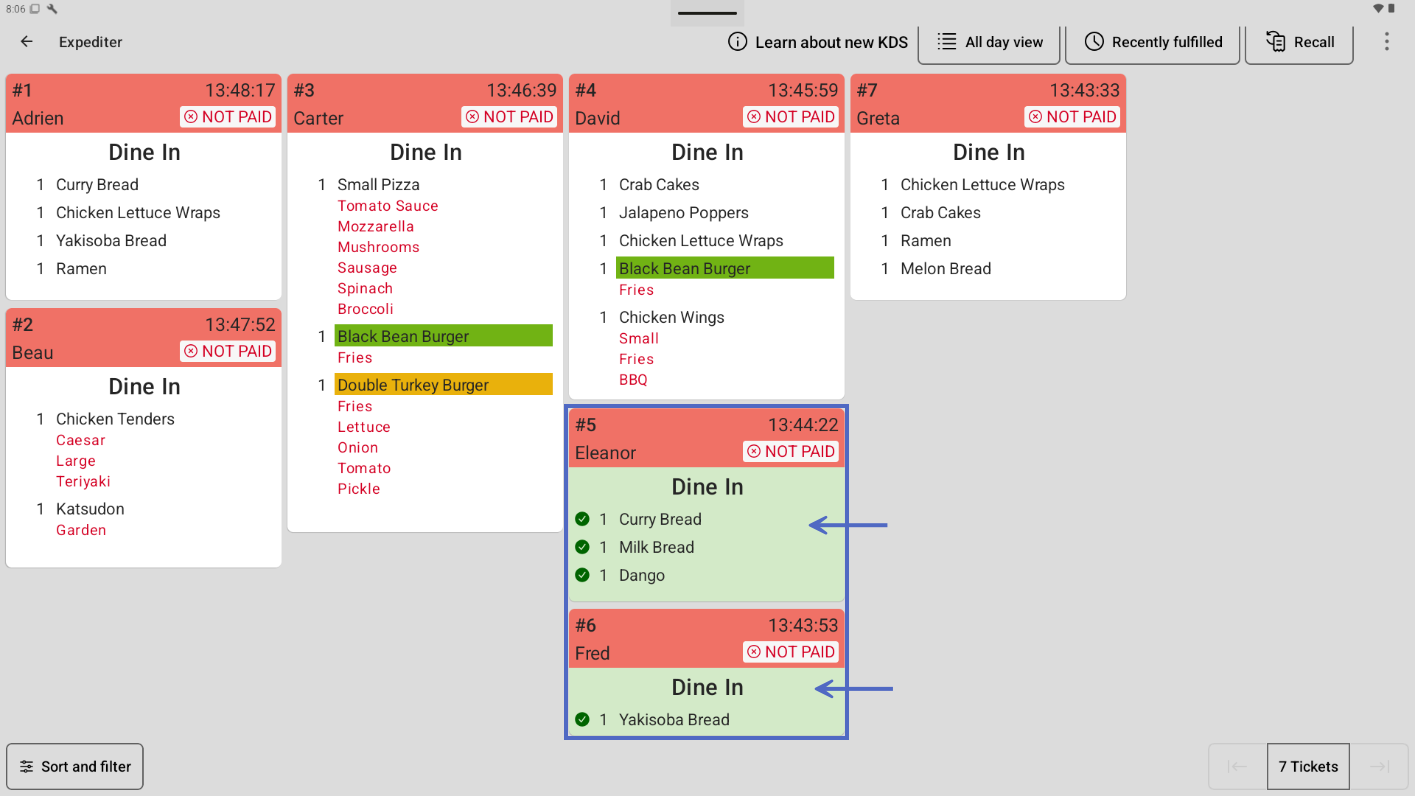
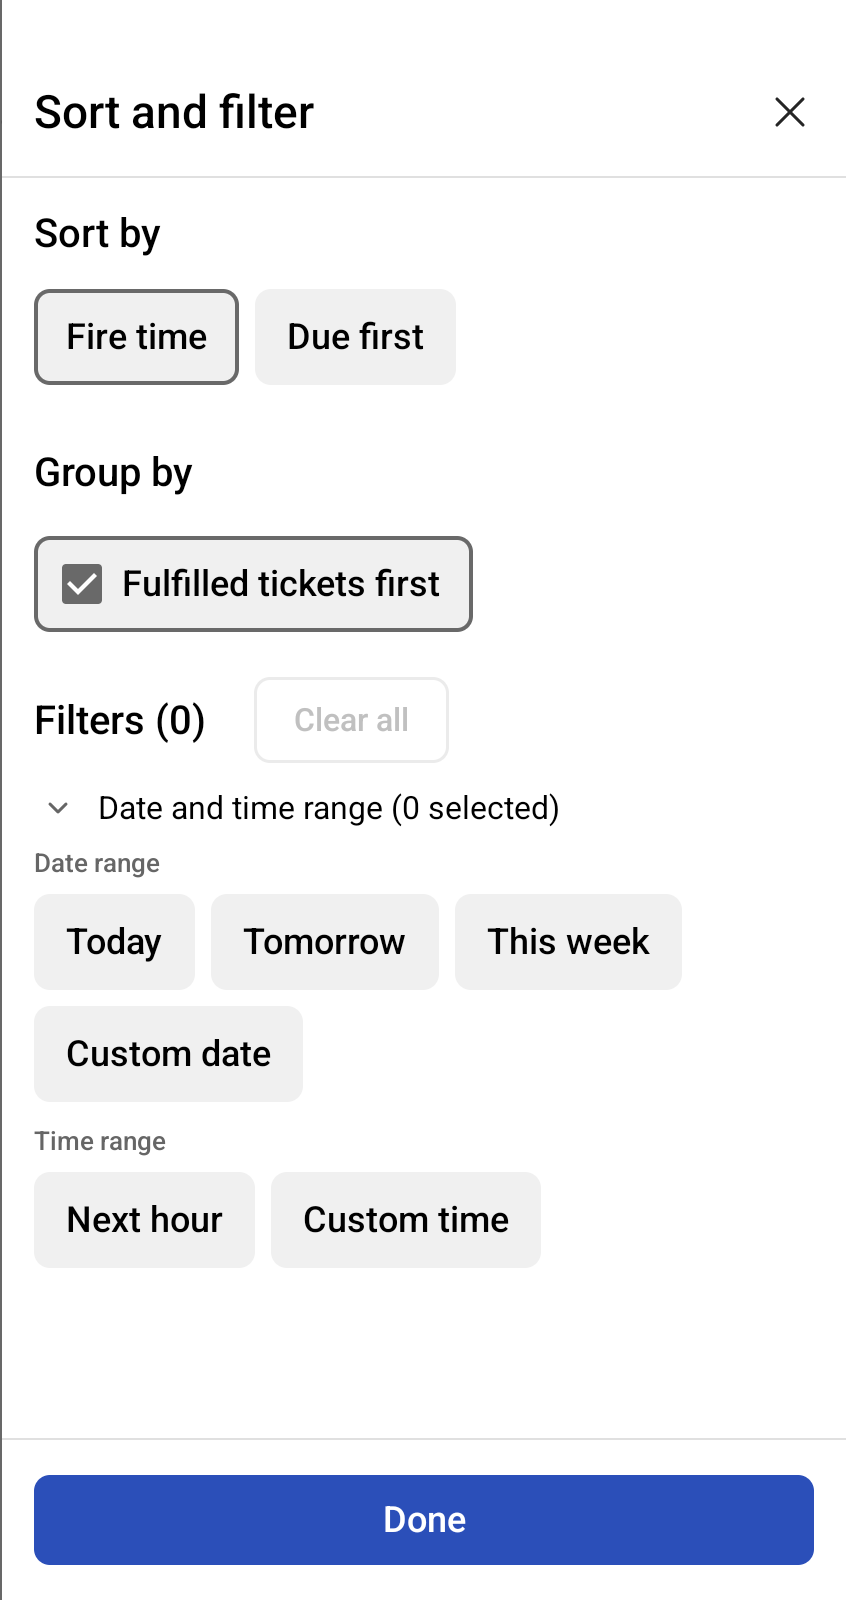
For the Fulfilled ticket behavior category, there is only one option for grouping tickets, and it is only available on expediter KDS devices: Sort fulfilled tickets first. This option is enabled by default. This option groups tickets that are fulfilled at the prep station level first. By clearing this option, the tickets remain in the current order until they are fulfilled at the expediter level.
Once you enable the Sort fulfilled tickets first option, you can set the Fulfilled ticket sorting setting to either:
-
Fulfilled time: This option sorts the grouped tickets by when they were fulfilled, with the earliest fulfillment time for a ticket first.
-
Fired time: This option sorts the grouped tickets by when they were fired. The oldest fired ticket is first.
For example, if you operate a drive-thru, you may want tickets to stay in the same order that they are entered to match the order of the vehicles at the drive-thru until they are fulfilled at the expediter level.
For another example, if you have guests dining at a location, you may want orders that are ready to go out as soon as they are fulfilled, meaning you would want to group those tickets first and sort them by when they were fulfilled. Alternatively, perhaps you want to emphasize orders that were fired first to take priority, because those guests were waiting longer for an order. In that case, you would sort fulfilled tickets by Fired time.
For more information about fulfillment levels, see Understanding item fulfillment.
Here is an example of an expediter KDS device with the Sort fulfilled tickets first option selected, and Fulfilled ticket sorting set to Fulfilled time.
Here is an example of the same expediter KDS device with the Sort fulfilled tickets first option not selected.
For the Filters category, you can choose to filter by Order date, Dining option, and Course. You can also choose to apply these filters to the production item counts. Under the Apply filters to section, you can select:
-
Tickets only: This option applies filters to KDS tickets (including All day view).
Note
All day view ignores the Sort by and Fulfilled ticket behavior categories because it is always sorted by the number of items and then alphabetically. All day view reflects only the items on tickets that match your filters.
-
Tickets and item counts: This option applies filters to both KDS tickets, and production item counts.
The Order due section includes the following options:
-
Today: This option shows tickets that are due on the current day. This includes all active tickets and tickets that are scheduled for fulfillment before the closing time.
-
Tomorrow: This option shows tickets that are due between closing time of the current day and closing time of the next day.
-
This week: This option shows tickets that are due or active in the current week. The current week is defined as the time from opening time Monday until closing time on Sunday. This option shows all active tickets (active tickets are tickets that are currently being worked on) and tickets that are scheduled for fulfillment before the closing time on Sunday.
-
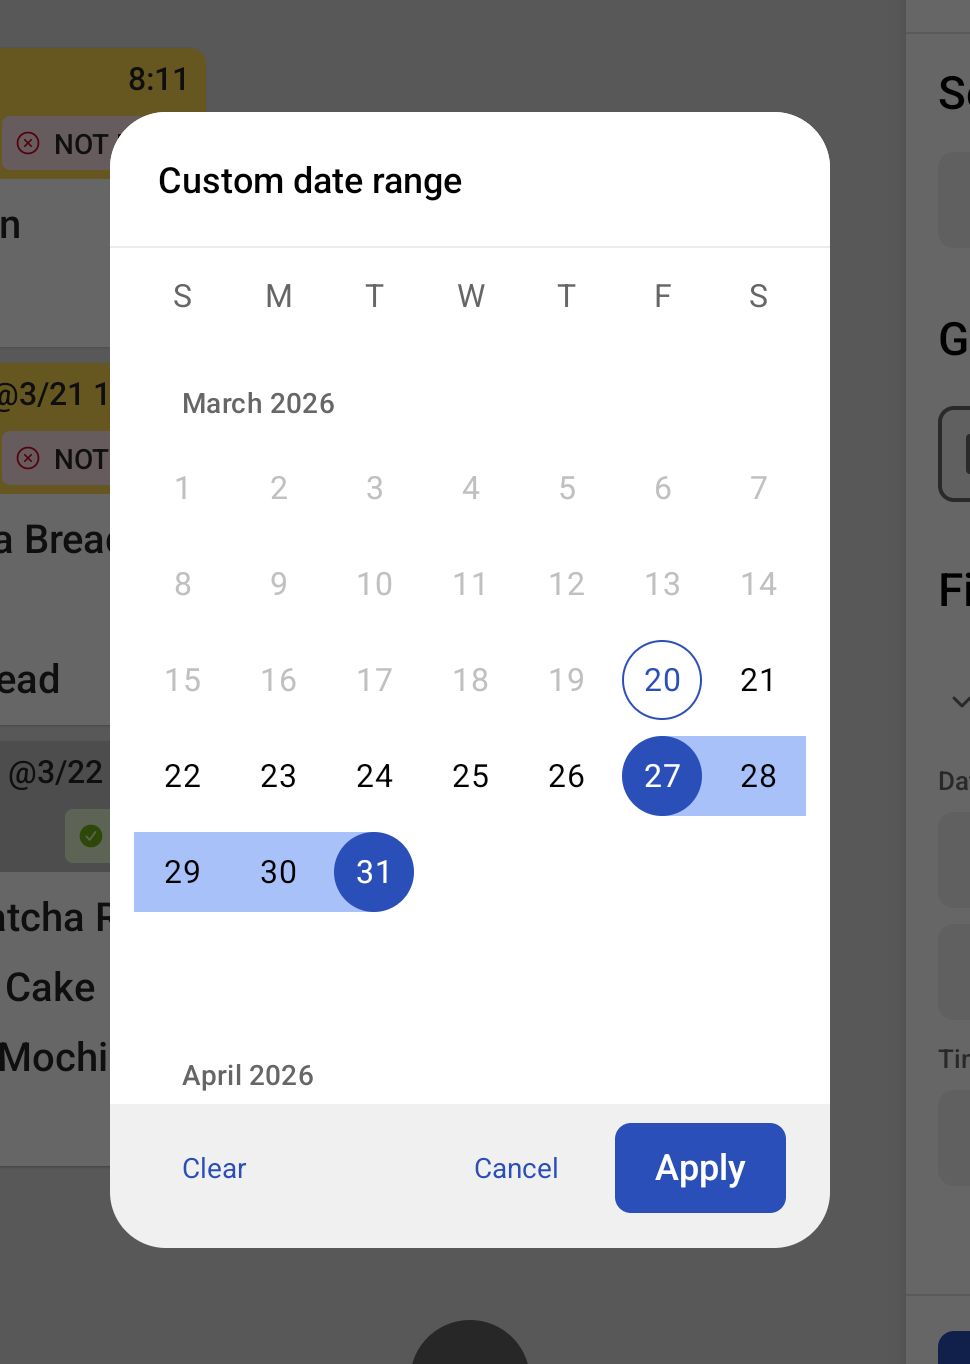
Custom date: This option shows tickets that are due from a chosen start date to the end date. If the start date is the current date, this includes all active tickets. If it is not the current date, this includes tickets that are scheduled, starting from the opening time. It includes all tickets between the start date until the closing time on the end date. You cannot choose past dates.
-
Next hour: This option shows tickets that are due in the next 60 minutes. This includes active tickets.
-
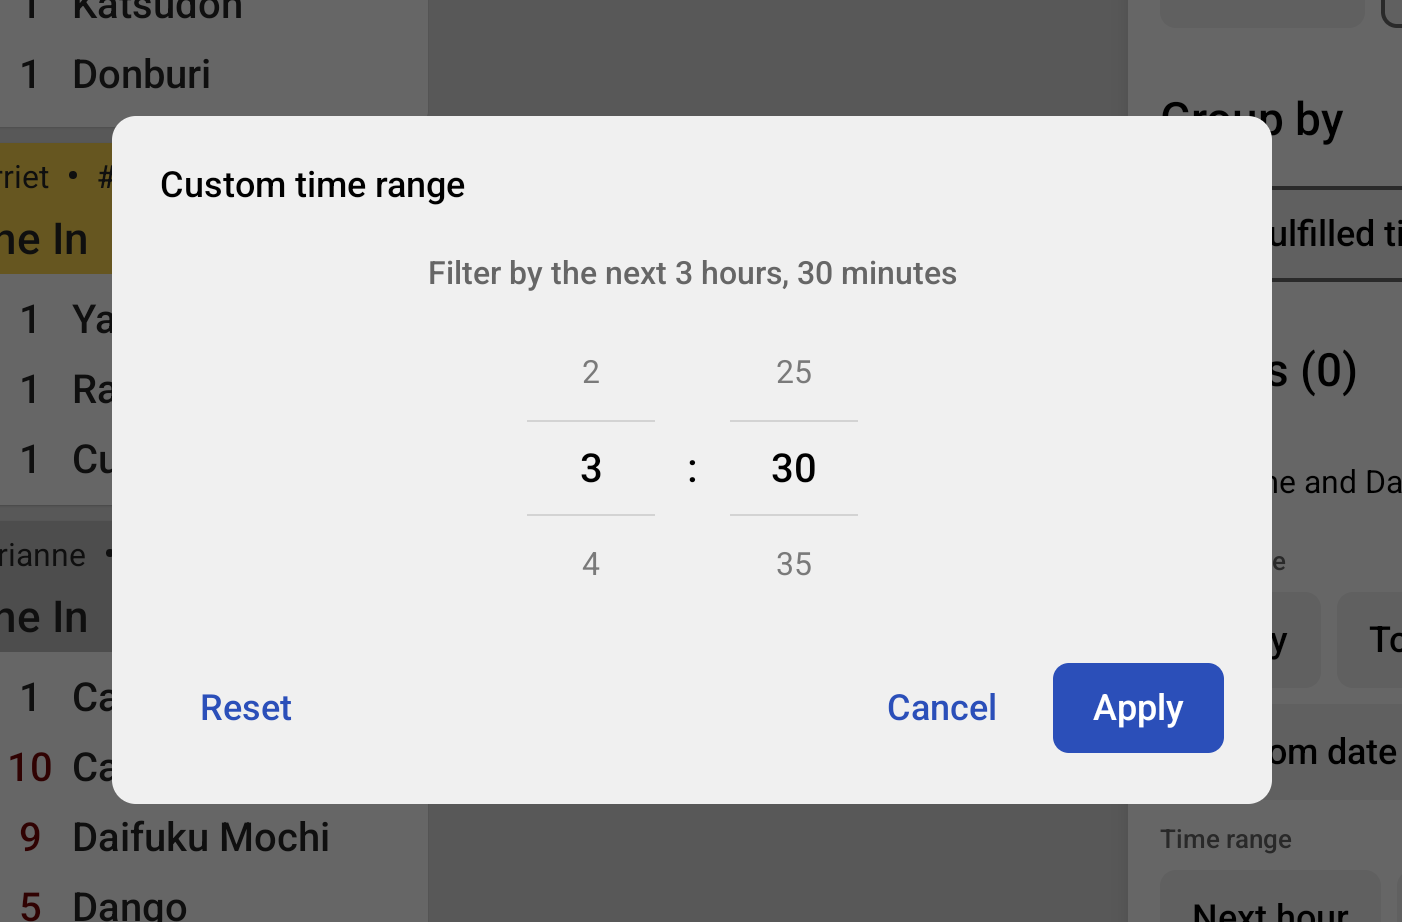
Custom time: This option shows tickets that are due in the time you specify, up to 23 hours and 55 minutes. This includes active tickets. This time is rolling, meaning that it is the time from the current time. For example, if you have one hour selected, at 1:00 PM, the filter includes tickets that are scheduled before and including 2:00 PM. At 1:15 PM, the filter now includes tickets that are scheduled before and including 2:15 PM.
You can only select one Order due option.
|
Note |
|
If the selected Order due option includes the current business day through the end of business hours, the filter includes current fired tickets. |
The Dining option section includes all of your configured dining options, including No dining option for orders without a dining option selected.
The Course section includes all your configured courses, including No course for items without a course configured.
For example, you want appetizers to be fulfilled within 8 minutes, and main courses to be fulfilled within 15 minutes. To organize tickets in the kitchen so that appetizer tickets are automatically displayed separately from main course tickets, you place two KDS devices at each of your prep stations, and configure one to show tickets for appetizer orders only and the other to show tickets for main course orders only. Selectively filtering tickets based on course in this way helps your employees work more effectively to meet your target timeframes.
Filtering by dining option and course can also be configured using the Device Setup > Ticket Display Options setting. Changes to this setting are reflected in the Sort and filter pane, and vice versa. For more information about the Ticket Display Options setting, see Filtering tickets from the Device Setup screen.
The Toast platform also offers a way for kitchens that use printers (or a combination of printers and KDS devices) to change the way that items are routed for fulfillment based on the dining option specified. For more information, see Rerouting based on dining option.
-
On the KDS device, select the Sort and filter button on the bottom left. The Sort and filter pane opens.
Note
The Fulfilled ticket behavior section is only available on expediter KDS devices.
-
Select your sort and filter options:
-
Optionally, if you select Due first under the Sort by category, and choose the Set your own option for the In-store order due time setting, the Custom due time for ASAP orders dialog opens. You must select an hour and minute value, then select Save. The Custom due time for ASAP orders dialog closes.
-
Optionally, if you select the Custom date option under the Filters category, the Custom date range dialog opens. You must select the start and end dates and then select Apply. The Custom date range dialog closes.
-
Optionally, if you select the Custom time option under the Filters category, the Custom time range dialog opens. You must choose an hour and minute value, then select Apply. The Custom time range dialog closes.
-
-
Select Done. The pane closes and your sorting and filtering choices are applied to the KDS tickets, and reflected in the Sort and filter button.
Note
You can select the X on the top right of the pane or anywhere outside of the pane to cancel any changes.
On your KDS devices, you can use the Ticket Display Options setting to limit the tickets that display to specific courses, dining options, or a combination of both.
|
Note |
|
Filtering by courses and dining options is also available using the Sort and filter pane. For more information, see Sort and filter pane overview. |
For example, you want appetizers to be fulfilled within 8 minutes, and main courses to be fulfilled within 15 minutes. To organize tickets in the kitchen so that appetizer tickets are automatically displayed separately from main course tickets, you place two KDS devices at each of your prep stations, and configure one to show tickets for appetizer orders only and the other to show tickets for main course orders only. Selectively filtering tickets based on course in this way helps your employees work more effectively to meet your target timeframes.
To selectively filter kitchen tickets by course or dining option
-
On the device, tap the Toast logo (or left arrow) in the top corner until the Toast POS home screen appears.
-
In the Setup section, select Device Setup.
-
In the Kitchen Setup section, select Ticket Display Options.
All of the dining options and courses configured for your restaurant appear.
-
To display tickets only for certain dining options or courses, tap to select the check box(es) next to those options.
If all of the check boxes or none of the check boxes are checked, all tickets appear on this device.
Note
Filters that you add using the Ticket Display Options setting also appear in the Sort and filter pane and vice versa.
-
Tap the Toast logo (or left arrow) in the top corner until the Toast POS home screen appears.